Crawlspaces stink, they rot, and are just plain icky. Photograph 1 shows the modern crawlspace, which is a forest of water droplets on the underside of fiberglass batt insulation. The exposed wood floor joists are rotting. The house over this crawlspace is not shabby (Photograph 2). Did I mention that this is a vented crawlspace (Photograph 3)? Oh, by the way, there is a continuous plastic sheet ground cover and excellent drainage. Everything in this crawlspace was done “right.” It has code specified ventilation, a continuous impermeable ground cover, excellent drainage and still we have a mess. What caused this mess? The floor insulation. No way. Yup.
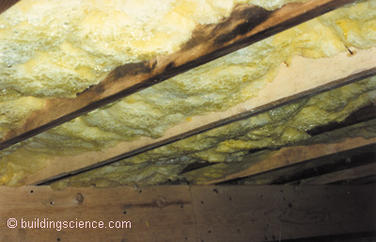
Photograph 1: Icky Crawlspace—Note the condensation on the underside of the fiberglass insulation and the rot at the exposed portions of the crawlspace floor joists.
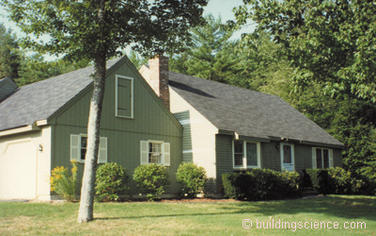
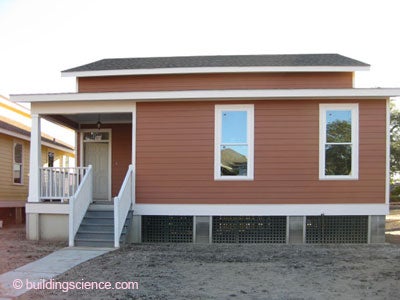
Photograph 2: Nice House Over Icky Crawlspace—This house with the crawlspace problem is in Washington, DC
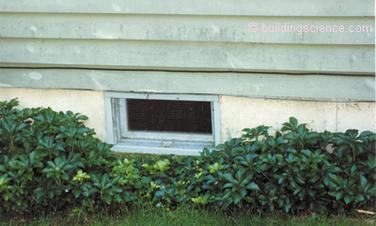
Photograph 3: Ventilation Opening—Crawlspace has plenty of cross ventilation and good drainage.
Think of the good old days—the Civil War, WWI, the Great Depression, WWII—crawlspaces were uninsulated. They were ventilated and they didn’t have ground covers—and they didn’t have problems. Why? The floor framing was pretty much always warmer than the ground (Figure 1). Everywhere, even in air-conditioned buildings. This was a pretty big deal as the temperature of the floor framing was above the dew point temperature of the exterior air that was used for “ventilation.” And the old floor finishes tended to breathe—they were relatively vapor open. No one had heard of vinyl flooring yet.
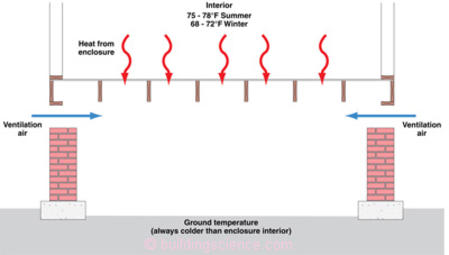
Figure 1: Old Crawlspaces—Old uninsulated and ventilated crawlspaces had warm floor assembly surfaces due to heat flow downward from occupied space above.
The ground in crawlspaces is cold,1 much colder than the outside air during the summer months. In an irony not appreciated except by building science geeks ventilation air in the summer months in most parts of North America brings moisture into crawlspaces and deposits this moisture on surfaces that are below the ventilation air dew point. In the good old days this was the ground—or the ground cover which of course is at the same temperature as the ground. It was not typically the floor framing. And who cared if the ground or the ground cover was wet as long as the wood framing was not.
We don’t get much ventilation air change in crawlspaces—the typical ventilation air change rate in a crawlspace is approximately 1 air change per hour (ach).2 In determining crawlspace surface temperatures we can pretty much ignore the ventilation air change.3 We can’t ignore the ventilation air in the moisture balance but we can in the energy balance. Crawlspace surface temperatures are dominated by radiation and conduction, not by convection (Figure 2). And, as pointed out, old crawlspace floor framing was not only warmer than the ground but also warmer than the ventilation air dew point.
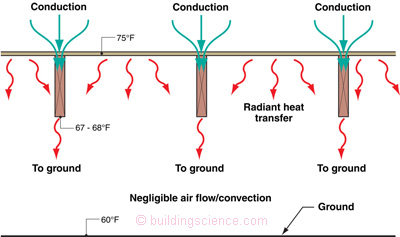
Figure 2: Old Crawlspace Temperatures—Surface temperatures are dominated by radiation and conduction, not by convection. Old crawlspace floor framing was not only warmer than the ground but also warmer than the ventilation air dew point.
That all changes when we install insulation in crawlspace floor framing. The most common insulation installed in this location are fiberglass batts. When fiberglass batts are installed between floor joists the exposed bottom edges of the floor joists become much colder (Figure 3). The surface temperature of the underside of the fiberglass batt insulation is also much colder than the floor sheathing—within one or two degrees of the ground temperature. The energy picture within the crawlspace is radiation dominated—the floor assembly surfaces are in essence radiation coupled to the ground. The exposed surface of the fiberglass batt insulation is below the dewpoint temperature of the air in the crawlspace as is the exposed portion of the wood floor joists and condensation forms on both the surface of the insulation and the surface of the exposed wood (go to Photograph 1 again).
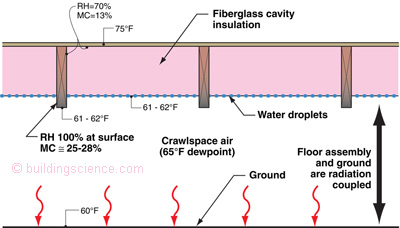
Figure 3: Insulated Crawlspace Temperatures—The surface temperature of the underside of the fiberglass batt insulation is colder than the floor sheathing—within one or two degrees of the ground temperature. The exposed surface of the fiberglass batt insulation is below the dewpoint temperature of the air in the crawlspace as is the exposed portion of the wood floor joists and condensation forms on both the surface of the insulation and the surface of the exposed wood.
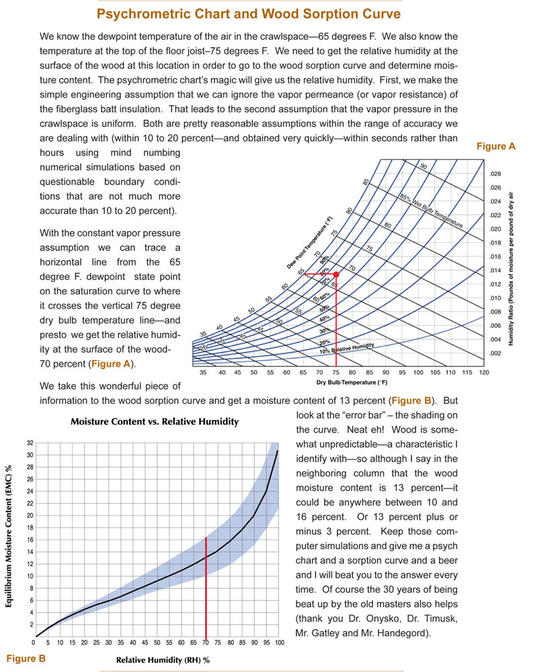
Now let’s look at the wood floor joist moisture content. Wood is hygroscopic—it “sees” relative humidity not vapor pressure. So we are going to need a psychrometric chart and a sorption curve for wood. The temperature of the wood floor joist is 75 degrees F at the top (i.e. interior temperature). We have to figure out the crawlspace conditions. The air in the crawlspace comes from the outside—who knew? Let’s pretend that this particular crawlspace is in Washington, DC. The average dew point of the exterior air during the summer months in Washington, DC is 65 degrees. Let’s bring this air into the crawlspace—so therefore the dew point of the air in the crawlspace is 65 degrees. Recall that the top of the floor joist is 75 degrees. The floor joist sees the dew point of the air in the crawlspace (we can ignore the vapor permeance characteristics of the fiberglass batt insulation since it is so vapor open—just pretend that we have air rather than insulation here—but not just any air—air with a huge temperature drop— “insulating air”), but because the floor joist is 75 degrees at this location, the relative humidity at this location is 70 percent yielding a wood equilibrium moisture content of 13 percent. The floor joist is “dry” at the top and “wet” at the bottom. Why wet at the bottom? The surface of the wood is cold, below the dew point of the air in the crawlspace and therefore condensation forms on the wood. At fiber saturation the moisture content of wood is 28 percent (go to Figure 3 again).
The wood floor joist moisture content increases in the downward direction as the wood becomes progressively colder (Figure 4). Another way of saying this—the warmer the wood, the drier the wood. Duh. If we were to wrap the floor joists completely with insulation we would warm up the wood thereby lowering the relative humidity the wood “sees” thereby lowering the moisture content. This is a pretty neat strategy that I will refer to later. So how low do we need to lower the moisture content of the wood? Below 19 percent to never see rot. Below 16 percent to never see mold. We could do this a couple of ways. One way is with spray foam insulation (Figure 5).
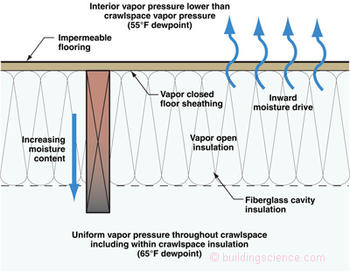
Figure 4: Moisture Dynamics—The wood moisture content increases as we move down the floor joist. At the same time the vapor drive is upward. The entire shaded area “sees” the same vapor pressure (dewpoint) due to the vapor openness of the fiberglass insulation. The entire vapor resistance is at the floor sheathing and flooring. If only the floor could breathe…it used to in the old days when we had wood floors and not vinyl…
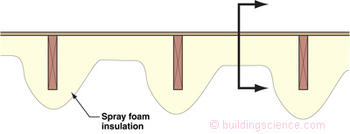
Figure 5: Warming the Wood—Wrapping the floor framing in foam insulation lowers the equilibrium moisture content of the wood. Warm wood is dry wood. Warm wood is happy wood. One not so minor issue, changing the temperature only gets you so far—the vapor drive upwards still needs to be addressed. The section line is the location of the cross-sections in Figure 8 which address the not so minor vapor drive issue.
But before we go there, we need to check out something else. Although the wood moisture content increases as we go downward the vapor drive is upward. Huh? This wood stuff is pretty weird. The wood moisture content thing we just explained. Time to look at vapor diffusion.
The interior is dry (dew point of 55 degrees F) and the crawlspace is wet (dew point of 65 degrees F). The moisture flow by vapor diffusion is from the crawlspace up through the floor into the building—at least during the summer. So the vapor drive is upward even though the wood in the floor joist gets wetter as we go downward. The inward drive is “felt” completely at the floor sheathing and floor finish. We can pretty much ignore the vapor open fiberglass batt cavity insulation—no vapor resistance here. We can’t ignore the vapor resistance of the floor sheathing and the floor finish.
If we were do something foolish like install vinyl flooring (0.1 to 0.5 perms) over OSB floor sheathing (1.0 perms) in an assembly like that described in Figure 4 we would get a result that looks like Photograph 4. Notice the pink spots on the vinyl flooring. Reminds you of the pink spots on vinyl wall-covering.4 Come to think of it, haven’t we just constructed a wall with vinyl wall-covering and laid it down? Same principle, same problem. The floor does not “breathe.” We have a vapor barrier on the wrong side of the assembly. So we can fix this problem by having a vapor permeable floor assembly—plywood sheathing (it is way more permeable than OSB) and carpet do the trick. Works, but it is kind of limiting. Oh, yeah, you also can’t put furniture on the floor if the furniture is impermeable, so you have to hold it up to ventilate under it—same for cabinetry—you have to ventilate it as well. But what if I don’t want plywood, carpet and ventilated furniture and cabinetry?
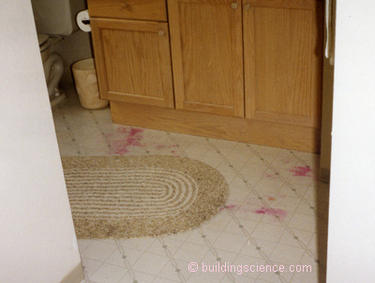
Photograph 4: Vinyl Flooring—Pink spots due to moisture problems arising from the impermeability of the vinyl flooring and ventilated and insulated crawlspace underneath.
The easy answer is to construct a conditioned crawlspace (Photograph 5). Construct it like a “mini-basement.” Then you can have any floor finish you want and save a bunch of energy and money. But I know you folks. You are stubborn and insist on doing the vented crawlspace thing. Hey, maybe you need to because you are in a flood zone—it could happen that you actually have a legitimate reason to construct a vented crawlspace. So how should the floor assembly look?

Photograph 5: Conditioned Crawlspace—The way all crawlspaces should look. Dry, warm, part of the house, not part of the outside or part of the ground. Insulated on the perimeter not in the floor. Beautiful.
Check out Figure 6 and Figure 7. Both show foil faced rigid insulation under the floor framing. The wood is warm and therefore dry. The foil facing on the rigid insulation handles the vapor drive. The foil facing is an exceptional vapor barrier ( 0.1 perm). Beautiful. It gets better, the foil facing, if you expose the shiny side (face it down into the crawlspace) almost eliminates radiative coupling and means that the surface of the insulation approaches the temperature of the ventilation air reducing condensation. So why don’t we see lots of this? Well, I forgot to mention that the rigid insulation needs to be airtight so that requires tiny people with good workmanship to seal the seams with foil tape that sticks in miserable environmental conditions forever. Having said that, a poor job using the approaches described in Figure 6 and Figure 7 are way better than what we typically get with Photograph 1 and Figure 3.
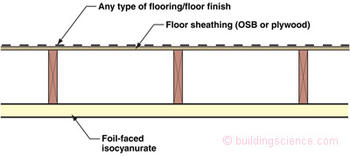
Figure 6: Vapor Barrier—Installing impermeable rigid insulation keeps the wood framing warm and provides a low perm layer that addresses the upward vapor drive. How impermeable? Less than 0.1 perms. Foil faced rigid insulations are the ticket here. This approach allows any type of flooring to be used above. Even better—exposing the shiny side of the foil facing (face it down into the crawlspace) almost eliminates radiative coupling and means that the surface of the insulation approaches the temperature of the ventilation air reducing condensation.
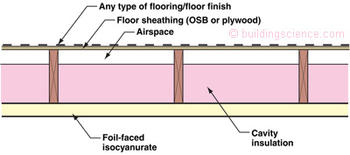
Figure 7: Cavity Insulation with Vapor Barrier—Adding impermeable foil faced insulating sheathing over fiberglass cavity insulation is a hybrid approach that uses the best qualities of both materials. Note that the optimum location for the airspace is above the cavity insulation. Are you folks paying attention at the EPA ENERGY STAR® Program? Makes for warmer floors—this is the same detail that should be used under bedrooms over garages.
All this leads us back to Figure 5 and spray foam. Lots of folks are looking at this option due to the lack of tiny people with good workmanship.5 The spray foam clearly handles the warming the wood thing. Any foam will work for the wood warming—low density, high density, whatever. Recall, just by warming the wood you lower it’s equilibrium moisture content. Where things get difficult are with the vapor drive across the floor sheathing and the floor finish. Unless you stick to carpet, and ventilated furniture and ventilated cabinetry you are going to have to use high-density foam—at least 2 lb/ft3—due to its lower perm value. And at least 3 inches thick or thicker (gives you less than 1 perm at this thickness). Figure 8 shows a few configurations that pretty much work everywhere. Even Figure 8d, with vinyl flooring, works in mixed-humid and hot-humid climates. Having said that, I think you should just say no to vinyl—that makes things a whole lot easier. If you really like vinyl, go with Figure 6 or Figure 7 or even better Photograph 5 (the conditioned crawlspace or mini-basement).
What if I don’t want to completely encase the floor framing? What if I want to go with Figure 9 and Photograph 6? That works if the crawlspace does not get too cold—in the summer—if it is coupled more to the outside air than to the crawlspace ground temperature. Elevated crawlspaces with open piers work fine in this regard (Photograph 7).
At the end of the day, recall that the best crawlspace of all is filled with concrete and called a slab—or dug out and called a basement.
Figures 8a – 8d: Spray Foam Configurations—Stick to closed cell 2 1b/ft3 density spray foam. Avoid vinyl flooring—except in dry and cold climates.

Figure 8b 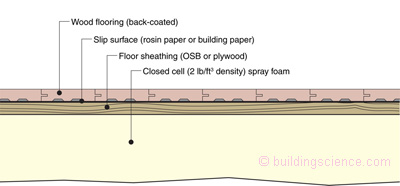
Figure 8c 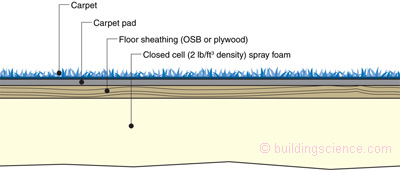
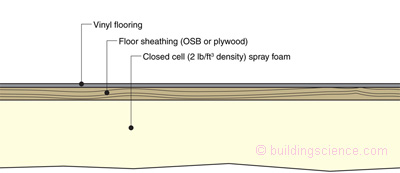

Figure 9: Not Encased Floor Framing—Use high-density foam, at least 2 lb/ft3, due to its lower perm rate and couple the crawlspace to the outside. Elevate the crawlspace and use open pier construction.
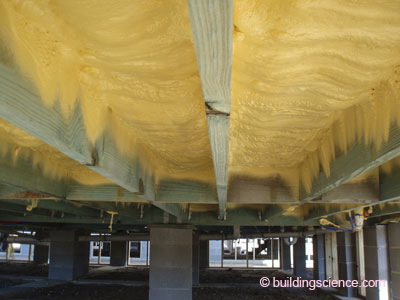
Photograph 6: Spray Foam Between Joists—Floor framing is not completely encased with spray foam in this application. Works only where the crawlspace is open to the outside.
Photograph 7: Elevated and Open Crawlspace—Open pier construction and a trellis couple the crawlspace to the exterior.
Footnotes:
A reasonable rule-of-thumb to estimate crawlspace ground surface temperatures is to use the average annual ambient air temperature for that location.
This comes from using radon gas as a “tracer gas”—thank you EPA—your radon studies provided useful information at least in this regard.
This is another one of those engineering approximations that drives energy weenies crazy.
The pink color comes from digestive enzymes exuded from mold that react with the plasticizers in the vinyl. The mold comes from the substrate being wet because of the impermeability of the vinyl. No vinyl no problem.
They all have gone on to fame and fortune in reality TV cable shows.