Some folks hate foam insulation. The rigid board stuff, the spray stuff, the flexible stuff. They don't like the blowing agents, they don't like the fire retardants, they don't like the chemical companies that make them, they don't like oil. Some of them don't like people, cute dogs. Whatever. For the record, I don't have any issues with low or high-density spray polyurethane foam, extruded polystyrene (XPS), expanded polystyrene (EPS), foil-faced isocyanurate, glass fiber-faced isocyanurate or cute dogs. I do have trouble with people – occasionally.
So where am I going with this? Some of these folks are called clients. And some of them are pretty big. Some huge architectural firms refuse to work with foam plastic rigid insulation. Again, I repeat, I have no issues here. I use all of these products on a regular basis. But when a client comes to me and says I want to do a high performance building and I do not want to use any foam insulation I say OK. Then when they say I want to build it in a hot humid climate or a mixed humid climate I say OK. And then I ask how high of a performance bar? And they say Net Zero or Passive House. Then I say I don't think its been done but here's how I would do it.
So here's how I would do it.
Let’s pick New Orleans or Galveston. Hurricanes and humidity. Fun, eh? And let’s make it wood frame. Why? Well, wood apparently grows on trees, and that seems to be acceptable, sort of. We of course have to use the “right” trees. OK. Whatever. Just give me your constraints1 and I will work with the physics.
First thing I am going to do is pick the wall design. Of course it is going to be a version of the “perfect wall” (see “BSI-001: The Perfect Wall”). And of course we will use “advanced framing” (see “BSI-030:Advanced Framing”) with the structural frame completely sheathed with structural wood sheathing – oriented strand board (OSB). We have to deal with hurricanes folks. Hurricanes. So, structural sheathing everywhere. I am going to pick an OSB with an integral facing that provides water control and that facilitates taping. The taped OSB will act as the water control layer, the air control layer and the vapor control layer (Photograph 1). I am going to do something similar with the roof design. The structural sheathing of the roof assembly will act as the air control layer and the vapor control layer – but not the water control layer. Check out the air control layer continuity between the wall and the roof in Photograph 1. That also applies to the vapor control continuity as well. More on the roof and the vapor control of both the wall and roof later.
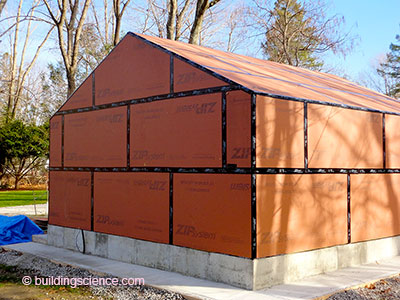
Photograph 1: Perfect Wall Meets Perfect Roof—OSB with an integral facing provides water control and facilitates taping. The taped OSB acts as the water control layer, the air control layer and the vapor control layer. Similarly for the roof. The structural sheathing of the roof assembly acts as the air control layer and the vapor control layer – but not the water control layer. Air control layer continuity between the wall and the roof is key. That also applies to the vapor control continuity as well. For the record, this is my “test” garage at my house in Westford, MA. So this works in a cold climate as well.
I also have to connect the air control layer of the wall to the air control layer of the foundation – which happens to be the concrete itself (Photograph 2). Sealant works here. So does a membrane strip with primer or a fluid applied flashing with a sealant. Pick an approach. I picked the sealant approach combined with a fluid applied flashing. More on the foundation later.
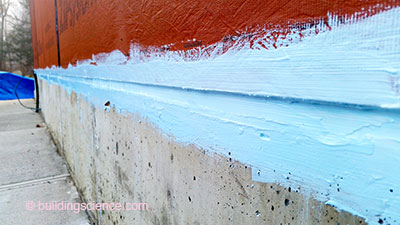
Photograph 2: Wall-to-Foundation Control Layer Continuity—It is necessary to connect the air control layer of the wall to the air control layer of the foundation – which happens to be the concrete itself. Sealant works here. So does a membrane strip with primer or a fluid applied flashing with a sealant. Pick an approach. I picked the sealant approach combined with a fluid-applied flashing.
The wall is going to be insulated both externally and internally. Externally with continuous insulation. Going to use stone wool sheathing or mineral wool sheathing. Two layers 2-inch thick get me around R-16. Internally with cellulose cavity insulation2. Could be fiberglass – blown or netted or batted. Could be cotton. Could be ground up and fluffed blue jeans. Whatever. With the cellulose make sure it is heavily treated with borate. The borate handles fire, insects and mold. Gets me around another R-20. So, nominally I get an R-36 wall3. Check out Figure 1. R-36 in a hot-humid climate – isn’t that insane? Well, look at the performance bar the client has set. Net Zero or Passive House. Not easy folks.
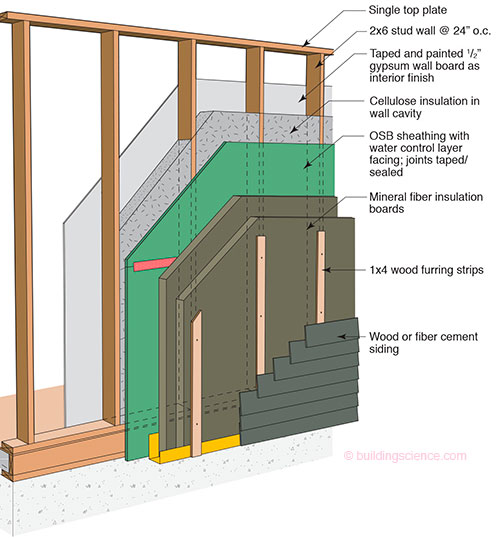
Figure 1: Perfect Wall Redux—Insulated externally with continuous insulation—stone wool sheathing or mineral wool sheathing. Two layers of 2-inch thick yielding approximately R-16. Insulated internally with cellulose cavity insulation. Could be fiberglass – blown or netted or batted. Could be cotton. Could be ground up and fluffed blue jeans. Gets me around another R-20. So, nominally I get an R-36 wall.
Now what? Well you absolutely have to use 1x4 furring screwed through the stone wool or mineral wool. Remember the hurricane thing. You don’t want to loose the cladding. The screws need to be epoxy-coated steel and they need to penetrate directly into the wood frame. The furring does not need to be “treated” wood as it can dry easily into the air cavity on two sides. By not treating the wood stainless steel screws are avoided which are a miserable technology4. Check out Photograph 3.

Photograph 3: Furring and Cladding Attachment—You absolutely have to use 1x4 furring screwed through the stone wool or mineral wool. Remember the hurricane thing. You don’t want to loose the cladding. The screws need to be epoxy coated steel and they need to penetrate directly into the wood frame. The furring does not need to be “treated” wood as it can dry easily into the air cavity on two sides. By not treating the wood stainless steel screws are avoided.
The bottom of the external continuous insulation needs to be protected with an aluminum reverse cap flashing to keep critters out of it. And the air gap between the 1x4 wood furring strips needs to have an insect screen. We were here before (see “BSI-056: Leiningen Versus The Ants Redux”).
The cladding is going to be fiber cement clapboards coated on all 6 sides to reduce water absorption (make the “reservoir cladding” less of a “reservoir”). The fiber cement has to be fastened with ring shank nails. Recall the hurricane thing. You only have ¾-inch of “meat” to attach the cladding to. Some folks recommend ¾-inch marine grade plywood furring strips because of the hurricane thing or even 2x4’s as furring strips. These folks are called structural engineers and they are very conservative for good reasons.
The interior gypsum board will be paperless and skim coated with plaster and finished with acrylic latex paint. Removing the paper and going to a plaster skim coat pretty much makes the mold thing go away.
The location of the OSB sheathing allows it to act as a “vapor throttle” controlling inward vapor drive during cooling while allowing outward vapor drive during heating. Recall that OSB (and plywood even more) increase in permeance as relative humidity goes up (see “BSI-087: Chubby Checker and the “Fat Man” Do Permeance”).
Let’s do the roof. Of course it is going to be a conditioned attic.5 No roof vents to leak rainwater during hurricane vents. No negative pressures when we locate duct work and mechanical systems in the attic. No issues with fire if we are building close to lot lines. No issues with burning embers being sucked into roof vents in wild fire areas. No suction/pressurization issues leading to roof blow-off during hurricanes. Did I mention the hurricane thing?
Figure 2 shows the continuity of the air control layer, the vapor control layer and the thermal control layer at the roof-to-wall interface. The soffit assembly is a “trapezoidal box beam”. A second layer of OSB sheathing is installed over the top of two layers of 2-inch stone wool or mineral wool insulation. With cellulose insulation in the framing cavity we are nominally at R-50 for the thermal resistance of the roof assembly. Note that you could use netted fiberglass or fiberglass batts or spray-applied fiberglass. Lots of options here.
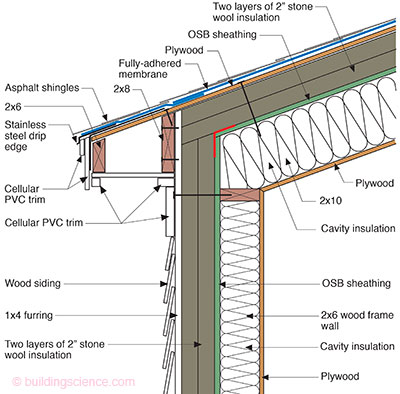
Figure 2: Control Layers—Continuity of the air control layer, the vapor control layer and the thermal control layer at the roof-to-wall interface is provided by connecting the wall OSB sheathing to the roof OSB sheathing. The soffit assembly is a “trapezoidal box beam”. A second layer of OSB sheathing is installed over the top of two layers of 2-inch stone wool or mineral wool insulation. With cellulose insulation in the framing cavity we are nominally at R-50 for the thermal resistance of the roof assembly. Note that you could use netted fiberglass or fiberglass batts or spray-applied fiberglass.
We are not done with the roof yet. The two layers of rigid insulation above the roof deck control the temperature of the condensing surface – and even better – meet the prescriptive requirements of the Model Codes for unvented roof assemblies.
Still not done with the roof. Now look at Figure 3 and Photograph 4. We add a “vapor diffusion port” (see “BSI-088: Venting Vapor”). But this vapor diffusion port comes with a twist. It vents water vapor that migrates into the stone wool – mineral wool layer above the OSB structural roof deck. We have a “forgiving assembly” coupled with external insulation controlling the temperature of the assembly condensing surface (the underside of the OSB structural roof deck). We don’t “trap” any moisture with this assembly. Neat eh? It gets better. This is not limited to the south. This works everywhere. Yup, Chicago. Boston. Toronto.6 Works all over – with the caveat that you need to add enough insulation top-side of the structural deck to control the temperature of that condensing surface7.
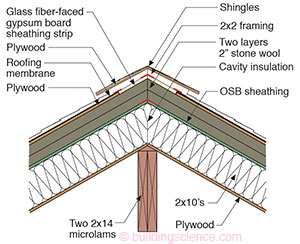
Figure 3: “Vapor Diffusion Port”—See “BSI-088: Venting Vapor”. This vapor diffusion port comes with a twist. It vents water vapor that migrates into the stone wool – mineral wool layer above the OSB structural roof deck. We have a “forgiving assembly” coupled with external insulation controlling the temperature of the assembly condensing surface (the underside of the OSB structural roof deck). We don’t “trap” any moisture with this assembly. Neat eh? It gets better. This is not limited to the south. This works everywhere – with the caveat that you need to add enough insulation top-side of the structural deck to control the temperature of that condensing surface.
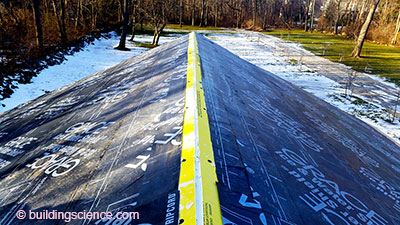
Photograph 4: Vapor Diffusion Port Under Construction—Note the glass fiber-faced gypsum board strip on either side of the ridge. This material acts as a water control layer and air control layer while providing high water vapor transmission. It also provides fire resistance. Note the snow on the ground. This is not New Orleans or Galveston – it is my backyard.
Time to do the foundation. If the soil conditions allow it – do a stem wall. Real easy to do (Figure 4). Stone wool or mineral wool with the right density (greater than 10 lbs/ft3) can be installed under concrete slabs. You absolutely have to install them over a granular capillary break. And you need to seal the top of the slab – across the rigid insulation bond break – to the top of the stem wall using a masticed stainless steel mesh membrane strip. This is—and I use the next word with emphasis—absolutely necessary to provide a “termite barrier”8 and to provide air control layer continuity between the perimeter wall and the slab itself which is acting as the air control layer of the foundation.
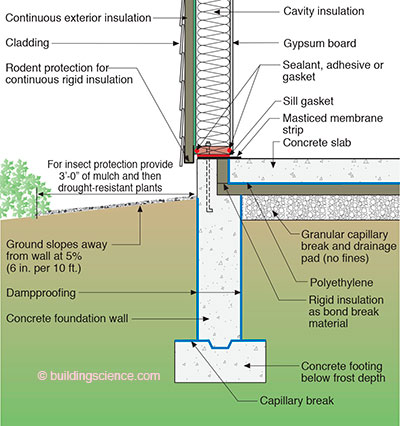
Figure 4: Foundation Stem Wall—Stone wool or mineral wool with the right density (greater than 10 lbs/ft3) can be installed under concrete slabs. You absolutely have to install them over a granular capillary break. And you need to seal the top of the slab – across the rigid insulation bond break – to the top of the stem wall using a masticed stainless steel mesh membrane strip. This is – and I use the next word with emphasis—absolutely necessary to provide a “termite barrier” and to provide air control layer continuity between the perimeter wall and the slab itself, which is acting as the air control layer of the foundation.
If you have bad soil conditions you are going to end up with a post-tensioned monolithic slab. And that means you cannot insulate the slab edge with any known practical approach9. You have to do it on the top-side (Figure 5). This completely eliminates the termite issue and it handles the thermal bridge issue associated with brick or stone veneers (Figure 6).

Figure 5: Post-Tensioned Monolithic Slab—It is not possible to insulate the slab edge with any known practical approach. It can be done on the top-side. This completely eliminates the termite issue.
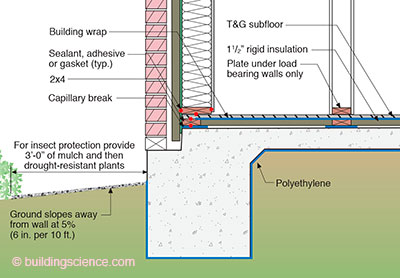
Figure 6: More Post-Tensioned Monolithic Slab—Top of slab insulation handles the thermal bridge issue associated with brick or stone veneers.
But why insulate the slab foundation anyway? It is the south? Well, you wanted ultra high performance. You now have it. By the way you can do this in colder climates as well. Check out Figure 7.
The key to Figure 7 is that there must be an interior perimeter drain and a granular capillary break along the vertical portion – as well as the horizontal portion – of the stone wool and mineral wool layer. This is necessary in order to keep the stone wool – mineral wool from becoming saturated. This insulation layer can get intermittently wet as long as it is capable of drying. The granular layer and perimeter drain allow that to happen.
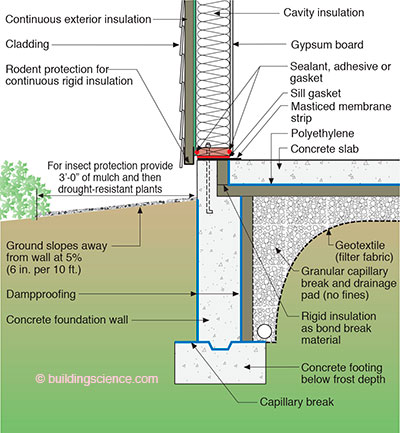
Figure 7: Cold Climate Stem Wall—The key to this detail is the interior perimeter drain and a granular capillary break along the vertical portion – as well as the horizontal portion – of the stone wool and mineral wool layer. This is necessary in order to keep the stone wool – mineral wool from becoming saturated. This insulation layer can get intermittently wet as long as it is capable of drying. The granular layer and perimeter drain allow that to happen.
OK, so there we have it. A high performance wood frame building in a hot-humid or mixed-humid climate with no foam. Guess what? Exactly the same details can be used for rigid foam board insulation. You can use XPS or EPS or polyisocyanurates in the wall and roof assembly exactly as shown. Well, not quite, you don’t need the vapor diffusion port on the roof detail with XPS, EPS or polyisocyanurates.
With the foundation details, you are limited to XPS and EPS under the slab. The polyisocyanurates don’t work under the slab – at least I haven’t figured out how to use them here. With EPS you need the interior perimeter drain and stone capillary break in Figure 7. With XPS you do not. There is more. You can use spray foam – low-density or high-density – in the cavities for both the wall and roof details in all climate zones. How do you like them apples? Eh?
Think about it. You can pretty much use any insulation system you want in any climate zone. You like stone wool or mineral wool? Go for it. You like XPS? Go for it. You like low-density foam? Go for it. You like high-density foam? Go for it. You like EPS? Go for it. You hate any of these? Don’t use them. Just follow the physics10.
Footnotes:
- Over the years we have done houses and offices for chemically sensitive individuals and to say that it was challenging would be an understatement. But incredibly interesting and quite rewarding. I have had to use no wood sometimes. Sometimes only concrete and plaster – and with no additives or workability agents or release oils on formwork. Lots of stainless steel. Sometimes no stainless steel. Sometimes only cork insulation. Sometimes only straw. Sometimes cotton. You get the idea. I teach a grad class every now and then and I like to mess with the students heads…yes, that comes as a surprise to you…and give them a project to design, say a museum located on the top of a ski mountain connected to a hospital and then limit the materials they can use…Makes for interesting designs and better engineers and architects.
- Best use for the New York Times…
- We are using “Joe Math” here. Figure out the framing factor and the air films and the thermal bridging associated with the cladding attachments if you want to be anal about it.
- The heads twist off and they cost a fortune. Ask me how I know?
- Note that I did not use the words “unvented attic”. We are connecting the attic space to the house. It is part of the conditioned volume/area of the building enclosure.
- Which still does not have a hockey team…
- This might not be necessary due to the diffusion port removal mechanism. Might not need as much insulation because we might be able to tolerate moisture in the assembly. Still working on this. Got some attic test assemblies that are being “stressed” to determine the limit of performance. In the meanwhile stay with the conservative approach. Control the temperature of the condensing surface using the code recommended levels of insulation.
- The stainless steel mesh approach comes to us from Australia which, believe it or not, has more miserable termites than we do in the US. It is rumored that the Australian termites don’t have helmets or pads which makes sense since the Aussies that play Australian Rules Football don’t have them either. Aussies claim American football players are sissies. Note that they do not make any such claims about Canadian hockey players – except for the ones that play for the Toronto Maple Leafs…
- Yeah, I know, some of you think you can do this on the exterior vertical face of the slab. I thought so too. I even drew up some details showing this. But I have given up. It has been too difficult to protect the insulation during the construction process and not worth the effort if you have a brick veneer or stone veneer and you consider the associated thermal bridge. This is based on my experience. I have crossed to the dark side on this one…due to the pain threshold experienced.
- I don’t have a problem with people not using certain products. Their decision. What bugs me is when they tell me I can’t use them. Your building, you get to make the decision. My building, I get to make the decision. The fact that I can make all of them work is good, but besides the point. We can argue about social responsibility and who gets to decide what that means some other time. Now that I am a genuinely old person I have come to the conclusion that one persons social responsibility is often some other persons social irresponsibility.