The problem with flood damaged buildings is that the damage is done by dirty water. Everything imaginable and unimaginable is in flood water. We call it “black water” or Category 3 water. It includes sewage, bacteria, fungi…stuff that will make you really, really sick. It is not a Doobie Brothers song[1]…we are not talking Ol’Mississippi rollin’on… If there are catfish they are not jumpin…they are pretty much dead.
“Black water” is very different from “clean water” or Category 1 water. Category 1 water is easy to deal with. You get it from broken water supply lines, sink and tub overflows and the like. Just dry the wet spot…and be done. Big caveat here…dry it quickly before you are overwhelmed with mold. You have days….not weeks…to get it dry. We all know how to do this[2].
Between Category 1 water and Category 3 water we have…you guessed it….Category 2 water or “grey water”. Stuff from dishwashers, urine in toilet bowls, sump pump failures. We also know how to do this. The same folks who do the Category 1 stuff know how to do the Category 2 stuff.
Houston after Hurricane Harvey is a “black water” Category 3 extreme event. Check out Photograph 1, Photograph 2 and Photograph 3. So what do you do? You raise the flag and roll up your sleeves and get to it (Photograph 4).
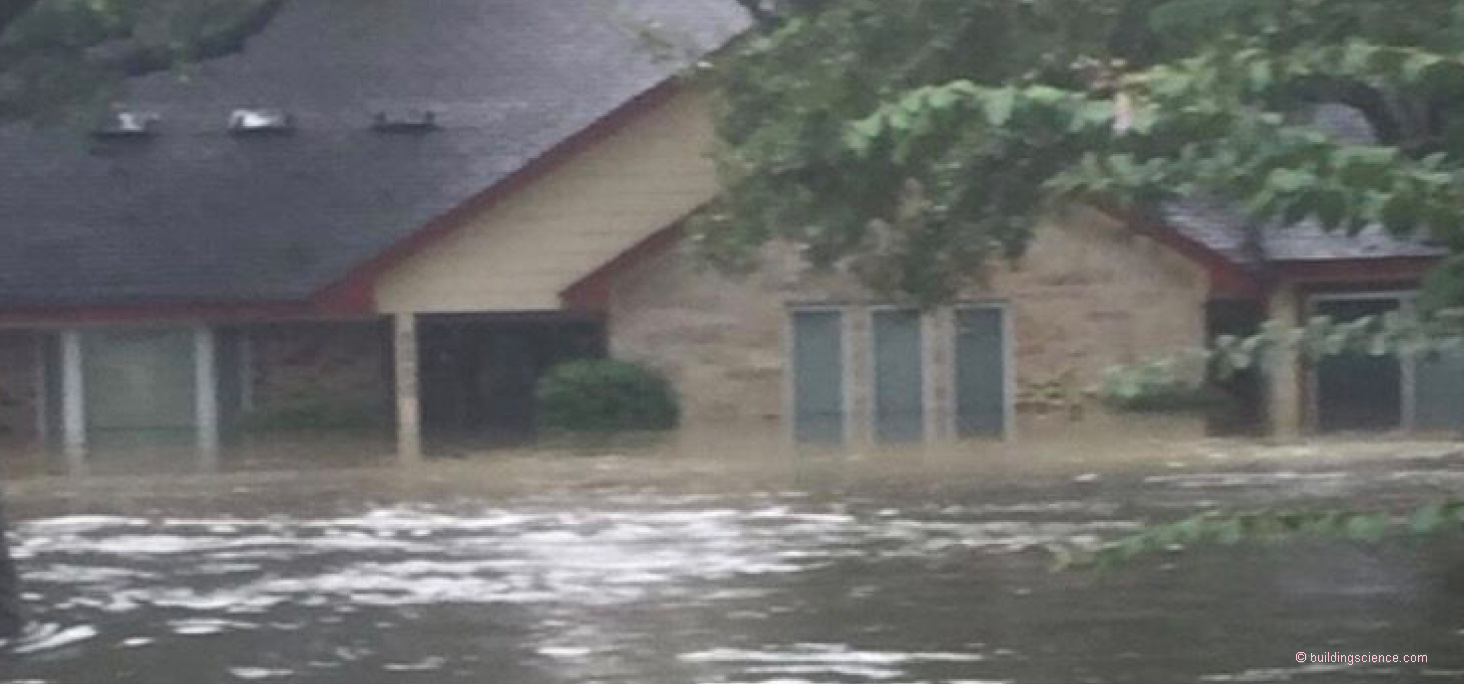
Photograph 1: “Black Water” Extreme Event – The problem with flood damaged buildings is that the damage is done by dirty water. Everything imaginable and unimaginable is in flood water. Photograph courtesy of Dave Yelovich.
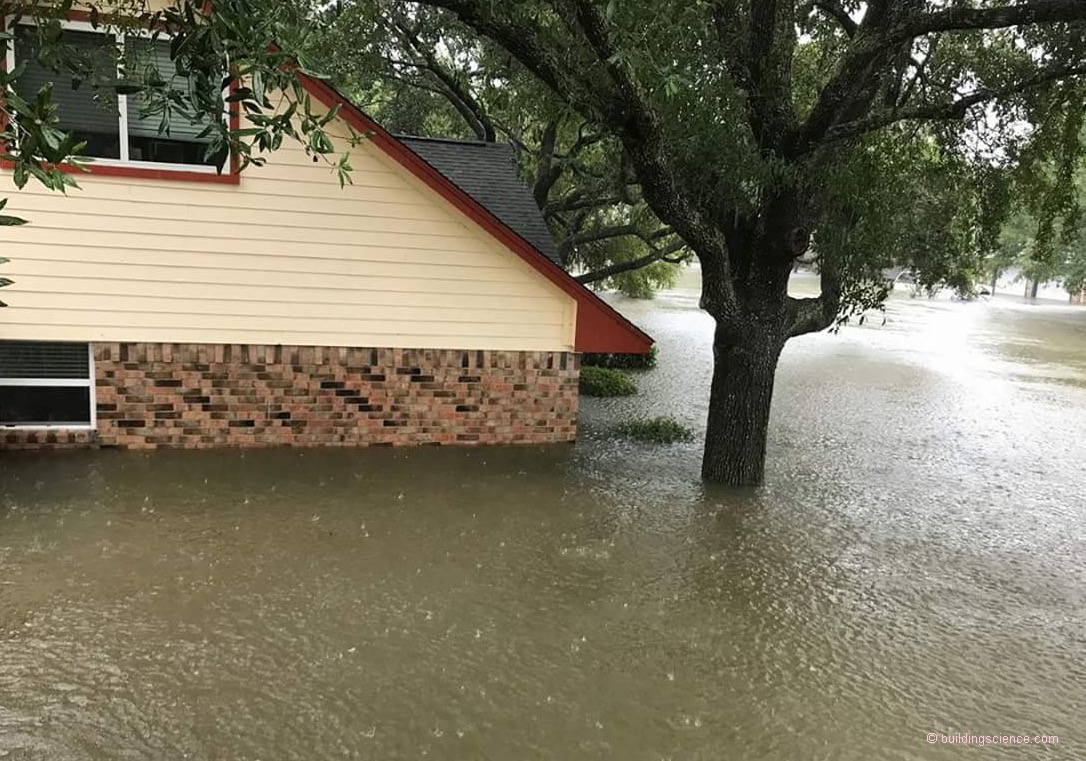
Photograph 2: Yelovich House - This my friend Dave Yelovich’s house as seen from the second floor of his neighbor’s house. Photograph courtesy of Dave Yelovich.
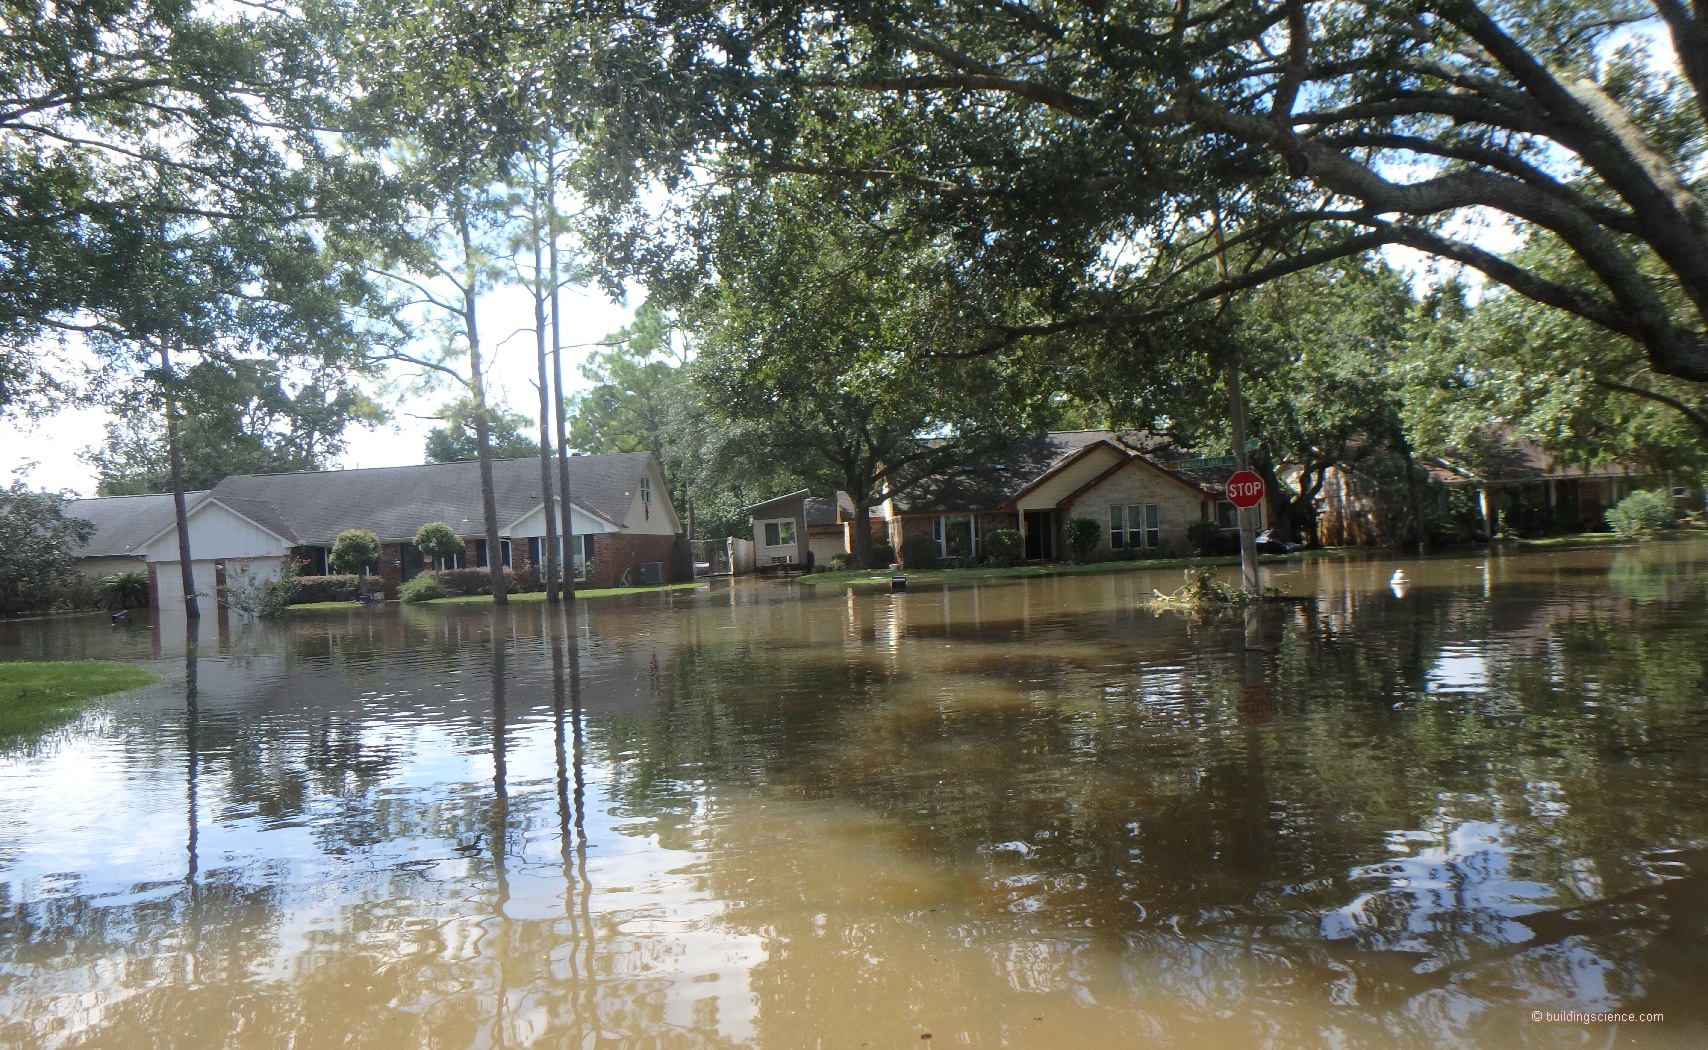
Photograph 3: Sun Comes Back - Flood water recedes. Actually looks quite beautiful if you don’t know what just happened and what comes next. Time to get to work. Photograph courtesy of Dave Yelovich.
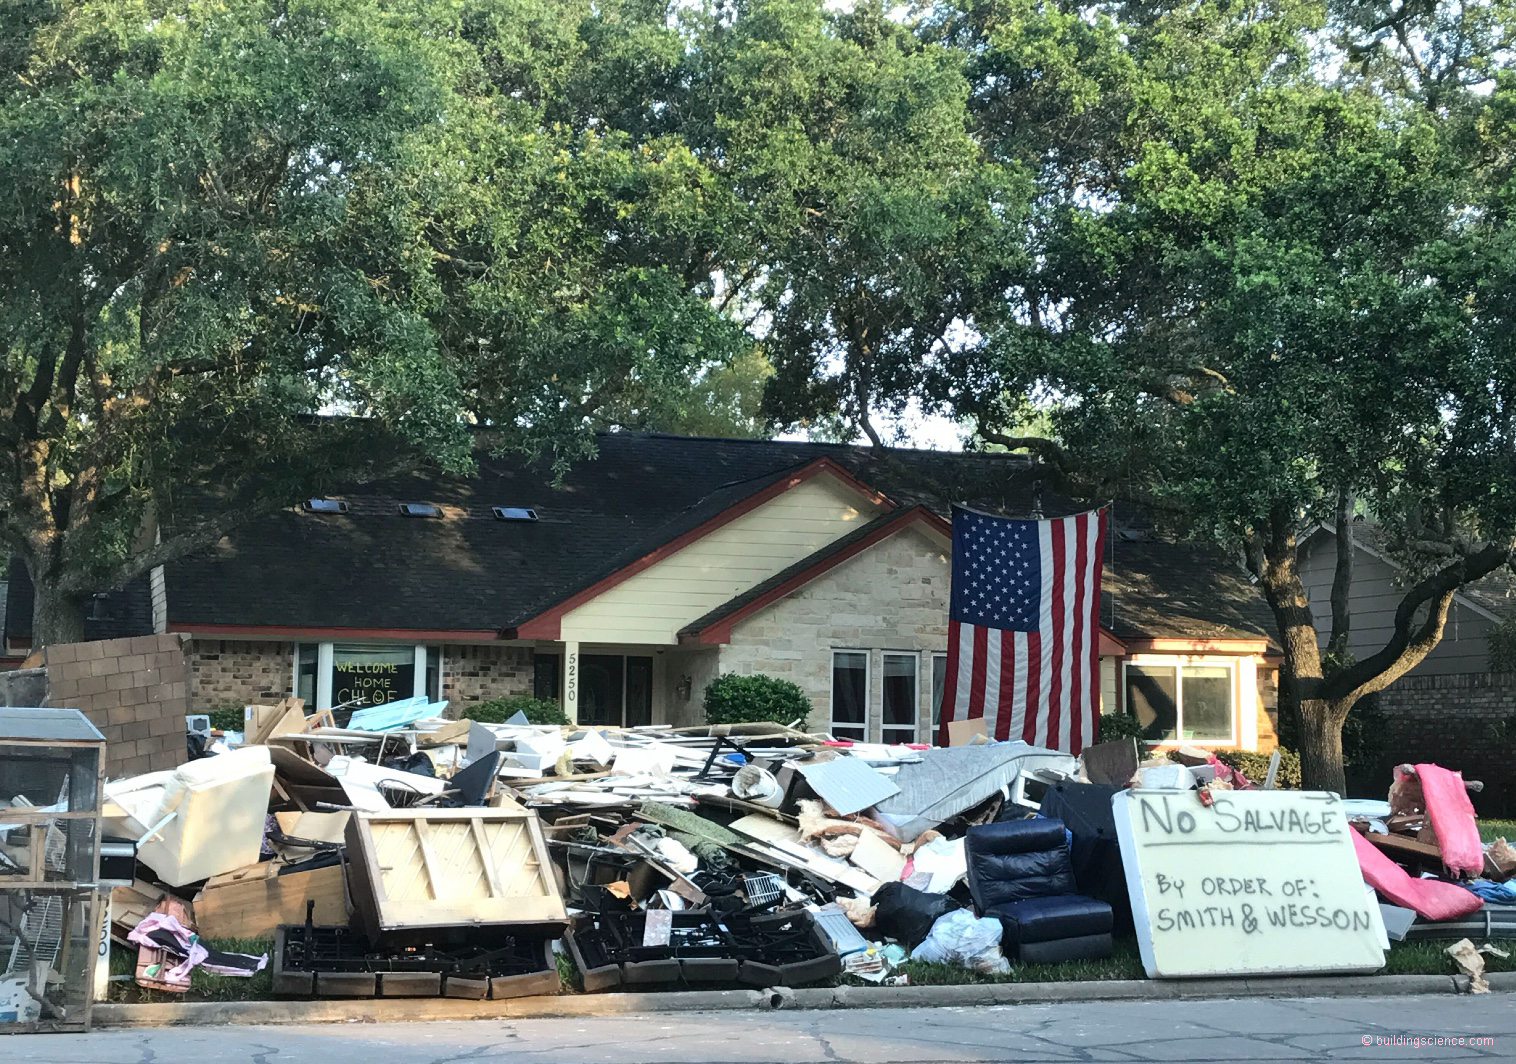
Photograph 4: Street Scape – Common sight. American flag and all the trash and stuff. Love you Dave. You throw out all the carpets, fabrics, pretty much all your soft furniture, cardboard boxes and on and on. It is typically not worth the effort to professionally have this type of stuff cleaned…except if it is a family heirloom. Photograph courtesy of Dave Yelovich.
You throw out all the carpets, fabrics, pretty much all your soft furniture, cardboard boxes and on and on. It is typically not worth the effort to professionally have this type of stuff cleaned…except if it is a family heirloom. Again, we all know how to do this[3].
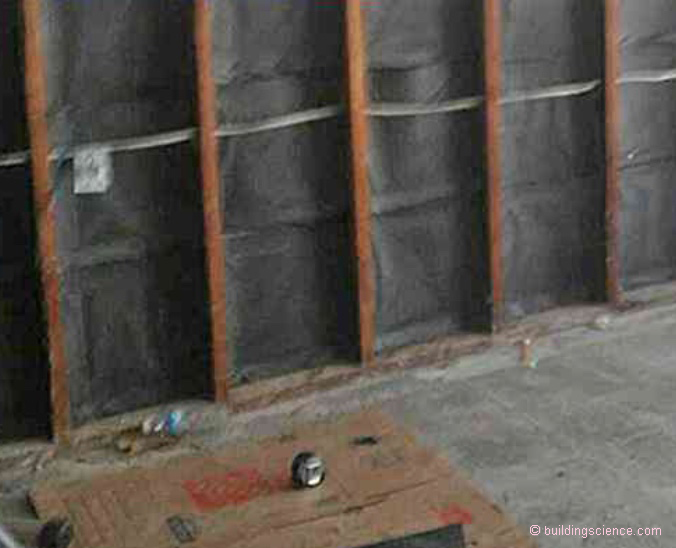
Now it gets interesting...especially if you have brick. You cut away and get rid of all the interior gypsum board and cavity insulation and your sheathing leaving bare stud framing and naked exposed brick (Photograph 5). When in doubt throw it out. Now what?
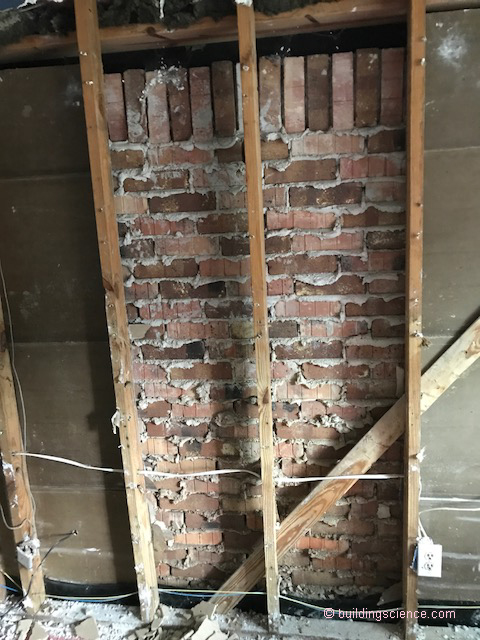
Photograph 5: Backside of Brick - Now it gets interesting...especially if you have brick. You cut away and get rid of all the interior gypsum board and cavity insulation and your sheathing leaving bare stud framing and naked exposed brick. When in doubt throw it out.
Wash, rinse and dry. Clean all the surfaces with water and detergent, sanitize them with a bleach solution, rewash them and rinse and then dry. Note that we all know how to do this as has already been mentioned.
So here we are clean and dry and having to put things back together. Being the cynic that I am…comes with age…I bet we will get flooded again. If it was me I wouldn’t rebuild in the same place without a huge regional investment in civil engineering infrastructure….dams, dikes, spillways, canals, pumps…and then I would build up. I would knock everything down and start with a clean sheet of paper. More about that later. But, alas, that is not the way it is going to go.
How to rehabilitate thousands of houses that are not going to be knocked down? And under the assumption that it is going to happen again?
Here goes…. First thing we have to do is clean out the debris at the bottom of the wall cavity. Cut the flashing out. Yes, you read that correctly. Use an air compressor to blow stuff out of the gap. Completely expose the concrete in the seat of the slab edge of the foundation. Drill weep holes through the bottom course of brick. Drill them from the outside. How many? Every other vertical joint in the first course of brick. Big weeps, ok? Line them with commercially available insect guards. Go online. We all know how to do this. Pick a Houston manufacturer if you can. They need the business…especially now.
Now apply a fluid applied flashing to the bottom of the wall (Figure 1). The intent is to turn the bottom plate of the existing frame wall into a pan flashing. The fluid applied flashing should completely cover the top of the bottom plate and seal upwards around each stud. The fluid applied flashing needs to run down the exterior face of the bottom plate and seal to the seat in the concrete supporting the brick veneer. There will probably be a “jog” or an “offset” at the intersection of the bottom plate and the upper corner of the seat in the slab depending on whether the original wall sheathing (now removed) lined up with the seat or was framed to overlap the seat.
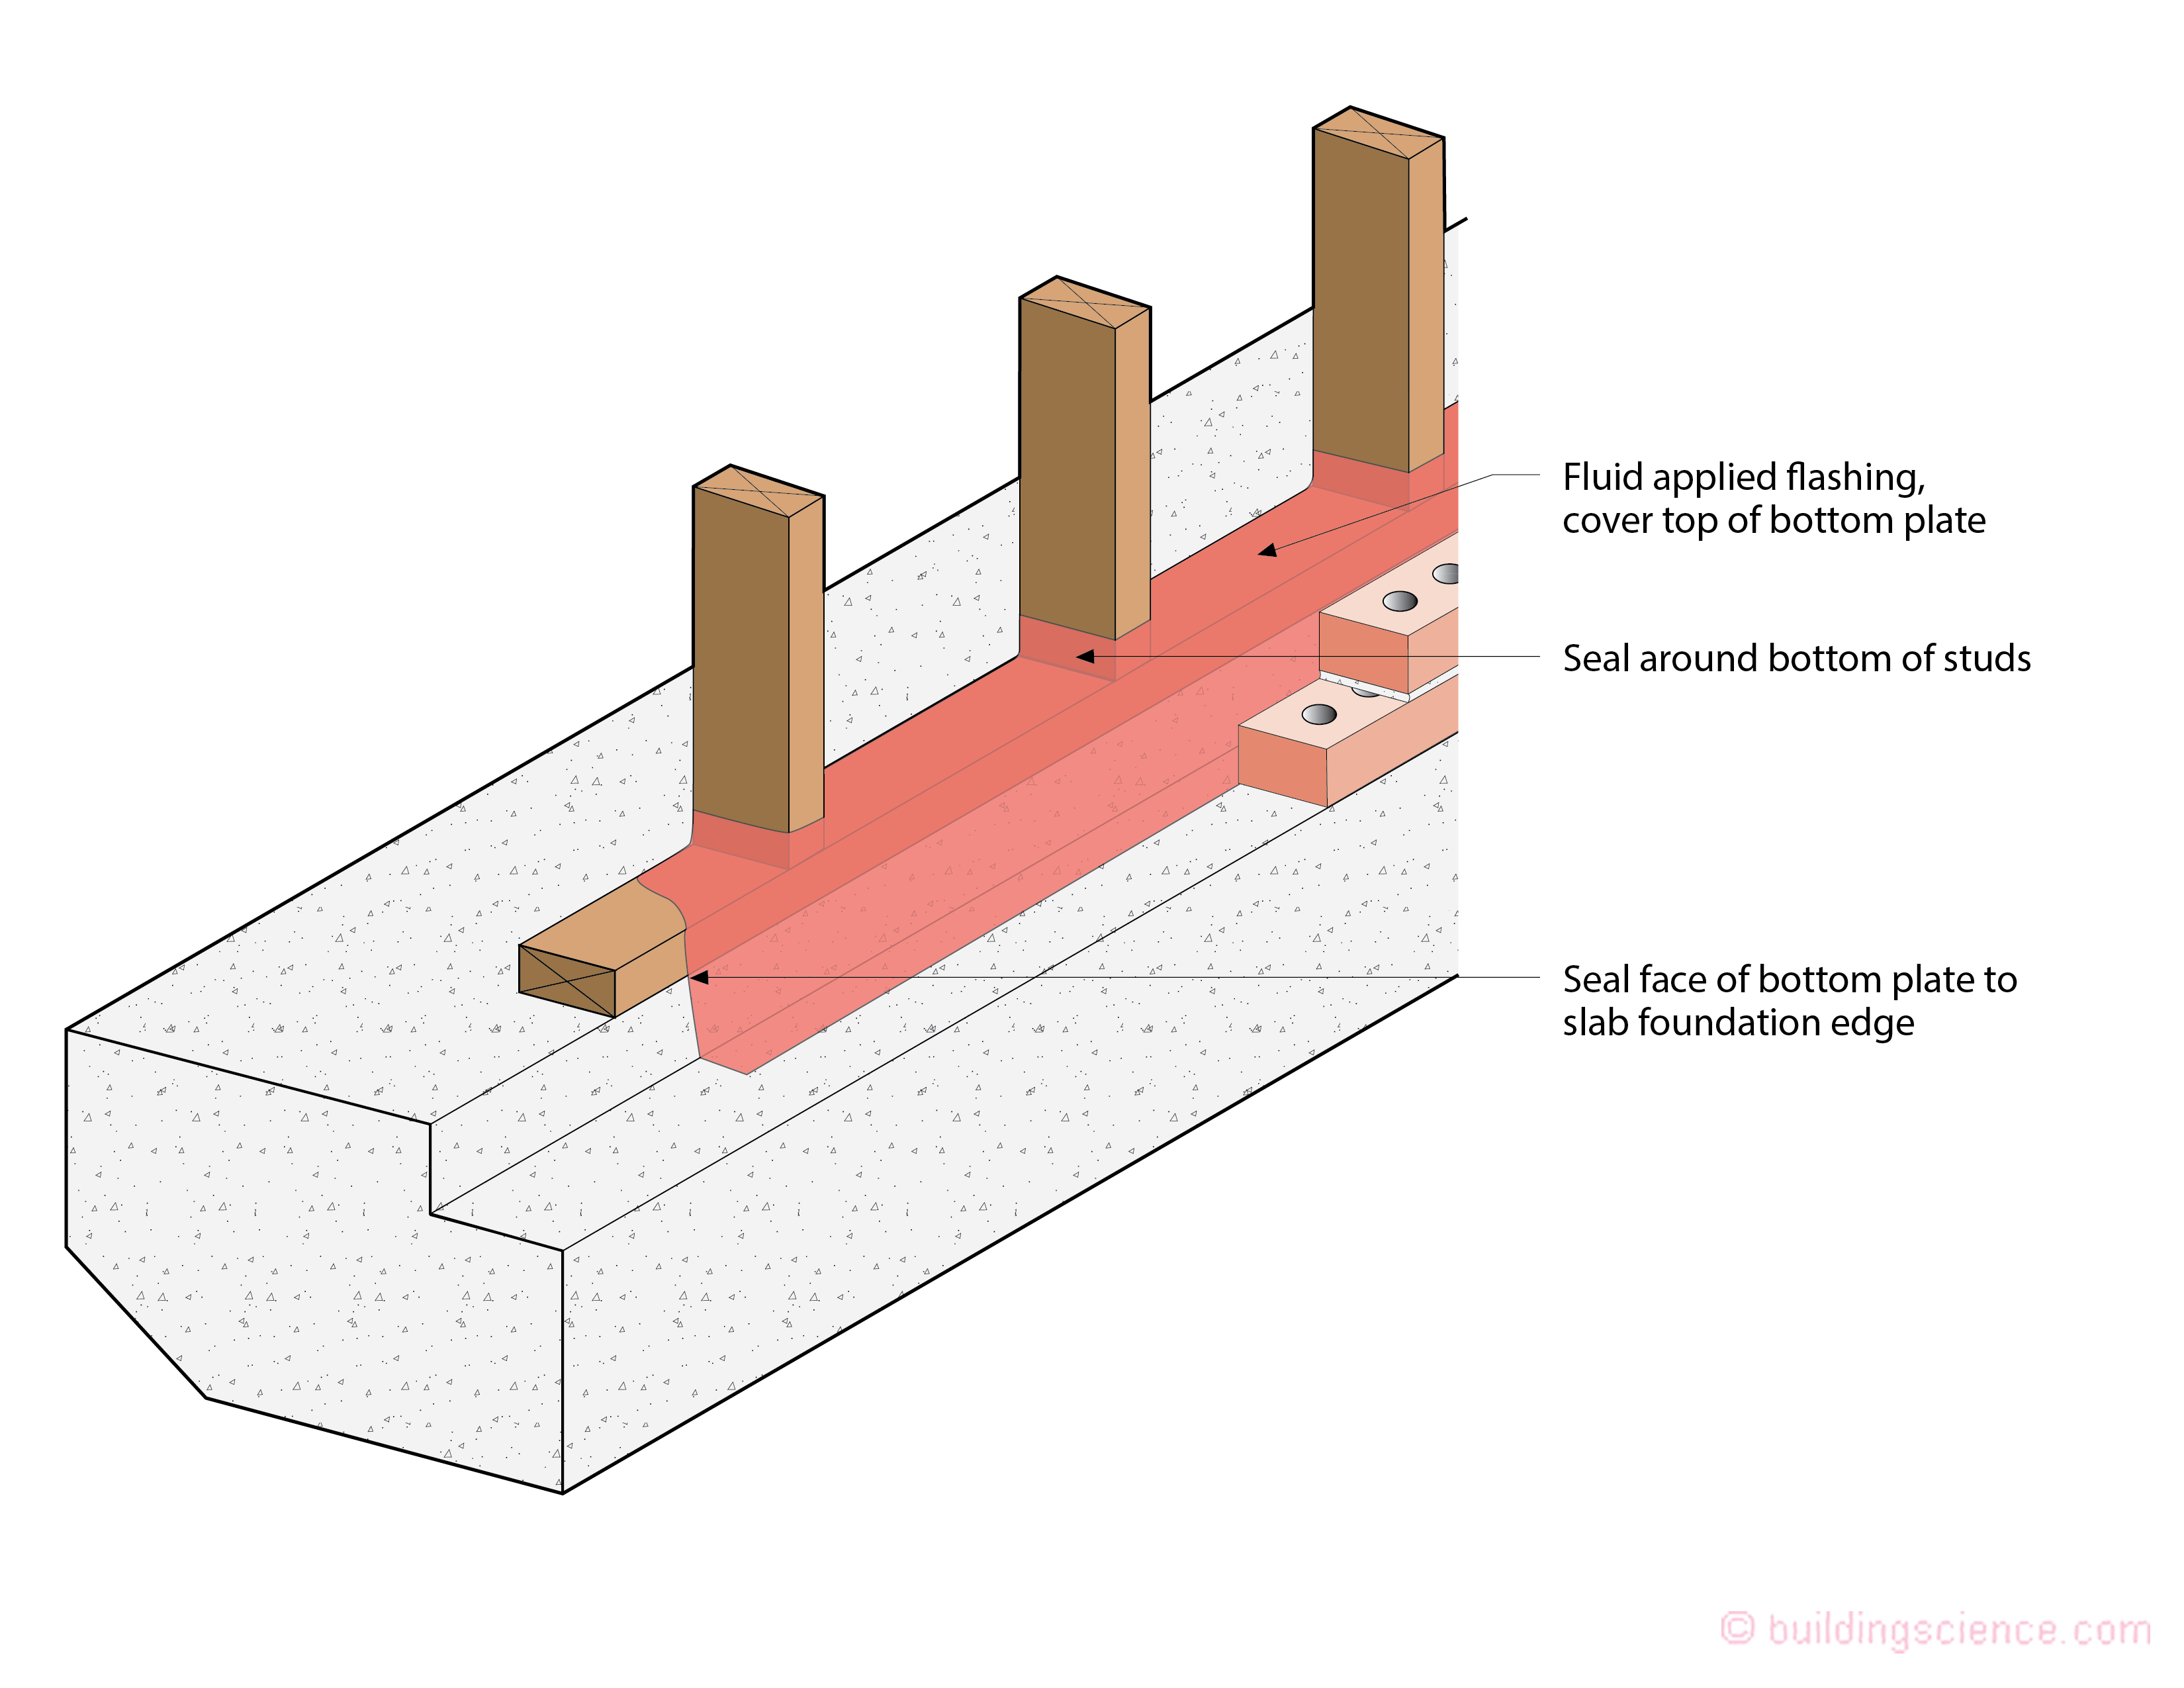
Figure 1: Fluid Applied Flashing - The intent is to turn the bottom plate of the existing frame wall into a pan flashing. The fluid applied flashing should completely cover the top of the bottom plate and seal upwards around each stud. The fluid applied flashing needs to run down the exterior face of the bottom plate and seal to the seat in the concrete supporting the brick veneer. There will probably be a “jog” or an “offset” at the intersection of the bottom plate and the upper corner of the seat in the slab depending on whether the original wall sheathing (now removed) lined up with the seat or was framed to overlap the seat.
Two approaches can now be used. The first involves a thin flexible sheet of extruded polystyrene (XPS)…3/8 inch…that is installed shingle fashion between the brick veneer and the exterior face of the studs (Figure 2). The XPS is “wedged” in place with XPS wedges at stud locations (Figure 3). The thin flexible XPS sheet is “fished” in behind the studs with the wedges holding it in place. That is why the brick ties needed to disappear. The XPS sheet needs to be limited in height to probably no more than three feet to allow the wedges to be “smushed” into place from the top downwards. The wedges are only temporarily needed. The “attachment” of the XPS sheathing is accomplished with spray polyurethane foam (SPF) of the closed cell “flavor” (Photograph 6 and Figure 4).
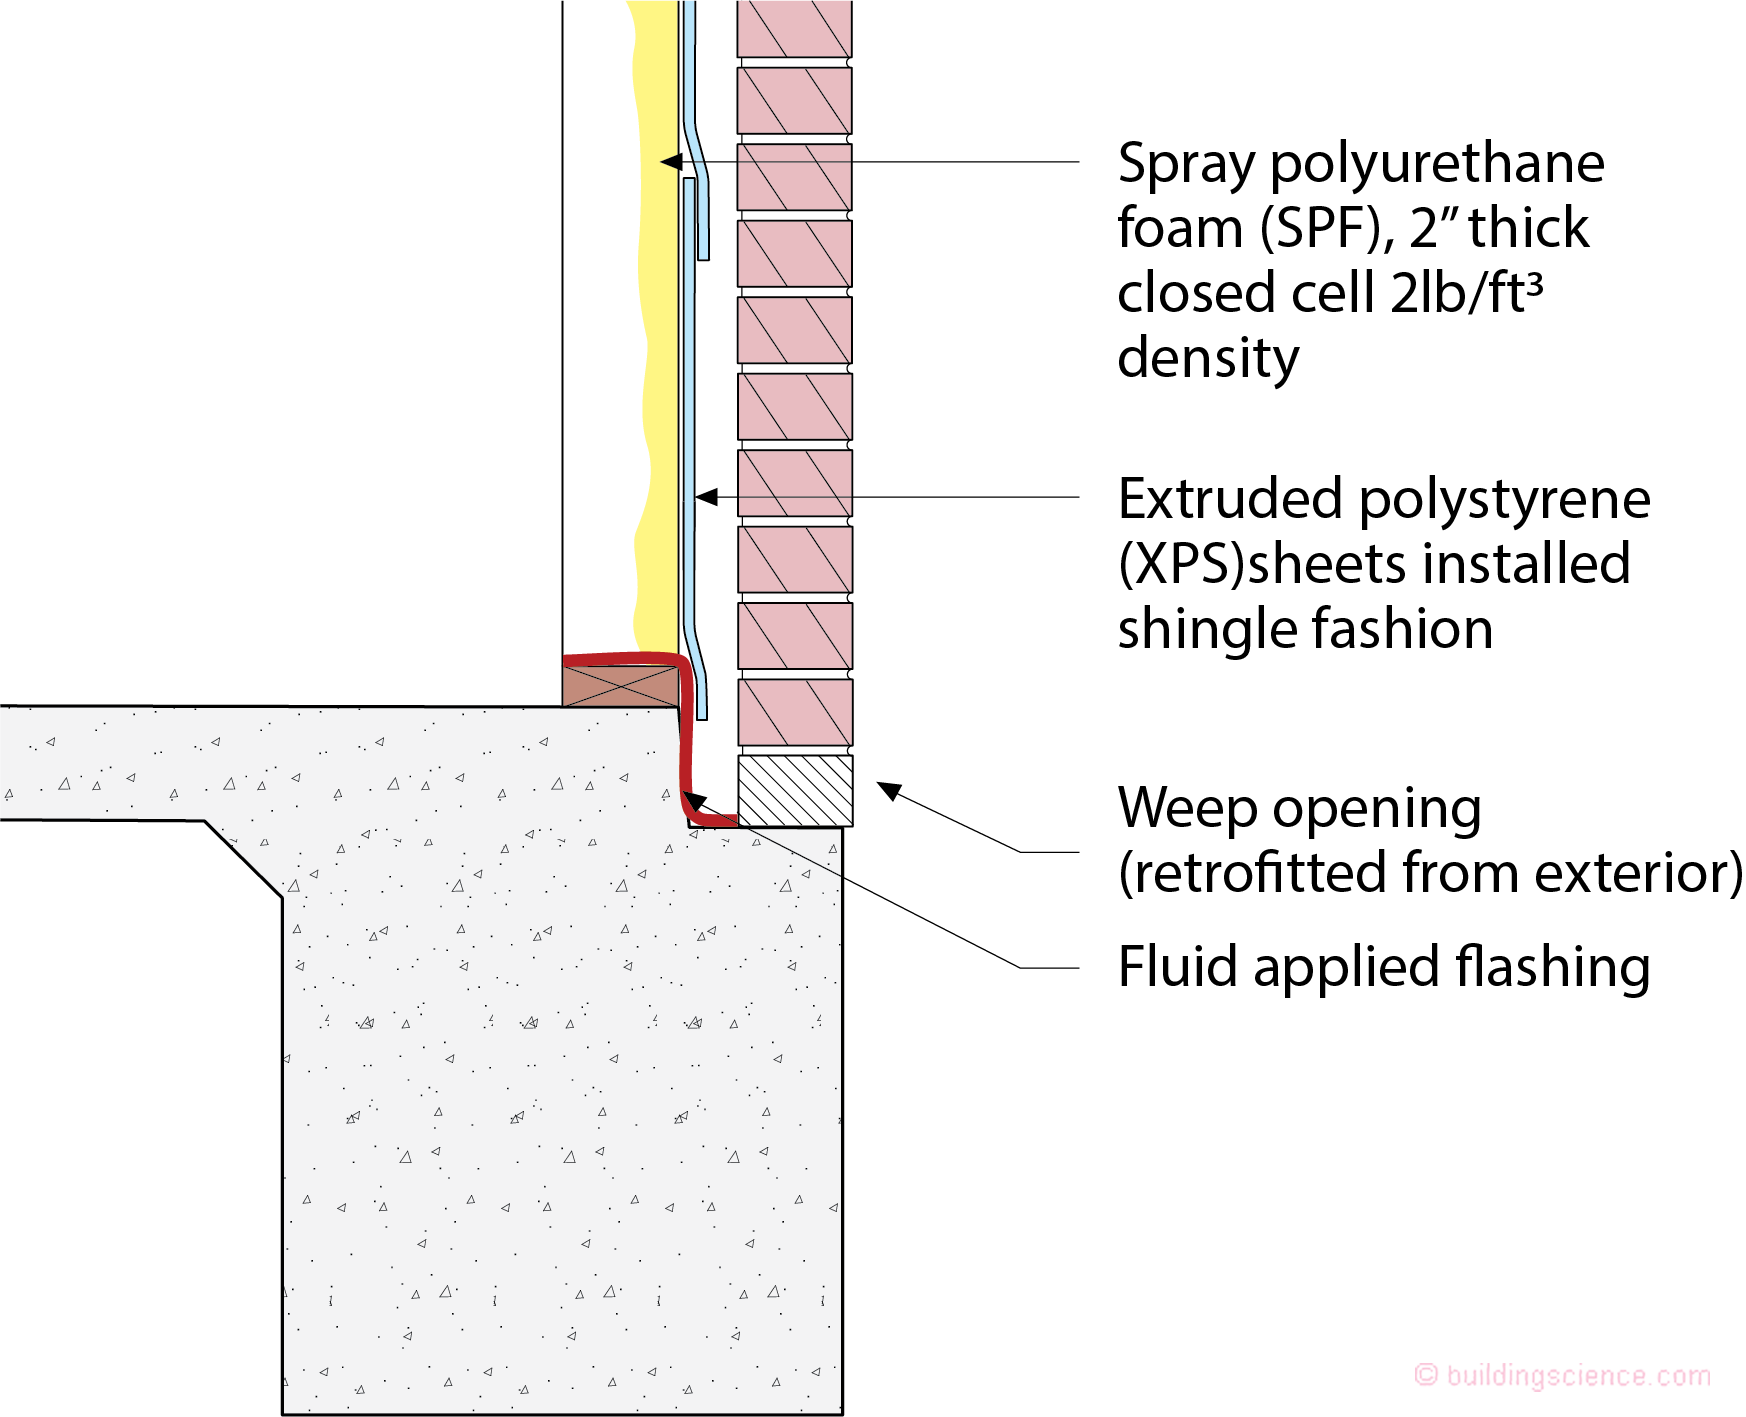
Figure 2: Extruded Polystyrene Sheathing - A thin flexible sheet of extruded polystyrene (XPS)…3/8 inch… is installed shingle fashion between the brick veneer and the exterior face of the studs. The sheathing is installed shingle fashion and overlaps the exterior of the bottom plate.
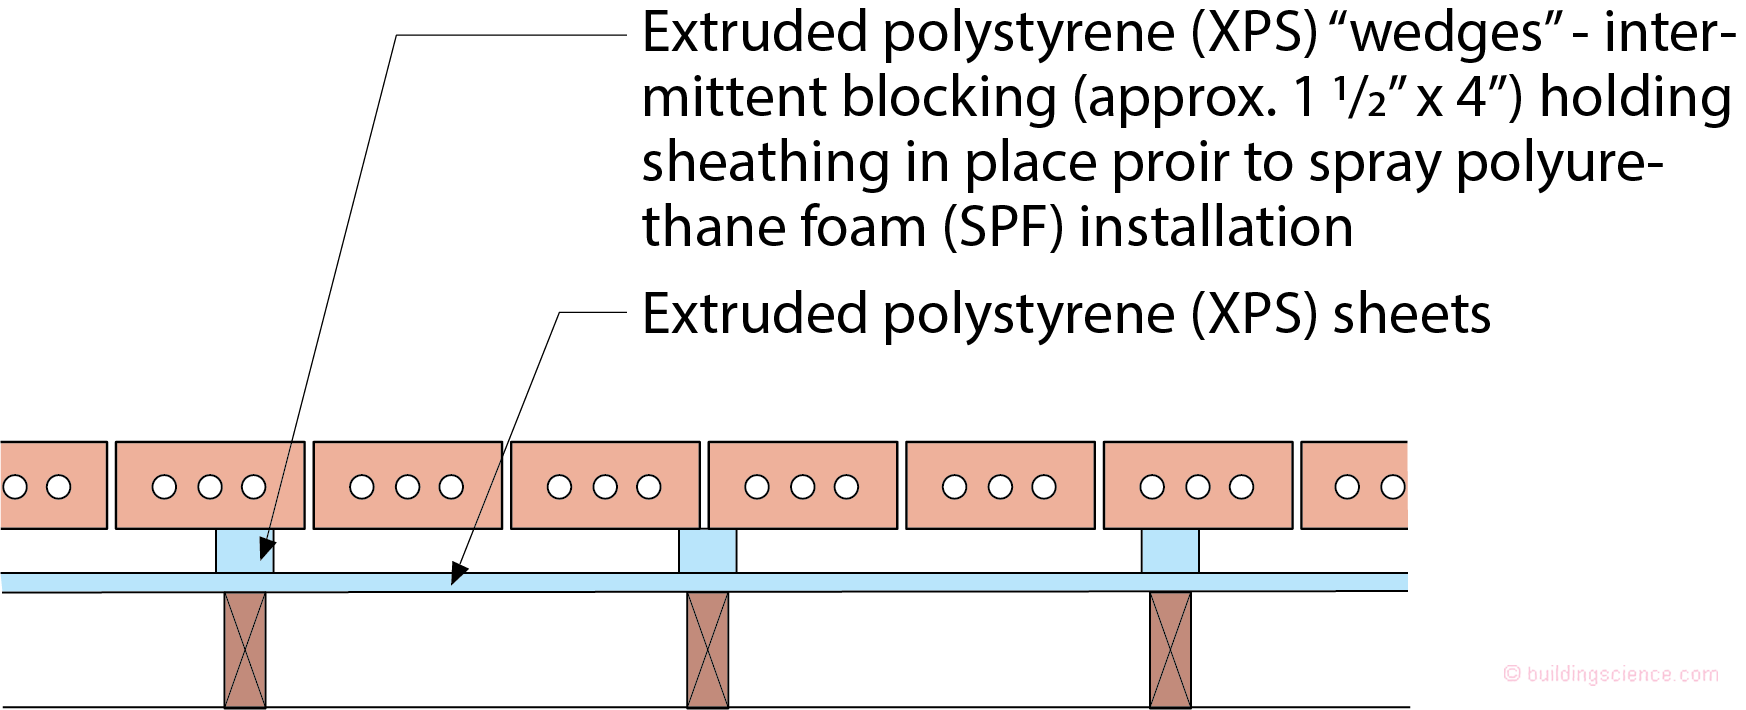
Figure 3: Wedges - The XPS is “wedged” in place with XPS wedges at stud locations. The thin flexible XPS sheet is “fished” in behind the studs with the wedges holding it in place. That is why the brick ties needed to disappear. The XPS sheet needs to be limited in height to probably no more than three feet to allow the wedges to be “smushed” into place from the top downwards.
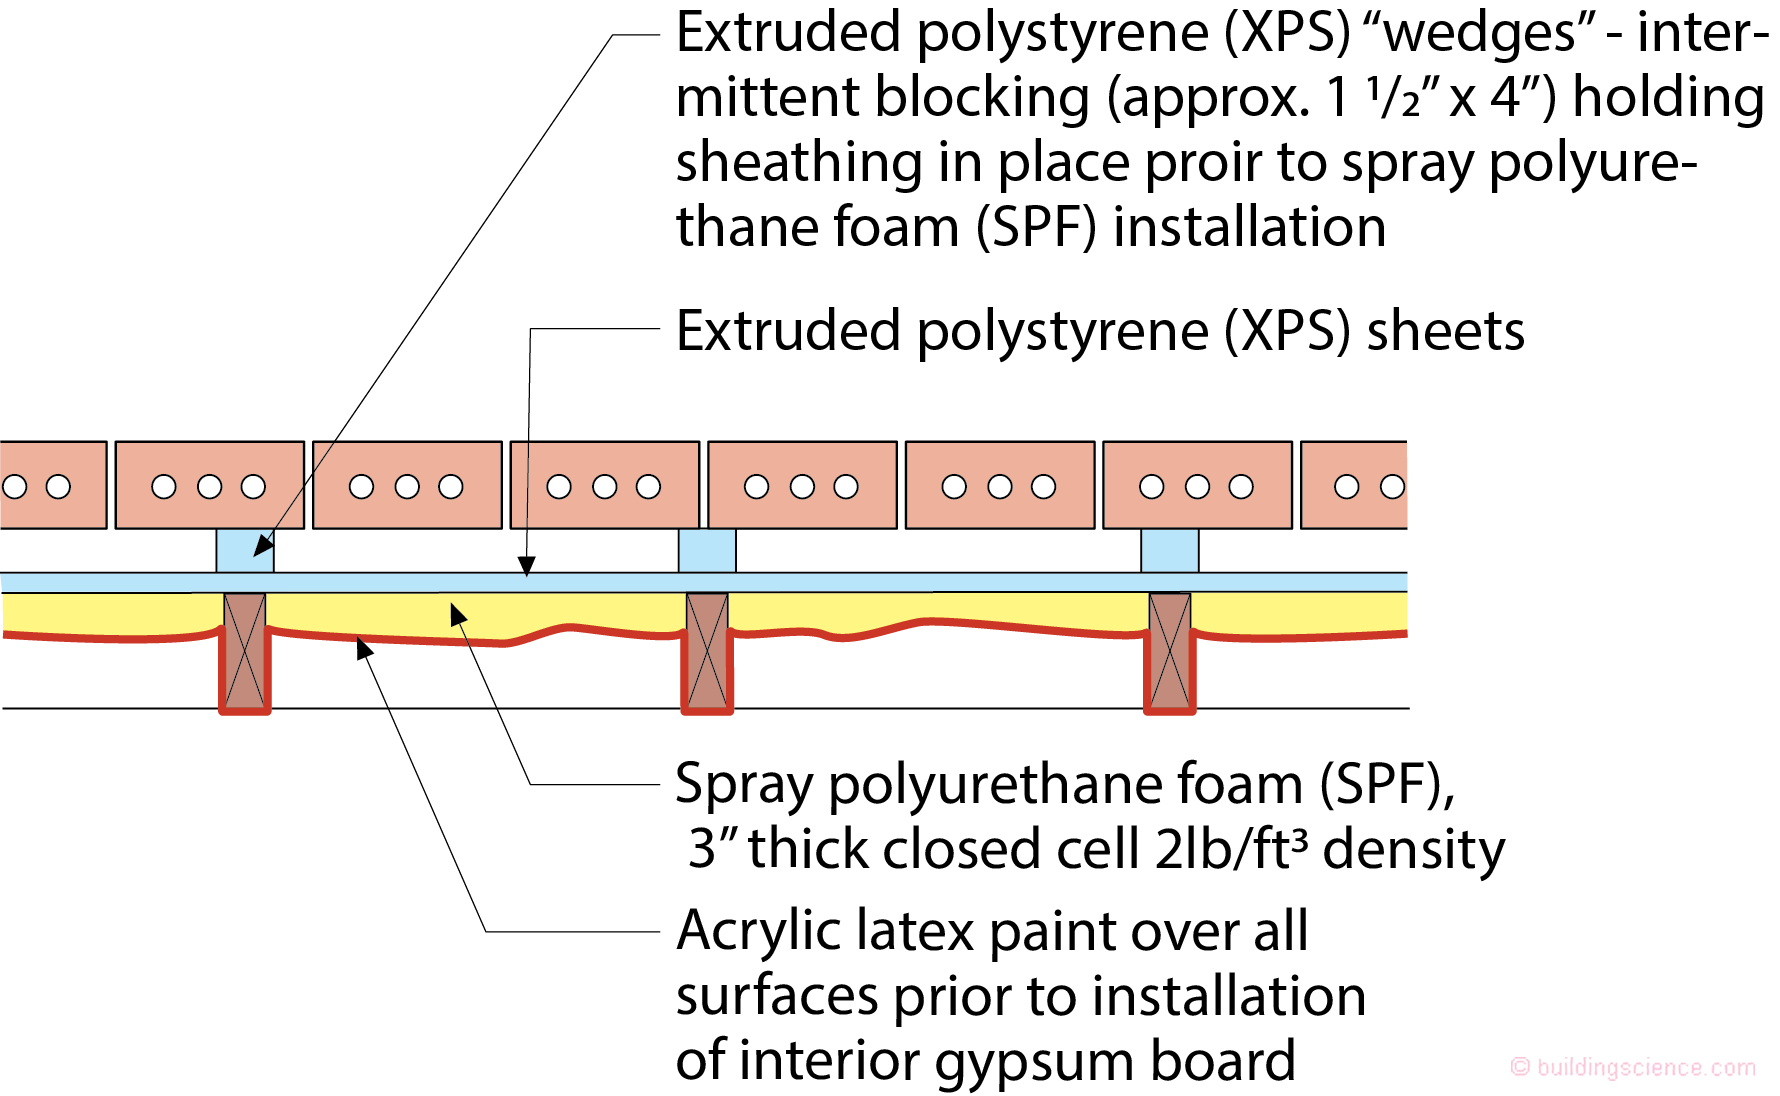
Figure 4: Spray Polyurethane Foam - The “attachment” of the XPS sheathing is accomplished with spray polyurethane foam (SPF) of the closed cell “flavor”. Paint everything with acrylic latex paint…and I mean everything…all surfaces…the studs, the bottom plate, the interior of the SPF, everything…prior to the installation of the interior gypsum board lining. When the next flood comes…and it will come…we throw away the interior gypsum board…as before…but now we just have to wash, rinse and dry the painted surface.
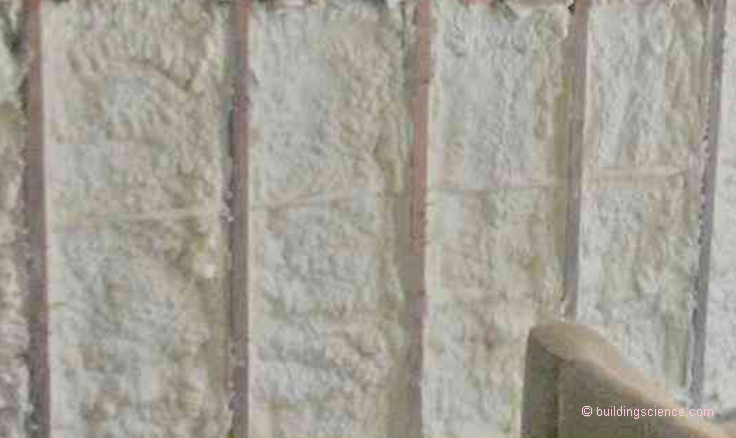
Photograph 6: Spray Polyurethane Foam - The “attachment” of the XPS sheathing is accomplished with spray polyurethane foam (SPF) of the closed cell “flavor”. Only closed cell (2 lb/ft3 density) should be used for two reasons. The first is the closed cell provides “racking” resistance to the wall assembly. Recall that the sheathing no longer can do this as it is gone. The second is that when the next flood happens we want an insulation that does not absorb or hold water. Photograph courtesy of Joseph Pauwels.
Only closed cell (2 lb/ft3 density) should be used for two reasons. The first is the closed cell provides “racking” resistance to the wall assembly. Recall that the sheathing no longer can do this as it is gone. The second is that when the next flood happens we want an insulation that does not absorb or hold water.
Now we do something to make it easy for us the next time we get a flood…paint everything with acrylic latex paint…and I mean everything…all surfaces…the studs, the bottom plate, the interior of the SPF, everything…prior to the installation of the interior gypsum board lining. When the next flood comes…and it will come…we throw away the interior gypsum board…as before…but now we just have to wash, rinse and dry the painted surface. We are “Scotchgarding”[4] the building assembly.
The second approach involves installing a drainage mat with a filter fabric directly against the interior of the brick veneer…with the filter fabric facing inwards (Figure 5, Figure 6 and Photograph 7). This approach eliminates the need for the “wedges”…but it requires the use of a thicker layer of SPF. The SPF needs to “catch” the stud cavity, filling it at least 3 inches thick in order to provide the racking resistance. Once again, we have to coat all of the interior surfaces with acrylic latex paint prior to the installation of the interior gypsum board.
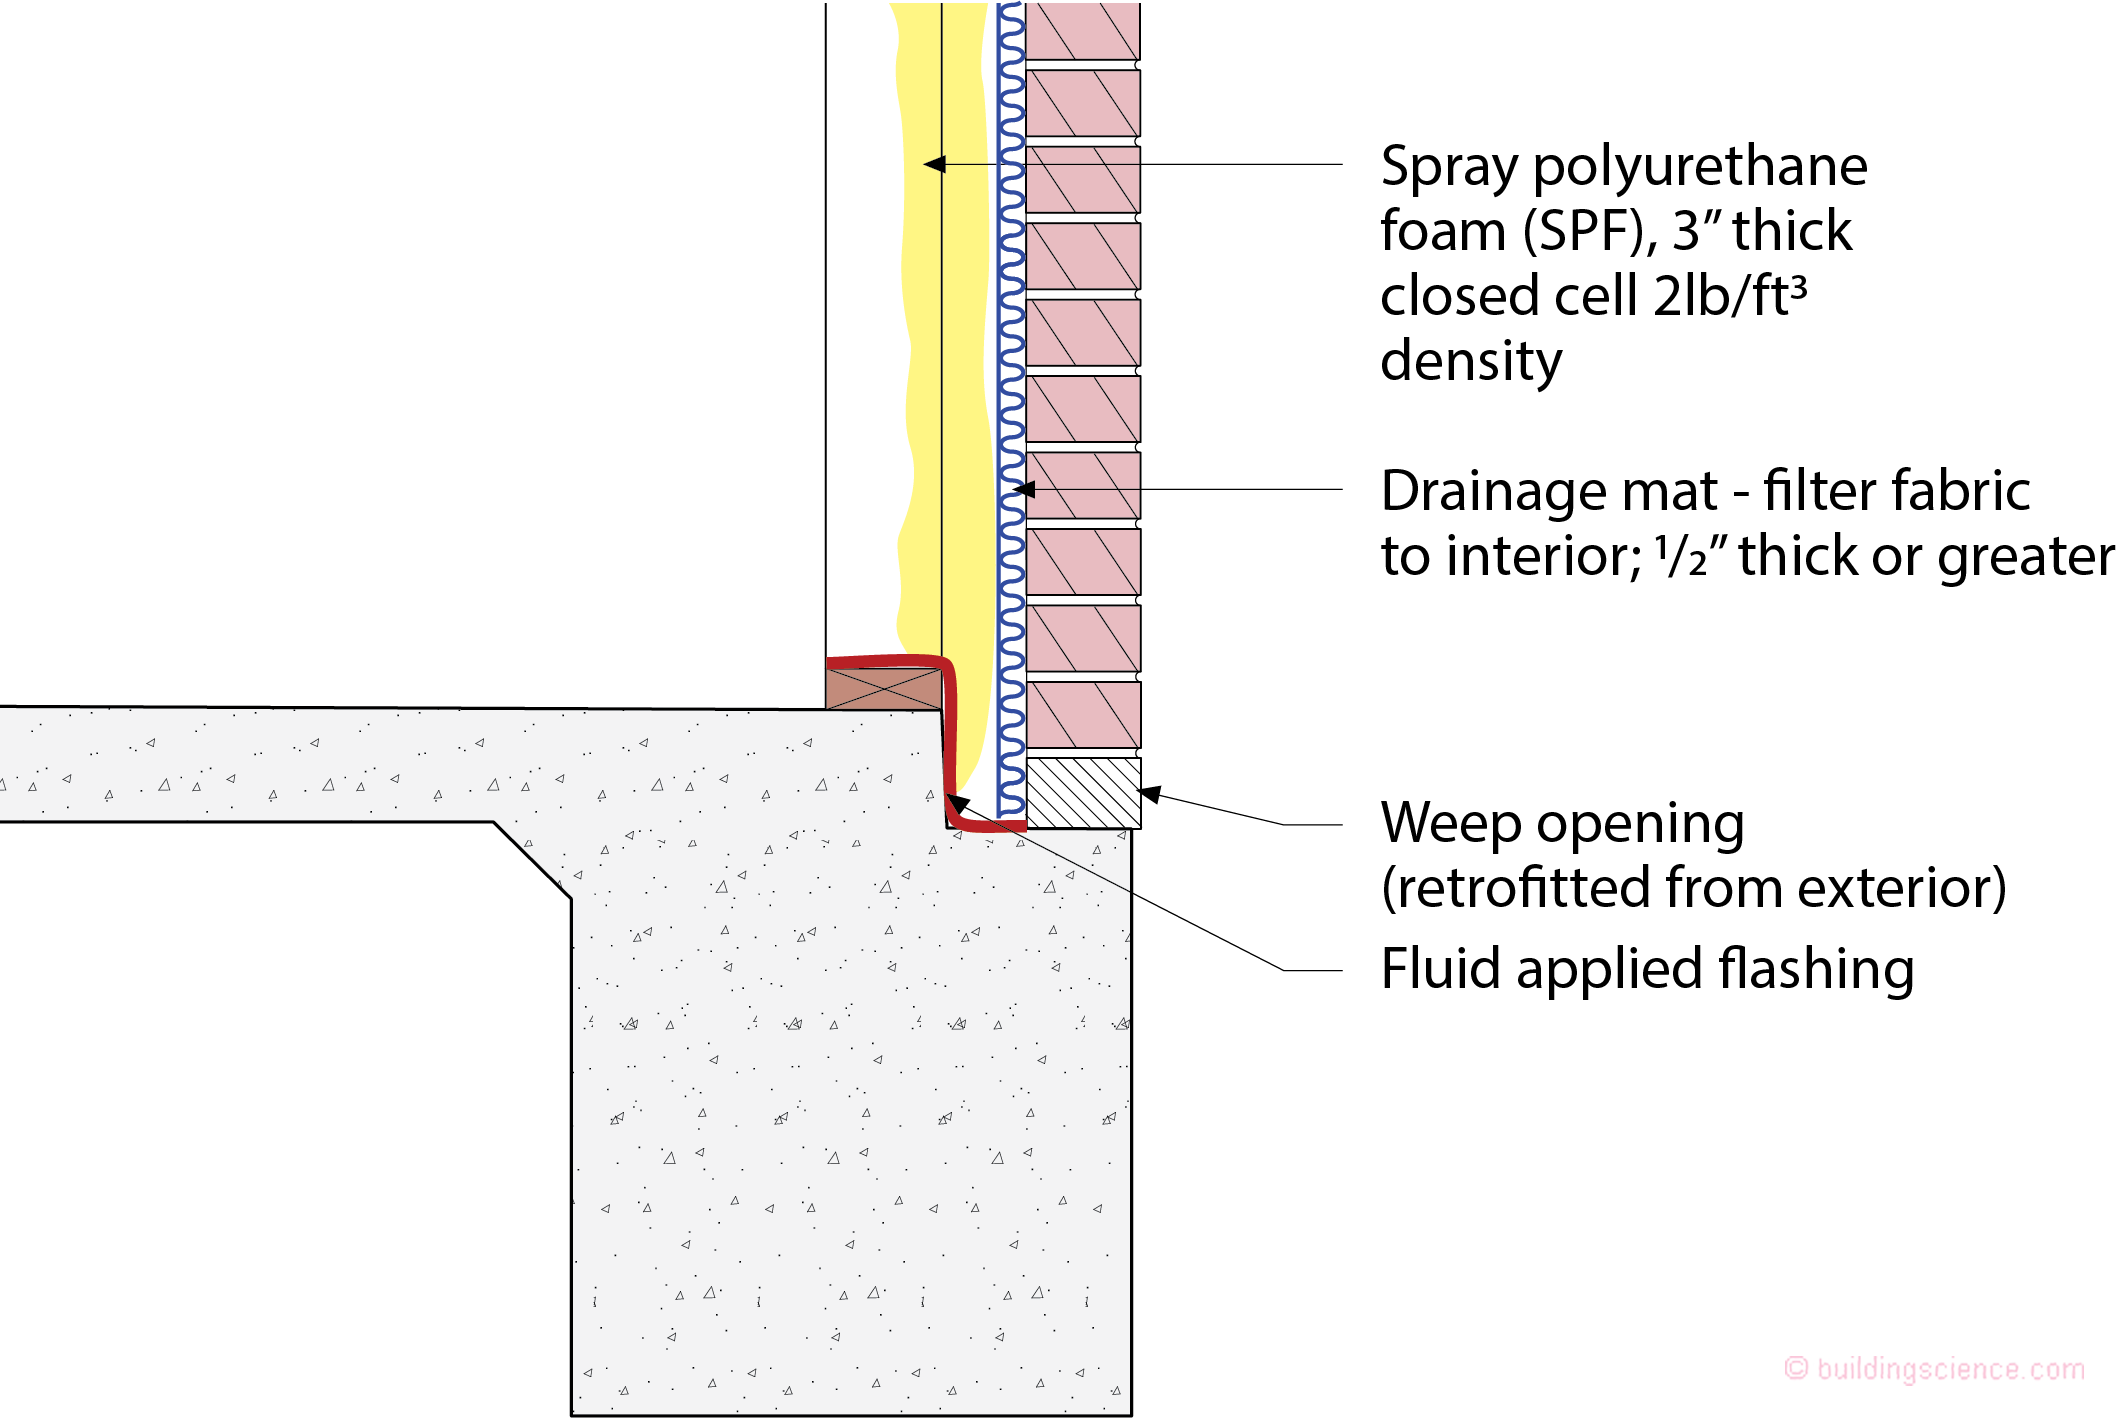
Figure 5: Drainage Mat – A drainage mat with a filter fabric is installed directly against the interior of the brick veneer…with the filter fabric facing inwards. This approach eliminates the need for the “wedges”…but it requires the use of a thicker layer of SPF.
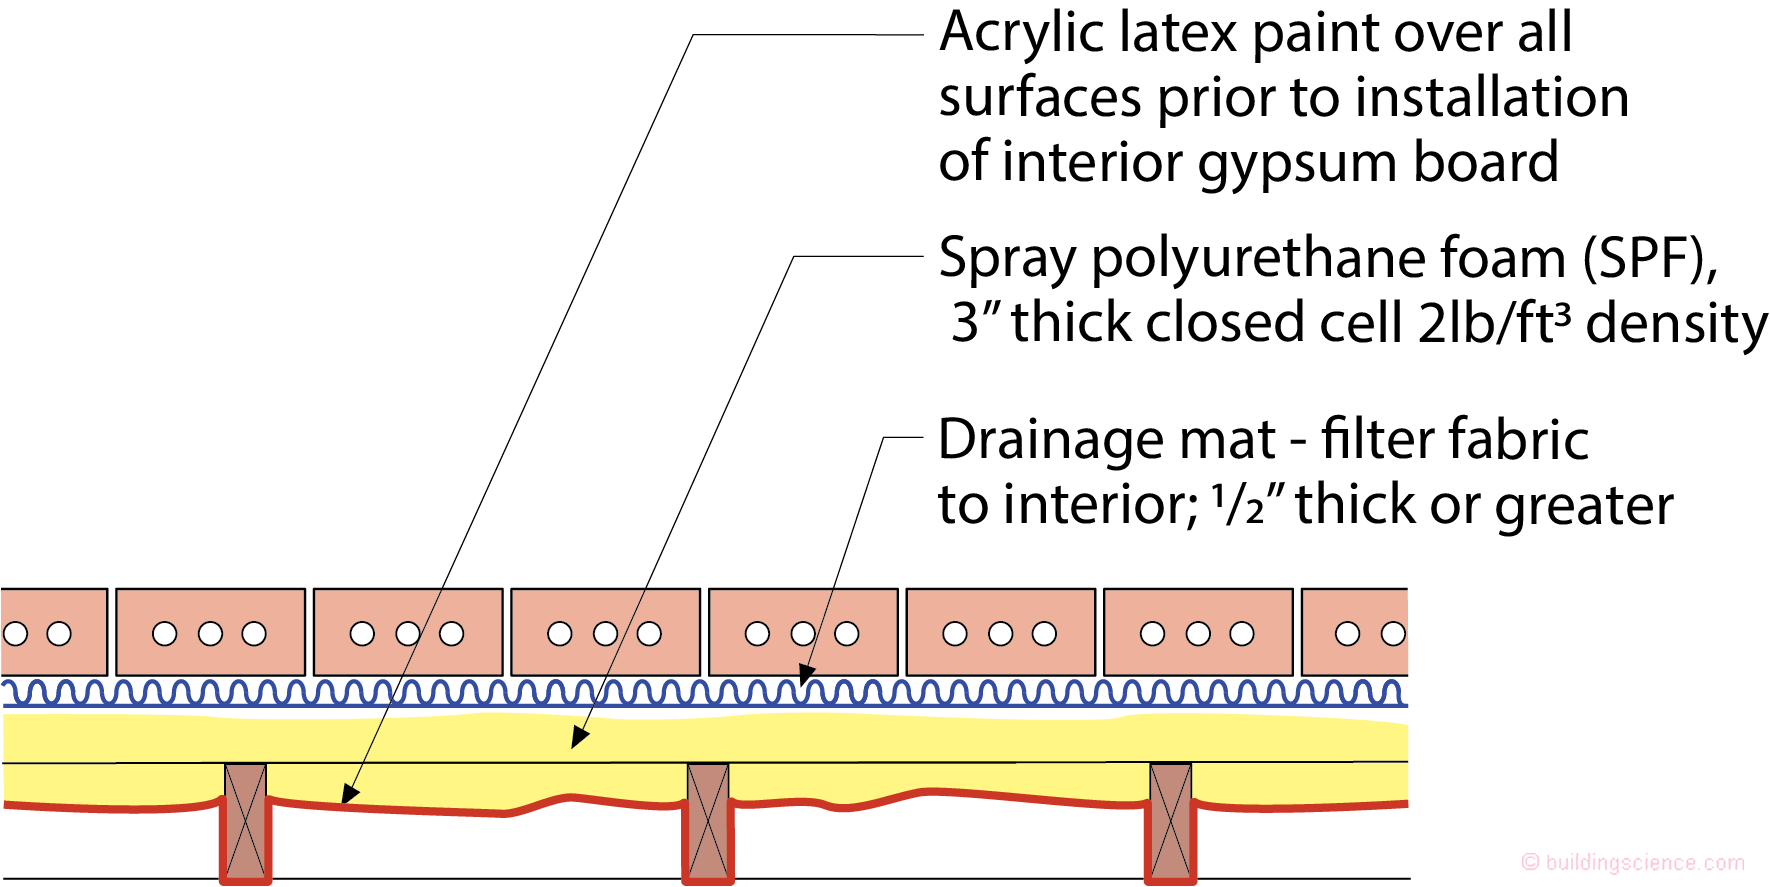
Figure 6: More Spray Polyurethane Foam - The SPF needs to “catch” the stud cavity filling it at least 3 inches thick in order to provide the racking resistance. Once again, we have to coat all of the interior surfaces with acrylic latex paint prior to the installation of the interior gypsum board.
Photograph 7: Drainage Mat – The drainage mat is installed directly against the interior of the brick veneer…with the filter fabric facing inwards. Photograph courtesy of Joseph Pauwels.
What if I can’t run the drainage mat past the studs? Then you don’t. Check out Figure 7. Note the wrapping of the outside of the studs with the fluid applied flashing. The SPF needs to adhere directly to uncoated wood…you need to stop the fluid applied flashing “exterior wrap” to leave enough exposed wood stud for full SPF adhesion. What is nice about this approach is that the brick ties get to stay. Having noted this…. the approach in Figure 5 and Figure 6 is significantly “more robust” from a water control perspective.
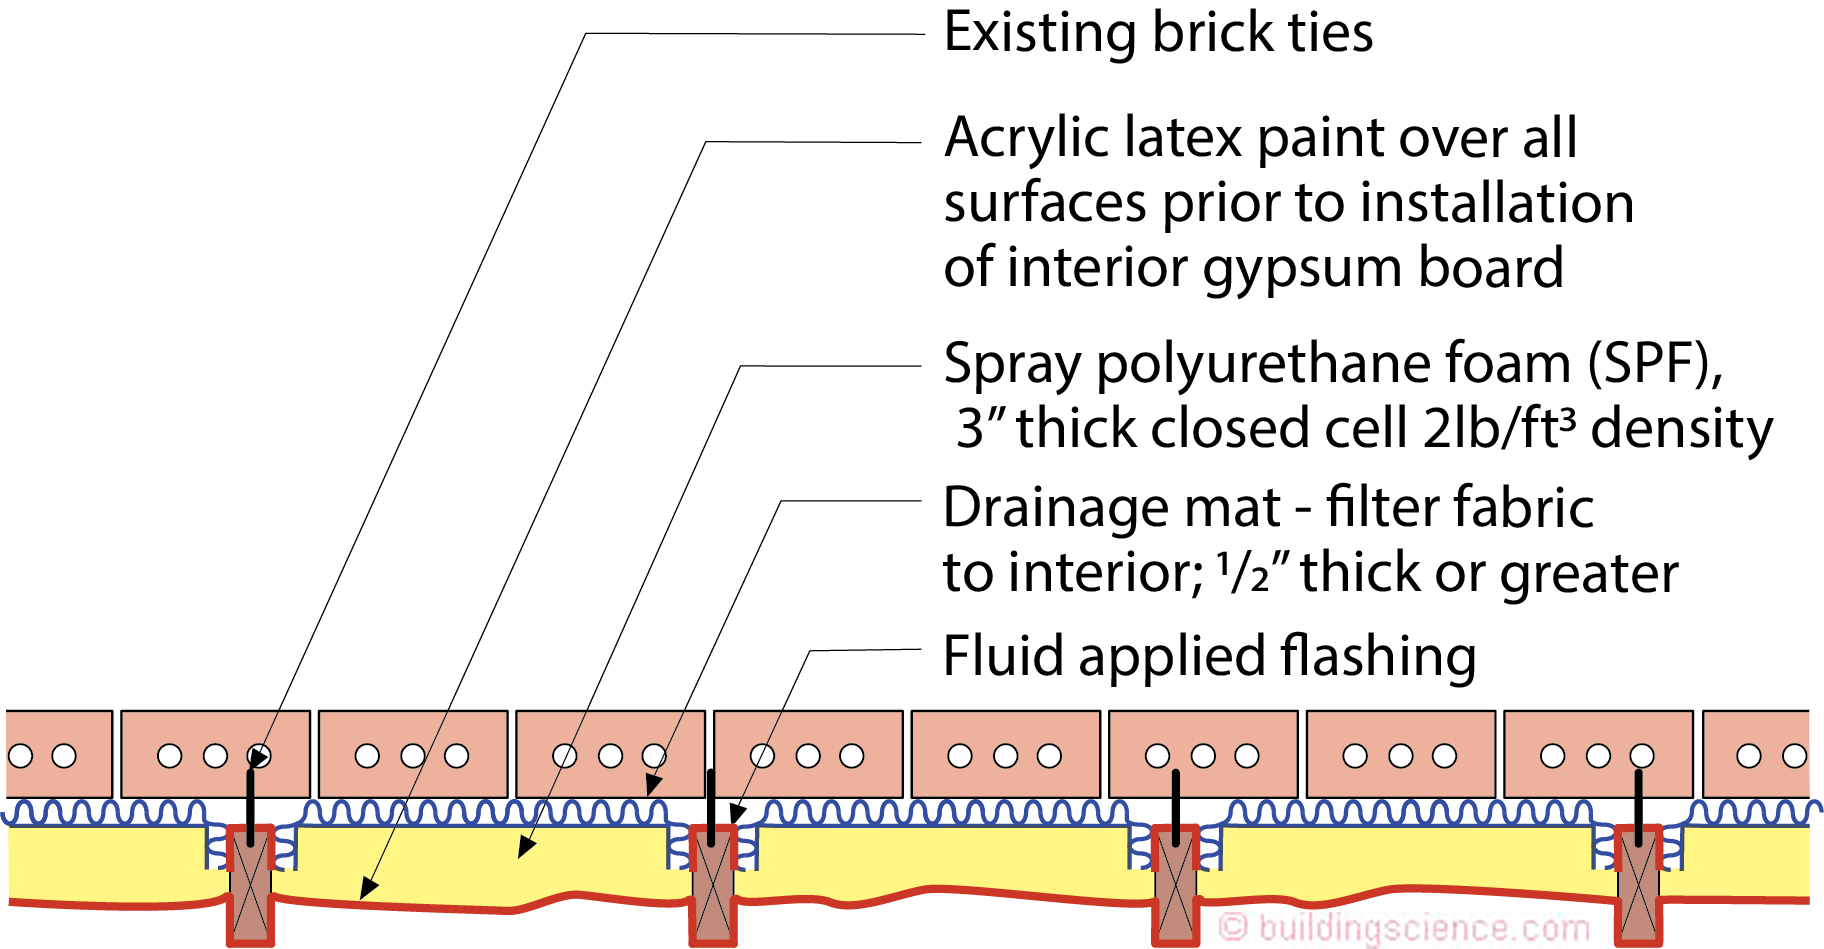
Figure 7: Brick Ties Get To Stay - Note the wrapping of the outside of the studs with the fluid applied flashing. The SPF needs to adhere directly to uncoated wood…you need to stop the fluid applied flashing “exterior wrap” to leave enough exposed wood stud for full SPF adhesion.
What are we missing? Hah! Windows and doors. You need to pull them out and connect the water control of the wall to the window openings and the door openings. Use fluid applied flashing reinforced with mesh tape. In the first approach where XPS is used the window and door flashing needs to seal to the exterior face of the XPS. In the second approach where SPF is used trim the SPF around the perimeter of the rough openings after it has been installed and then apply the fluid applied flashing. Then install new windows and doors. Do it correctly (see BSI-085: Windows Can Be A Pain, April 2015).
All of this is summarized in Figure 8.
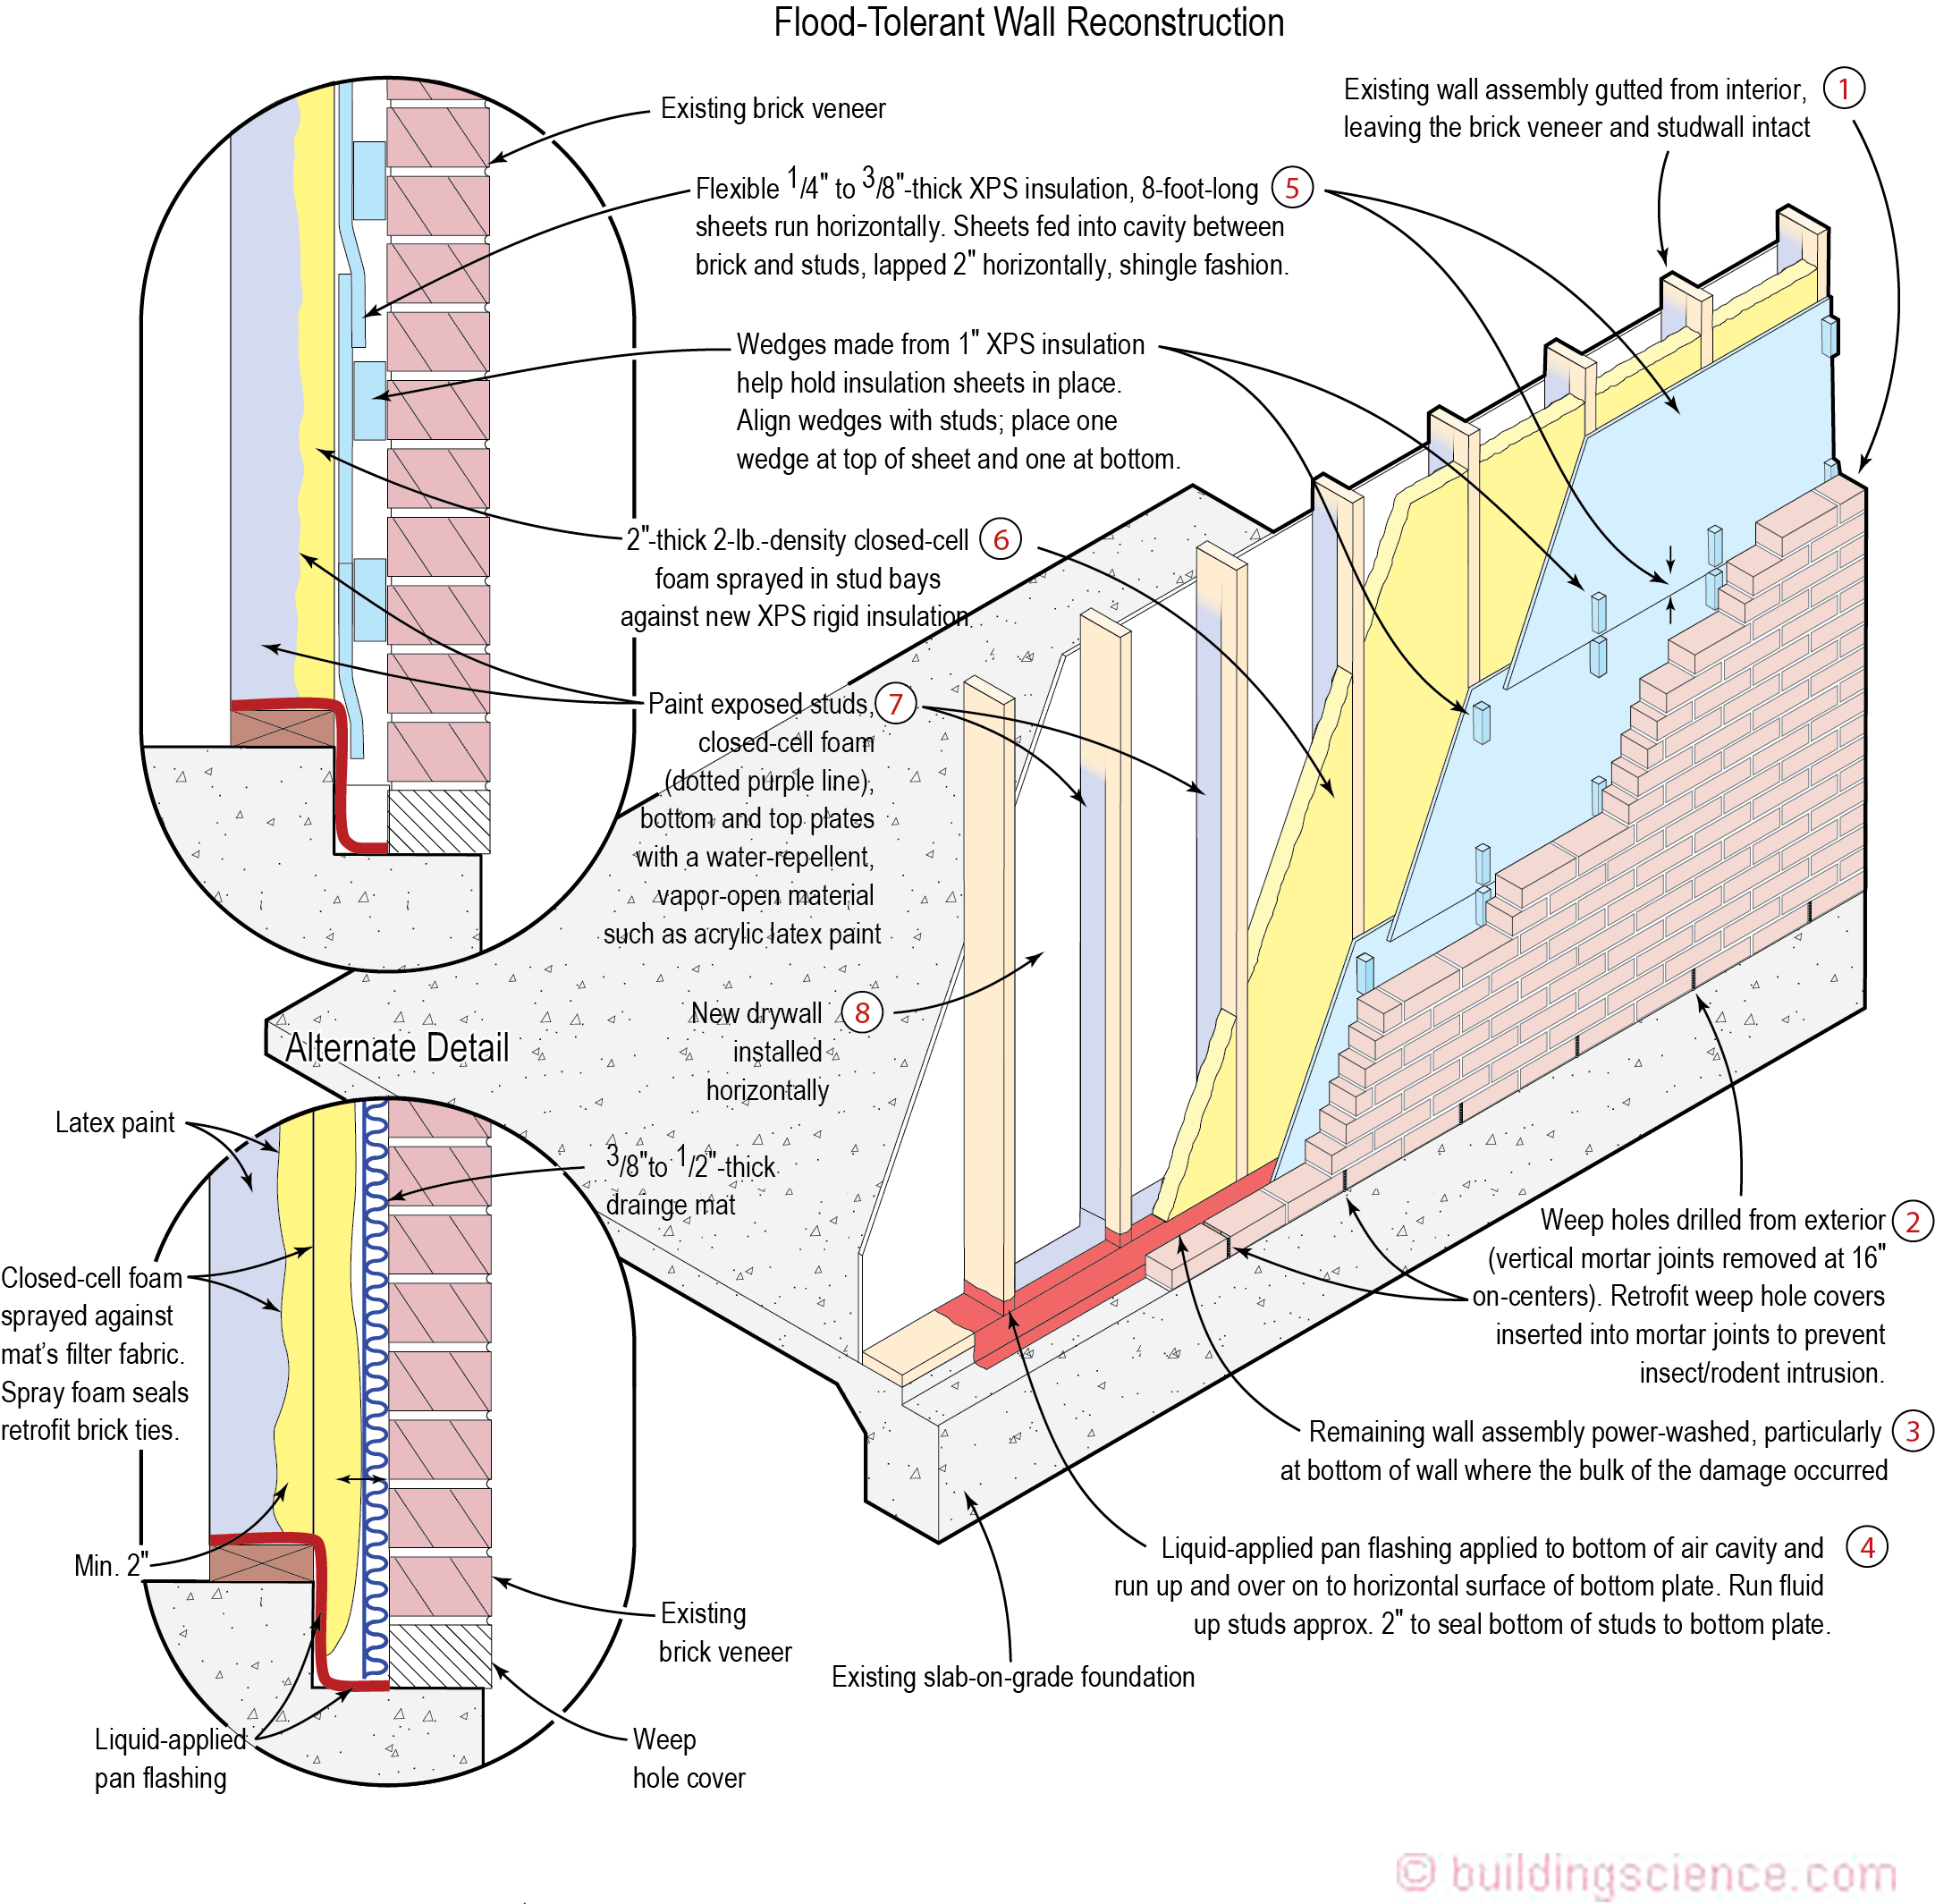
Figure 8: Flood-Tolerant Wall Reconstruction
So what would I do if I had a clean sheet of paper? How would I build from scratch knowing I would get hit with a flood? We have been here before…long time ago (Rebuilding After Katrina, ASHRAE Journal, November 2005). I have learned a few things since then…mostly the “black water” stuff. I updated some of the original figures in the Katrina piece based on what I know now. Here goes with the new stuff….
You need to build up. And you should build the first floor out of concrete block. And then drop a second floor on top of that out of wood frame (Figure 9). Welcome to Florida construction. It would work great in Houston…or anywhere it floods. The only add to Figure 9 in the over 10 years since I first drew it for the Katrina rebuild is the addition of a vapor open coating on the inside face of the concrete block to facilitate the wash, rinse and dry cycle. For sure with “black water” you will have to discard the interior gypsum board. But with just hurricane “rain wetting” the drying thing becomes easy. I know this because buildings built this way had absolutely no issues after Hurricane Irma. Naples, Fl was hit with sustained 140 mph winds and the new houses laughed it off. A few tiles blew off. Almost every window leaked. But, things were dried quickly and Naples is back in shape. The trees did not fare well, but the new buildings worked just fine[5].
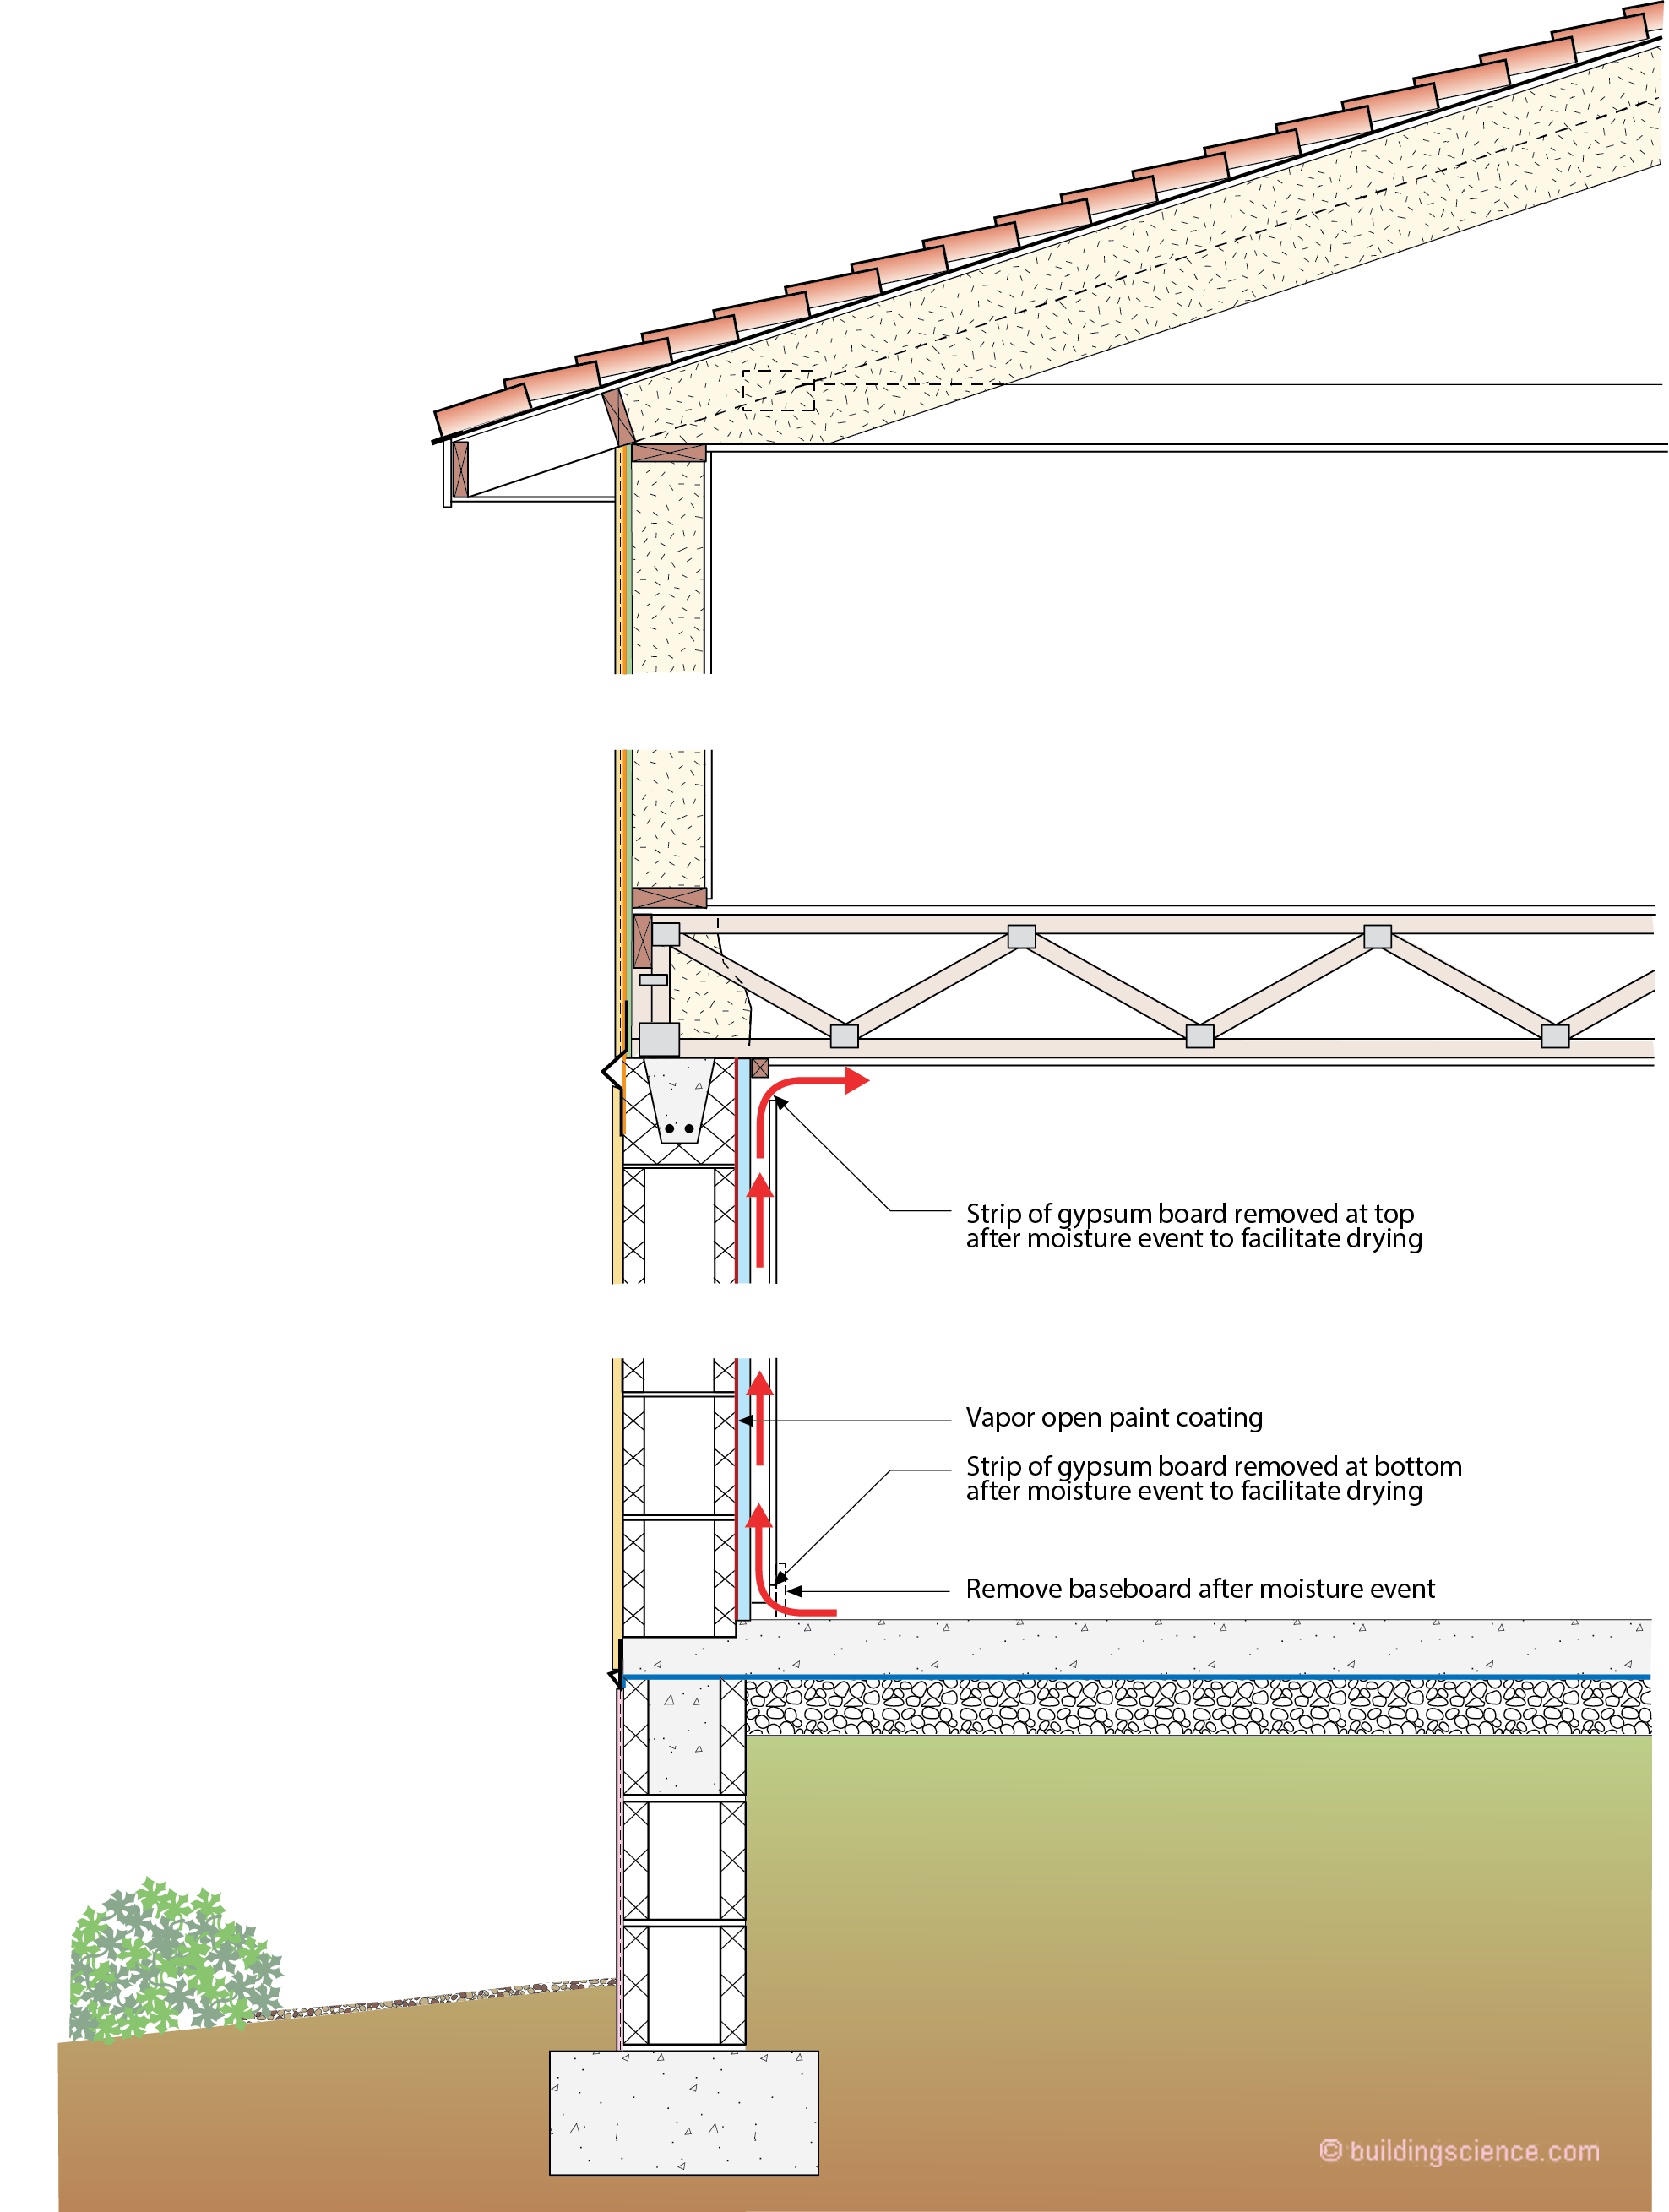
Figure 9: Best Way to Build - You need to build up. And you should build the first floor out of concrete block. And then drop a second floor on top of that out of wood frame. Note the use of a vapor open coating on the inside face of the concrete block to facilitate the wash, rinse and dry cycle. For sure with “black water” you will have to discard the interior gypsum board. But with just hurricane “rain wetting” the drying thing becomes easy.
OK, yeah, I know, you are not going to build up…. An old engineer can dream can’t he? And you are not going to build out of concrete block. OK. Figure 10 is the best we can do. No wood sheathing. Only XPS sheathing. All the racking resistance comes from closed cell SPF. Everything is painted on the interior prior to installation of the interior gypsum board. There is horizontal trim half way up the wall on the interior….if you get lucky you will only have to trash half the wall because the water does not rise up too high. Note the crown molding gap and the baseboard gap to facilitate drying. Sure you don’t want to build up higher?
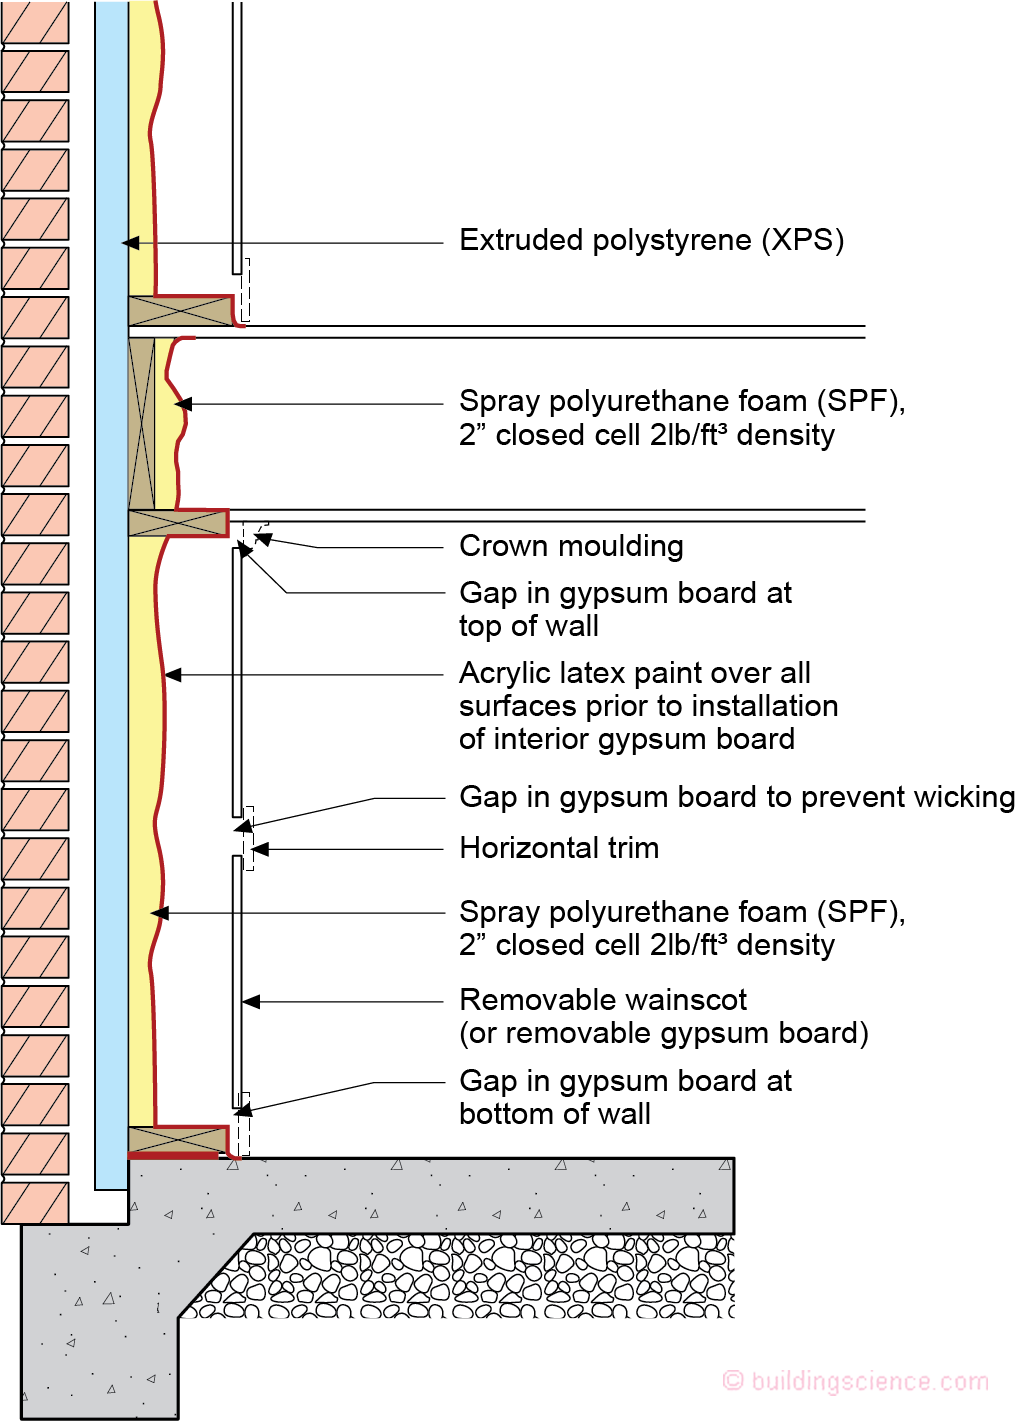
Figure 10: Wood Frame Slab on Grade - No wood sheathing. Only XPS sheathing. All the racking resistance comes from closed cell SPF. Everything is painted on the interior prior to installation of the interior gypsum board. There is horizontal trim half way up the wall on the interior….if you get lucky you will only have to trash half the wall because the water does not rise up too high. Note the crown molding gap and the baseboard gap to facilitate drying. Sure you don’t want to build up higher?
How about meeting me half way (Figure 11)? Elevate the slab and stick with the wood frame. But no wood based sheathing. Closed cell SPF. Coat everything with a “Scotchguard” approach and be ready to wash, rinse and dry the next time bad stuff happens.
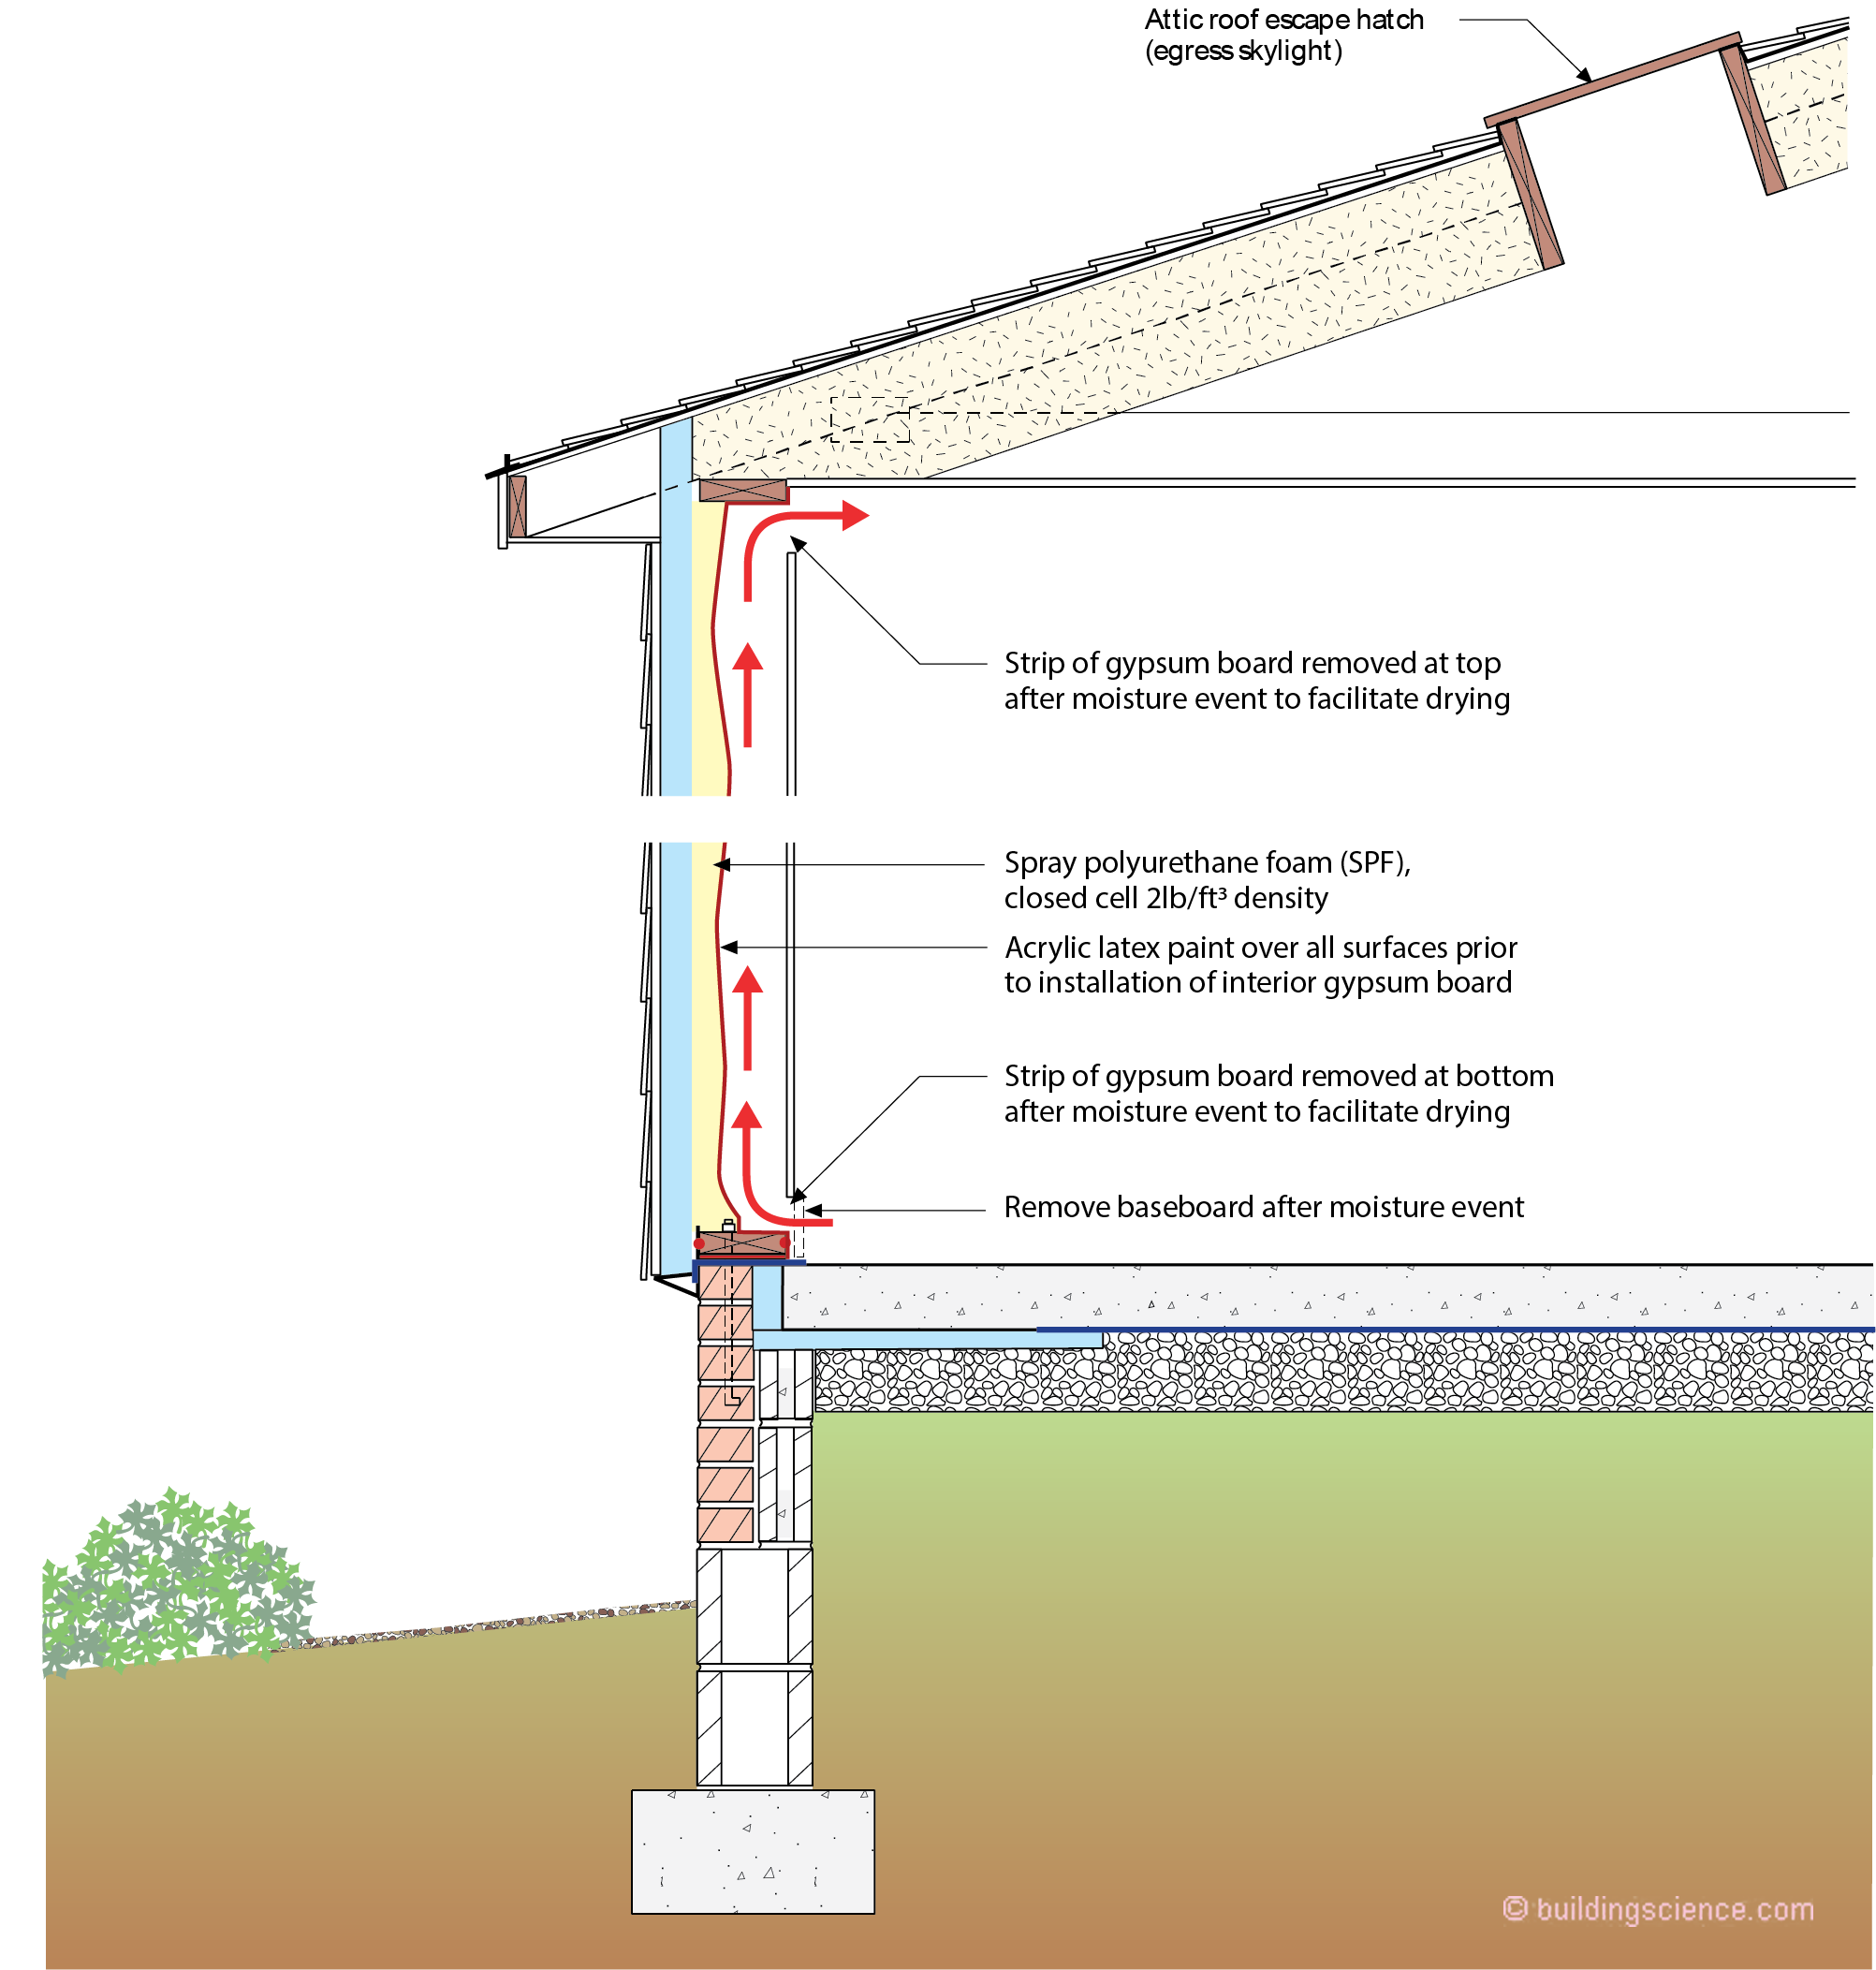
Figure 11: Elevated Slab With Wood Frame - Elevate the slab and stick with the wood frame. But no wood based sheathing. Closed cell SPF. Coat everything with a “Scotchguard” approach and be ready to wash, rinse and dry the next time bad stuff happens.
[1] Black Water is a song recorded by the Doobie Brothers in 1974. It was written by Patrick Simmons who was also the lead vocalist. It hit number 1 in 1975…a big year for me as an undergraduate engineer hanging with the Lady Godiva Memorial Band.
[2] There are countless professional drying companies that do this. I like folks from the Restoration Industry Association (IRA)…I have worked with them for years.
[3] There are recognized cleaning standards. The EPA is the place to start. My friend and colleague Terry Brennan wrote a nice guidance piece many years ago (https://www.epa.gov/sites/production/files/2014-08/documents/flood-related_cleaning_report.pdf). Then go to the S500 Standard and Reference Guide for Professional Water Damage Restoration, Institute of Inspection Cleaning and Restoration (IICRC).
When you are doing all of this you also have to get rid of the brick ties. Why will become obvious a little later. Relax about the structural issue. The old corrugated ties we use residentially never did anything anyway except catch mortar droppings and rust out. A single story brick veneer never needed ties in the first place. The mortar droppings did most of the work. Talk to an old structural engineer and enjoy the story.
[4] Scotchgard is a 3M product that acts as a stain repellent and water repellant. It is ubiquitous…everyone knows what you mean when you say “Scotchgard”. It has been around since before I was born. Two chemists, Patsy Sherman and Samuel Smith, according to legend, discovered it accidentally in 1952 while working on new types of jet aircraft fuel lines. Hat tip to 3M and to chemists Sherman and Smith.
[5] I walked those houses with a silly ass grin all over my face. Stuff works. The key was to get temporary power to run a dehumidifier up and running in a day or two. Don’t need to get the a/c running. Too much power is needed. Wait for the utility company to get its act together. Go with the dehumidifiers. Keep the RH below 80 percent and you are golden. Let the temperature float. Temperature don’t matter. Relative humidity matters. Keep the windows closed and run the dehumidifier. Have a fan or two to mix the air. Throw out the wet carpet. Have a Mojito and relax. Probably a warm Mojito. Running the dehumidifier is more important than running the refrigerator.