Stucco over concrete masonry units (“CMU’s)1 aka “block walls” is a Florida thing….that sometimes migrates north. We know a lot about how they work…but sometimes we forget… And then subtle things are no longer subtle…especially when we change materials. Why do we change materials? Ah, we sometimes run out of the stuff we have always used…or we don’t like some of the stuff we have always used for reasons that might make sense or for reasons that might need therapy…or we want to kick up the performance a notch or two or three.
I am not going to limit myself to Florida. I am going to focus on “interior” insulation options for stucco over concrete masonry units (CMU’s) constructed in International Energy Conservation Code (IECC) Climate Zones 1A, 2A and 3A. Note the “A” means “Moist’. “B” means “Dry” – you can pretty much do anything you want in places where it is “dry”. In Climate Zones 4 and higher you need a different approach. We were here before (BSI-105: Avoiding Mass Failures, June 2018). In places that have something called “winter” you do not have inward vapor drive all the time – you also have outward vapor drive. I am also going to focus on stucco not metal claddings since they can’t store moisture and are typically “drained”. I am going to avoid “non-reservoir” claddings that are drained because they are pretty easy to deal with – you don’t have to do much with “non-reservoir” drained claddings.
And once again, for the record, I like all insulations…the more the better. However, they do not all work the same way on the interior of a stucco clad CMU “block wall”. They can all be made to work…but they do not all work the same way. I think I mentioned that.
The subtle thing that is no longer subtle when we change insulations is vapor flow…water vapor flow. Let’s take a simple straightforward block wall an install traditional stucco over the top of it. We have been doing this forever. We also paint the stucco. We also insulate the inside2. What I am now going to share with you will be a surprise to some…and not a surprise to many.
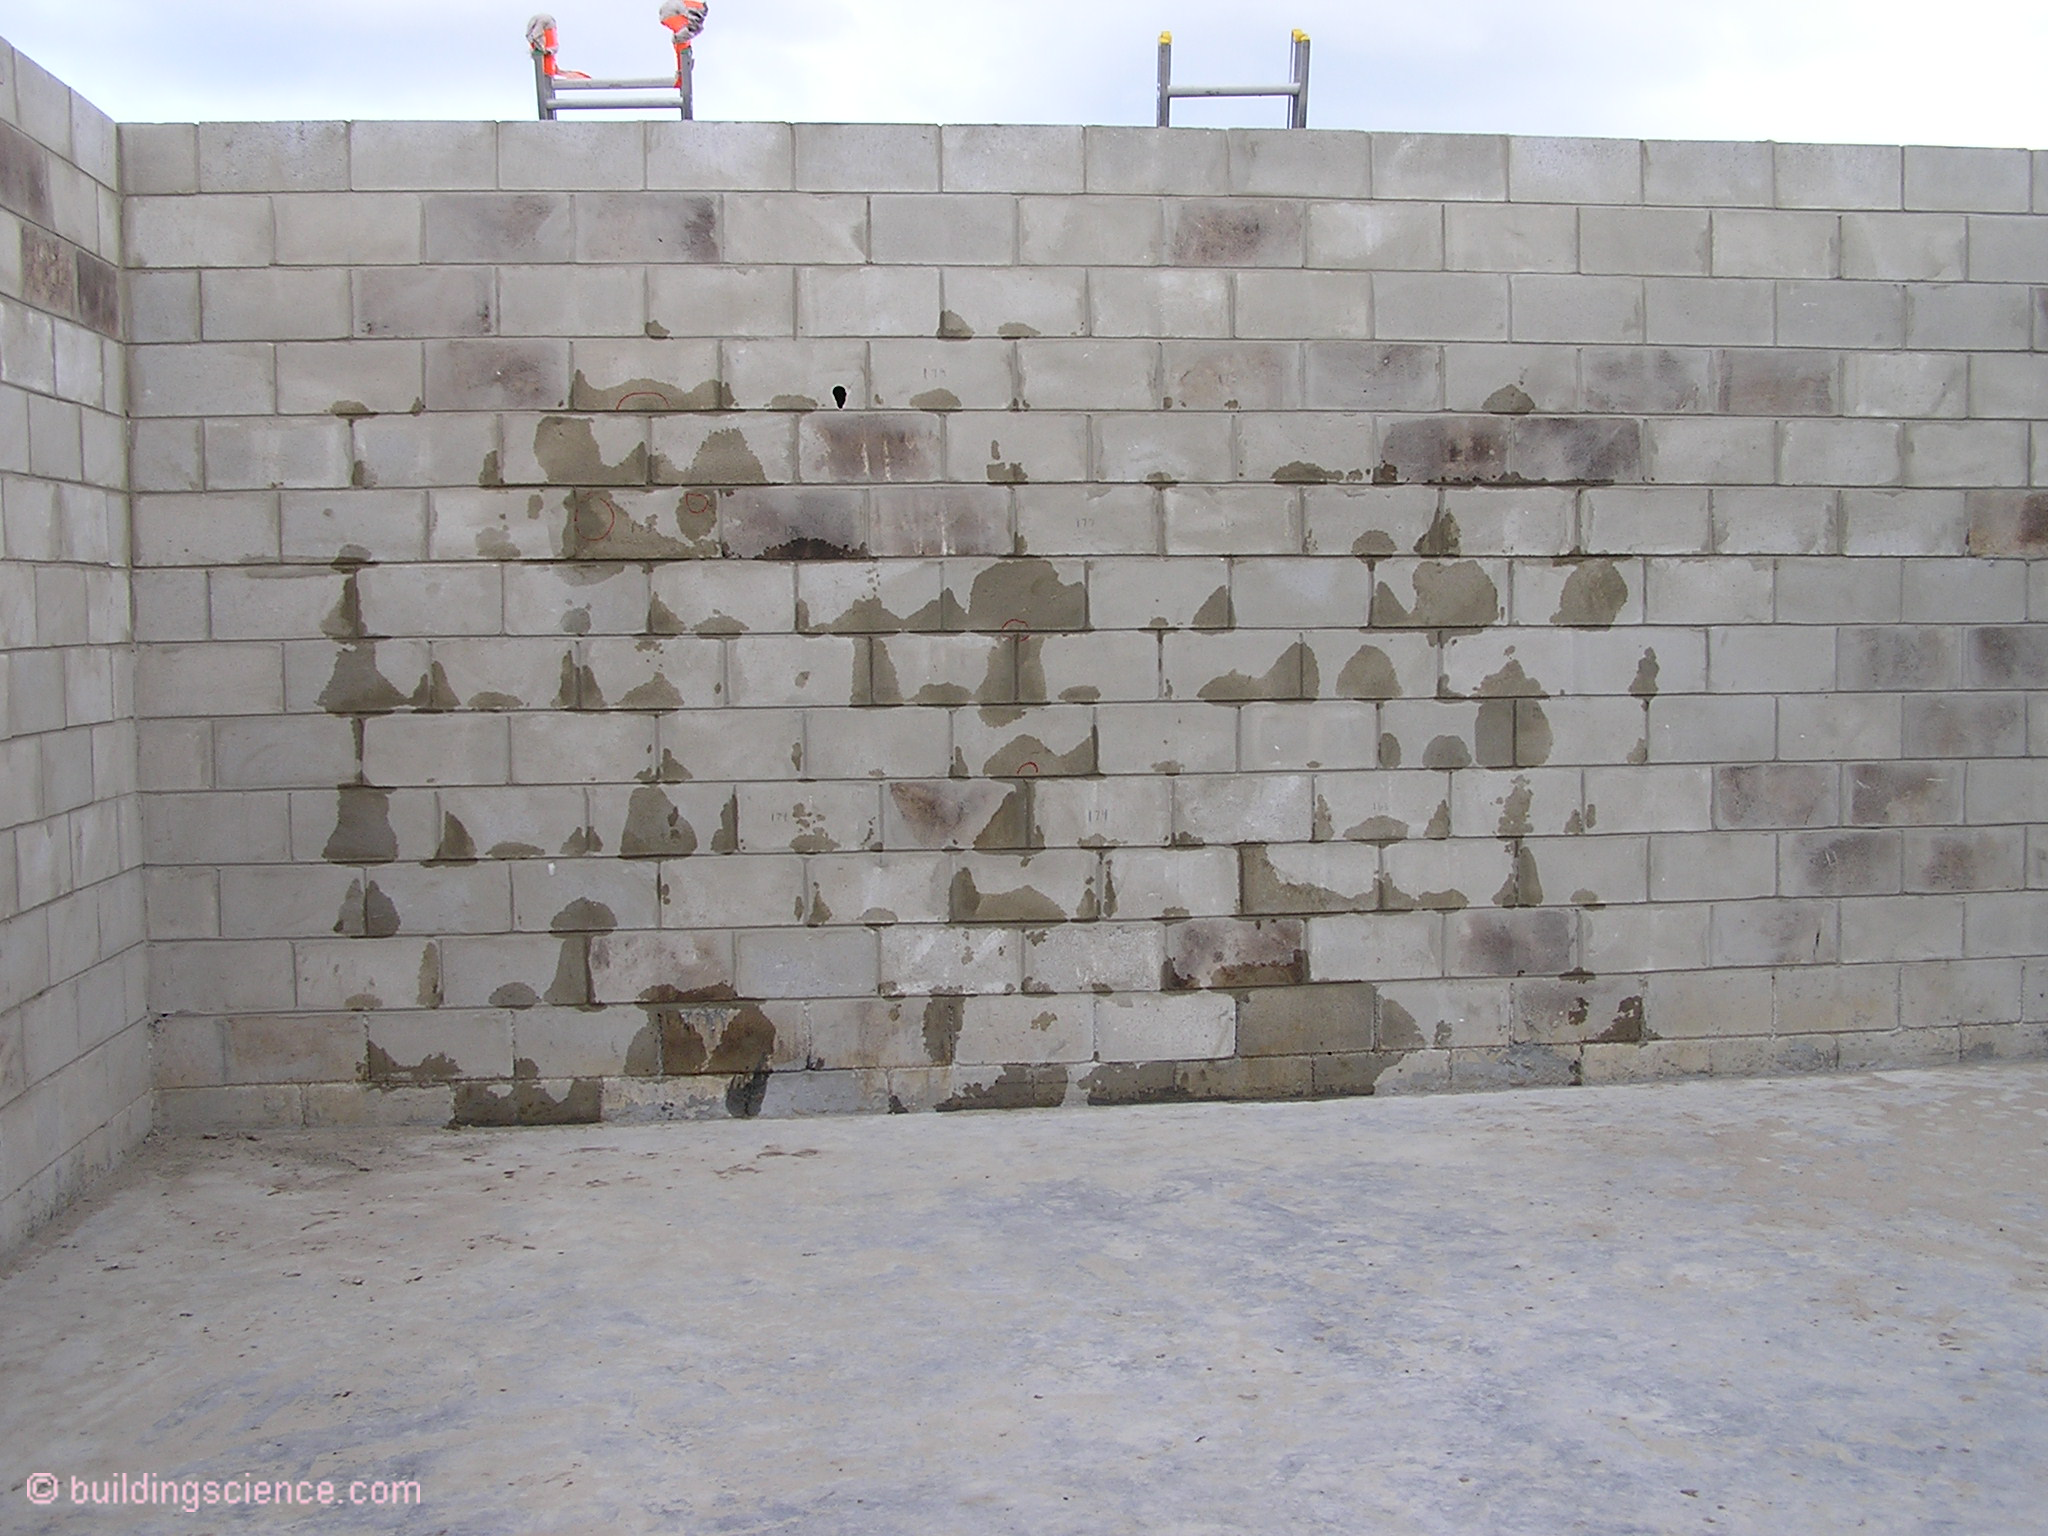
Stucco renderings on block walls leak. Yup. When it rains on a stuccoed block wall it leaks. Always has. I had a lot of fun with this 20 years ago in Orlando. I talked a big time production home builder into letting me play with some of his houses before he sold them and normal people moved in. Actually, it was as a result of the three hurricanes that hit Orlando in six weeks in 2004 (Charley, Frances and Jeanne). Wow. The deal was I could play with a row of detached garages that were stucco over block construction (Photograph 1). I added a bunch of water with a spray rack (Photograph 2). No air pressure difference was induced, just gravity, surface tension, capillarity and time. Knocked a bunch of holes on the inside of the block walls and looked (Photograph 3). Think “endoscopy” for walls…building science proctology.
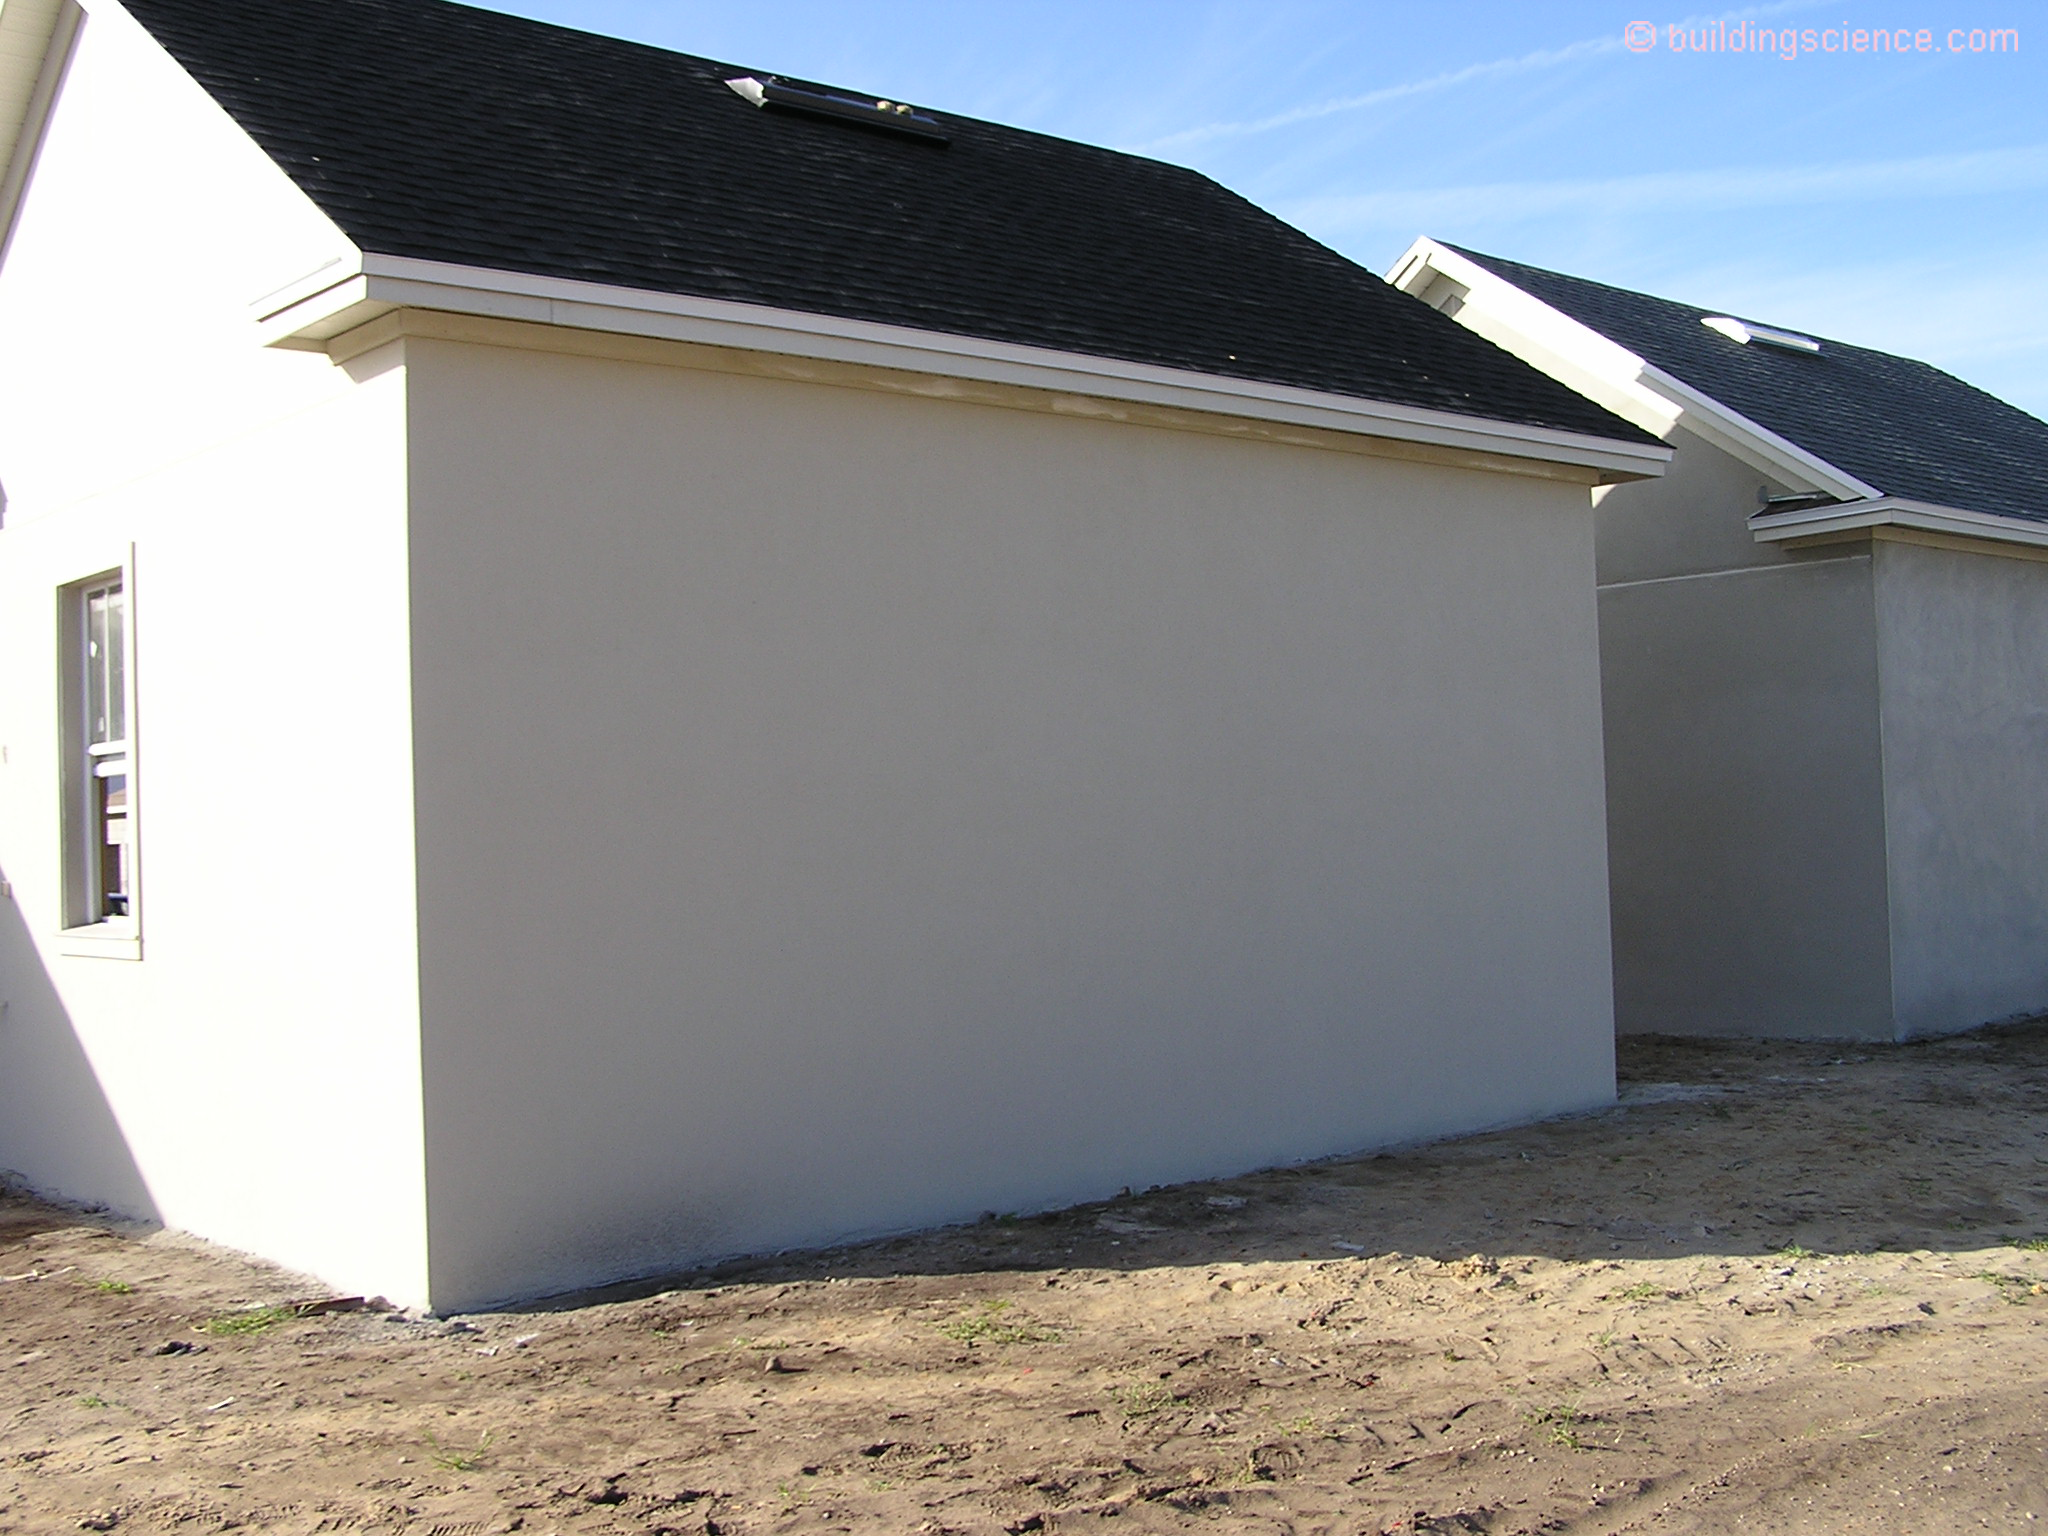
Photograph 1: Detached Garages - Playing with a row of detached garages with stucco over block construction.
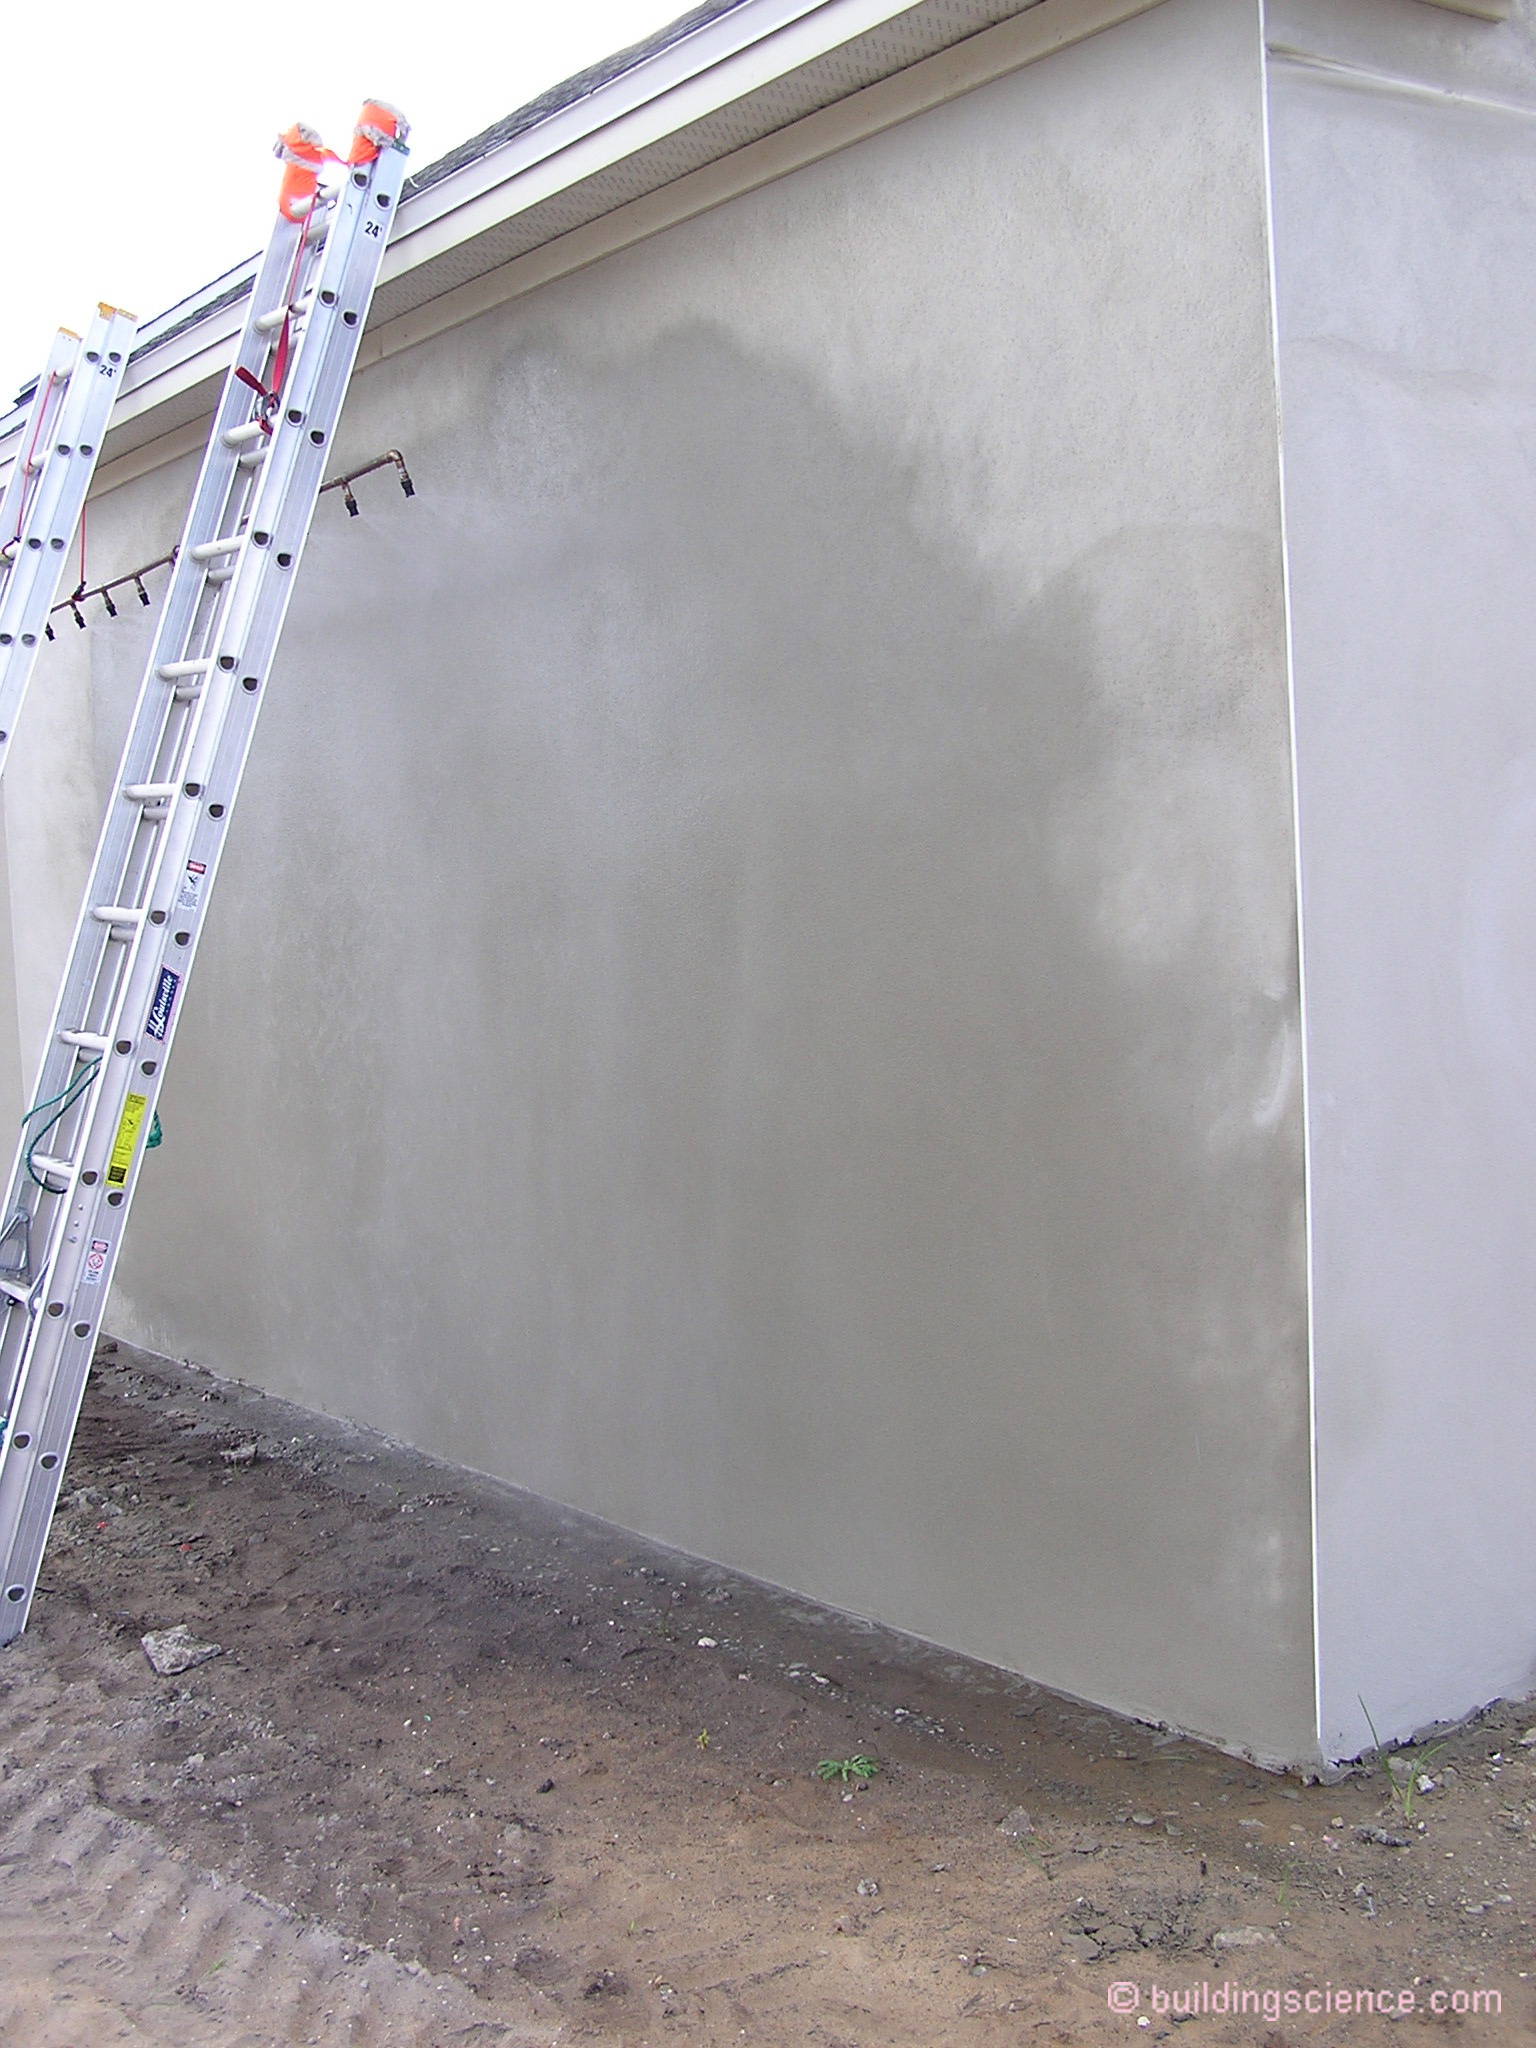
Photograph 2: Spray Rack – Adding water to the stucco surfaces at the ASTM E1105 5 gph/ft2 rate. No induced air pressure, just gravity, surface tension and capillarity.
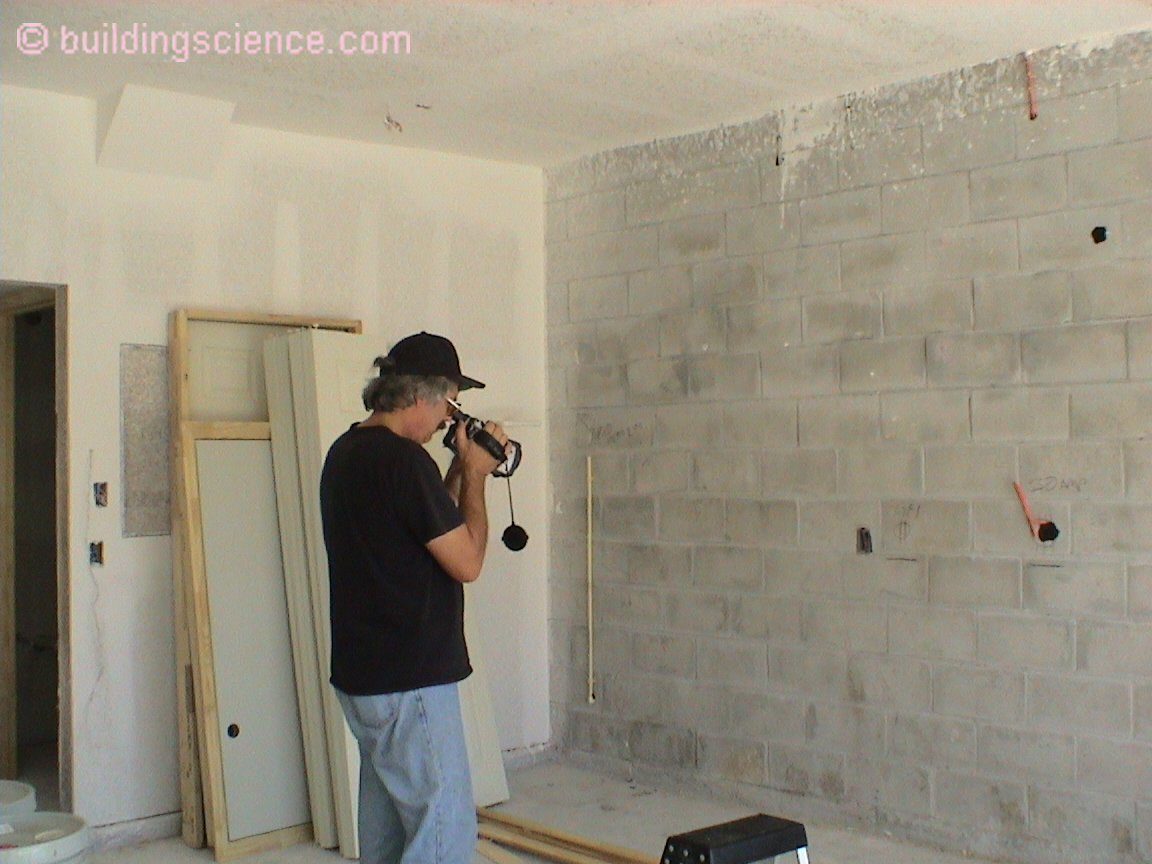
Photograph 3: Endoscopy for Walls - Knocked a bunch of holes on the inside of the block walls and looked inside.
The suckers leaked after a couple of minutes – right into the block cavities (Photograph 4). Not a couple of hours. A couple of minutes. Ten to fifteen minutes. Yes, even I was surprised. The old wizards I asked about this afterword were not surprised – they laughed and said welcome to the old folks club. Being who I am – I wanted to push things to serious failure. I kept adding water. Took a little over an hour (Photograph 5).
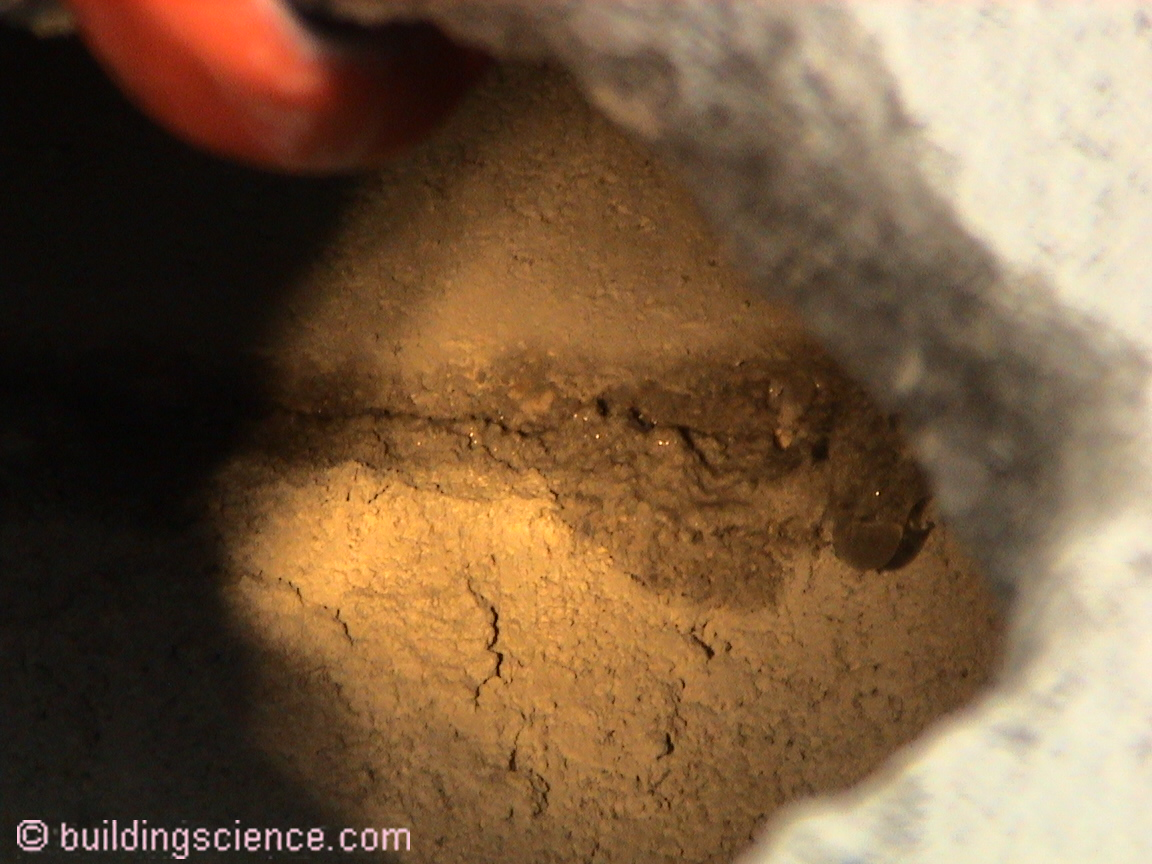
Photograph 4: Water Leakage - The suckers leaked after a couple of minutes – right into the block cavities. Not a couple of hours. A couple of minutes. Ten to fifteen minutes.
Photograph 5: Pushing Things - Being who I am – I wanted to push things to serious failure. I kept adding water. Long garden hose. Took a little over an hour. It’s why they call me a “hoser”. Neat pattern.
Everyone, relax a bit. The amount of water added was a lot – the ASTM E1105 5 gph/ft2 rate. To put this into perspective this is 8 inches of rainwater per hour…on a vertical surface. The greatest amount of rainfall recorded on a horizontal surface in the United States over a 1 hour period is 12 inches – Holt, Missouri in 1947. If this amount of water – the ASTM E1105 water rate – 8 inches per hour - was ever to fall on a vertical surface in the real world like a stucco wall I would expect there would be a 600 year old man walking animals 2 by 2 to a big wooden boat.
So what was the point of the water test if a non-typical amount of water is put on the wall? Note that there was no air pressure difference. Wind changes things. They do have “big wind events” in Florida and the “gulf coast” and up to the Carolina’s coast line when it is raining. Understanding that there are pathways was the key point. It was always about figuring out the pathways. Here is the “takeaway”. Walls get wet. Mass walls with stucco on them get wet. Always have. And, I am not going out on a limb when I say they always will. The question is how wet do they get and how do they dry? And can we control it? Here comes the big news. They tend to dry in both directions. And the drying can be managed depending on the material choices.
Check out Figure 1. Rainwater enters the stucco. Rainwater is absorbed by the stucco. Rainwater also gets past the stucco into the block mass wall. Rainwater is absorbed by the block mass wall. Rainwater drains down the block wall cavities.

Figure 1: Water Pathways - Rainwater enters the stucco. Rainwater is absorbed by the stucco. Rainwater also gets past the stucco into the block mass wall. Rainwater is absorbed by the block mass wall. Rainwater drains down the block wall cavities.
Let’s add air conditioning and solar radiation. Florida is known as the “sunshine state”. Also lots of folks think Florida is a “cool place” especially during “spring break”. Vapor flow, excluding air transport, is due to a temperature gradient (“warm to cold”) and due to a concentration gradient (“more to less”). In a rain wetted stucco CMU “block wall” the water in the exterior stucco and exterior side of the block wall is at a higher concentration than the water vapor in the outside air. When the sun is shining on the wall the water in the exterior stucco and exterior side of the block wall is also warmer than the water vapor in the outside air. As such there is outward vapor flow (Figure 2). Not done yet. The interior is air conditioned. Air conditioners are also dehumidifiers. So the water vapor in the interior air is colder than the water in the exterior side of the block wall. The water in the exterior side of the block wall is also at a higher concentration than the water vapor in the inside air. As such there is also inward vapor flow (also Figure 2).
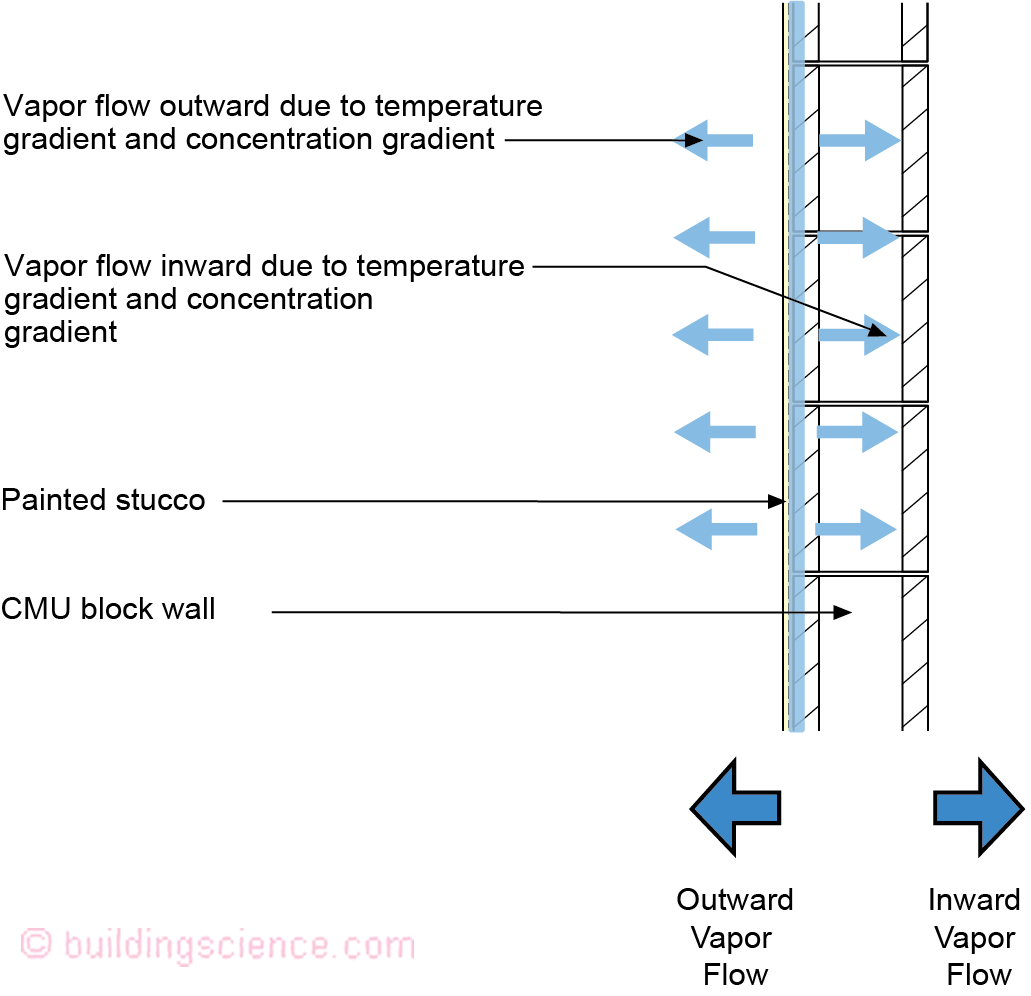
Figure 2: Vapor Flow Excluding Air Transport – Vapor flow outward and inward due to temperature gradients and concentration gradients.
So how do we stay out of trouble? A couple of ways. The first is to reduce the rainwater absorption by painting the stucco (Figure 3). You need to paint stucco – or you need to add “magic” stuff like polymer modification to keep it from absorbing water. But when we paint the stucco or add “magic’ stuff we shouldn’t reduce its ability to dry to the exterior. With respect to paint we want a paint that is “liquid water closed” but “vapor open” – hydrophobic and vapor permeable. The hydrophobic part is easy. The vapor permeable should be easy but is not. Especially when folks try to have the paint also be able to span cracks in the stucco. Guess what? Stucco has cracks. All stucco has cracks. Always has. Always will. Yup, I will get arguments about this. Trust me, be conservative. Assume the stucco will have cracks even as you try to get it to have no cracks.

Figure 3: Staying Out of Trouble - Reduce rainwater absorption by painting the stucco with a paint that is “liquid water closed” but “vapor open” – hydrophobic and vapor permeable - greater than 10 perms “wet cup”. Inward vapor flow can be “throttled” – slowed down, but not stopped – by the permeance of the interior insulation.
Back to the paint thing. When we formulate paint to be able to span cracks the paint typically becomes less vapor permeable. It is very, very difficult to get “crack spanning paint” that is also vapor permeable. It is possible, but not cheap. If the paint on the stucco is too impermeable it bubbles, blisters and peels (Photograph 6). Here comes a “Joe Rule”. The paint on the stucco needs to be greater than 10 perms “wet cup” or it will bubble, blister and peel.

Photograph 6: Impermeable Paint - If the paint on the stucco is too impermeable it bubbles, blisters and peels. The paint on the stucco needs to be greater than 10 perms “wet cup” or it will bubble, blister and peel.
Back to staying out of trouble. The second thing we have to do is control the rate of inward vapor flow so that it does not damage the interior finishes or things like cabinets on the interior of exterior walls3. Inward vapor flow can be “throttled” – slowed down – by the permeance of the interior insulation (also Figure 3). It doesn’t need to be stopped – but it could be if the interior insulation controls condensation at the interface of the interior side of the CMU and the interior insulation. Here comes another “Joe Rule”. If you totally stop the inward vapor flow with a “for real” vapor barrier such as foil faced isocyanurate rigid insulation the thermal resistance of the foil faced rigid insulation should be R-5 or greater. With R-5 or greater you are controlling the temperature of the “condensing surface” by “warming” it up.
It is fairly common to use extruded polystyrene (XPS) rigid insulation on the interior of stucco clad CMU “block walls” (Figure 4 and Photograph 7). The inward vapor flow rate through the rigid insulation out of the CMU block wall needs to be “slower” than the vapor flow rate through the interior lining – painted gypsum board. Painted gypsum board is typically greater than 10 perms “wet cup”. The extruded polystyrene is about 1 perm “wet cup” when it is 1 inch thick (approximately R-5 for those folks that are interested). How about using expanded polystyrene (EPS)? That works. And how about closed cell spray polyurethane foam (ccSPF)? Yup. What do we have to be careful about? No interior vinyl wall coverings. None. Ever. Don’t go there. Can I use fabric wall coverings? Yeah, ok….
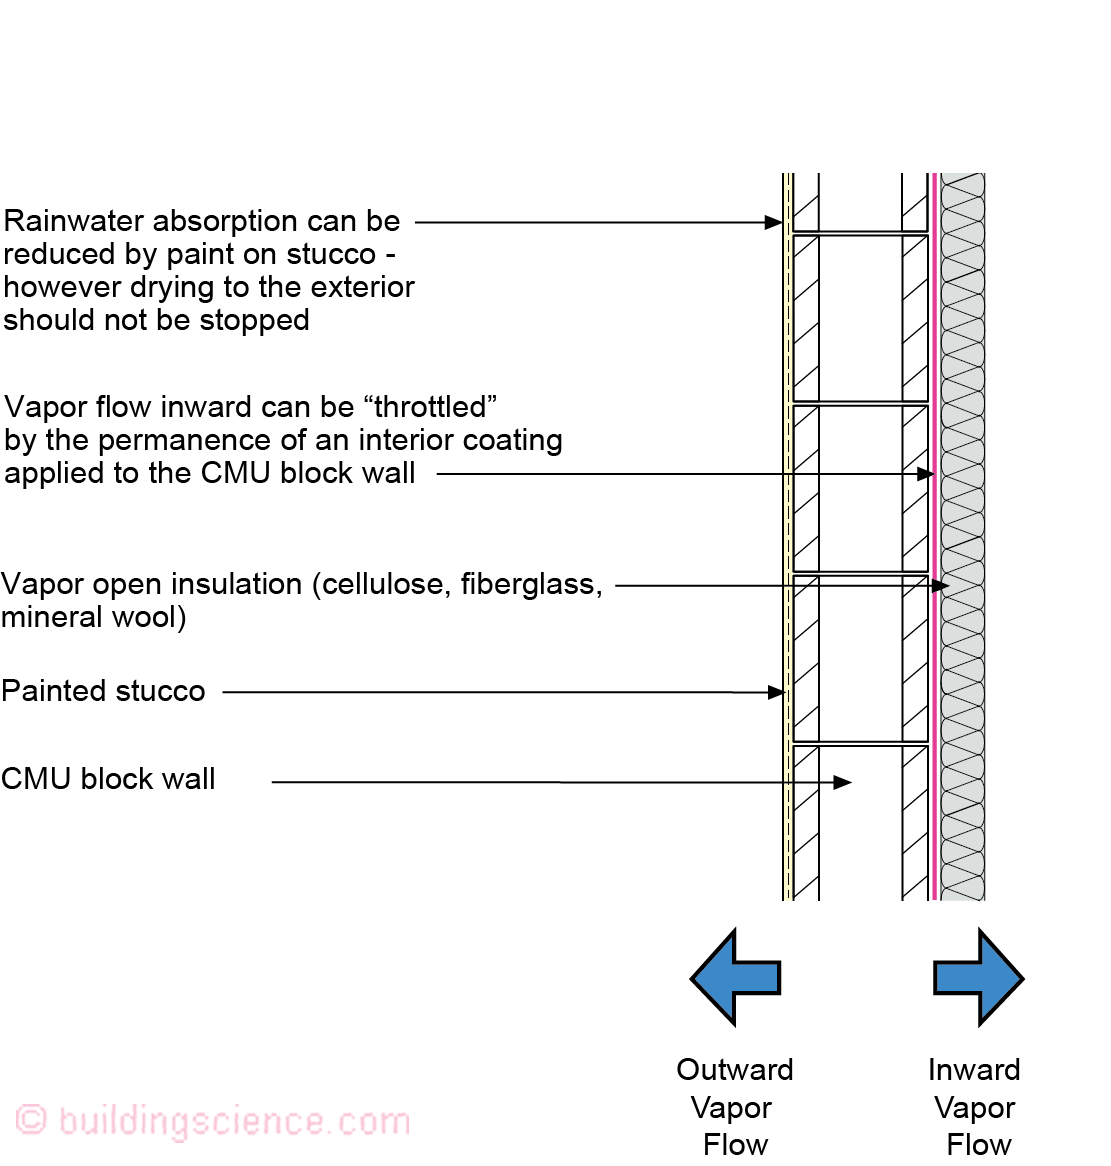
Figure 4: Extruded Polystyrene (XPS) – It is fairly common to use XPS rigid insulation on the interior of stucco clad CMU “block walls”. The inward vapor flow rate through the rigid insulation out of the CMU block wall needs to be “slower” than the vapor flow rate through the interior lining – painted gypsum board.
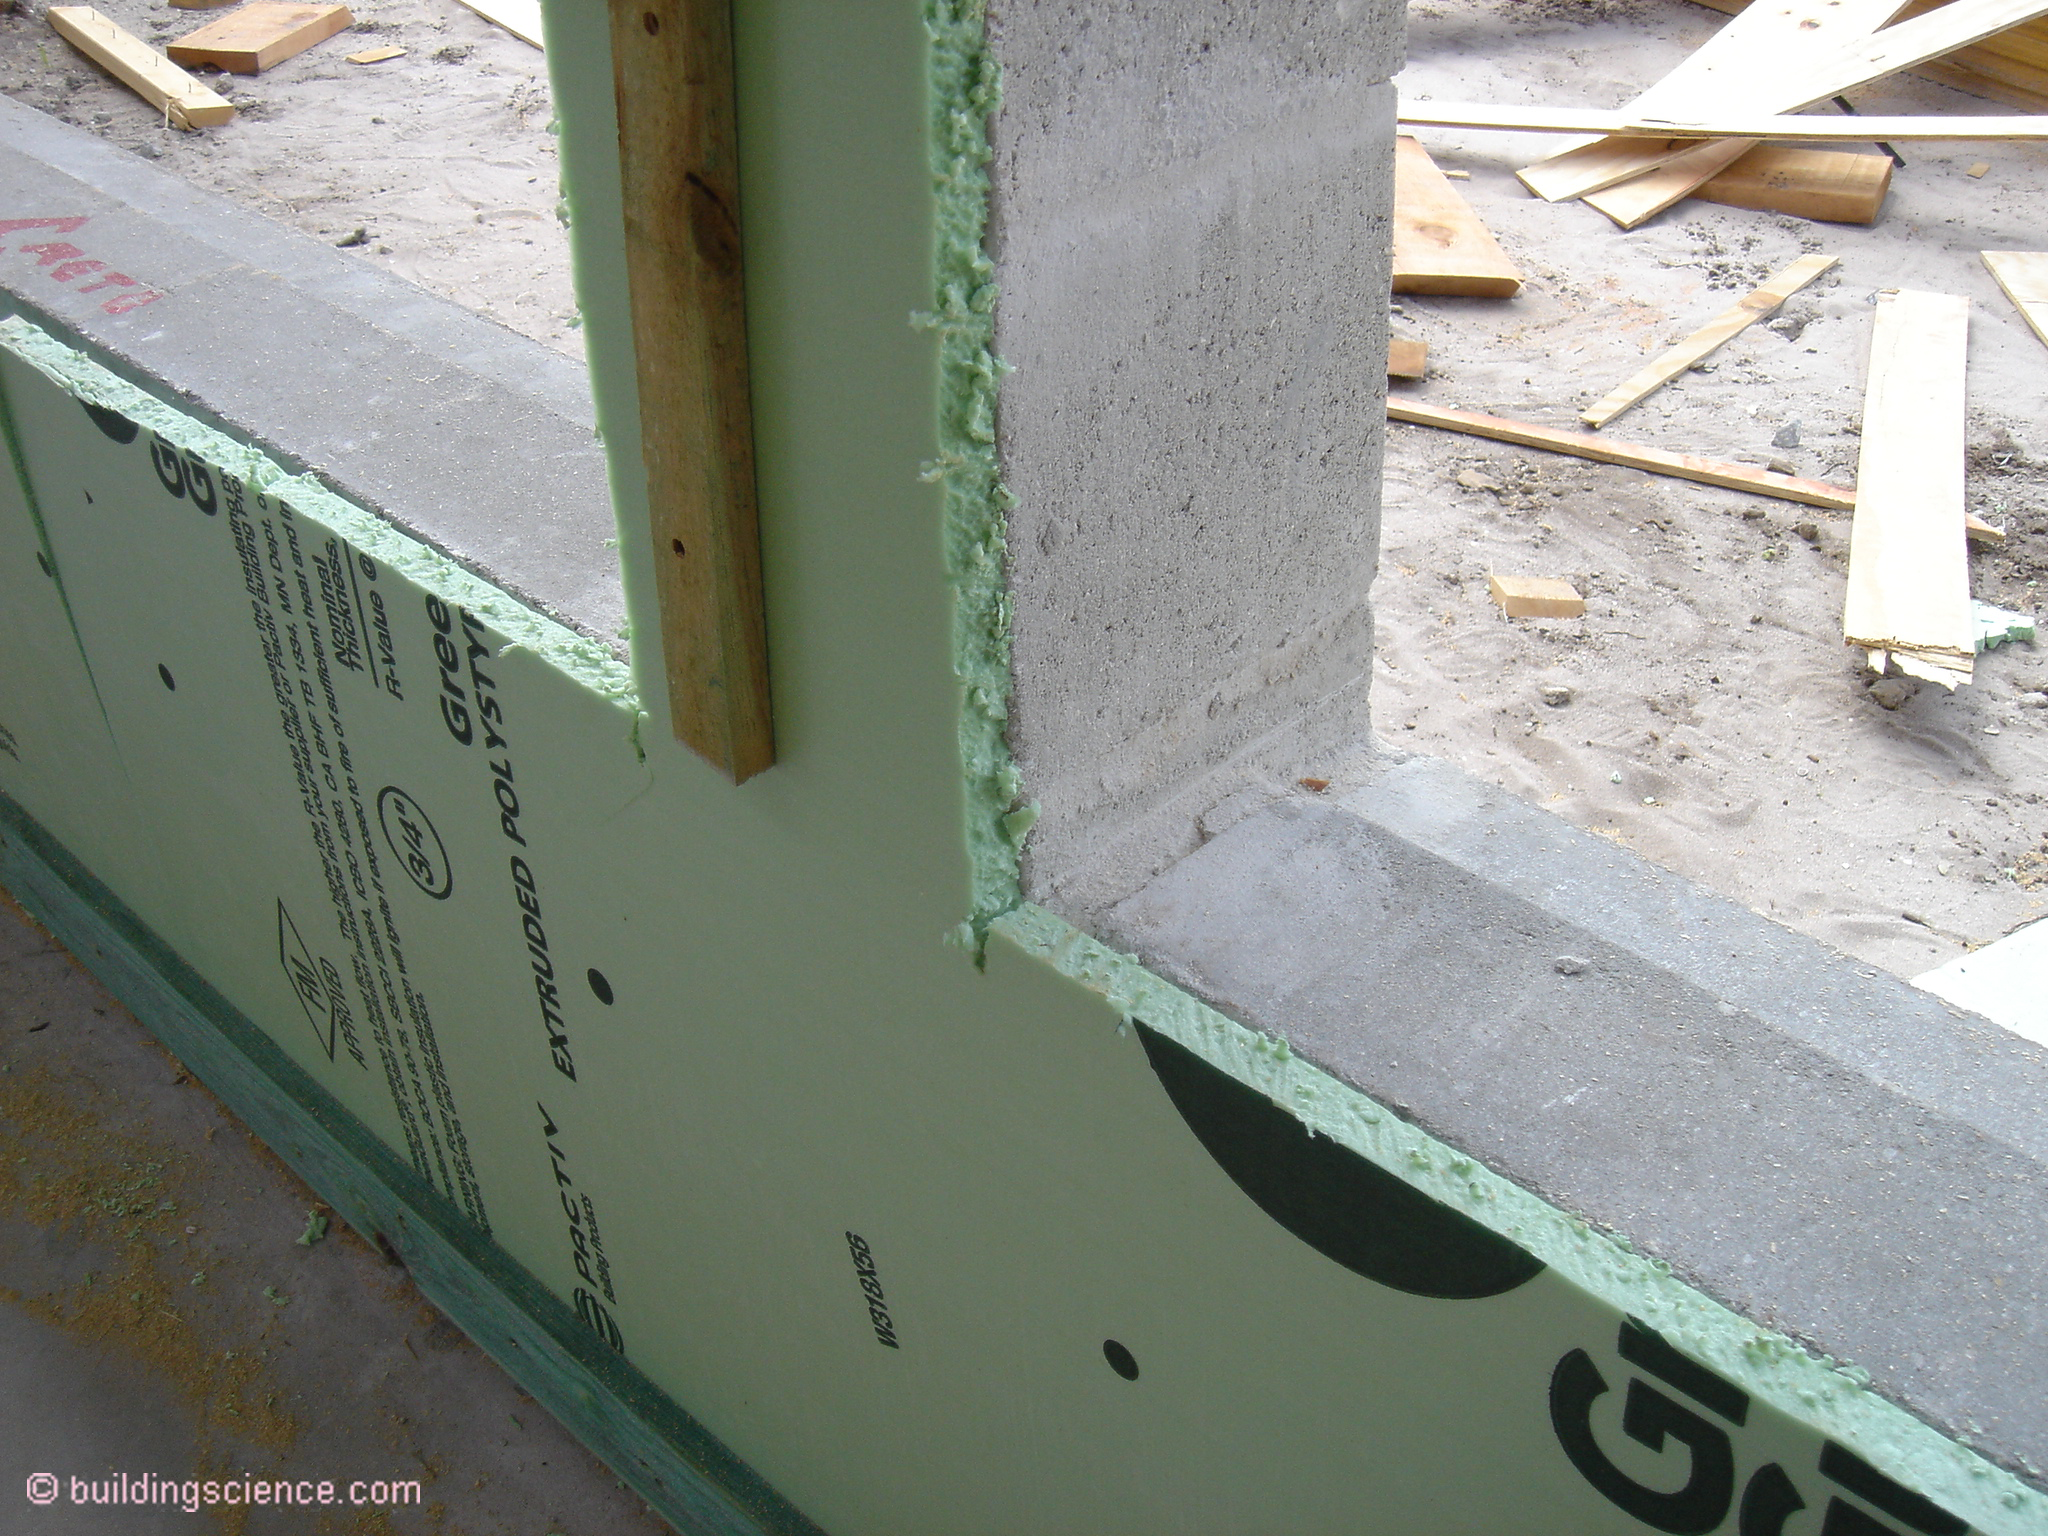
Photograph 7: Rigid Insulation Vapor Throttle - It is fairly common to use extruded polystyrene (XPS) rigid insulation on the interior of stucco clad CMU “block walls”.
What if I don’t want to use foil faced isocyanurate rigid insulation or extruded polystyrene (XPS) or expanded polystyrene (EPS) or closed cell spray polyurethane foam (ccSPF)? What if I wanted to use rigid mineral wool or fiberglass batts or cellulose insulation? Yes, you can, but you have to “throttle” the inward vapor flow out of the CMU “block wall”. You can install an interior coating on the interior surface of the CMU “block wall” (Figure 5). Here comes another “Joe Rule”. This interior coating should be less than 5 perms “wet cup”. Now you can use vapor open insulation such as cellulose, fiberglass and mineral wool on the interior of the wall (Figure 6 and Figure 7).
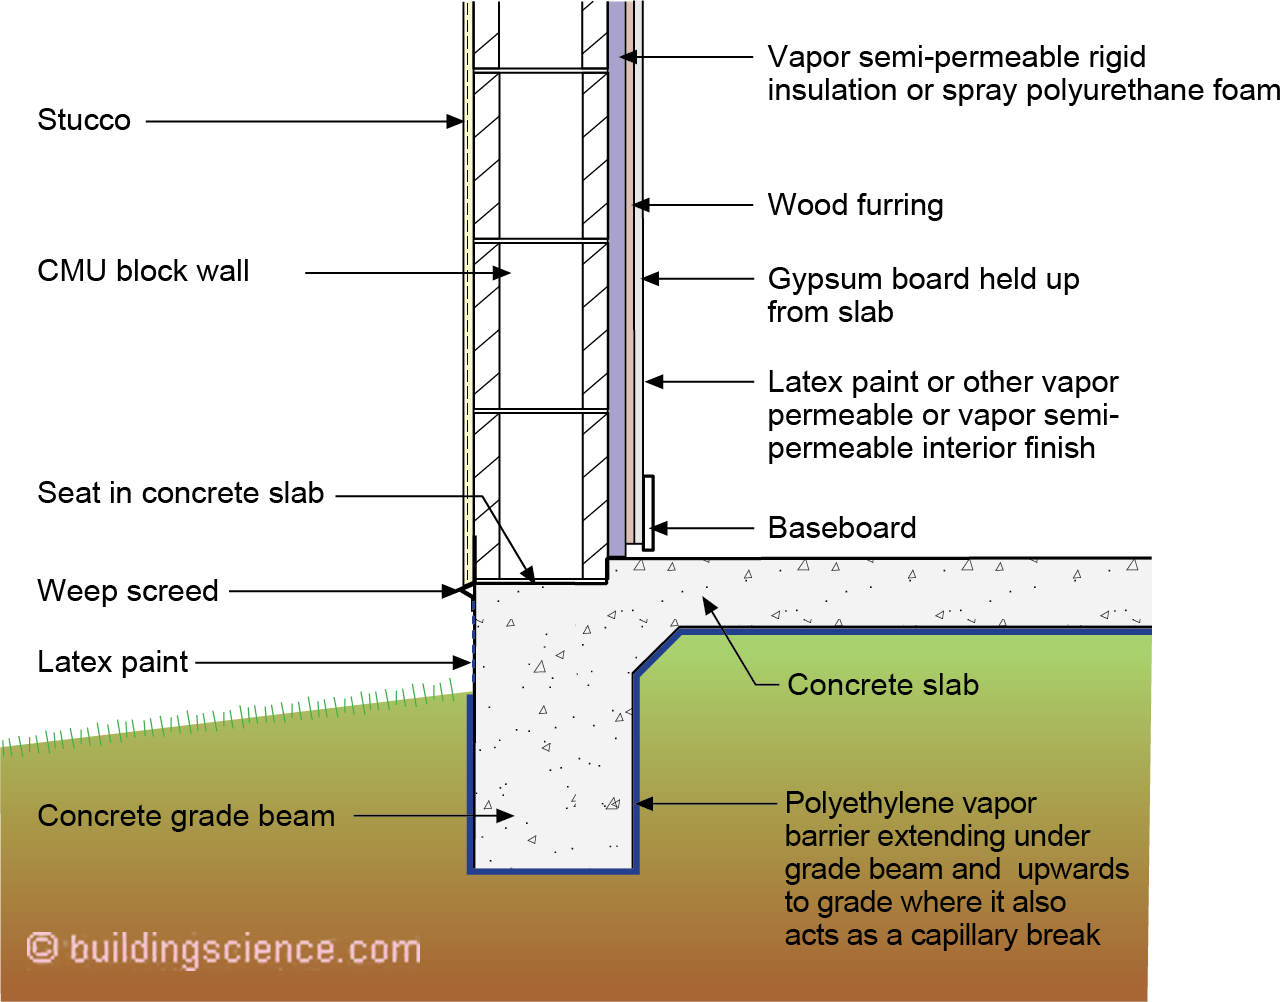
Figure 5: Interior Coating “Vapor Throttle” - You can install an interior coating on the interior surface of the CMU “block wall”. This interior coating should be less than 5 perms “wet cup” but more than 1 perm “wet cup”.
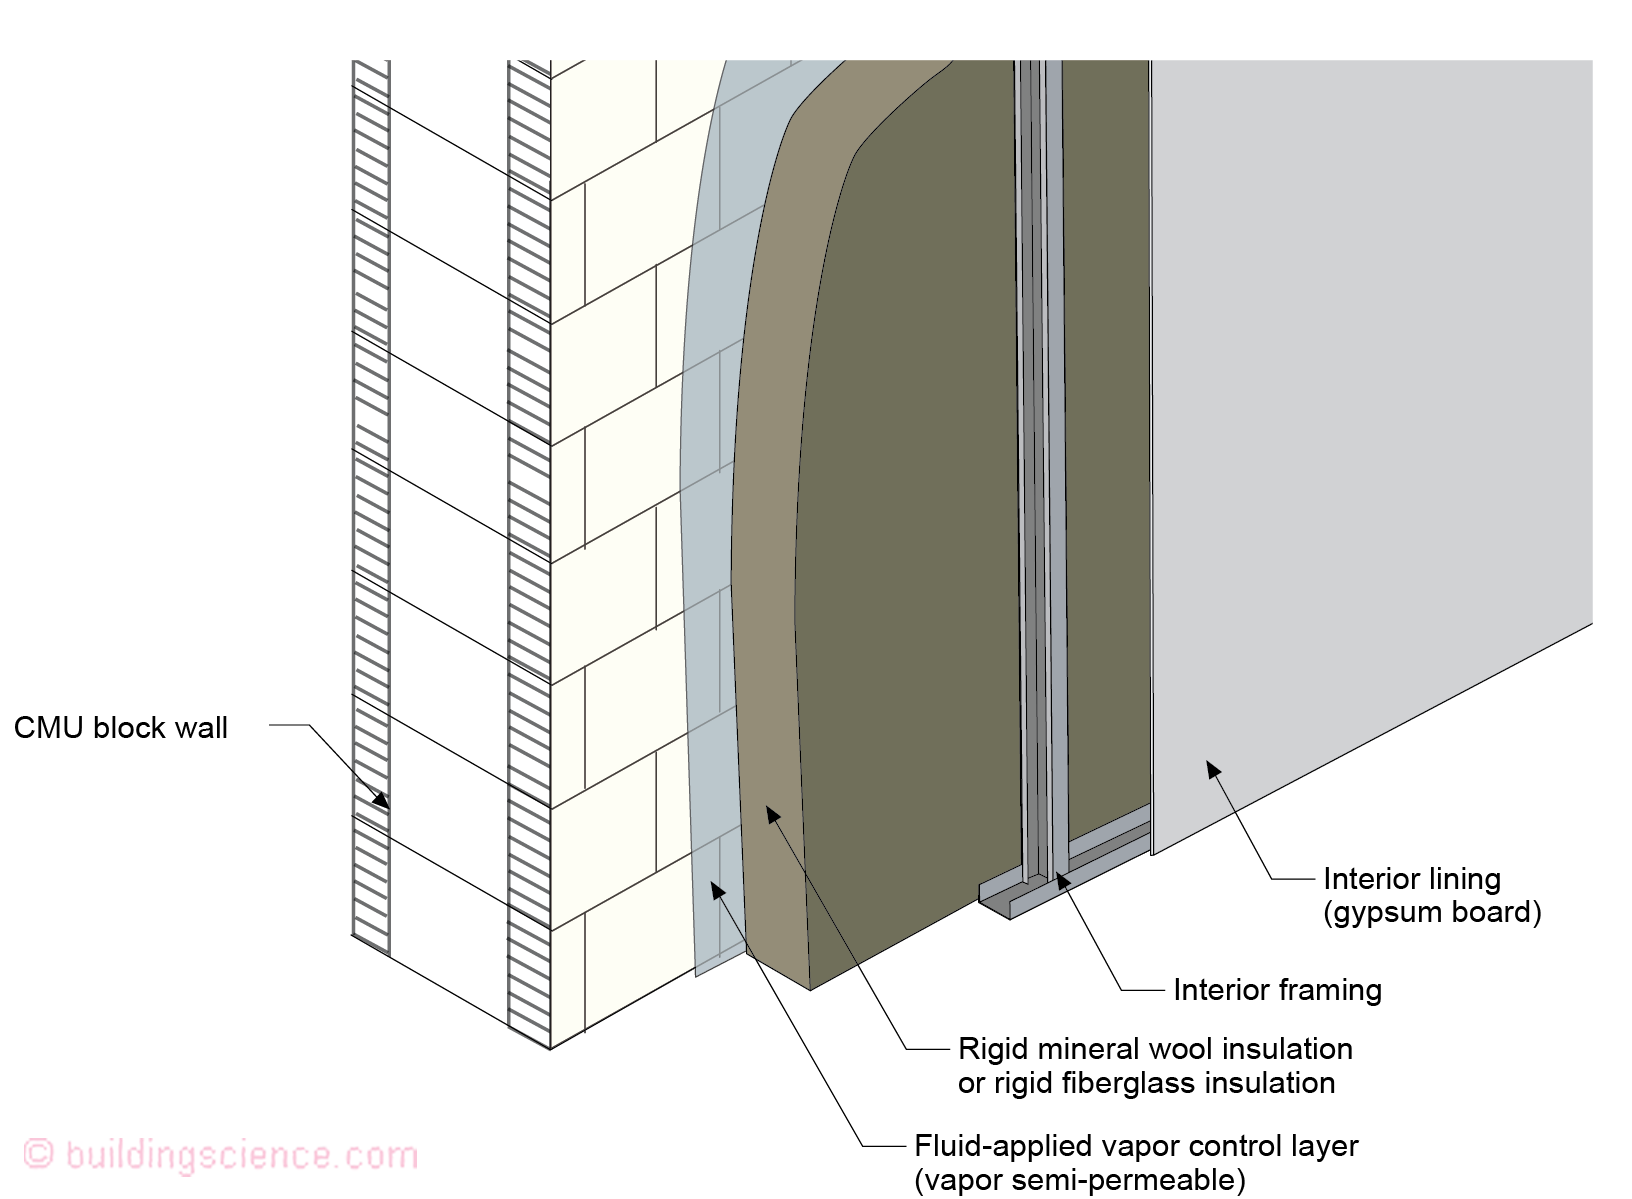
Figure 6: Rigid Mineral Wool/Rigid Fiberglass Insulation - You can use vapor open insulation such as mineral wool and fiberglass board insulation on the interior of the wall in conjunction with an interior coating acting as a “vapor throttle”. Note the continuous rigid insulation approach. No thermal bridge. The framing is on the inside of the continuous rigid insulation.
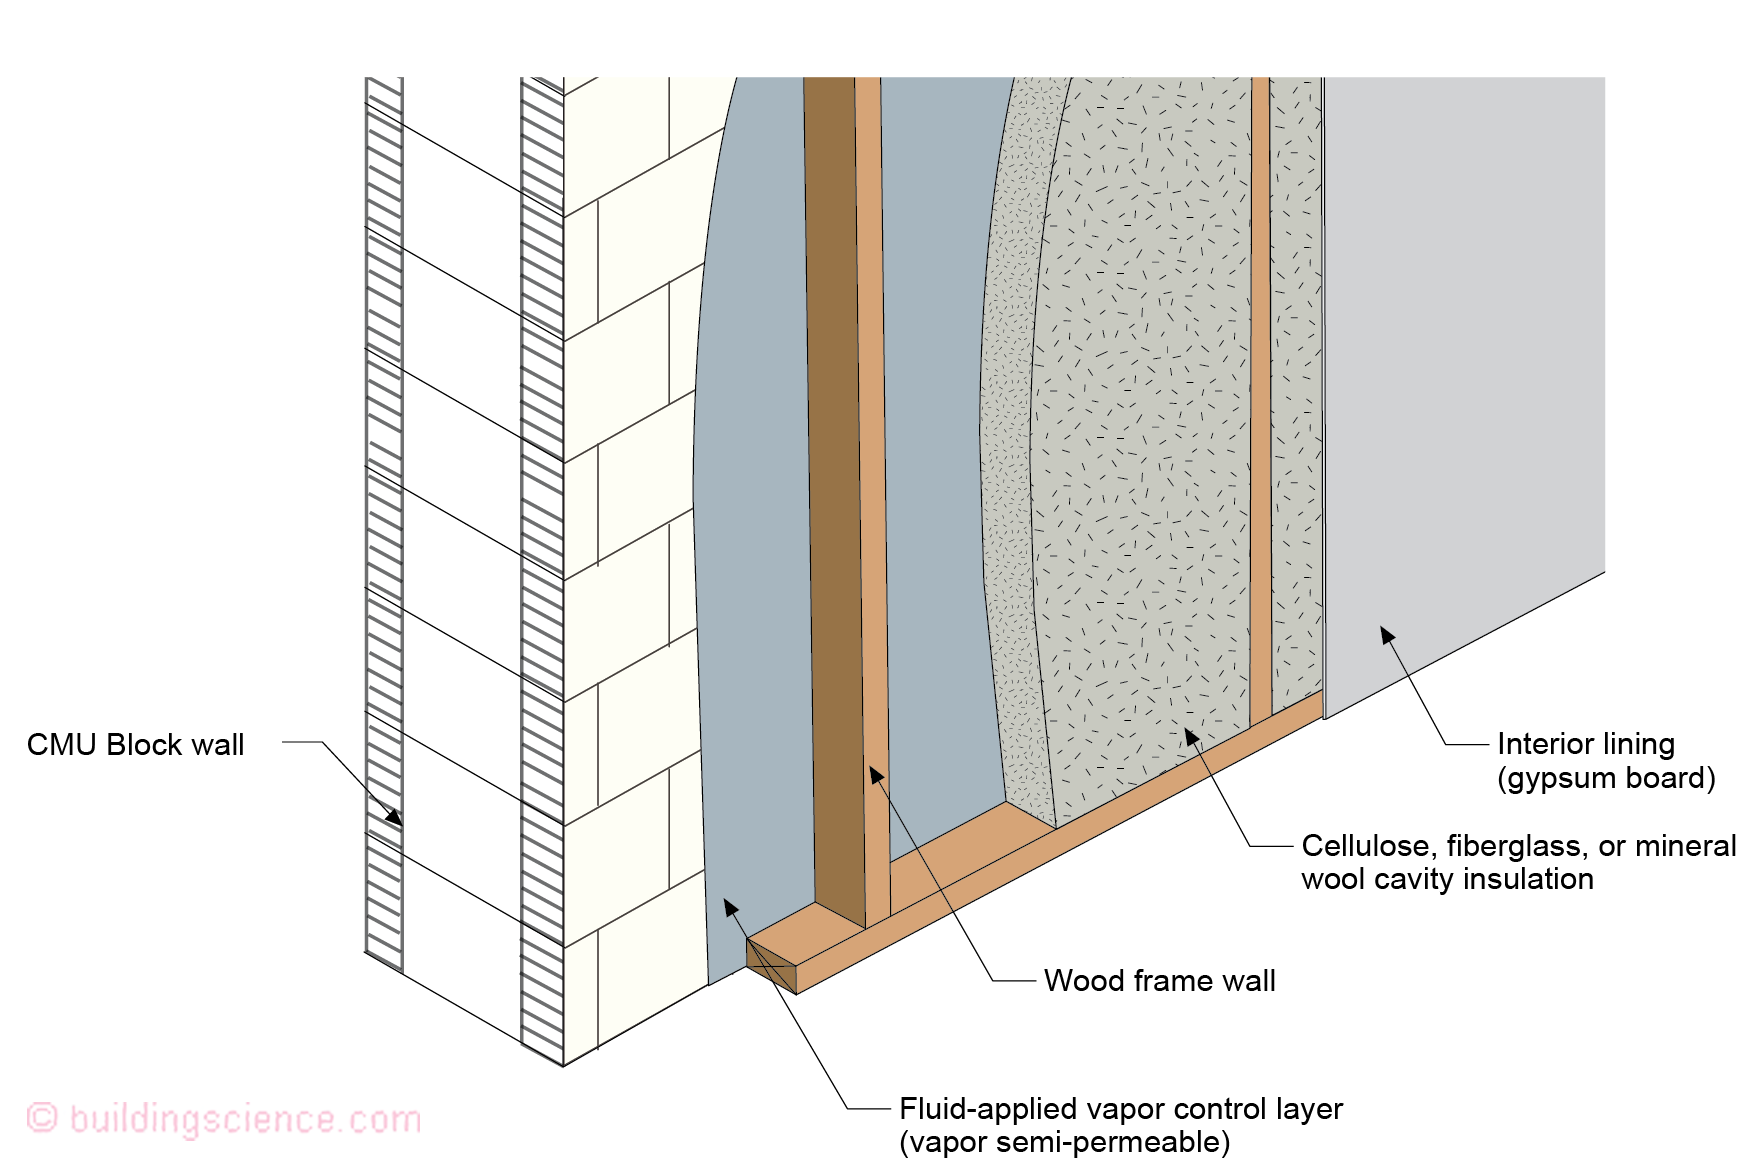
Figure 7: Cellulose, Fiberglass and Mineral Wool Cavity Insulation - You can use vapor open insulation such as cellulose, fiberglass and mineral wool cavity insulation on the interior of the wall in conjunction with an interior coating acting as a “vapor throttle”.
Anything else we have to be careful about? Yes of course. A couple of things. Don’t forget to put a “seat” in concrete slab at the perimeter to handle the rainwater draining down the CMU block cores (Photograph 8). The “seat” acts as flashing directing the rainwater to the exterior of the wall.
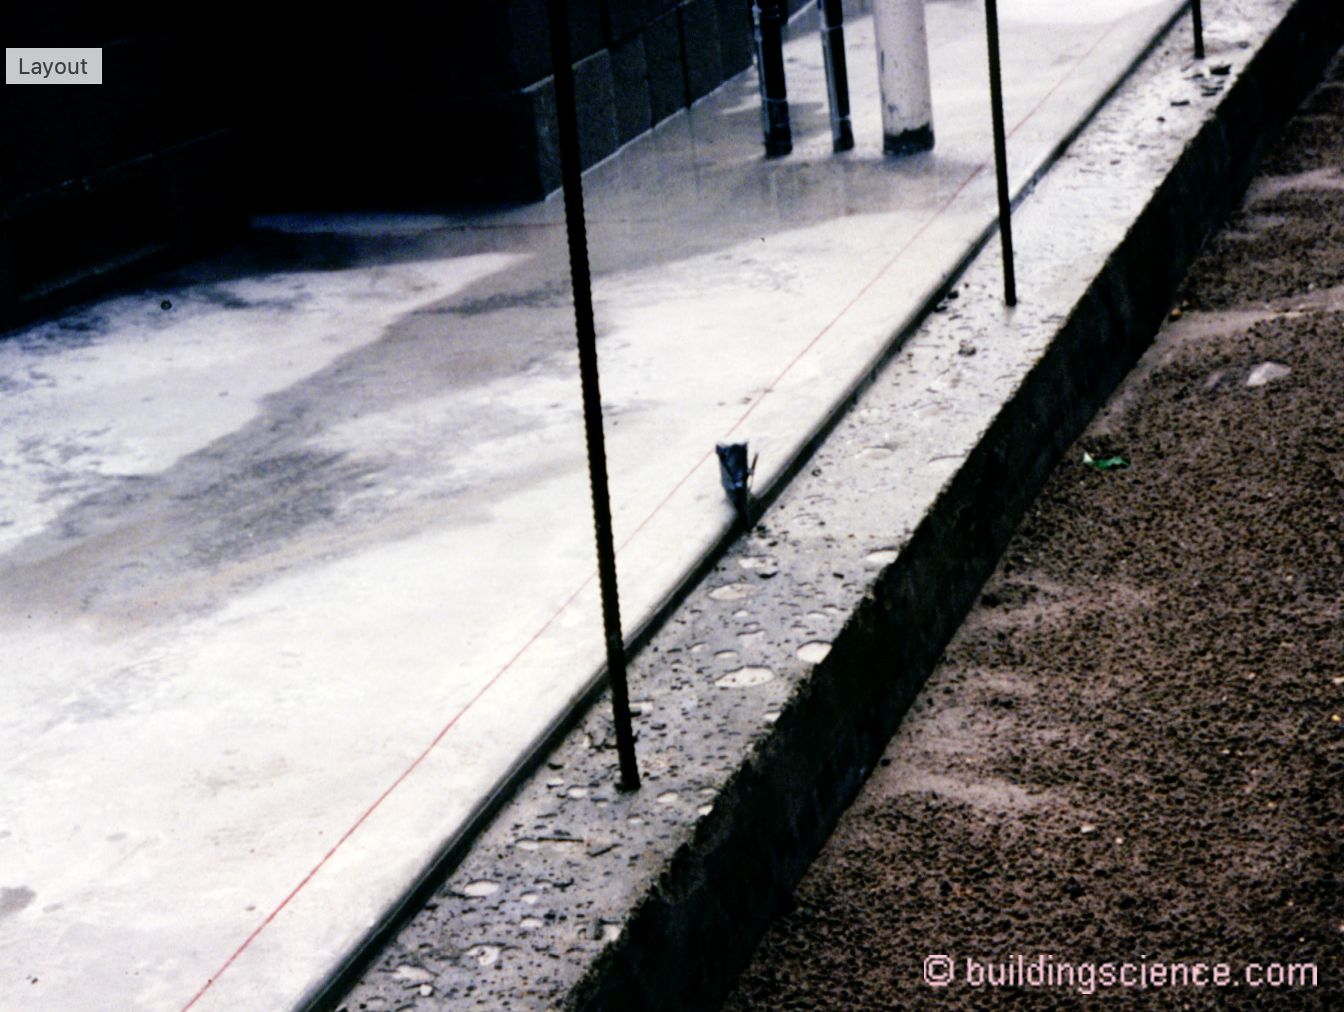
Photograph 8: Base of Wall Flashing – Installing a “seat” in concrete slab at the perimeter handles the rainwater draining down the CMU block cores. The “seat” acts as flashing directing the rainwater to the exterior of the wall.
What else? Windows. You absolutely have to drain the window opening to the exterior (Figure 8, Figure 9 and Figure 10). You absolutely must use a fluid applied coating around the entire perimeter of the rough opening (Photograph 9). The head of the window opening is also a big deal. The fluid applied coating over the “wood buck” at the underside of the CMU block at top of the window rough opening coupled with a concrete lintel acts as a “dam” and a “gutter” to prevent water from draining into the window from the wall at top of the window opening.

Figure 8: CMU “Block Wall” Window Rough Opening – Note the “tiered” concrete rough opening sill.
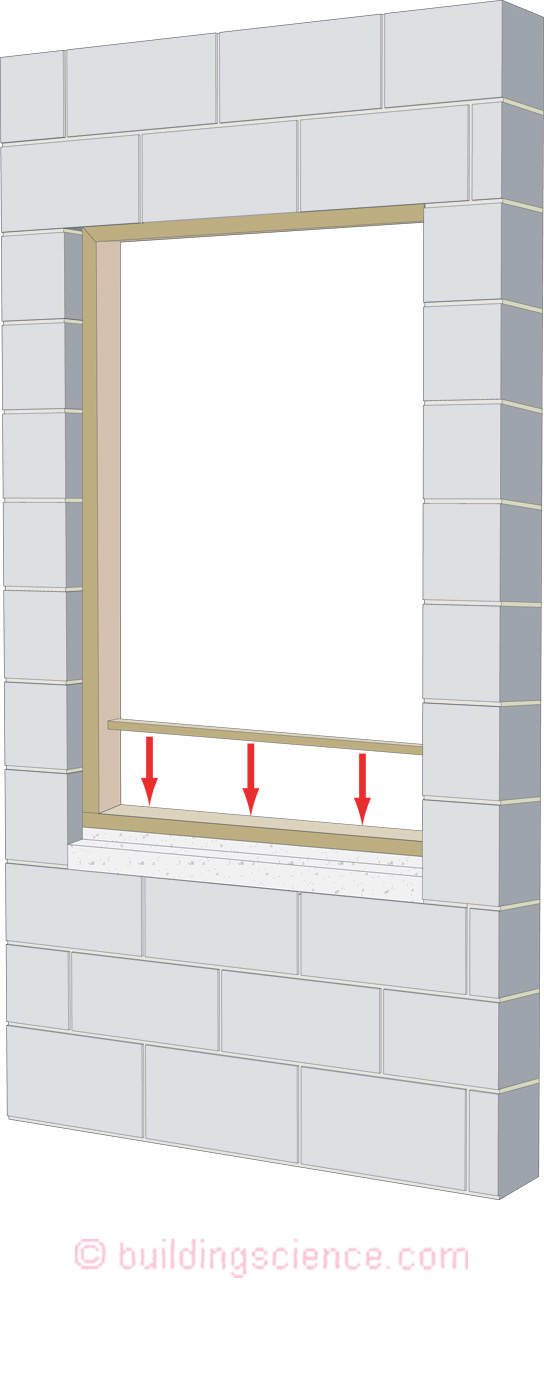
Figure 9: CMU “Block Wall” Window Rough Opening – Note the wood “rough buck’ lining with a “back dam” wood strip.
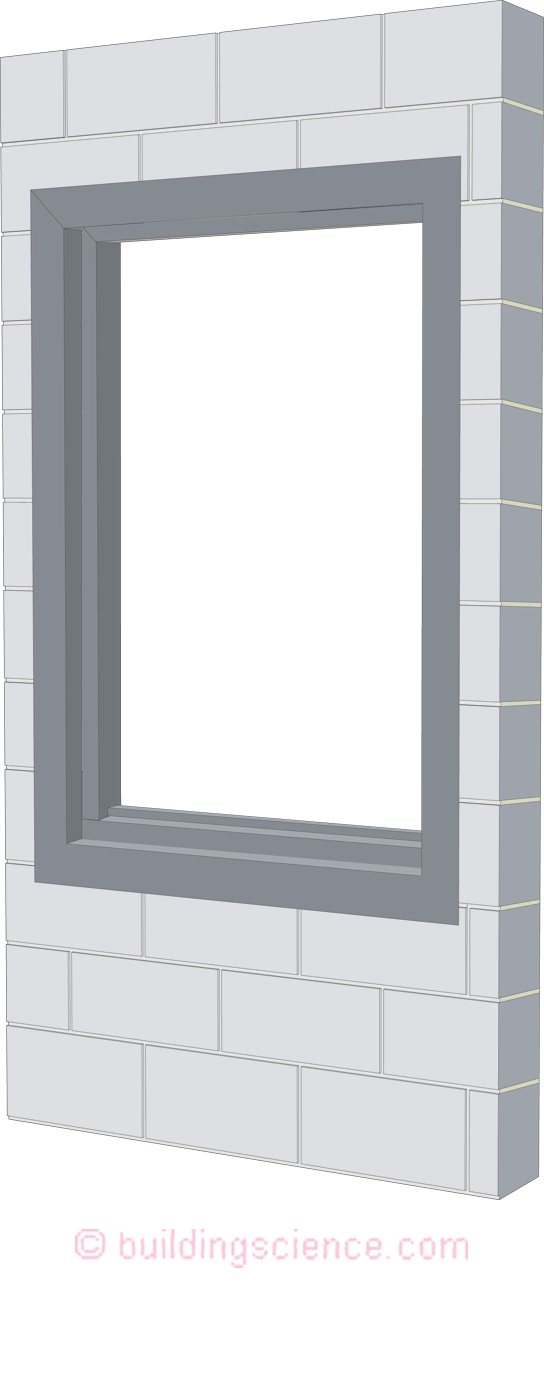
Figure 10: CMU “Block Wall” Window Rough Opening – Note the fluid applied coating around the entire perimeter of the rough opening.
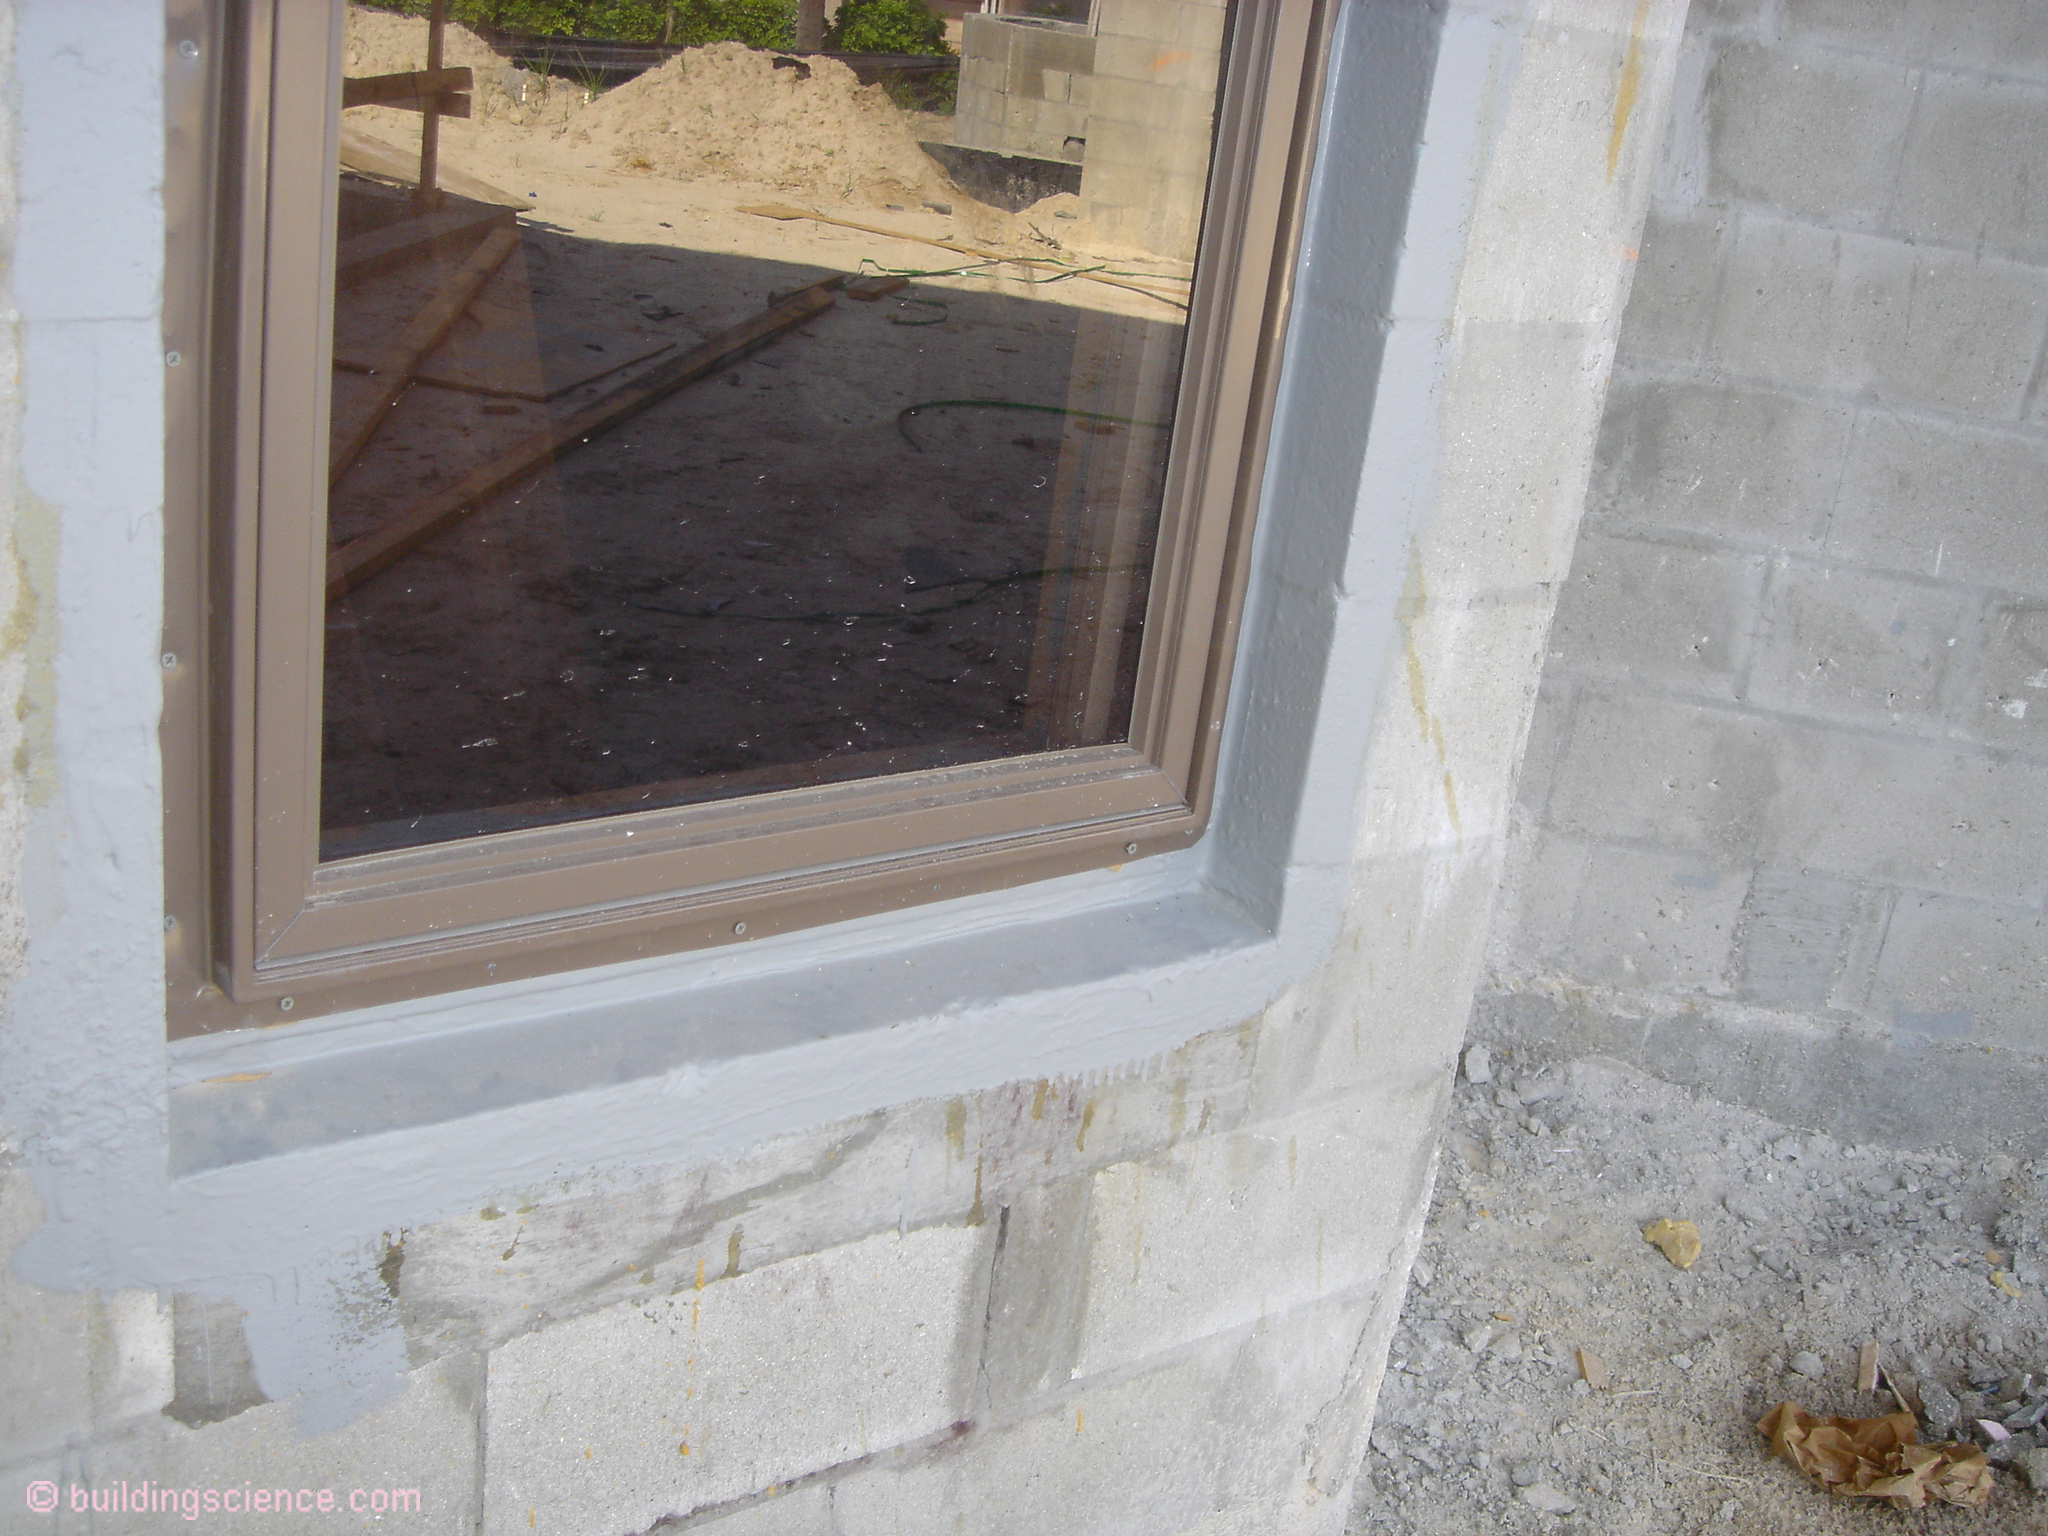
Photograph 9: Fluid Applied Flashing - You absolutely must use a fluid applied coating around the entire perimeter of the rough opening.
When we control both the inward and outward vapor flow in painted stucco clad CMU “block walls” that are internally insulated we pretty much can use any interior insulation system we want - extruded polystyrene (XPS), expanded polystyrene (EPS), spray polyurethane foam (SPF), cellulose, fiberglass and mineral wool. Neat, eh?
So what happens if we replace the CMU with cast-in-place concrete or precast and no stucco? Well, the concrete itself is an awesome “vapor throttle”. We typically don’t need to add anything on the interior if the interior insulation and interior finishes are vapor open. There has to be a catch. There is. Lots of moisture in the concrete when we cast it. We need to let this moisture dry to both the exterior and the interior. Or…wait for it…line the inside of the concrete with a something to “throttle” the inward flow of moisture in the concrete if we insulate and finish the interior of the wall before the concrete is “dry enough” to not damage the interior finishes as it continues to dry to the interior.
References:
Rainwater Management Performance of Newly Constructed Residential Building Enclosures During August and September 2004, Florida Home Builders Association, January 2005.
https://www.buildingscience.com/documents/reports/rr-0503-rainwater-management-orlando/view
BSI-105: Avoiding Mass Failures, June 2018
Footnotes:
1 In this wall assembly the “water control layer” is the exterior painted stucco. The “air control layer” is also the exterior painted stucco. One “vapor control layer” is the exterior paint on the stucco. We shall soon see that we will need an additional “vapor control layer” on the inside of the CMU “block wall”. The “thermal control layer” will be the interior insulation.
2 If we insulated the CMU “block walls” on the outside we wouldn’t be having this discussion. The issues go away when you use the “Perfect Wall” or an exterior insulated finish system (EIFS)… The “vapor control layer” goes on the outside of the CMU “block walls” when using such systems. So why not always just insulate on the outside? Cost, tradition, hurricane performance and skilled trades factor into that discussion.
3We have talked about this before…back ventilate cabinets….