Sometimes obvious things are not so obvious. And when you miss them, they can be expensive….and embarrassing. And often the embarrassing is worse than the expense….”that was dumb”…”.that hurts”…and finally... “there is no way I am going to tell anyone about this…” Well, enough time has passed….and now I am going to share.[1]
Here goes with the obvious. Brick and stone leak. They have always leaked, and they still leak. Here is the catch… old walls handled leakage differently than modern walls. Old walls had multiple layers..smooshed[2] together. Water that penetrated the outer layer was stored, absorbed, redistributed and subsequently dried to both the exterior and interior. They were called “mass walls” (Figure 1).
Modern walls took a different approach. The water that penetrates is drained back to the exterior (Figure 2). Recall the “drain the rain on the plane” discussion (BSI-112: Drain the Rain...On the Plane...the drainage plane*, November 2019).
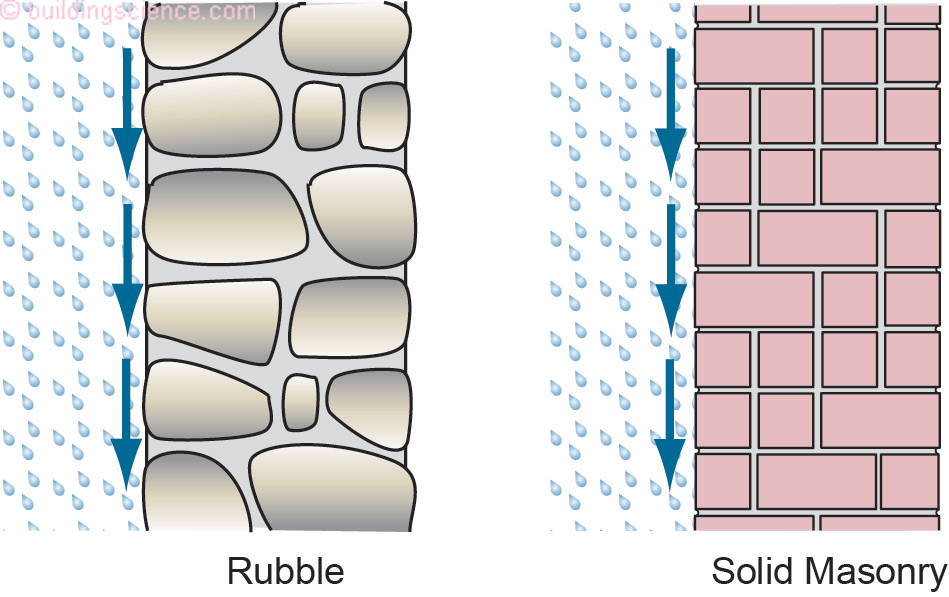
Figure 1: “Old Walls” - Old walls had multiple layers. Water that penetrated the outer layer was stored, absorbed, redistributed and subsequently dried to both the exterior and interior. They were called “mass walls”.
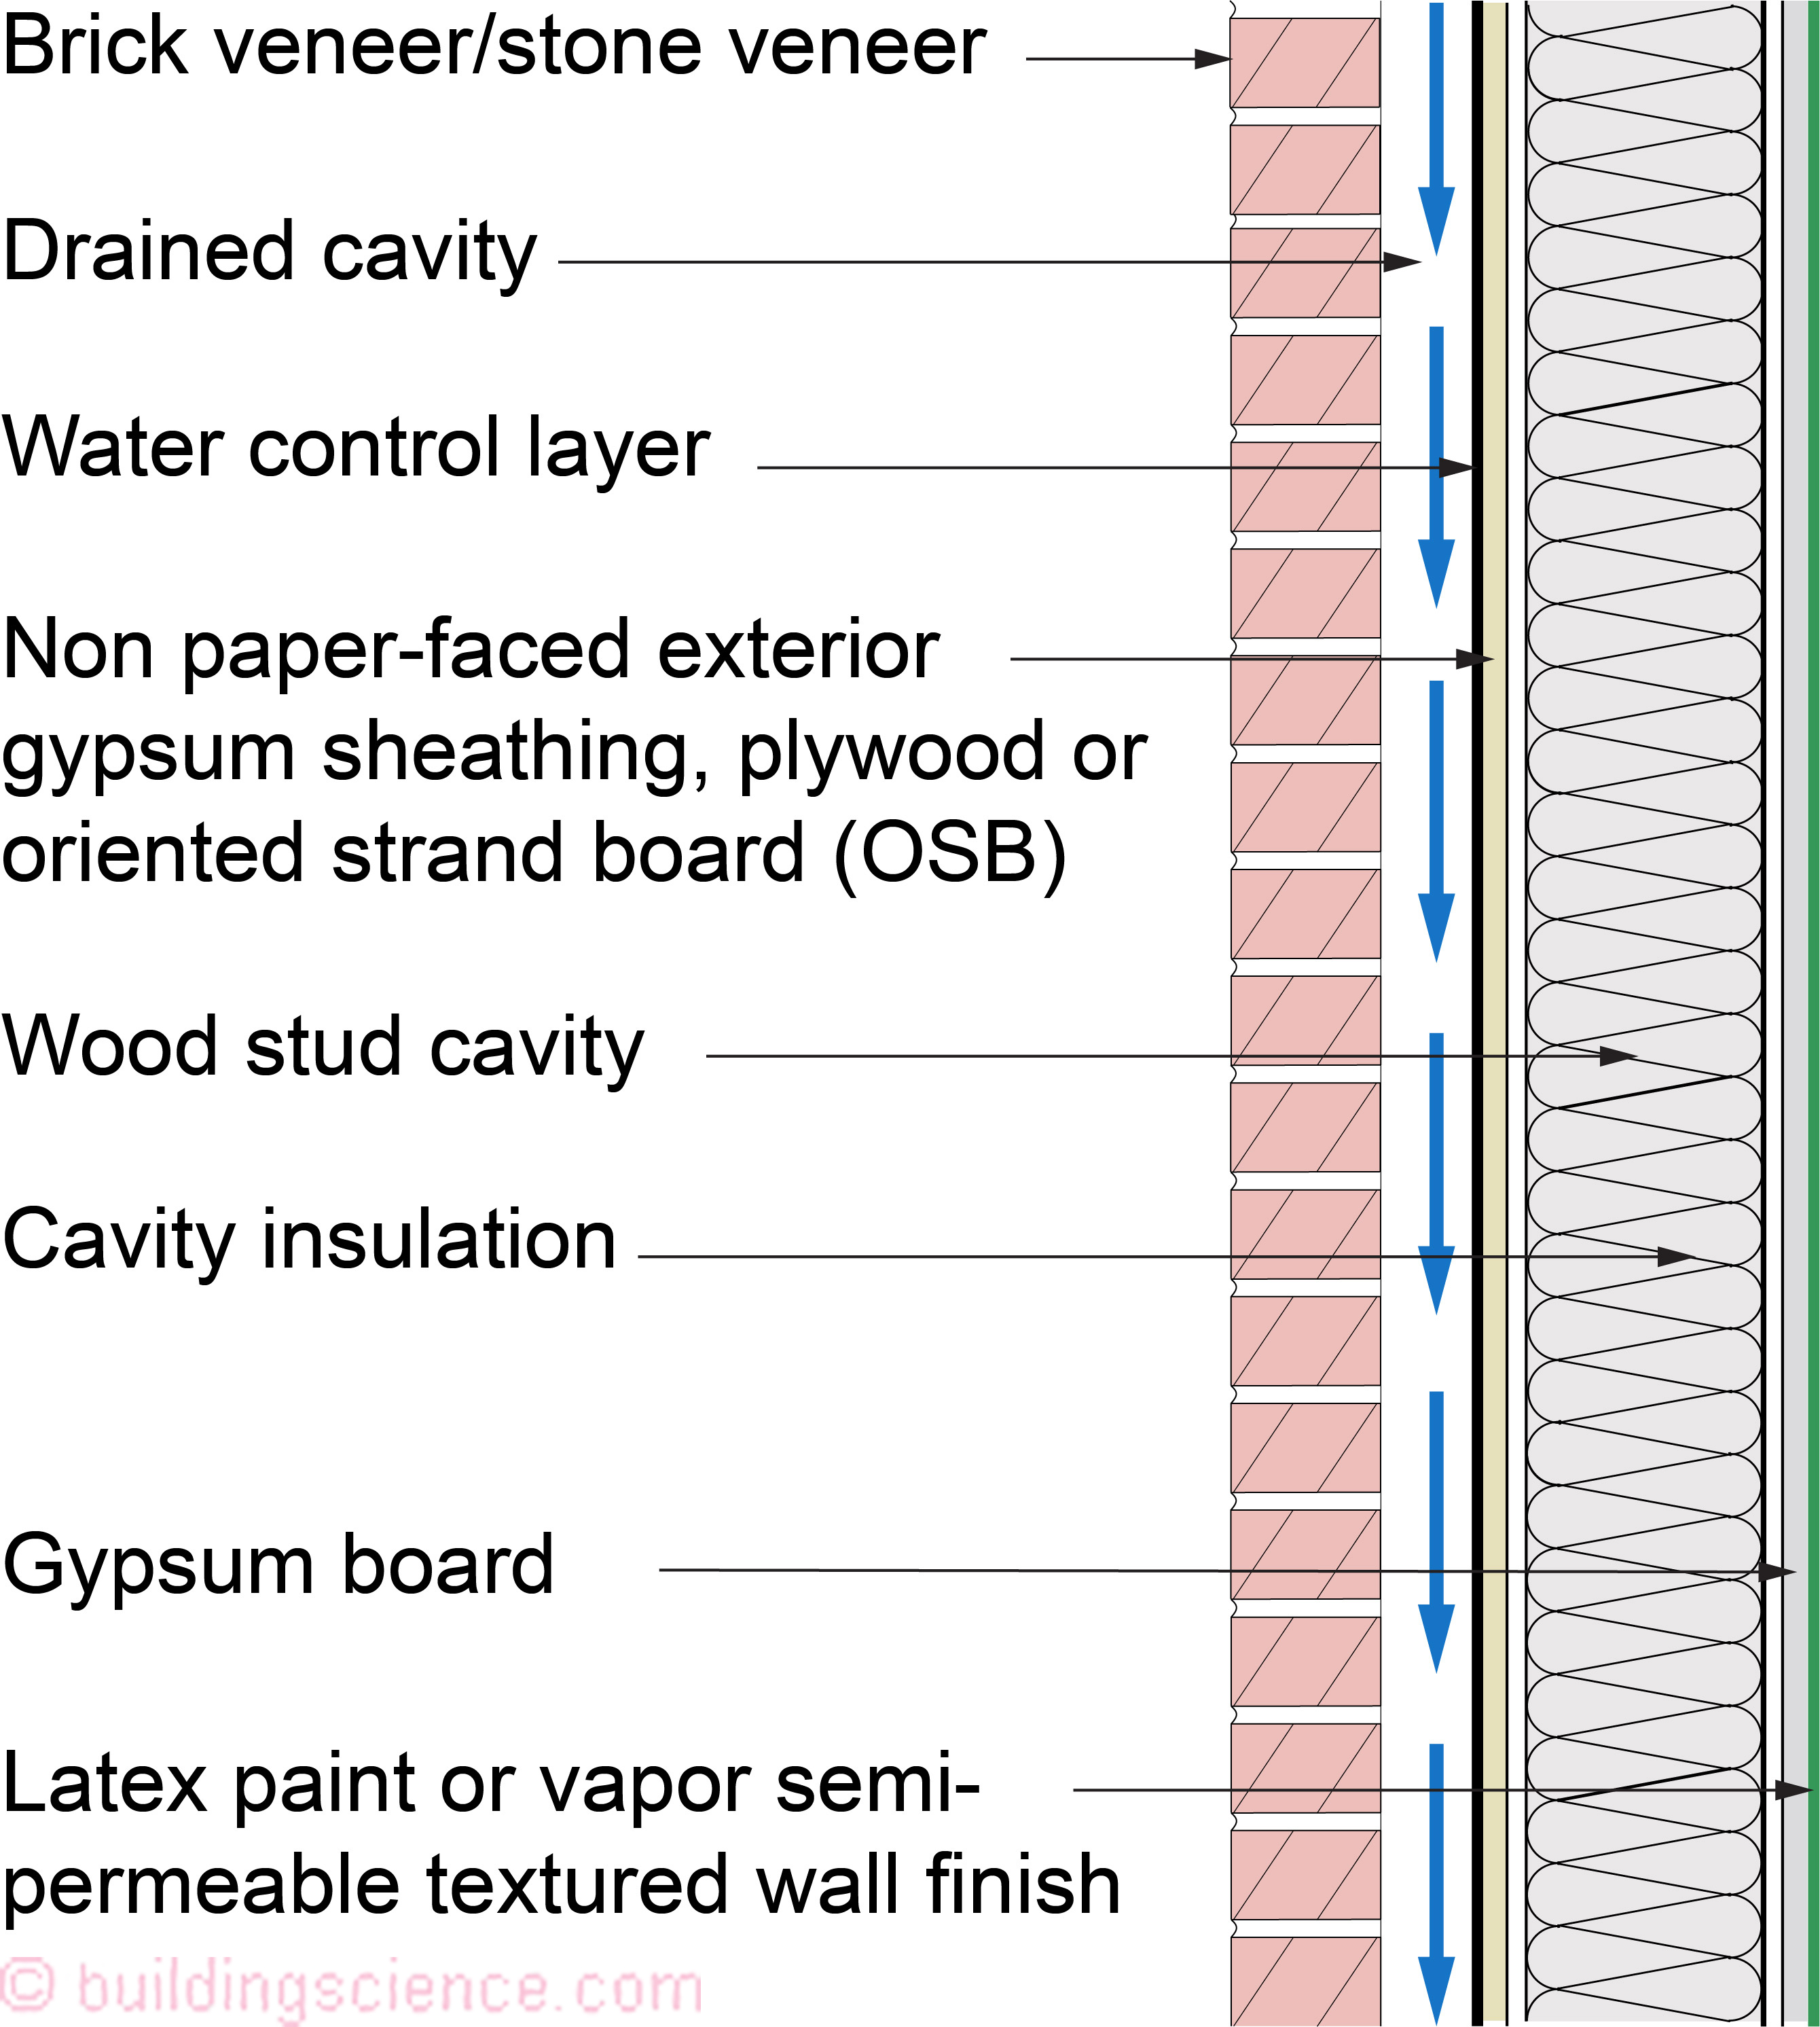
Figure 2: “Modern Walls” - The water that penetrates is drained back to the exterior. Recall the “drain the rain on the plane”.
Having said that, pointed that out, over and over again, people forget that old walls are different than modern walls, still to this day. I am going to try again, one more time, to show the obvious…and then have some fun at other people's expense.
First, I am going to conduct a field test that follows no approved ASTM protocol. Check out Photograph 1. I have tricked a youngster into using an ordinary garden hose to spray water against a brick veneer. This gentleman is clearly a “hoser”[3] … In about 20 to 30 seconds water can be seen penetrating and running down the back of the brick (Photograph 2)[4]. Turned the youngster and everyone else watching into “true believers”[5]. This should, of course, have been obvious, but folks are still stunned when they actually see it.
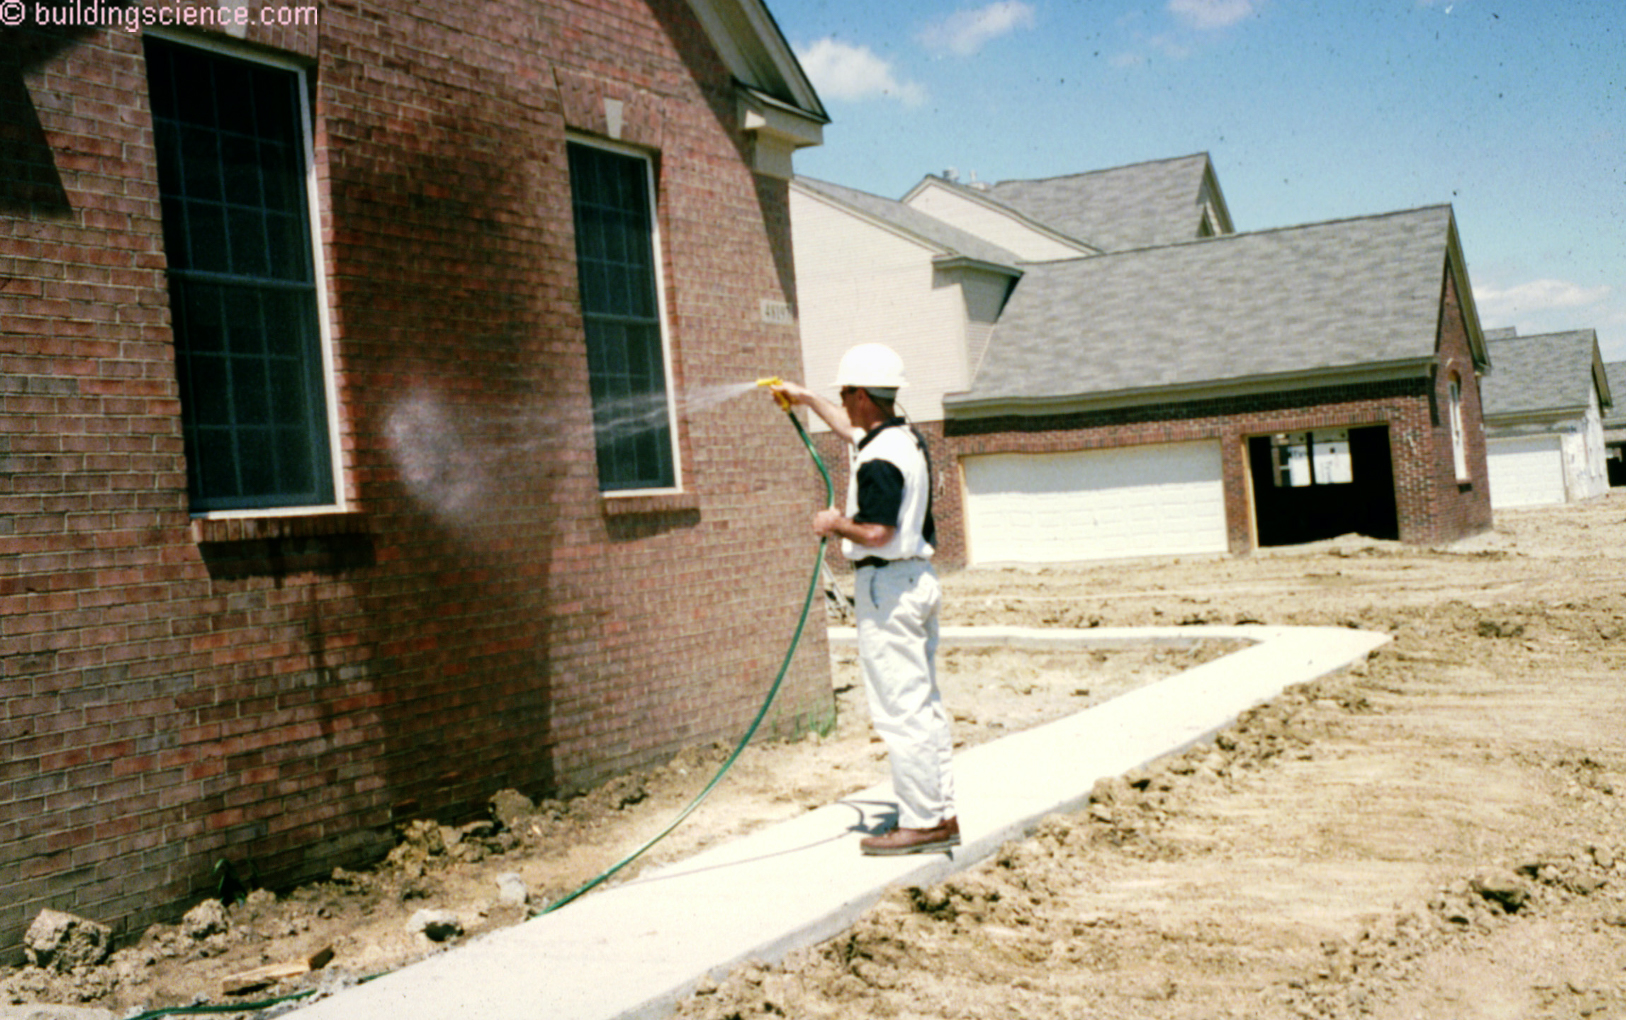
Photograph 1: Water Test - I have tricked a youngster into using an ordinary garden hose to spray water against a brick veneer. This field test follows no approved ASTM protocol.

Photograph 2: Water Leakage - In about 20 to 30 seconds water can be seen penetrating and running down the back of the brick. The water penetrates the joints between the brick and the mortar. The water does not pass through the brick or pass through the mortar. The weak link is the connection between the brick and the mortar.
OK, so what do we do with this penetrating water? Easy. Drain it down and out of the wall. Repeat after me “down and out”….”down and out”. The principle is obvious (Figure 3). Except not so obvious as we shall see. Folks forget the “out” part….ouch. That flashing at the bottom of the wall is a big deal. One of its important functions is to direct the penetrating water back to the exterior. Oh, one more thing….you shouldn’t forget to actually have a flashing….
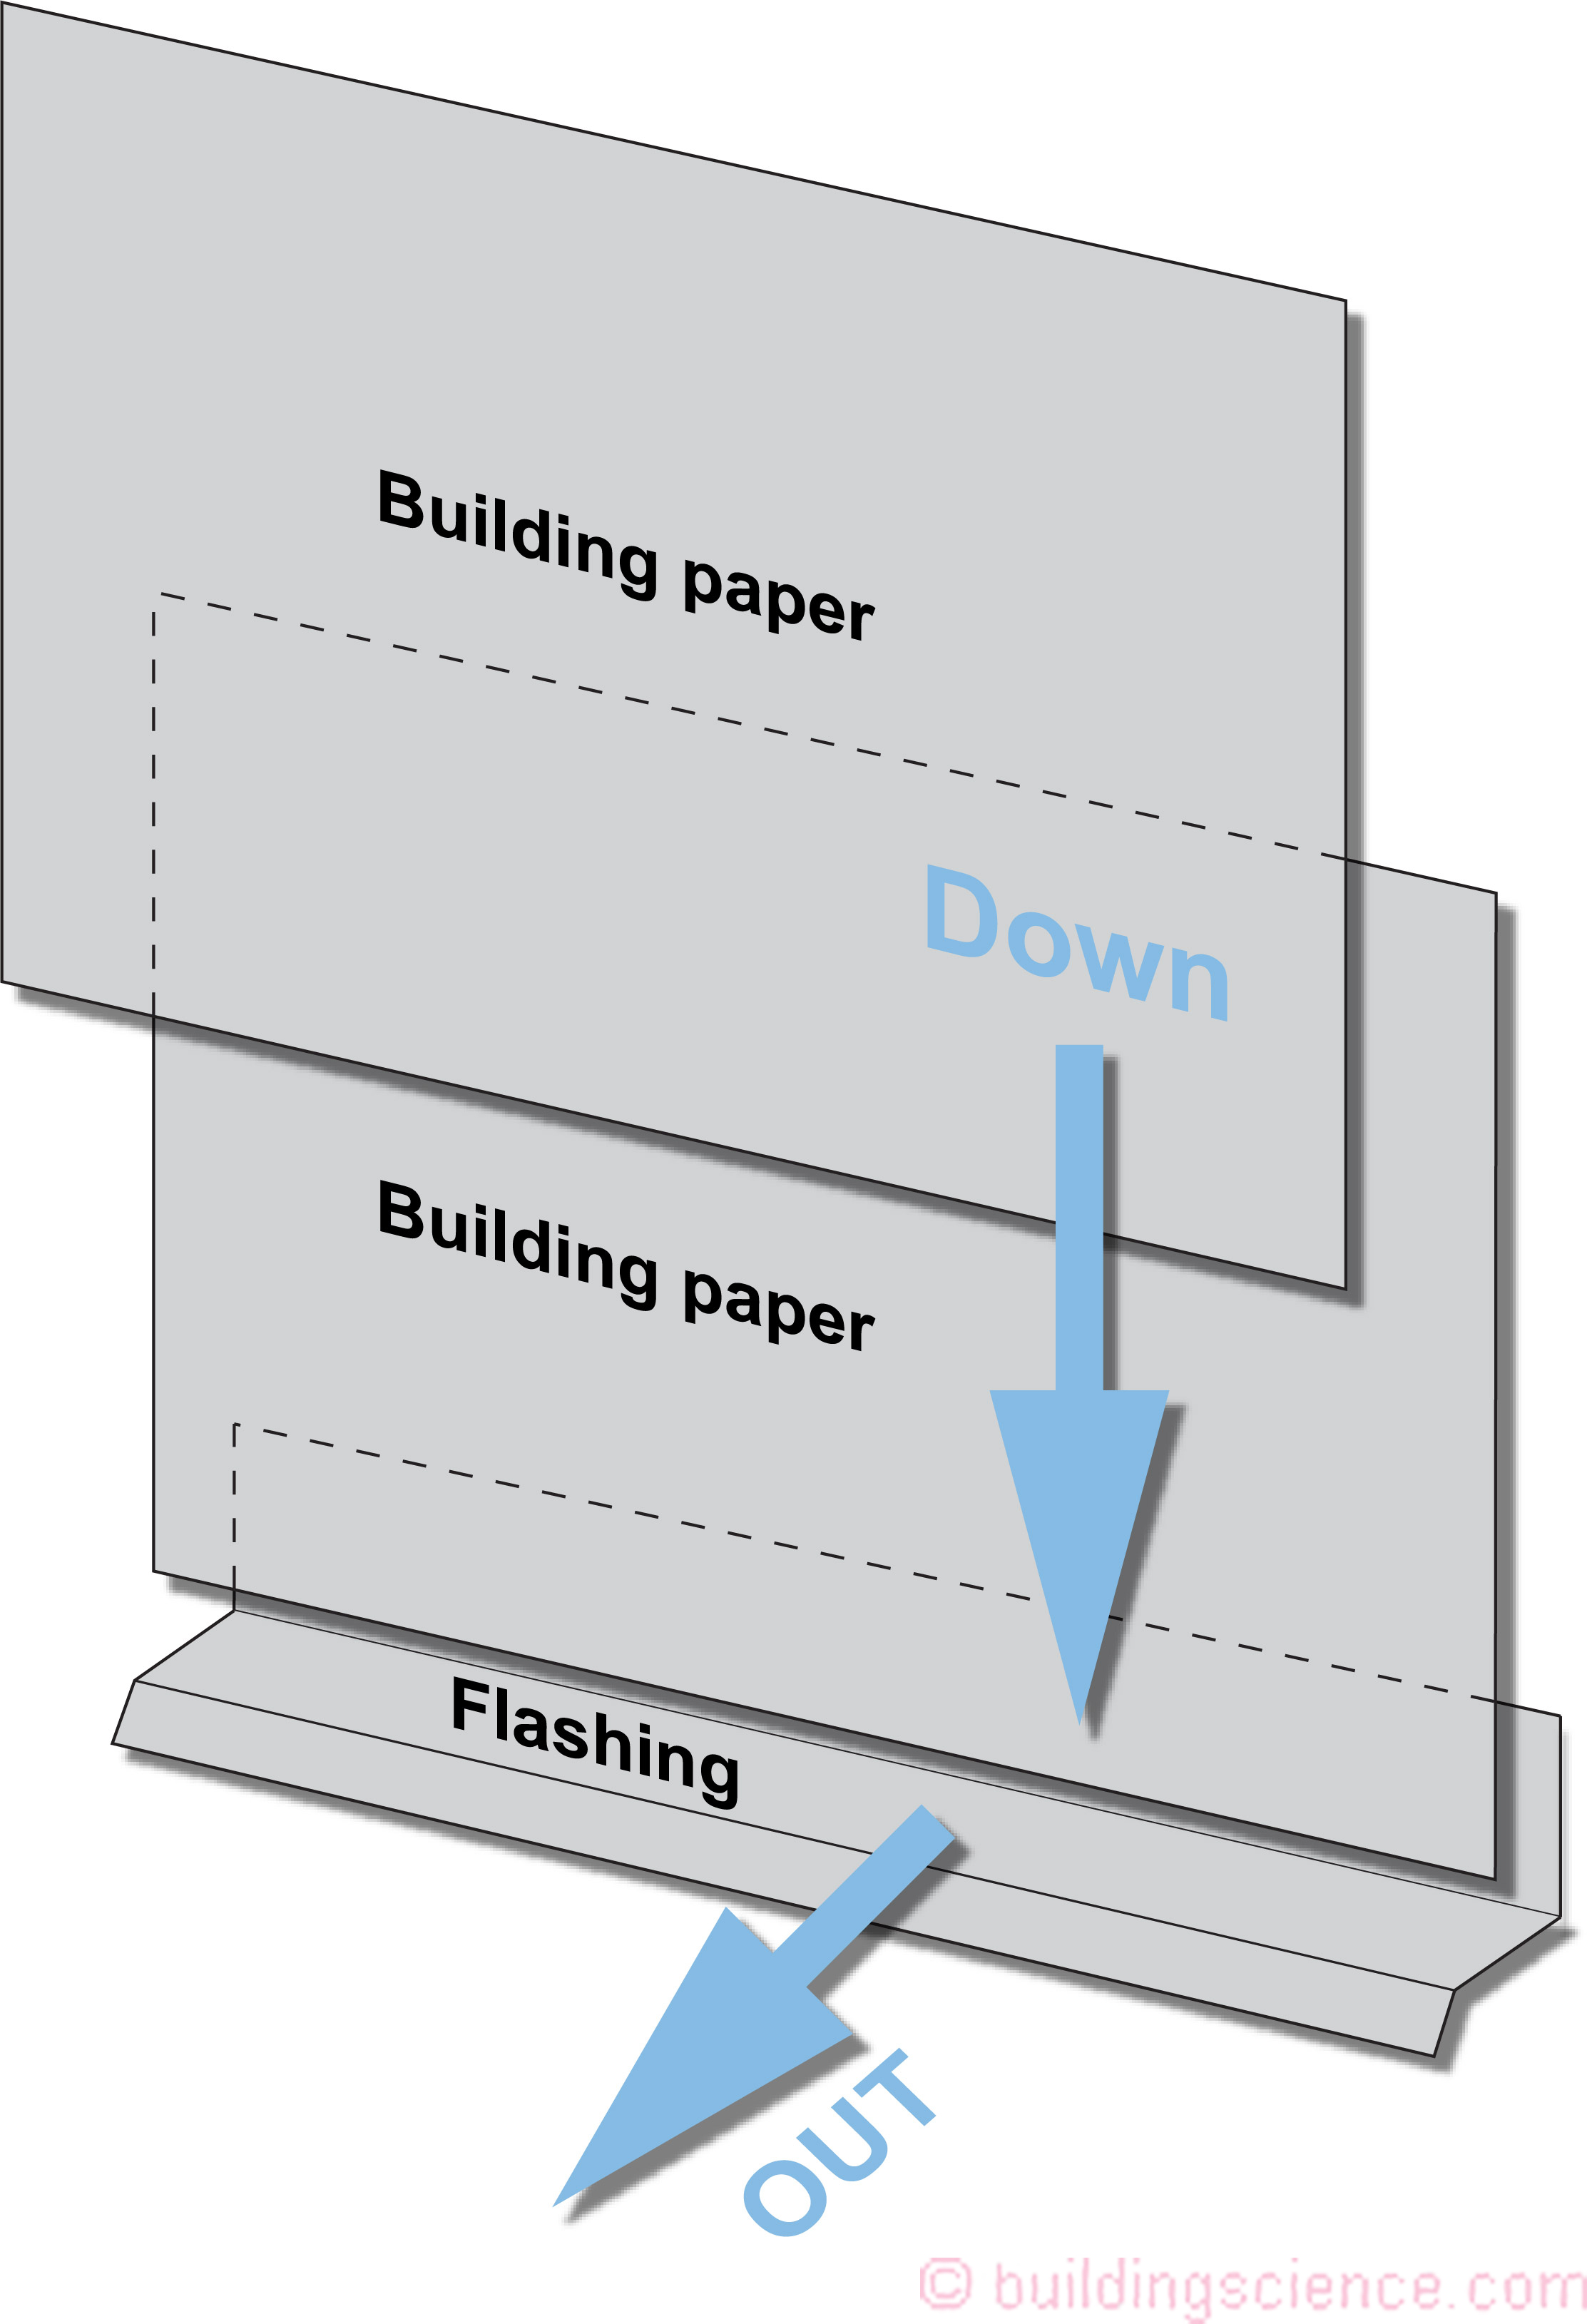
Figure 3: “Down and Out” - Drain penetrating water down and out of the wall. That flashing at the bottom of the wall is a big deal. One of its important functions is to direct the penetrating water back to the exterior.
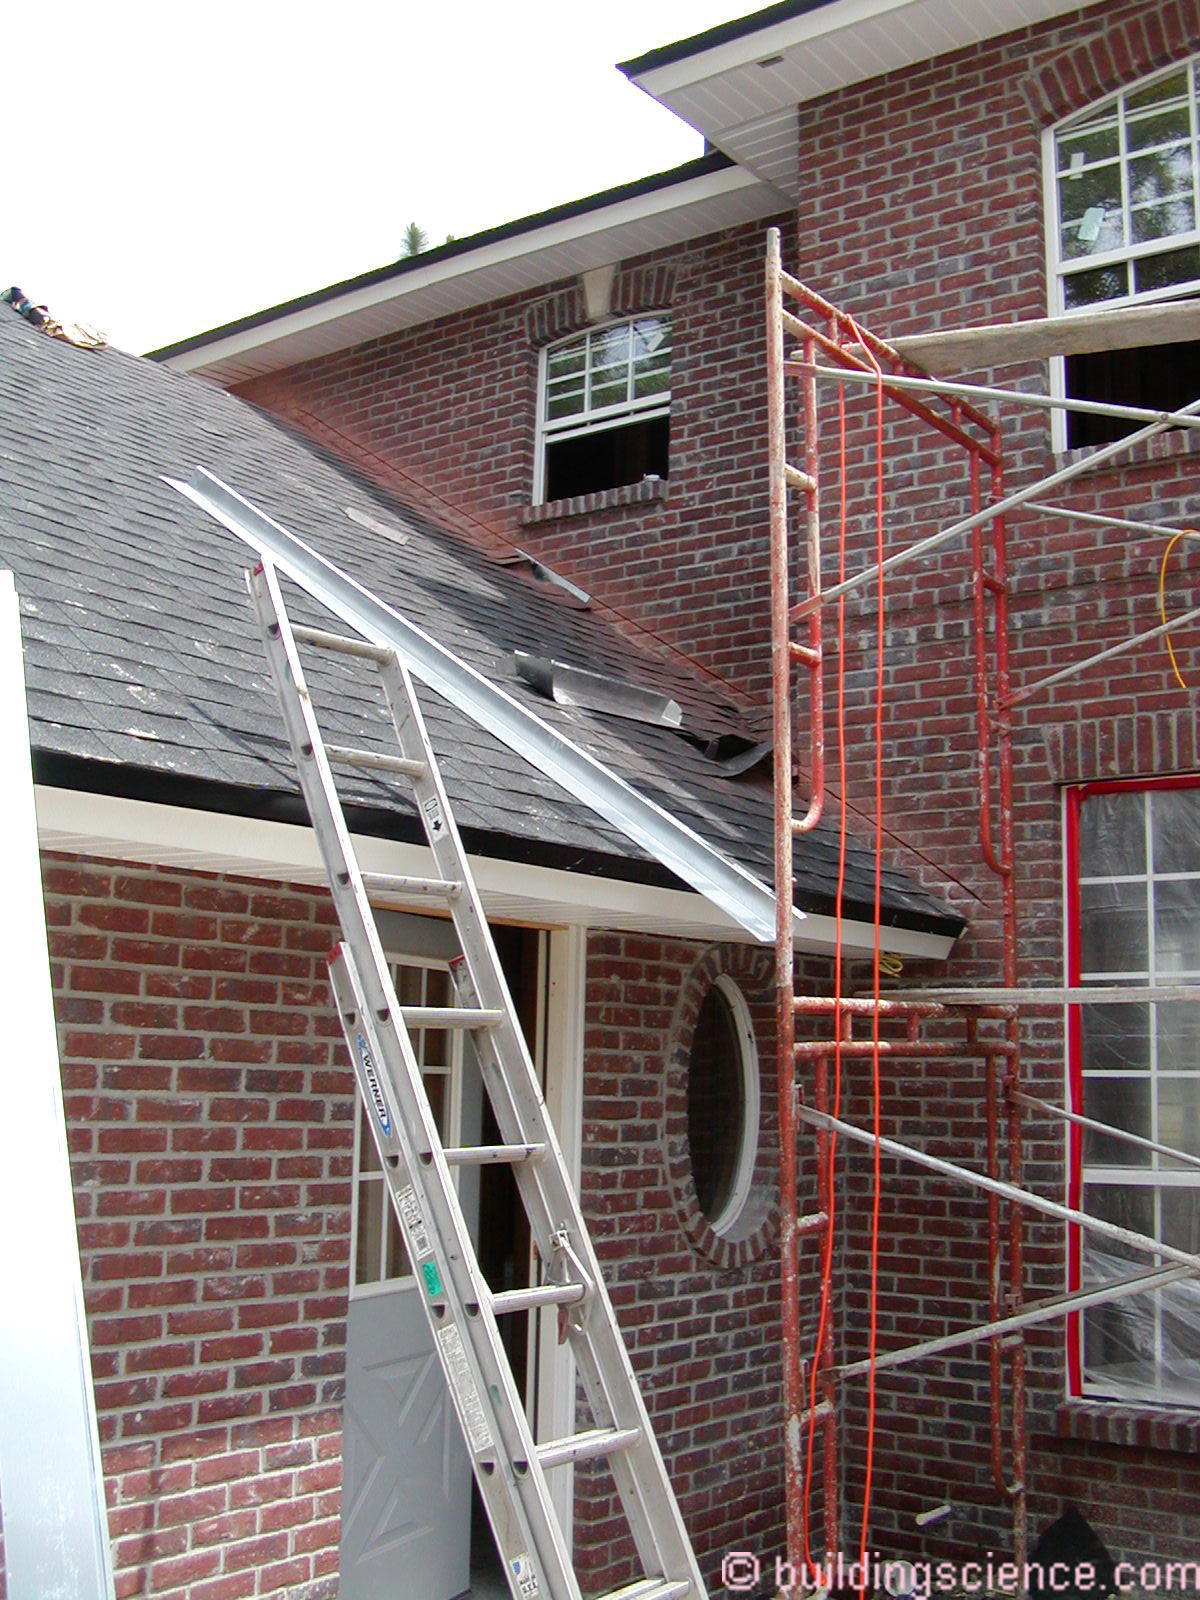
Let’s look at Photograph 3. The conversation started like this…”our “bay bump outs” seem to be leaking…but not all of them”….”we don’t understand…we build them all the same way…we use the same roofer…” Whenever I hear the words “we build them all the same way” my “Spidey sense”[6] tingles…. My response always is “let’s go and take a look at a bunch of them. Turns out that when the bay bump outs had vinyl siding above them they did not leak, but when they had brick they did. In Photograph 3, two bay bump outs are shown. The vinyl siding has not yet been installed above one bay bump out, but the brick has been installed above the other. The metal roof flashing is sealed to the plastic membrane water control layer in the wall where the vinyl siding is to be installed. In the brick wall, the metal roof flashing is sealed to the face of the brick veneer. The flashing does not penetrate through the brick and connect to the plastic membrane water control layer behind the brick. Simple, obvious and very expensive to fix.
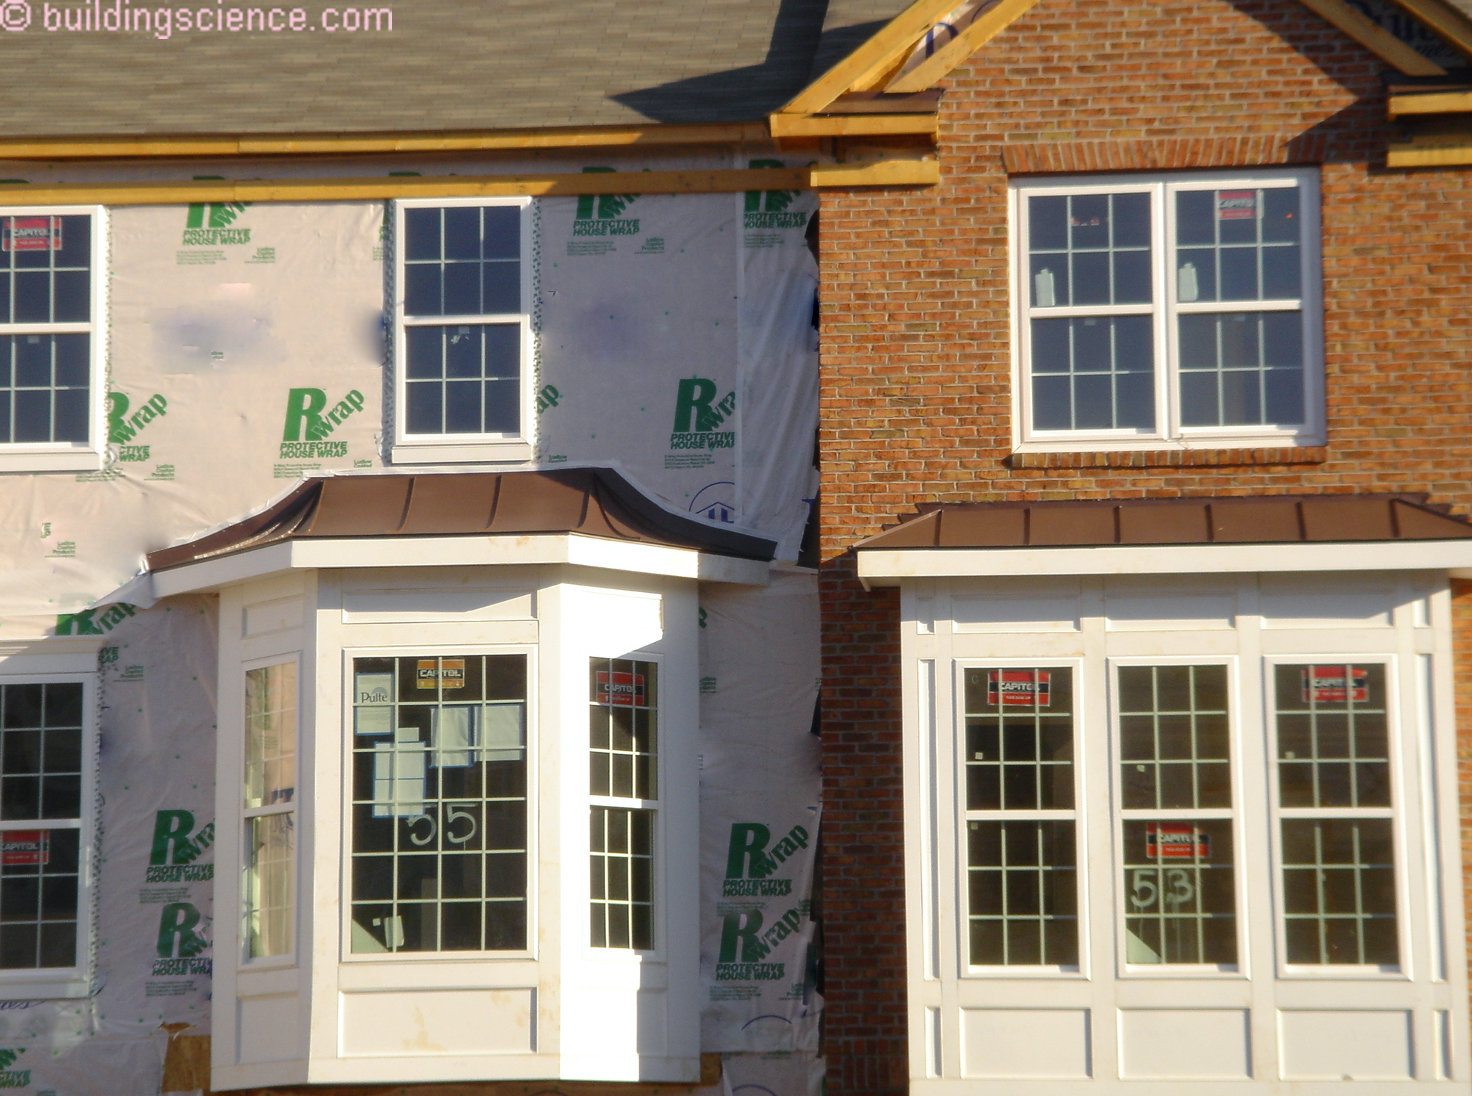
Photograph 3: Bay Bump Outs - Two bay bump outs are shown. The vinyl siding has not yet been installed above one bay bump out, but the brick has been installed above the other. The metal roof flashing is sealed to the plastic membrane water control layer in the wall where the vinyl siding is to be installed. In the brick wall, the metal roof flashing is sealed to the face of the brick veneer. The flashing does not penetrate through the brick and connect to the plastic membrane water control layer behind the brick.
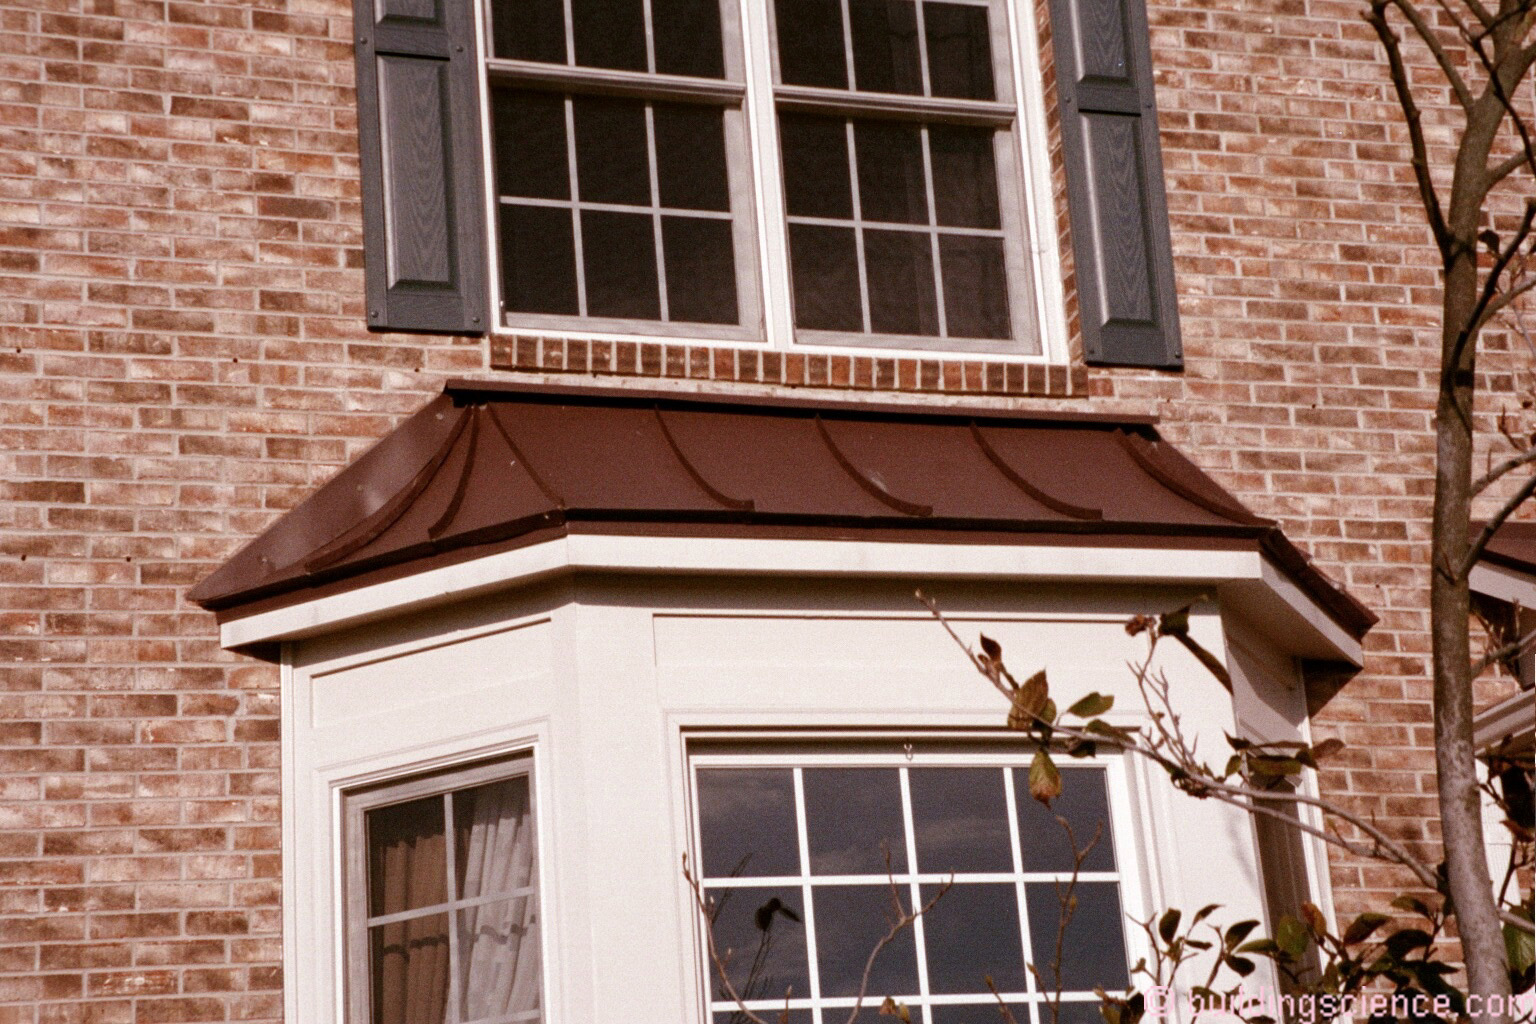
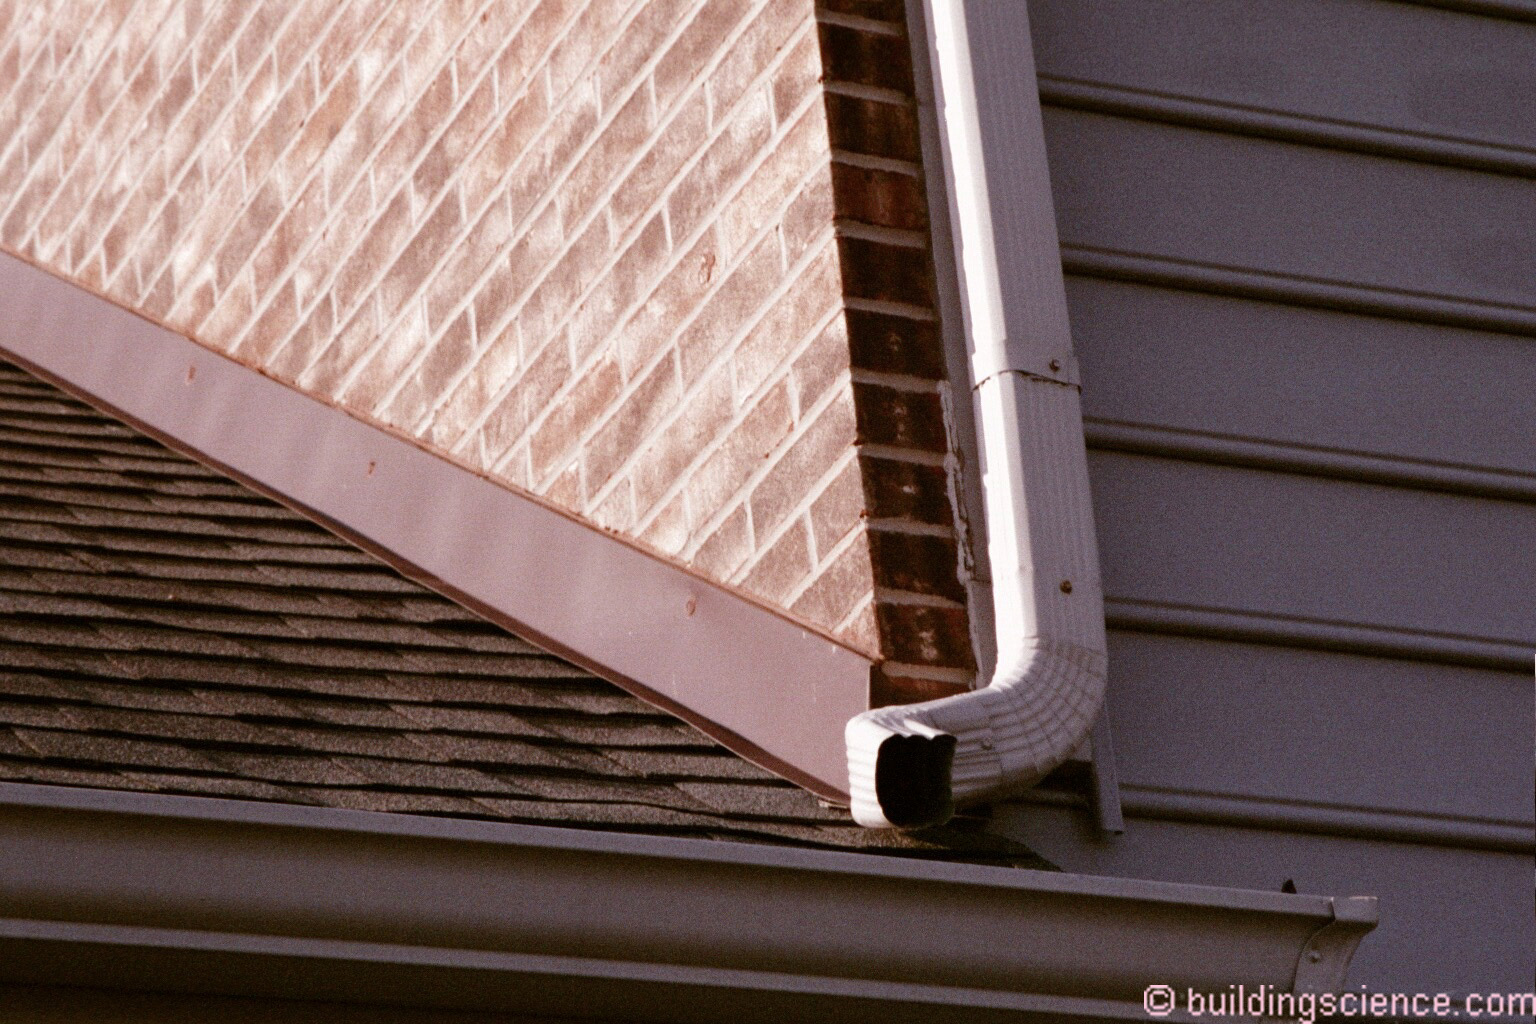
Photograph 4: More Bay Bump Outs - Same thing is going on here. The roof flashing is sealed to the face of the brick. It does not penetrate through the brick and connect to the water control layer behind the brick.
The metal roof has to come off. The framing supporting the metal roof has to come off to expose the steel angle supporting the brick. The brick has to come out above the metal roof. A through wall flashing has to be installed to direct the water draining behind the brick to the outside of the wall/roof intersection. Ouch.
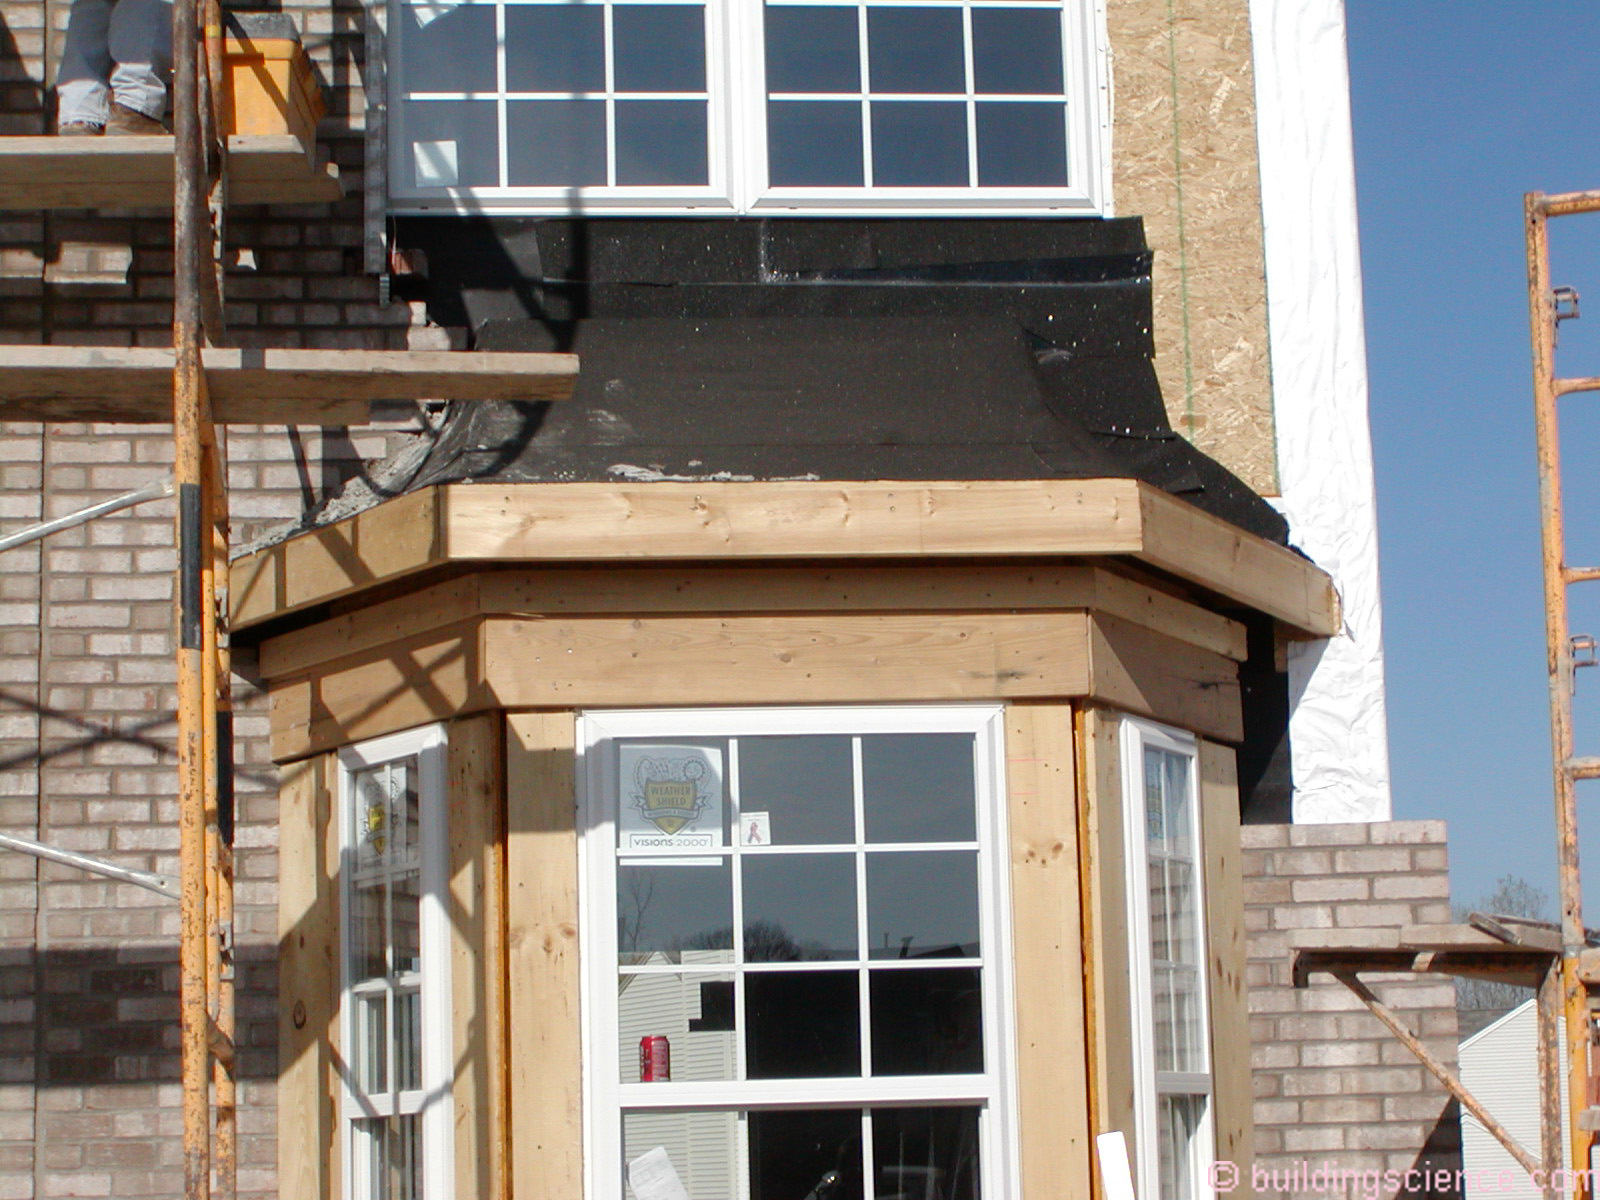
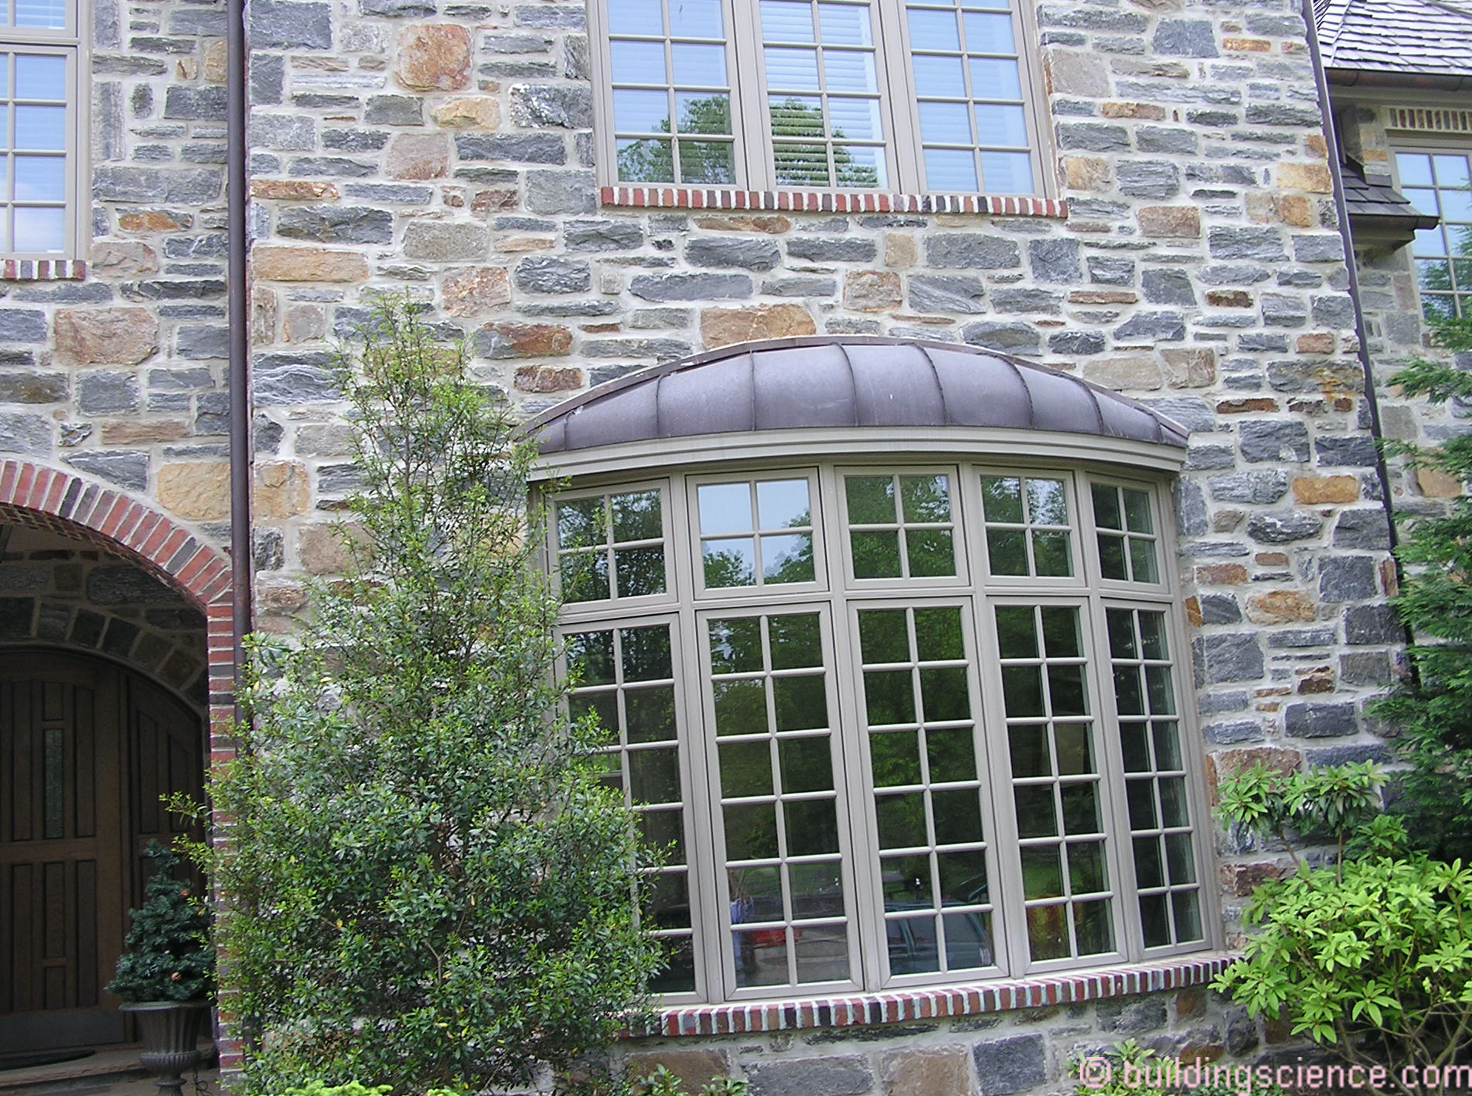
In Photograph 5, the copper roof with an integral roof is installed first, before the brick veneer and before the water control layer. Easy, elegant and it works. So why not this approach all the time? Ah, it is a pain in the butt to protect the metal roof while the brick is installed. It tends to get damaged…and so the builders want to install it after the brick.
Photograph 5: Bump Out Approach One - Copper roof with an integral roof is installed first, before the brick veneer and before the water control layer. Easy, elegant and it works. So why not this approach all the time? Ah, it is a pain in the butt to protect the metal roof while the brick is installed. It tends to get damaged…and so the builders want to install it after the brick.
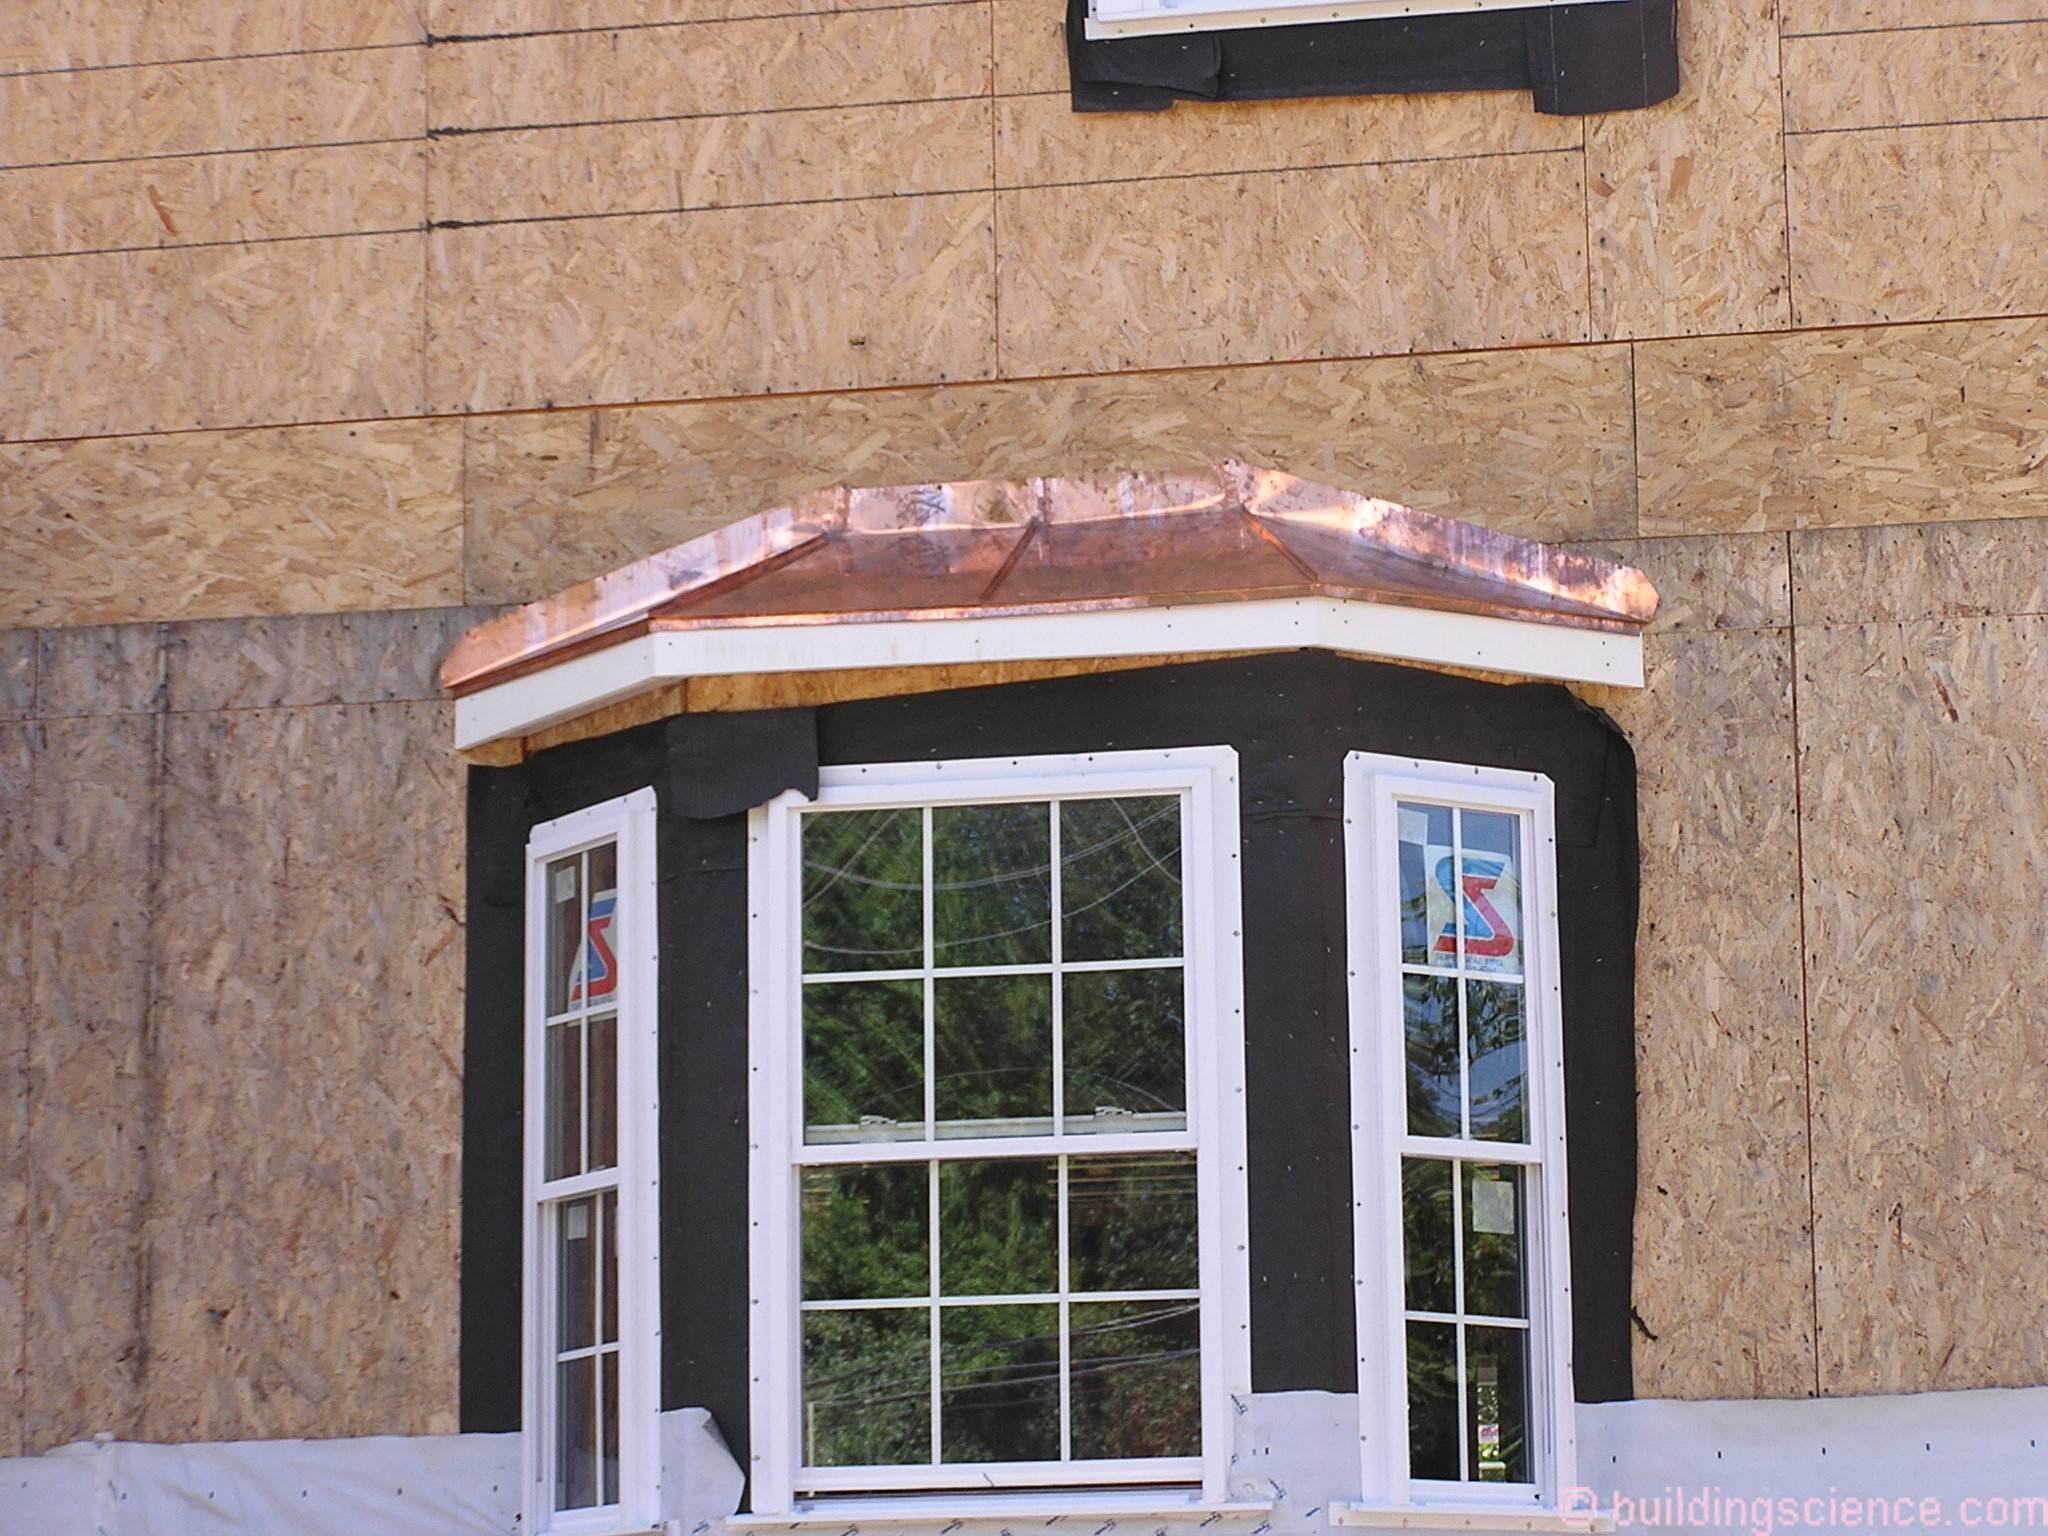
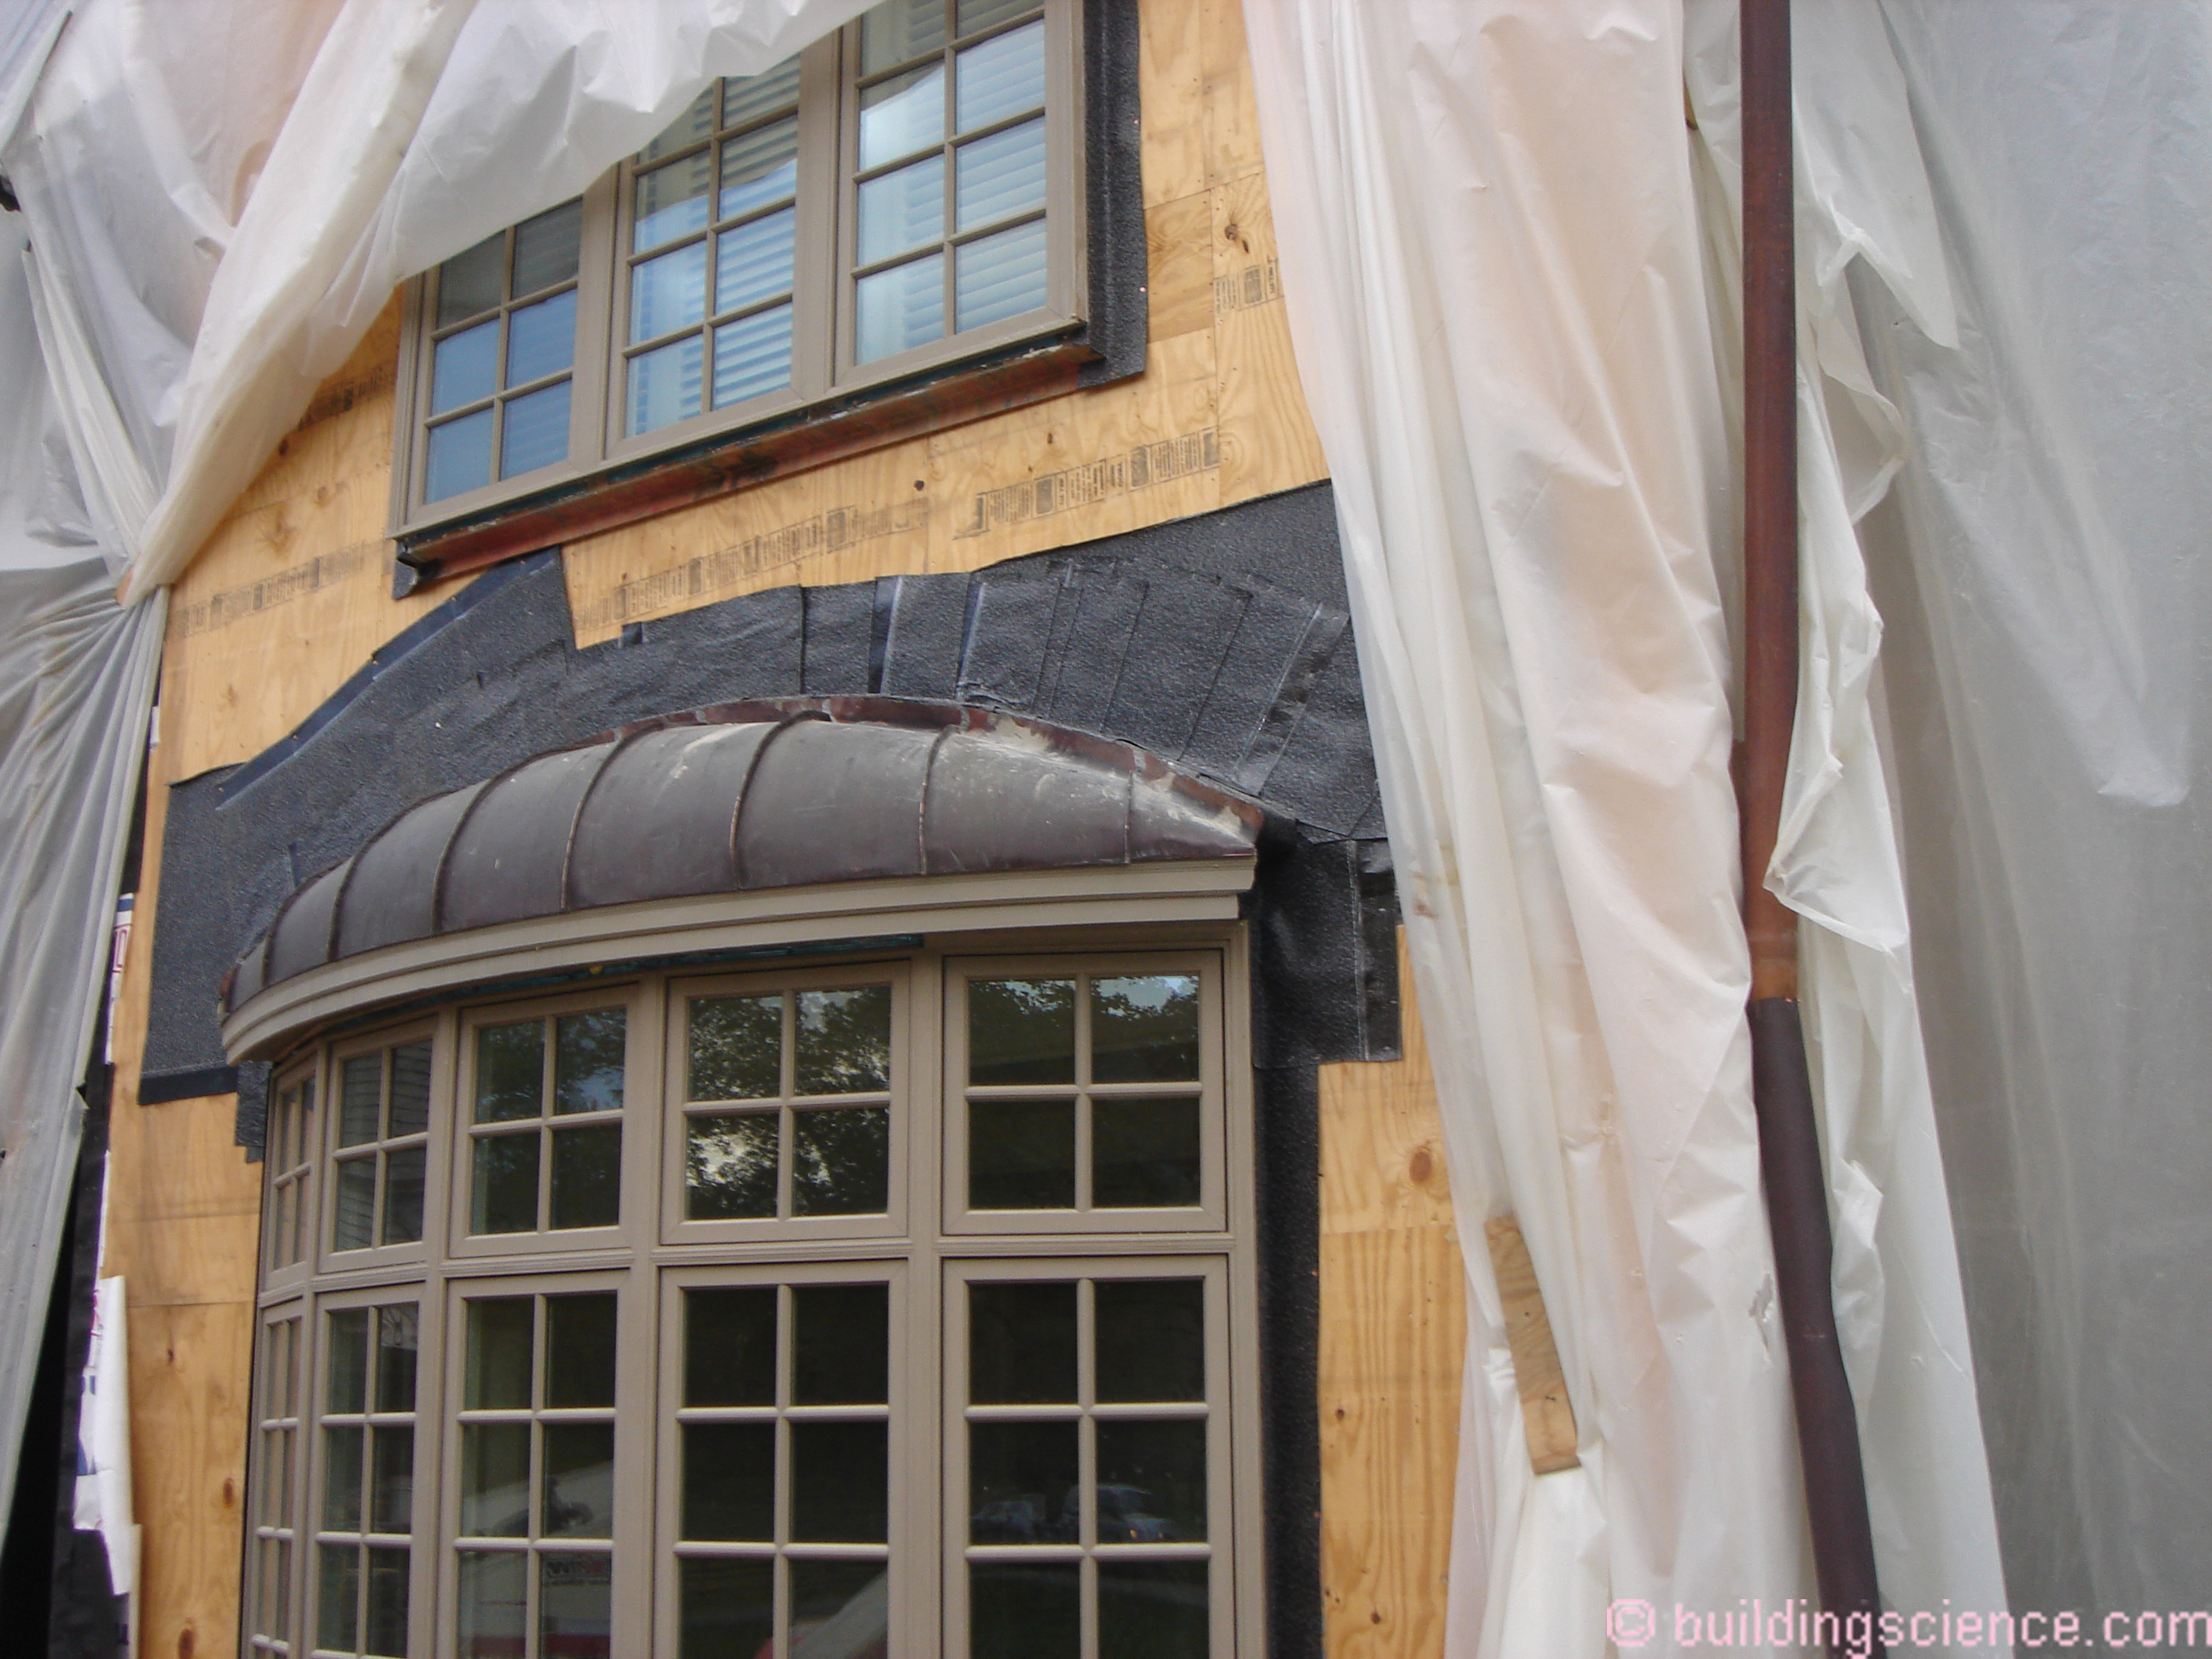
In Photograph 6, a fully adhered water control layer is installed prior to the installation of the brick and prior to the installation of the metal roof over the bay. This type of membrane is typically “robust” enough to survive the installation of the brick veneer. When the metal roof is installed over the top of this water control layer membrane, after the brick veneer is installed, it does not need to pass through the brick. The metal roof is in essence “decorative”. It provides UV protection to the membrane as well as physical protection to the membrane. It also looks good.
Photograph 6: Bump Out Approach Two - A fully adhered water control layer is installed prior to the installation of the brick and prior to the installation of the metal roof over the bay. This type of membrane is typically “robust” enough to survive the installation of the brick veneer. When the metal roof is installed over the top of this water control layer membrane, after the brick veneer is installed, it does not need to pass through the brick.
In Figure 4 and Figure 5 the brick veneer is supported by a metal angle – but with a “twist”… the brick veneer is constructed within a metal “gutter”. The water control layer is lapped into this gutter and the water that drains down the water control layer into the gutter is drained out both ends of the gutter. The gutter extends past both sides of the bay and drains into the wall cavity of the main walls. The metal roof is then sealed to the face of the brick.

Figure 4: “Brick Gutter” - The brick veneer is supported by a metal angle and constructed within a metal “gutter”. The water control layer is lapped into this gutter and the water that drains down the water control layer into the gutter is drained out both ends of the gutter. The gutter extends past both sides of the bay and drains into the wall cavity of the main walls.
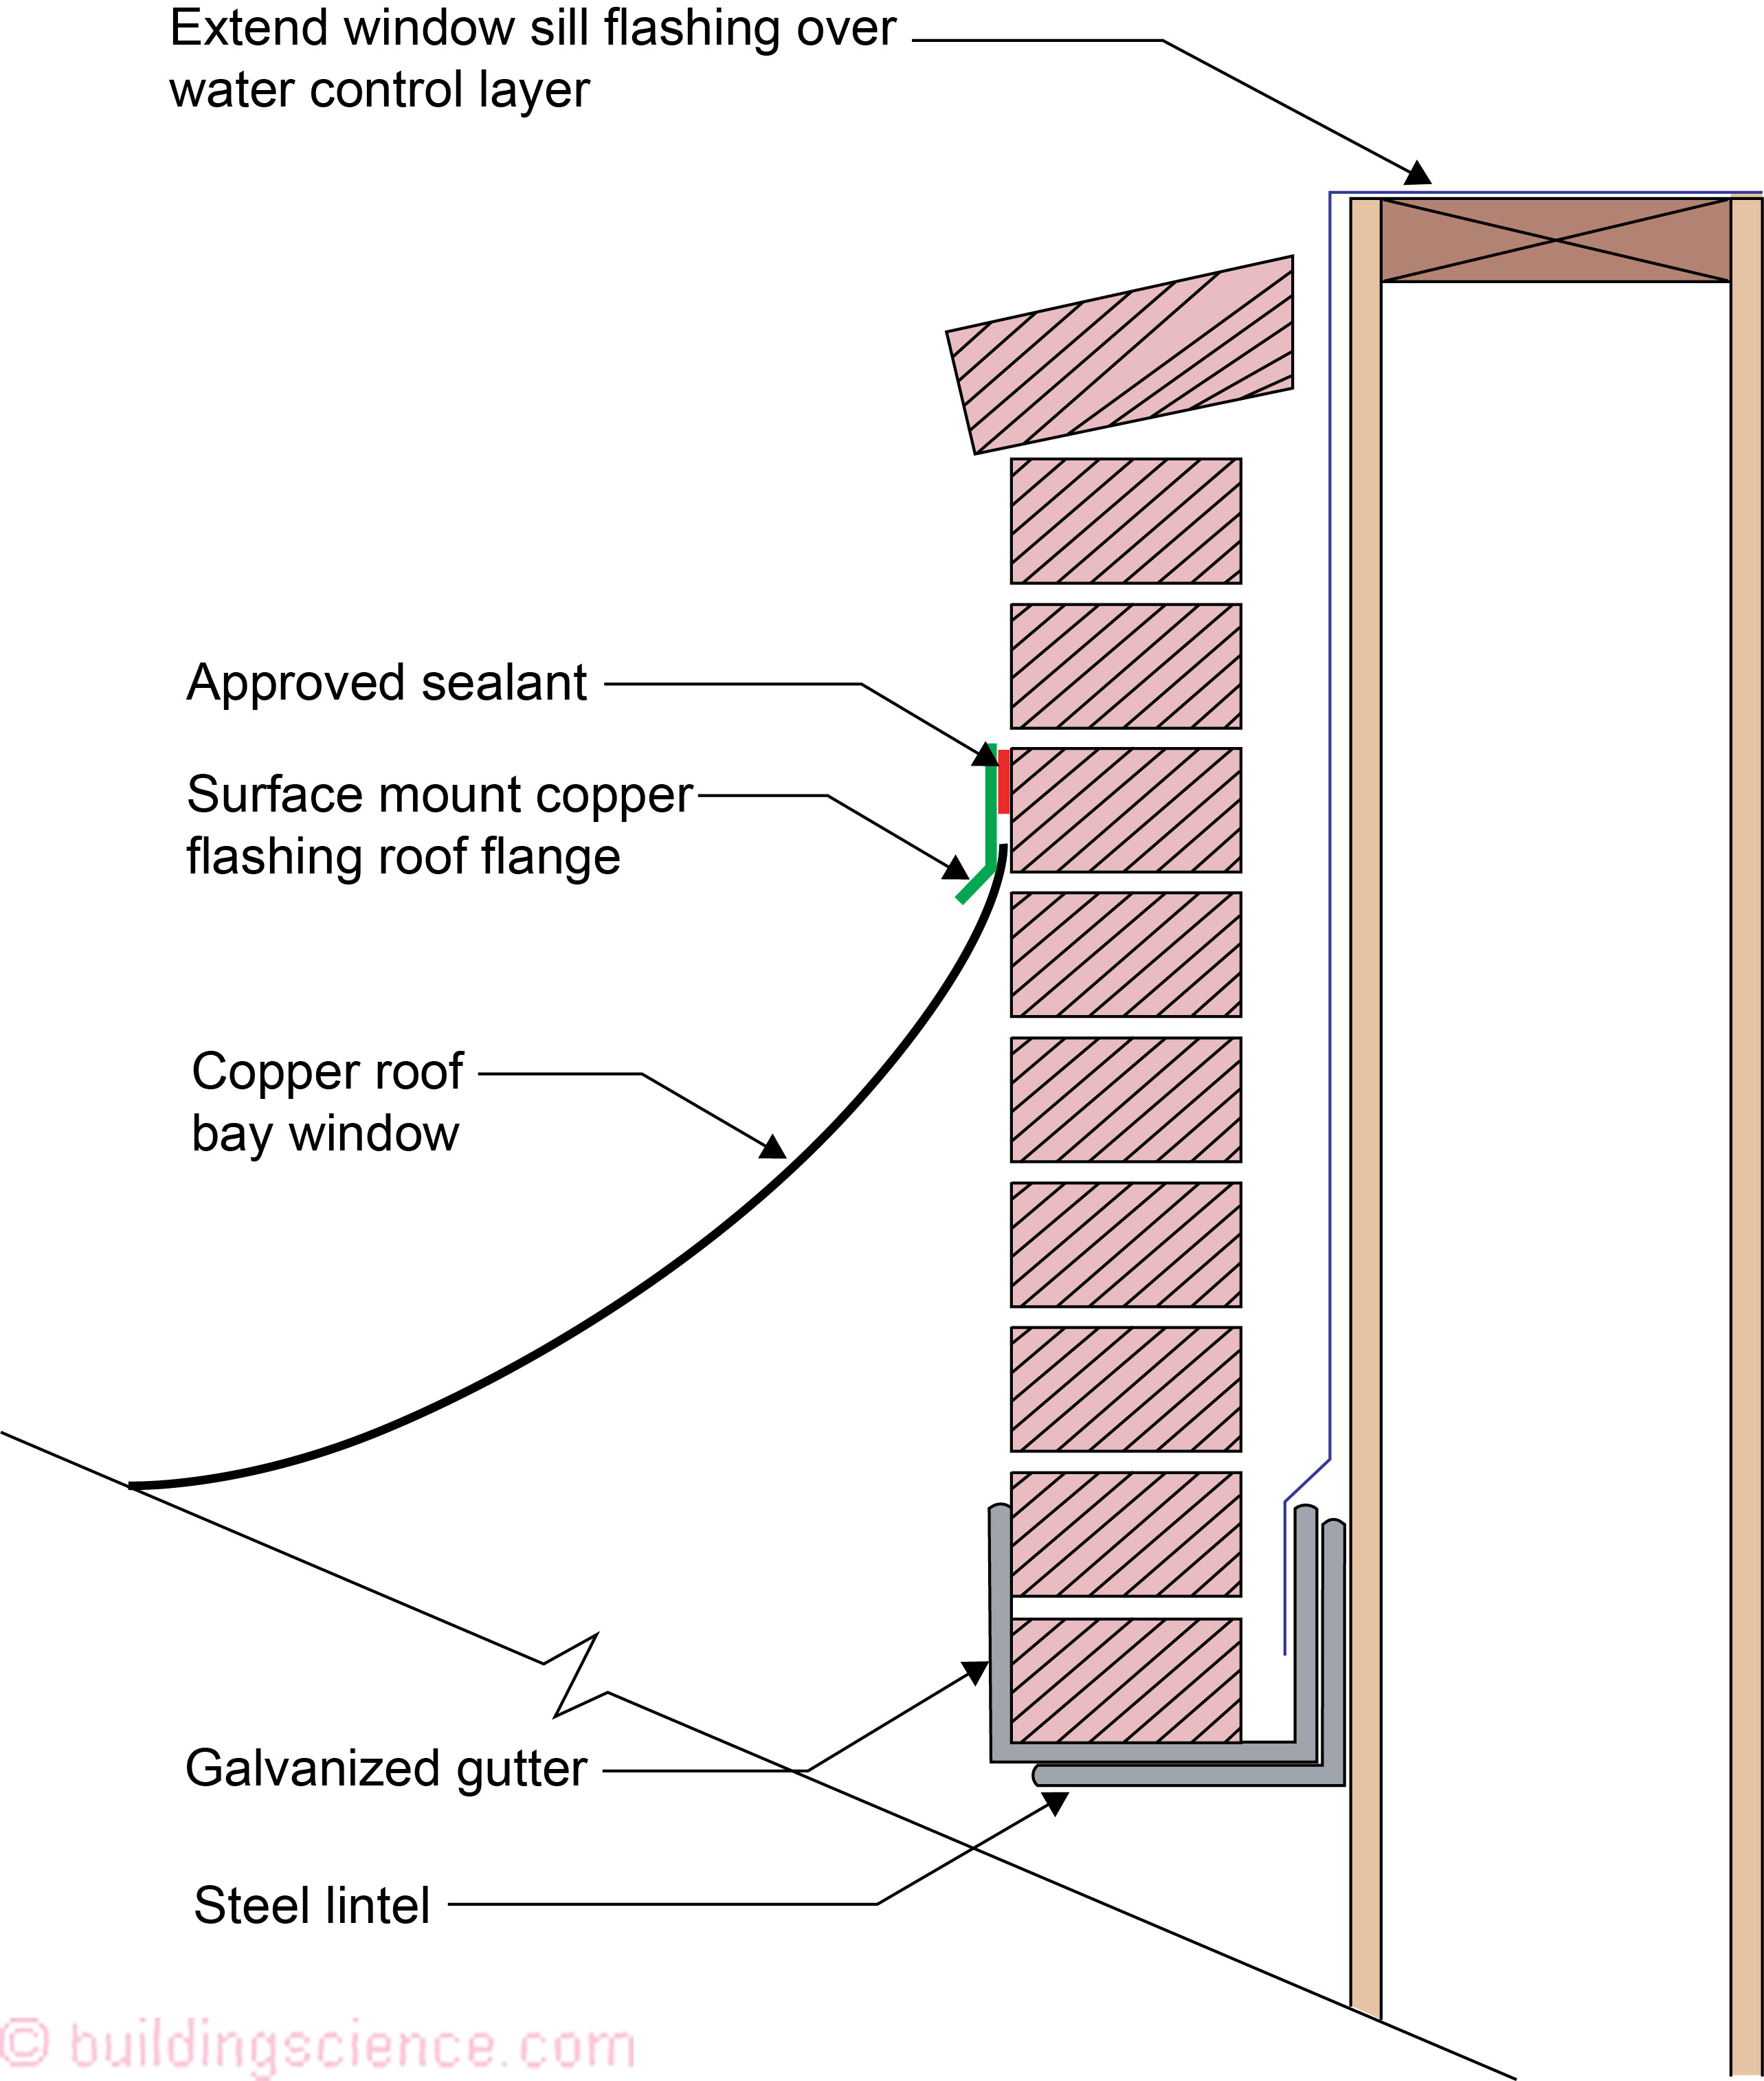
Figure 5: More Brick Gutter - The metal roof is sealed to the face of the brick.
What about stone veneers? Same issues, same problems, same solutions. Photograph 7 shows a metal roof sealed to the face of a stone veneer. Bad, bad, bad…. Photograph 8 shows the repair. The stone had to be taken down and a membrane installed to connect the water control of the metal roof to the water control of the wall…in a manner similar to what was done in Photograph 6 with brick veneer.
Photograph 7: Stone Veneer Bump Out - Metal roof sealed to the face of a stone veneer. Bad, bad, bad….
Photograph 8: Stone Veneer Bump Out Repair - The stone had to be taken down and a membrane installed to connect the water control of the metal roof to the water control of the wall.
So much for bays….can it get worse? Yes, of course. Much worse… Let’s now look at where walls meet roofs (Photograph 9). Here we have the intersection of a sloping roof with a brick veneer wall. How do we drain the back of the brick veneer to the exterior? In this photograph we don’t… The roof flashing is only sealed to the face of the brick veneer. Happens all the time.
Some folks believe that saw cutting a “notch” (the correct term is “regletting”) into the brick (Photograph 10) and inserting a “counter flashing” (Photograph 11) will do the trick. No chance.
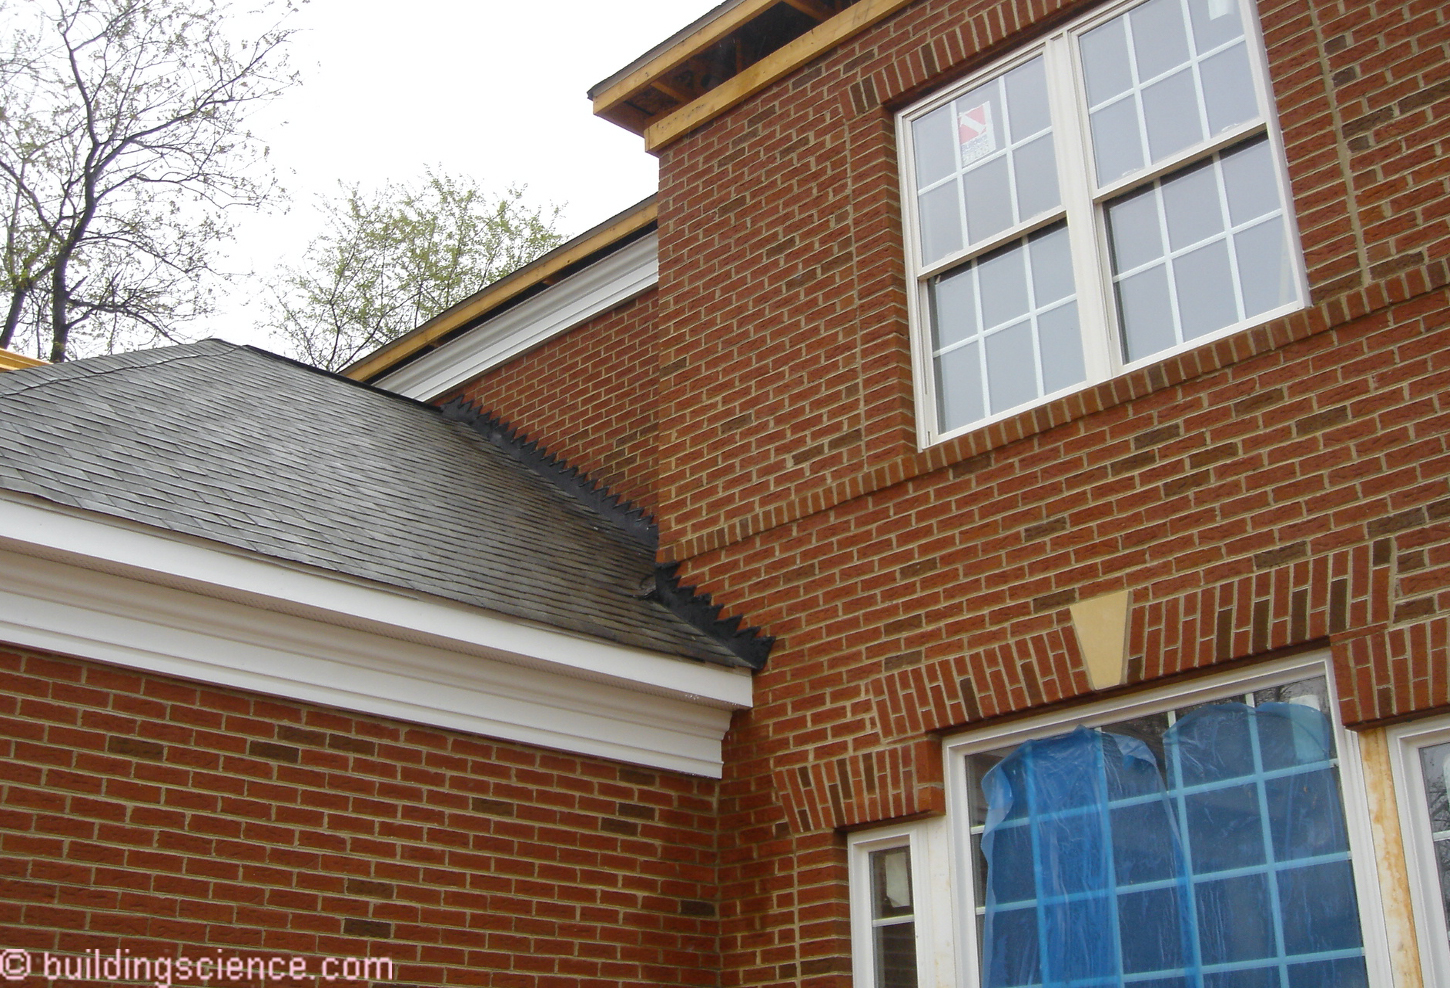
Photograph 9: Walls Meeting Roofs: Where we have the intersection of a sloping roof with a brick veneer wall the water control of the roof needs to connect to the water control of the wall. It is necessary to drain the back of the brick veneer to the exterior. This is not done here. The roof flashing is sealed to the face of the brick.
Photograph 10: Regletting Does Not Work - Saw cutting a “notch” or “reglet” into the brick and inserting a “counter flashing” will not do the trick. No chance.
Photograph 11: Counter Flashing Does Not Work – For the counter flashing to work it has to be connected to a through wall flashing that then connects to the water control layer of the wall.
Let’s try the same thing with stone. Nothing like a stone turret meeting a roof to have fun with (Photograph 12). Yup, a little bit of sealant will do the trick (Photograph 13). Hah!
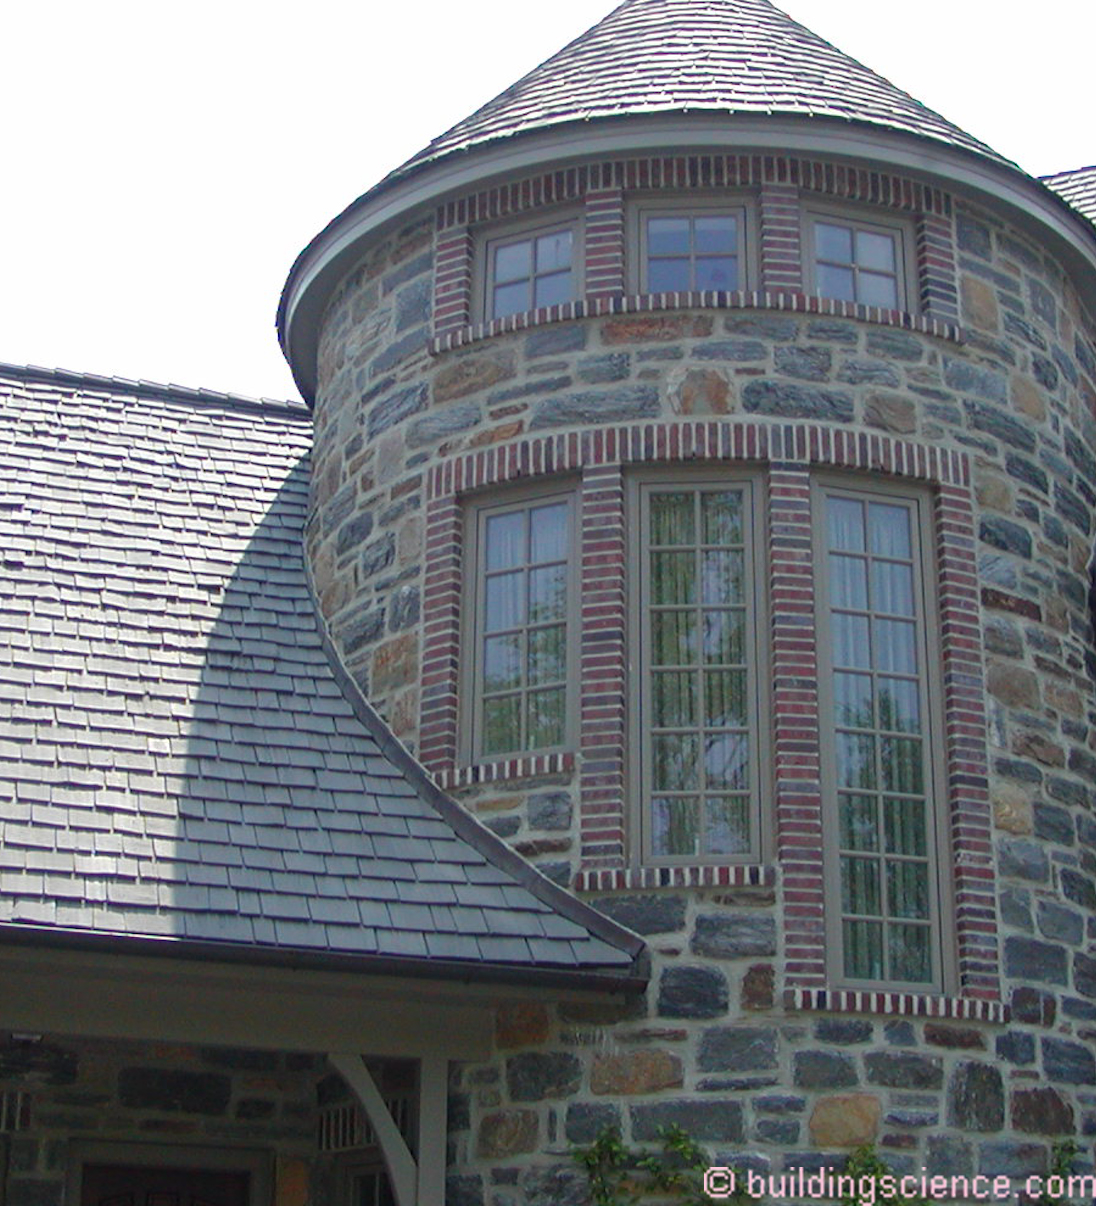
Photograph 12: Stone Veneer - Nothing like a stone turret meeting a roof to have fun with.
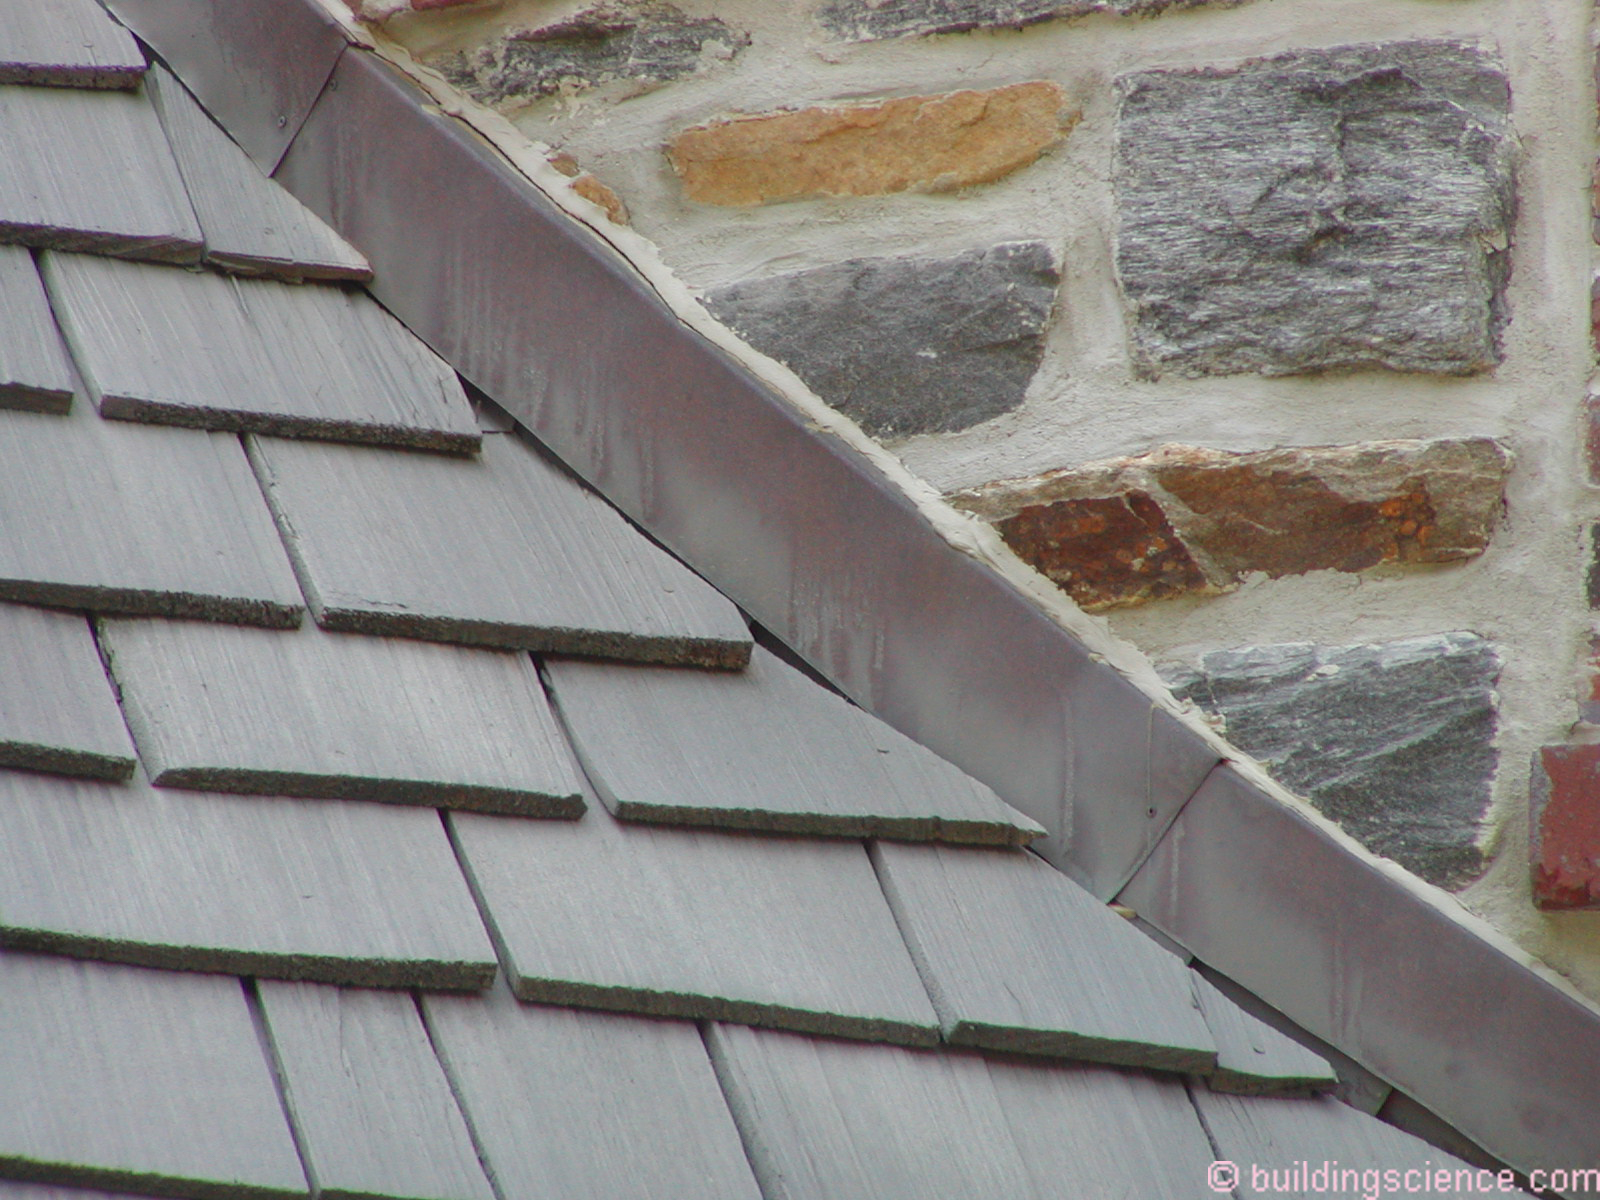
Photograph 13: Sealant Dreams - Yup, a little bit of sealant will do the trick. Hah! The stone has to be removed and through wall flashing installed.
The water control of the roof needs to connect to the water control of the wall and pass through the brick layer and stone layer. Figure 6 and Figure 7 show how it needs to be done. The flashing detail needs to be “stepped” upward and integrated into each course of brick. Note the end dam on each counter flashing segment in Figure 7. But this is hard….it is not easy… That is correct. Suck it up and do it…or stay away from brick and stone. Perhaps your future should be limited to siding and stucco.
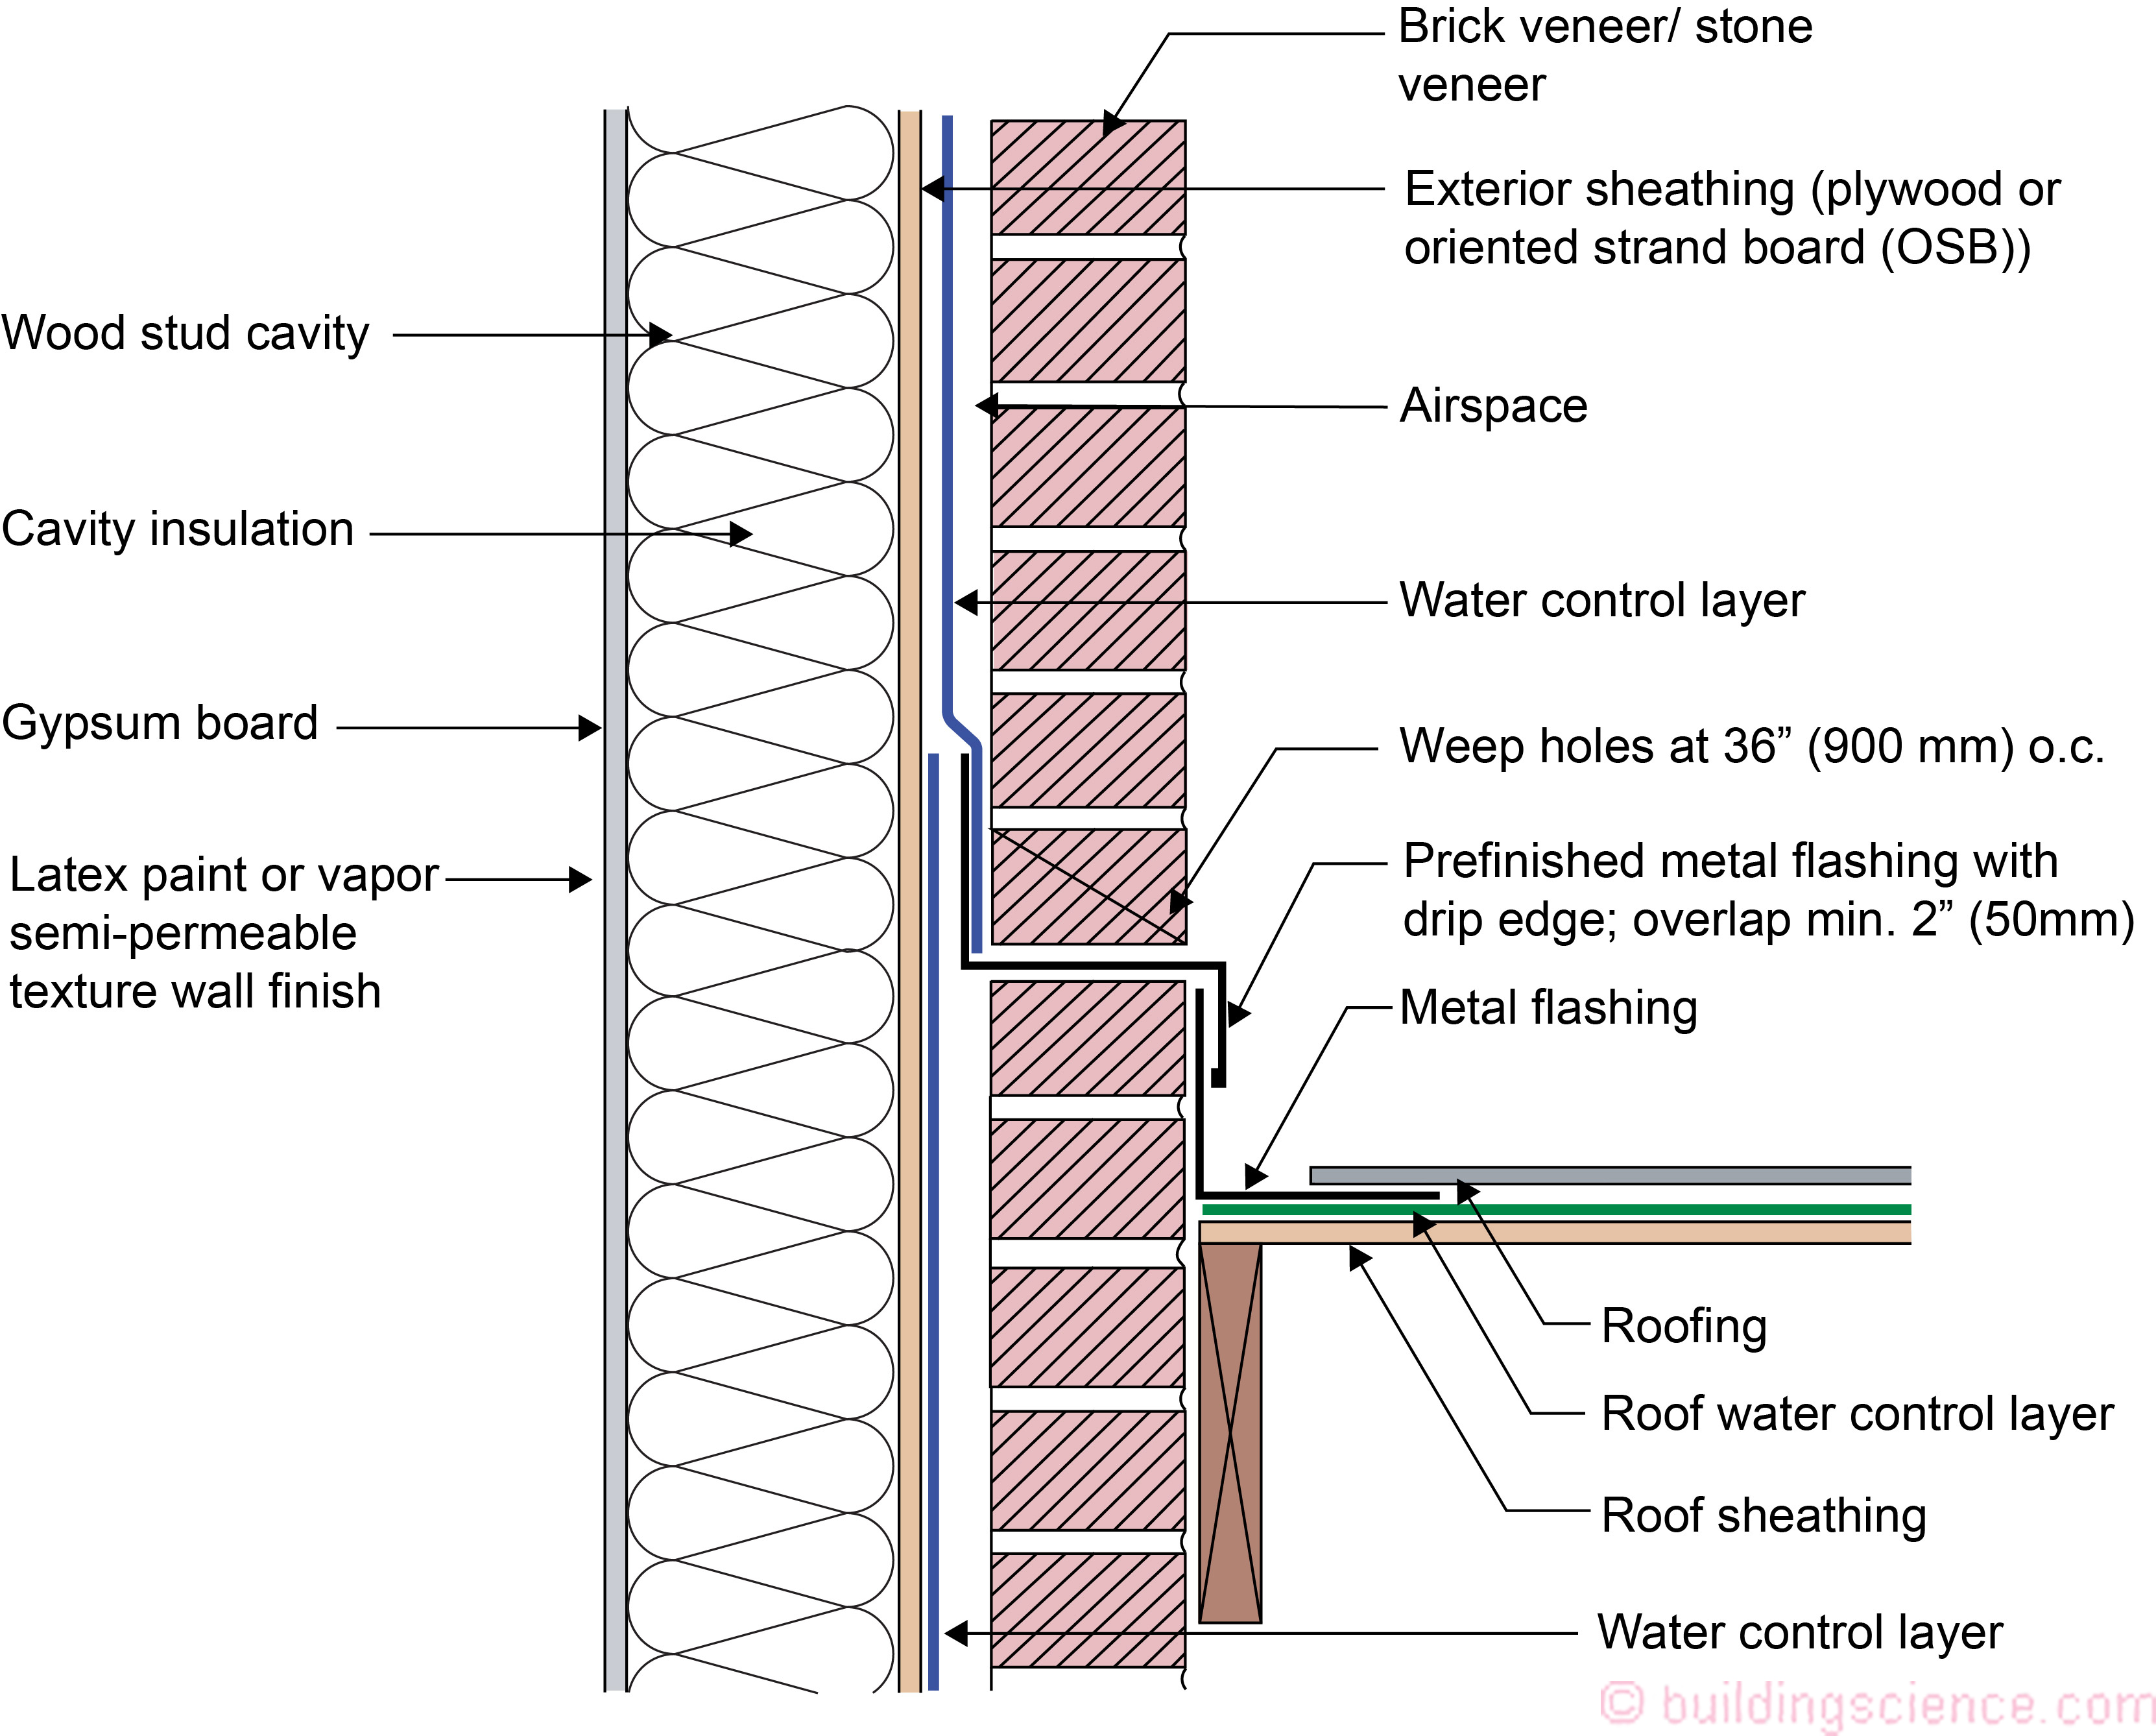
Figure 6: Roof to Wall Connection - The water control of the roof needs to connect to the water control of the wall and pass through the brick layer and stone layer.
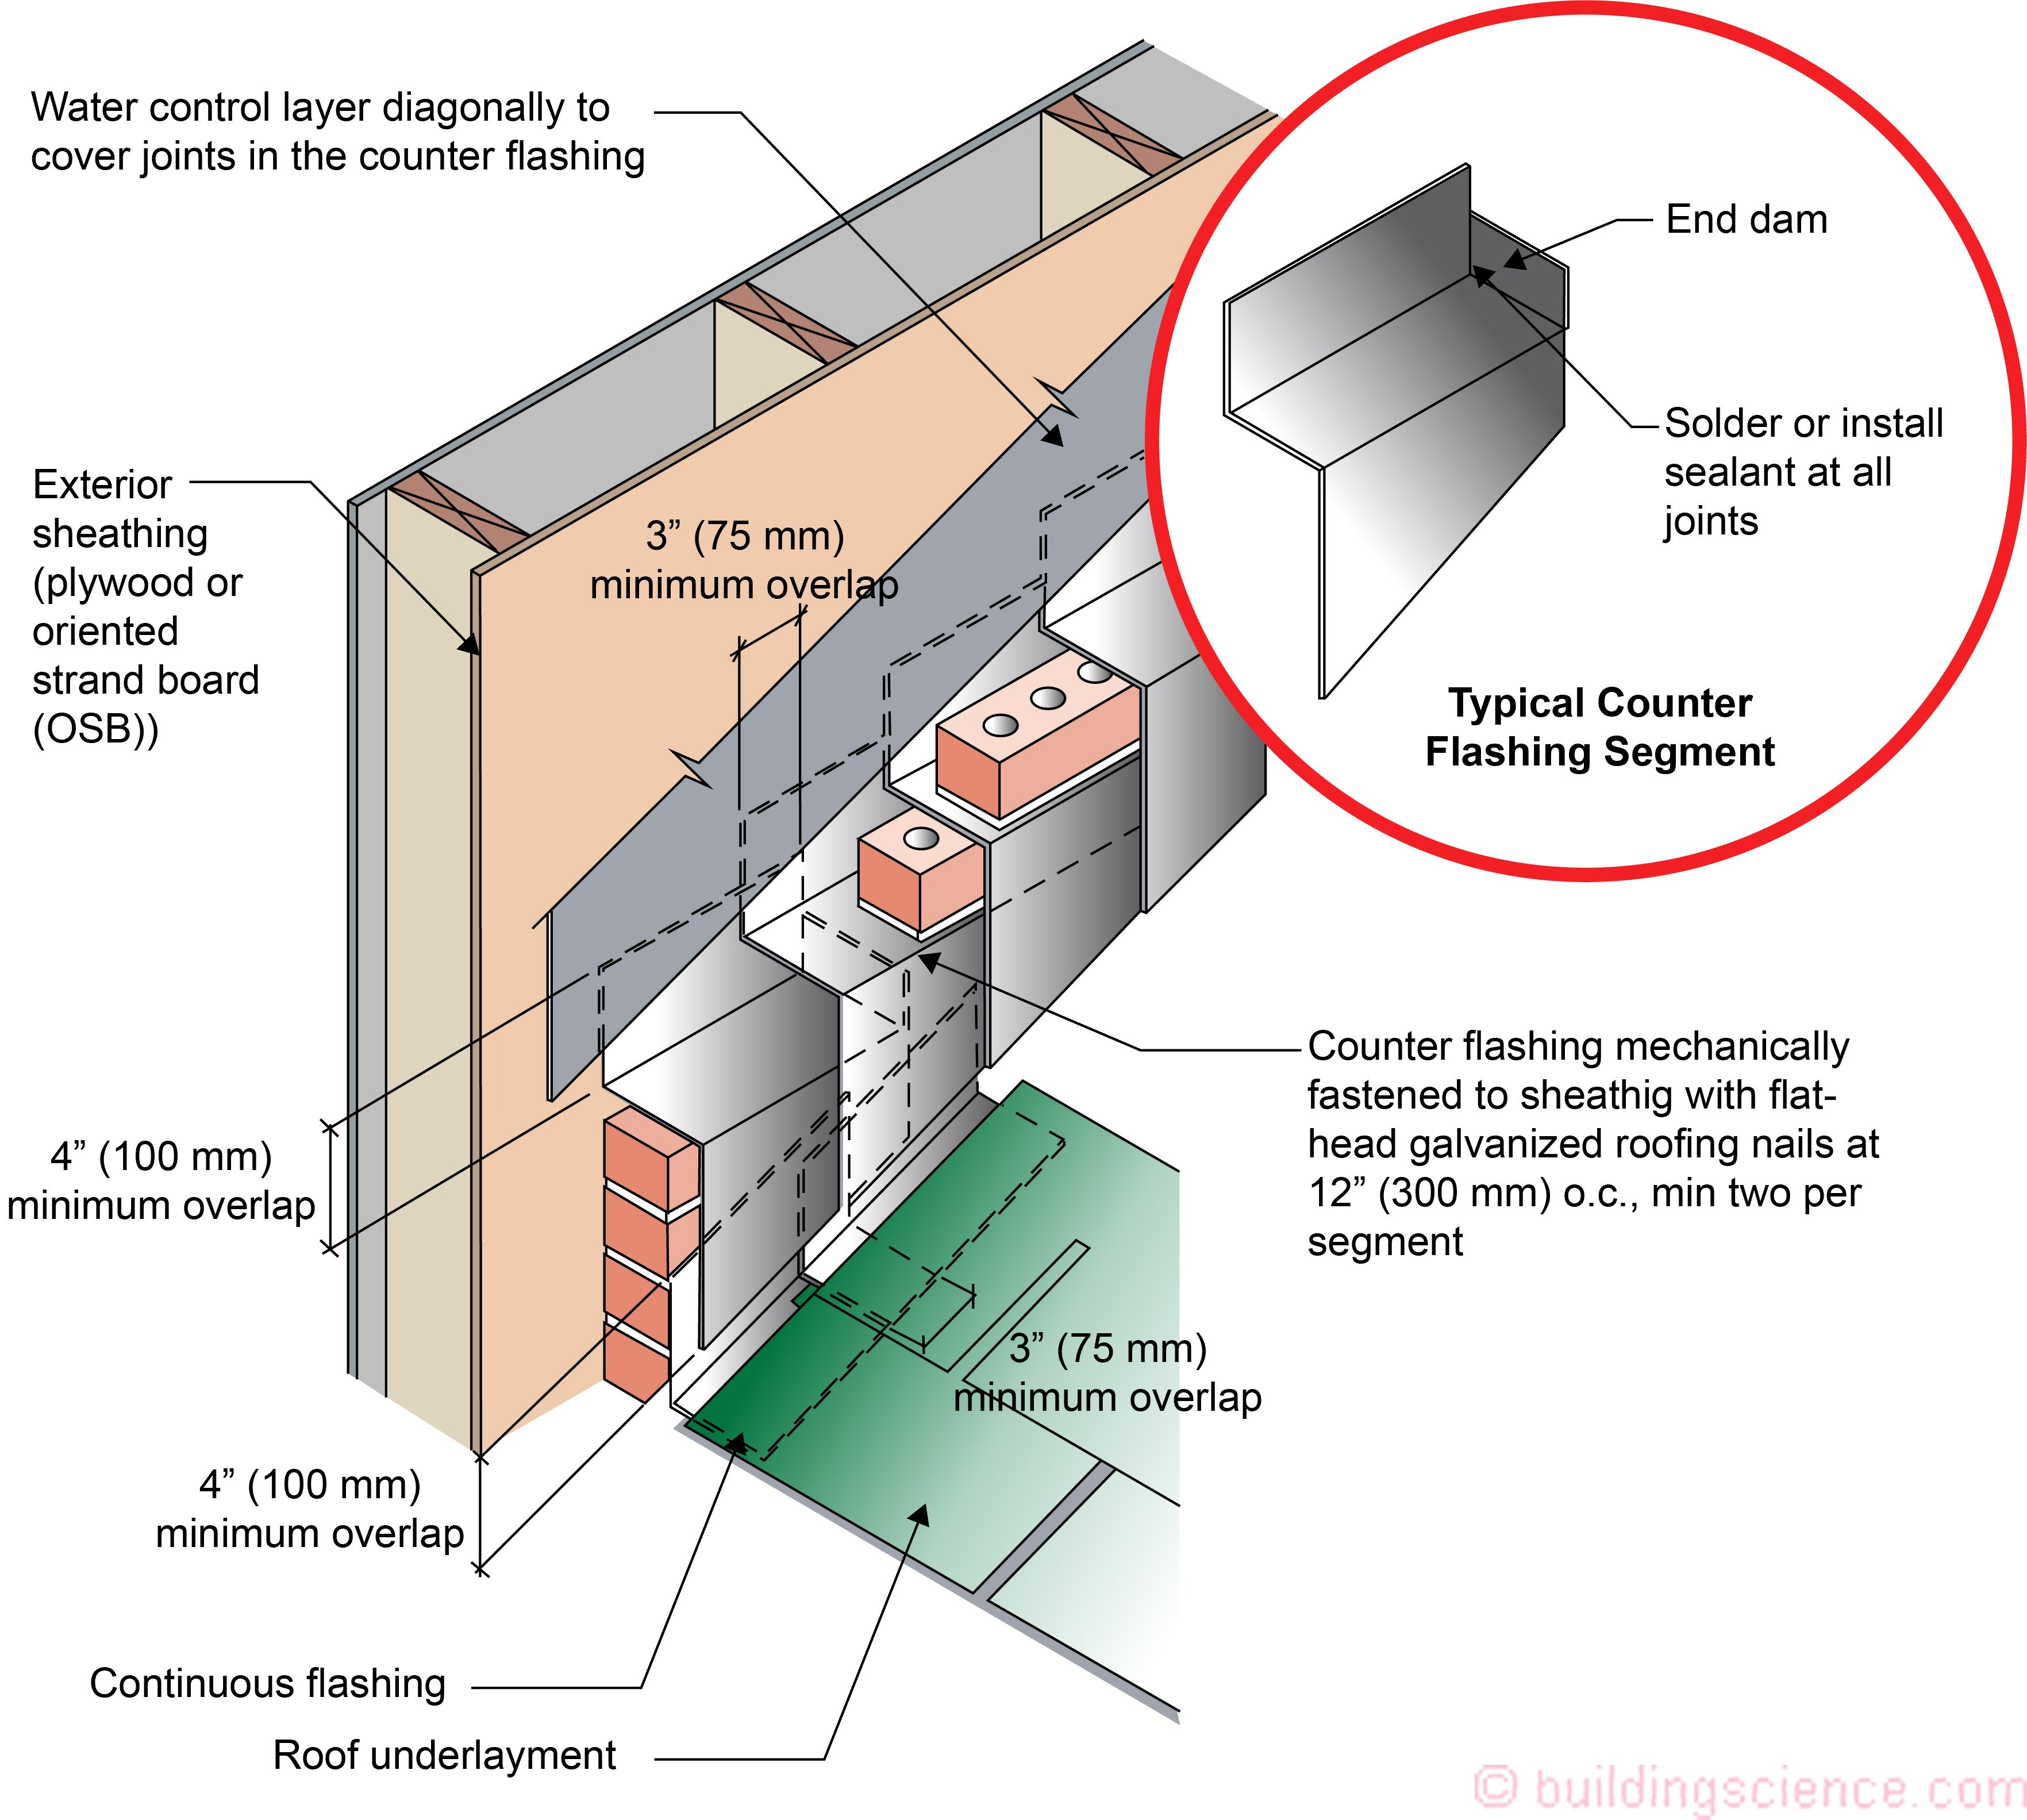
Figure 7: Roof to Wall Connection – Flashing detail needs to be “stepped” upward and integrated into each course of brick. Note the end dam on each counter flashing segment.
[1] There is no statute of limitations for embarrassment…. However, I have found over time that it now tends to bring a smile. The time between the embarrassment and the smile still varies….but tends to be directly related to the cost of the embarrassment….This is known as the Lstiburek Postulate.
[2] I am pretty sure “smooshed” is a metric term.
[3] Yes, this uncontrolled, un-ASTM sanctioned experiment took place in Canada.
[4] I did this at a garage wall. It tends to be difficult to convince someone to open up one of their walls just to show how things works. I did this at a builder’s “model home” where the builder’s construction office was in the garage….
[5] They joined the “cult of drainage”.
[6] ”The Amazing Spider-Man”…a great, great comic book for a nerd in the 1960’s…I should know…Same thing is going on in Photograph 4. The roof flashing is sealed to the face of the brick. I see this over and over again. So how should the flashing be installed? A couple of approaches. The first is shown in Photograph 5. The second in Photograph 6. The third in Figure 4 and Figure 5.