An edited version of this Insight first appeared in the ASHRAE Journal.
By Joseph W. Lstiburek, Ph.D., P.Eng., Fellow ASHRAE
The issues with stucco are pretty well understood and we have discussed them in detail before (“BSI-102: The Coming Stucco-Pocalypse”, January 2018 and “BSI-029: Stucco Woes – The Perfect Storm”, January 2010). Drainage, drainage and drainage are the key…Did I mention drainage? Also, inward vapor drive. Did I mention that as well? Can any cladding be worse? Ah, yes. Manufactured stone veneer or thin stone veneer also known as “lumpy stucco[1]” is my candidate.
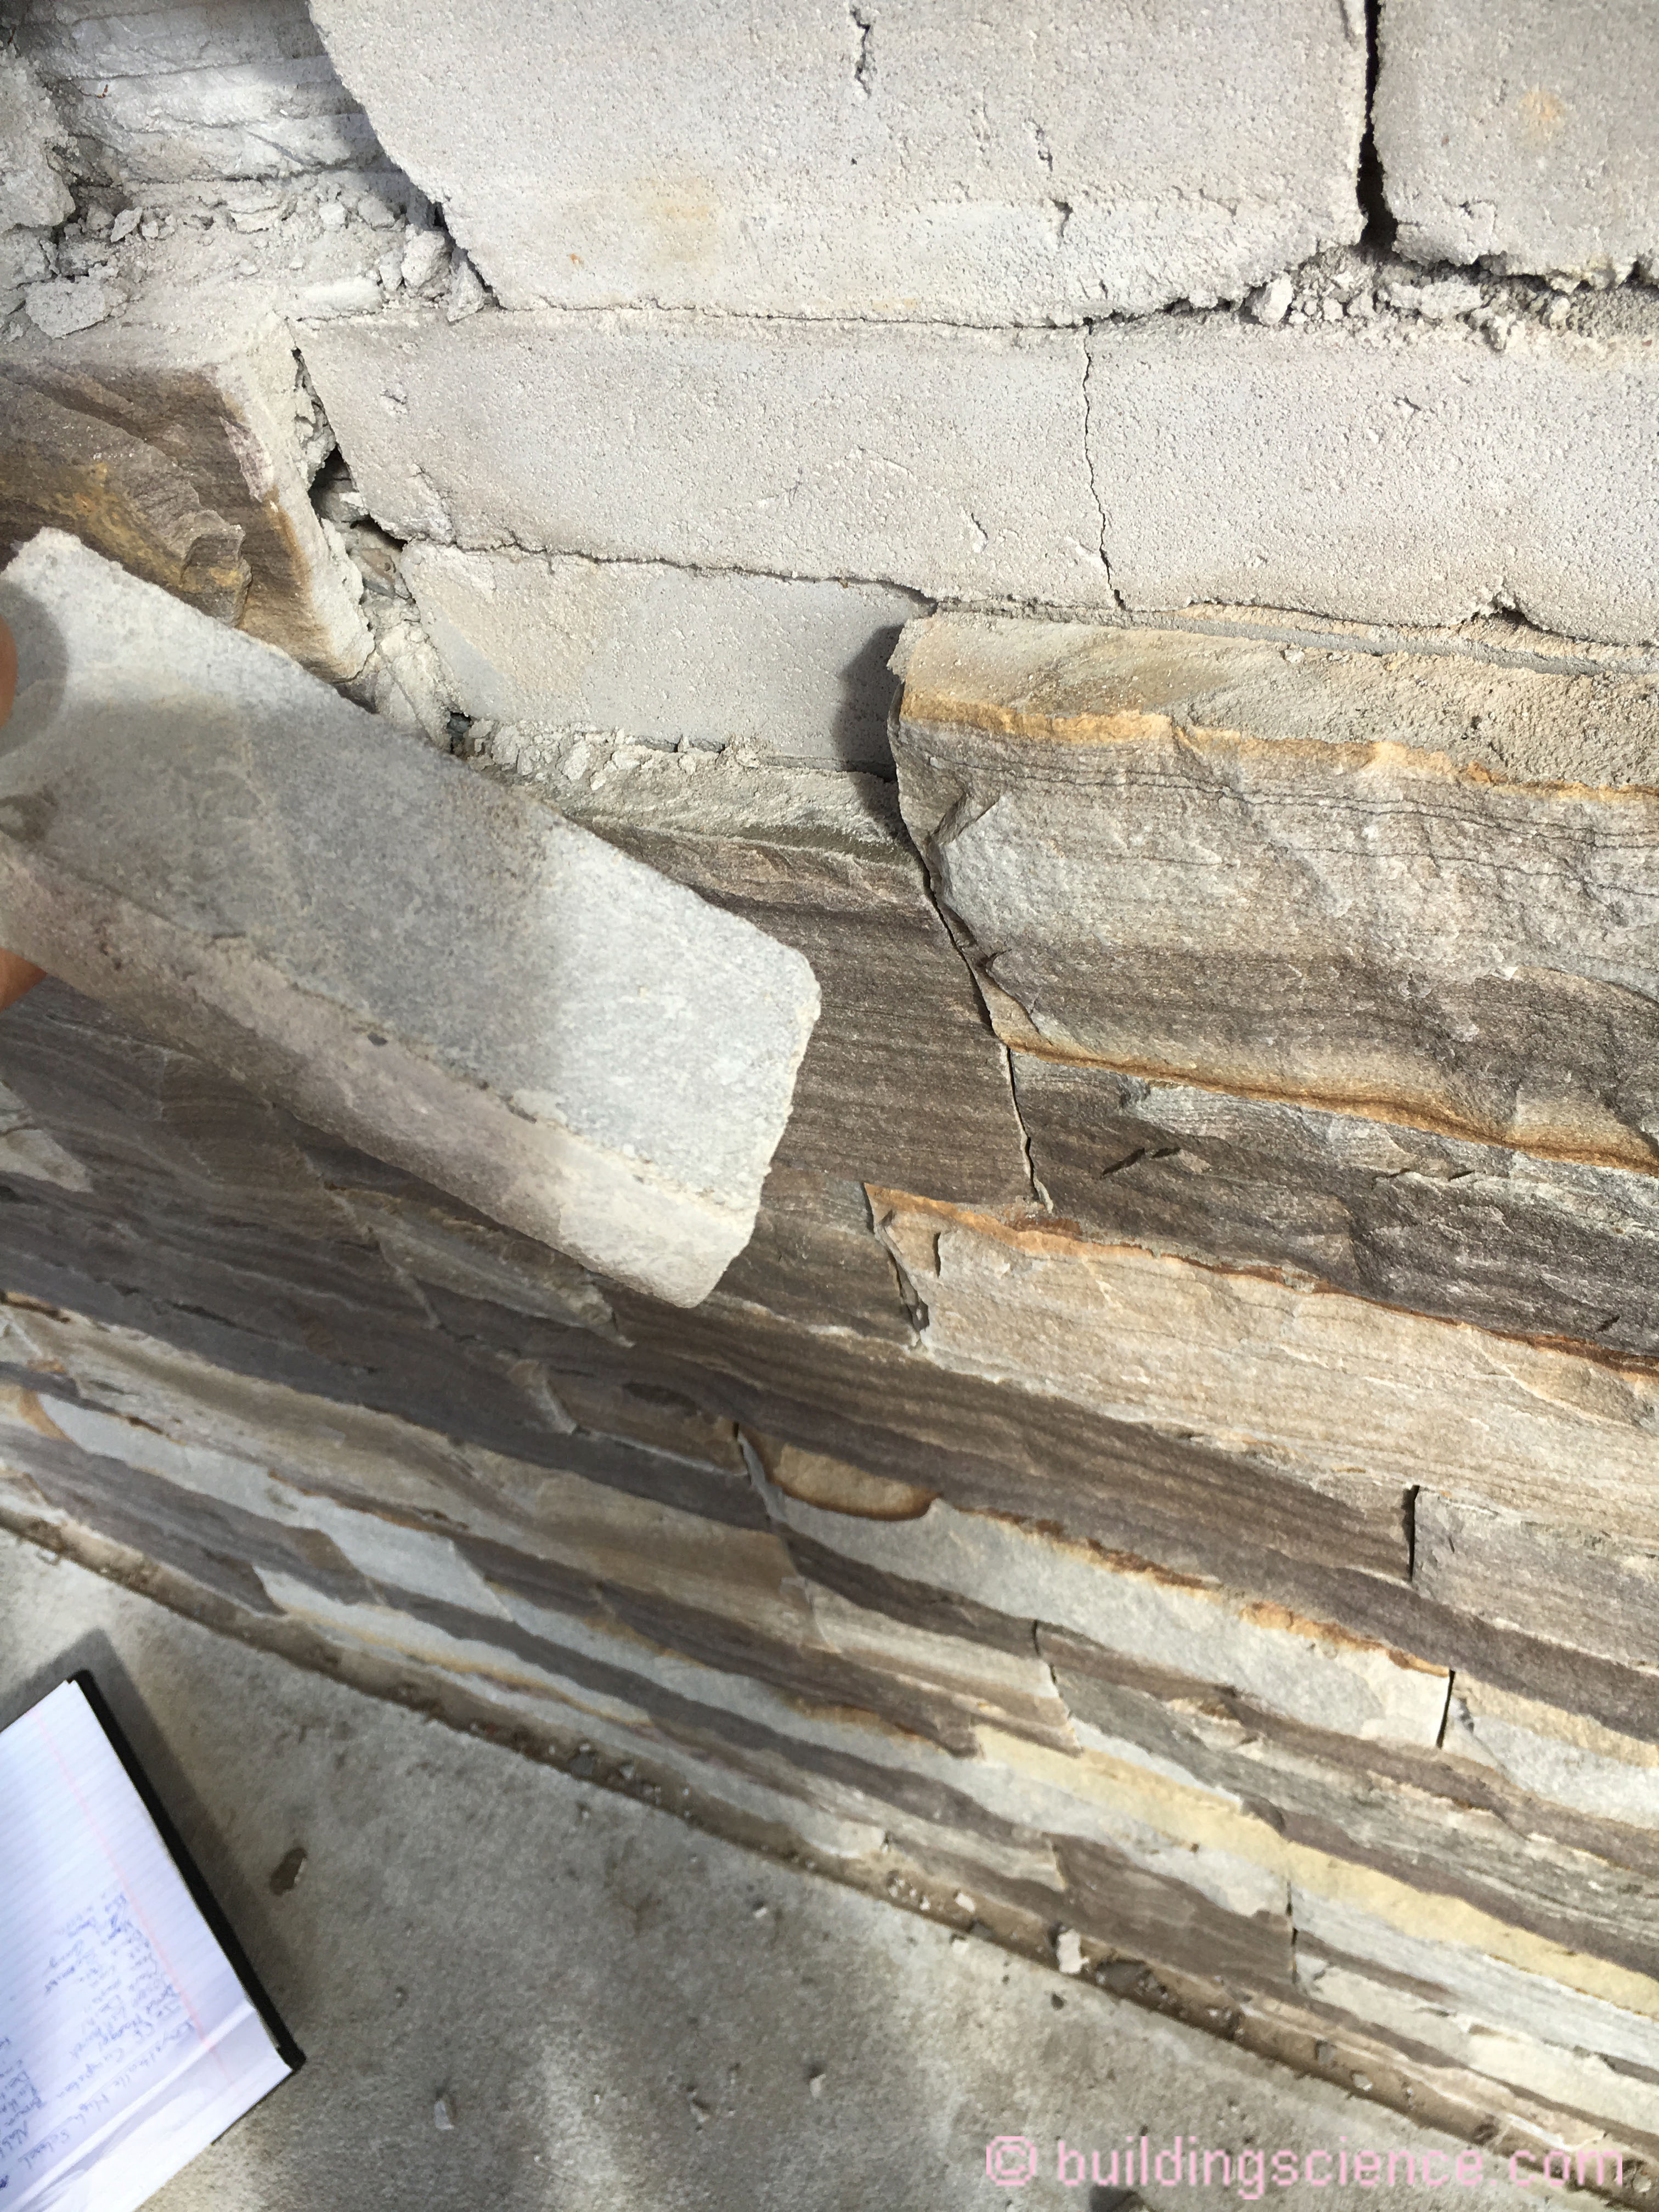
Take stucco and stick thin stones - both unreal (manufactured stone veneer – precast concrete veneer made to resemble natural stone) and real (thin cut stones) to the stucco surface. How can this be worse than plain stucco? Easy, with plain “smooth” stucco rainwater can drain off the surface. With “lumpy stucco” rainwater is held in the nooks and crannies so the surface stays wetter longer and because drainage is discontinuous in the nooks and crannies we get hydrostatic pressure….and we have covered hydrostatic pressure before (“BSI-057: Hockey Pucks & Hydrostatic Pressure”, January 2012). The results are often disastrous (Photograph 1, Photograph 2). Not only do we get hydrostatic pressure we also have a much bigger reservoir (stored and absorbed water)…and that means inward vapor drive. Think bad stucco on steroids….
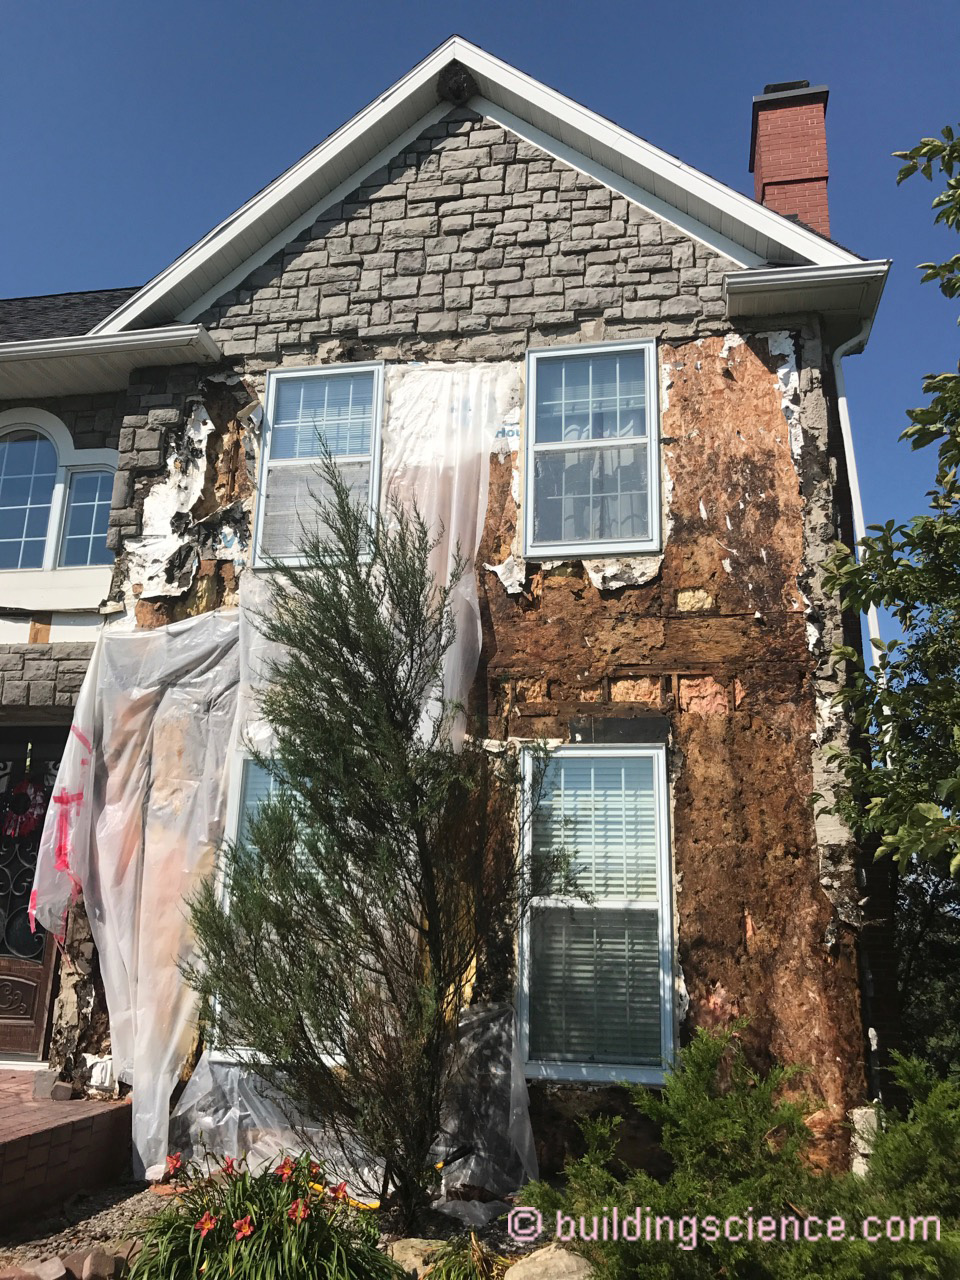
Photograph 1 – Lumpy Stucco Disaster: Stucco layer with adhered stone installed over a synthetic building paper over oriented strand board sheathing (OSB). Water held in nooks and crannies leads to a greater water load than traditional stucco. No drainage or capillary break or hygric redistribution.
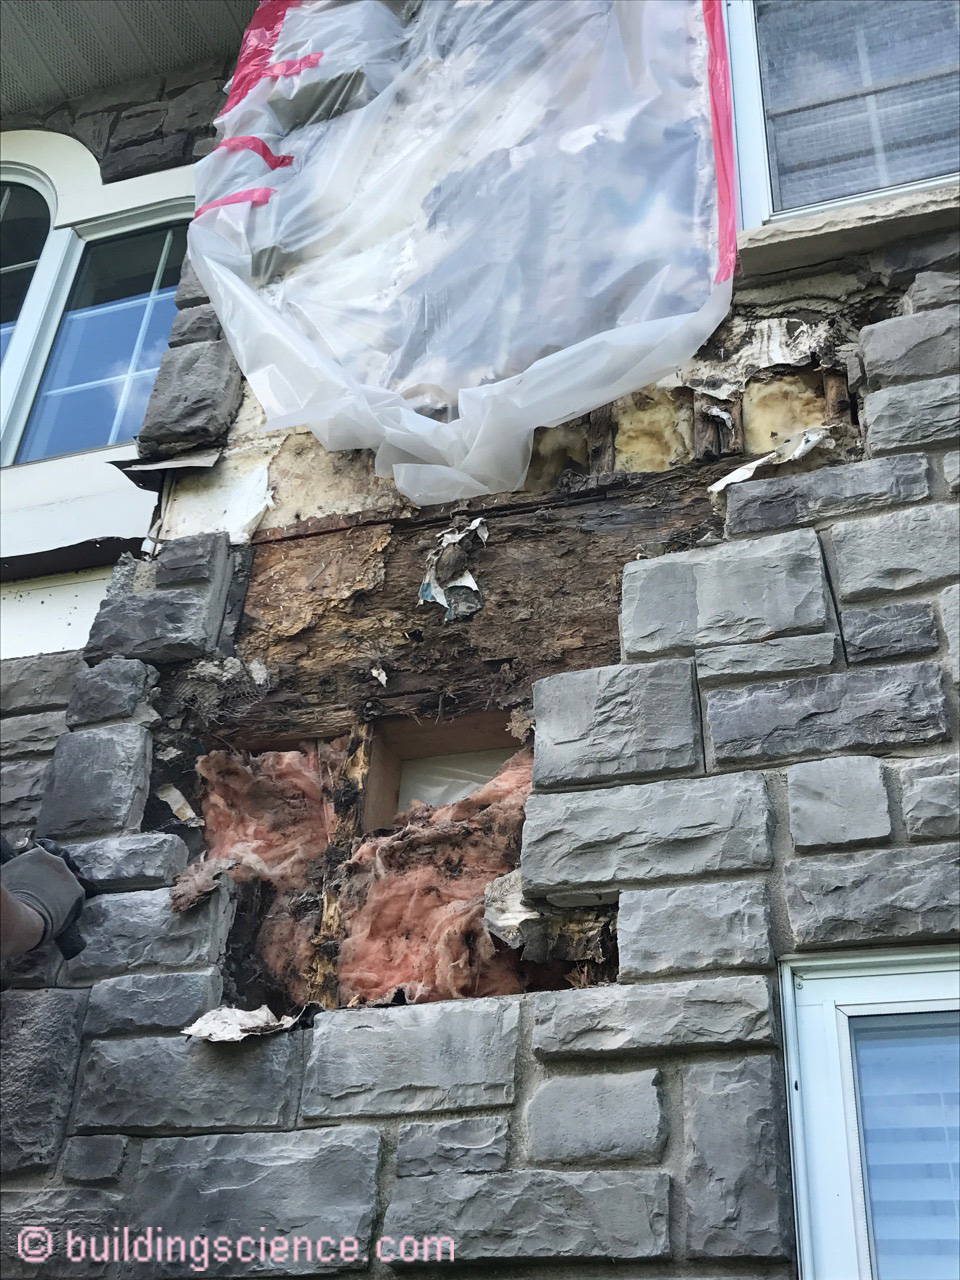
Photograph 2 – Disaster Made Worse: Interior plastic vapor barrier preventing inward drying coupled with a 2x6 insulated frame wall reducing energy flow thereby further reducing drying.
However, the problems are easy to avoid. Same approach as with stucco….provide a drainage layer behind the “lumpy stucco” (Figure 1). Drainage, drainage and drainage…and if the drainage gap is 3/16 inch or greater we get to address inward vapor drive and provide some hygric redistribution…aka “drying”. 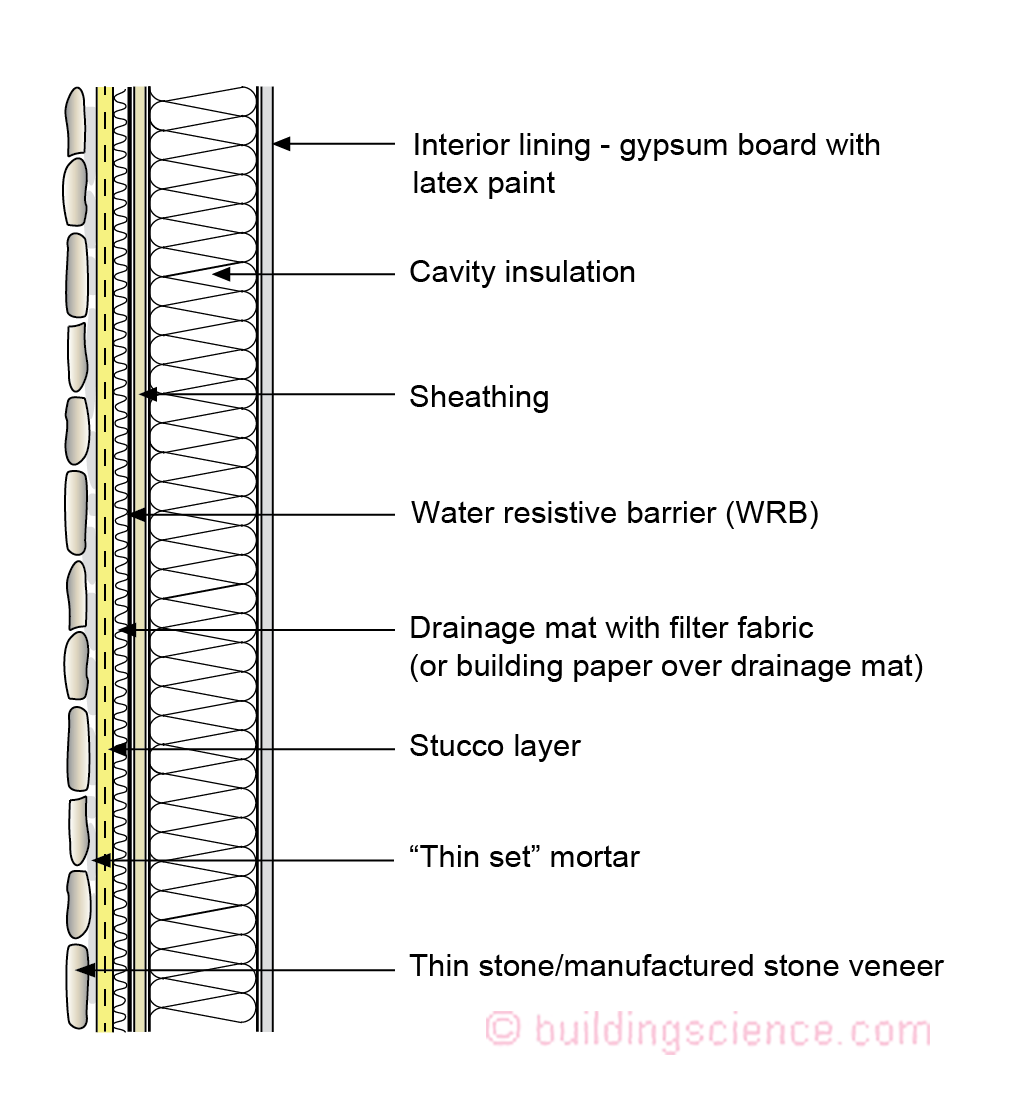
Figure 1 – Drainage Mat: The resulting gap provides drainage thereby addressing hydrostatic pressure concerns, provides a capillary break along with providing horizontal and vertical hygric resistribution – “aka” drying of the thin set mortar and stucco layer.
Easy, pretty much done here. So what else is there to talk about? Not so fast Bucko. There is much, much more. The real stone and the fake stones are falling off stucco all over the place…and have been for quite some time[2]. The problems go back decades…but have been attributed to issues that I believe are incorrect. Basically the argument is that workmanship is the issue.
We are not dealing with the rot and damage shown in Photograph 1and Photograph 2. We are just dealing with the thin stones falling off (Photograph 3and Photograph 4). Yup, workmanship. Over and over I get the same argument. Workmanship. Apparently, over 3 decades and more, and in regions all over North America, but only where it rains, we can’t seem to get folks to install the stuff correctly. I bought into that argument at first. Sure, there are workmanship issues on some projects. But there have been countless failures where the workmanship was exceptional and supervised continuously by third parties[3]. The failures are now so pronounced we have social media stirring up the pot[4].
Photograph 3 – Adhesion Failure:High rainwater exposure.

Photograph 4 – More Adhesion Failure:High rainwater exposure.
So how is the stuff installed? The stucco layer is installed over a sheathing and water control layer…then the veneer is adhered with “thin set” mortar to the stucco. The thin set mortar is applied to the back of the veneer and then the veneer is “smooshed” into the stucco layer. Now it gets interesting. The patterns of failure are distinctive.
The patterns of failure are rainwater exposure related. The failures are predominantly concentrated where there is greater rain exposure. It gets better. The failures are almost always at the veneer-thin set interface (Photograph 5and Photograph 6). And it does not matter whether the veneer is real stone or manufactured.
Photograph 5 – Thin Stone Veneer Adhesion Failure: Bond failure is at the veneer-thin set interface.
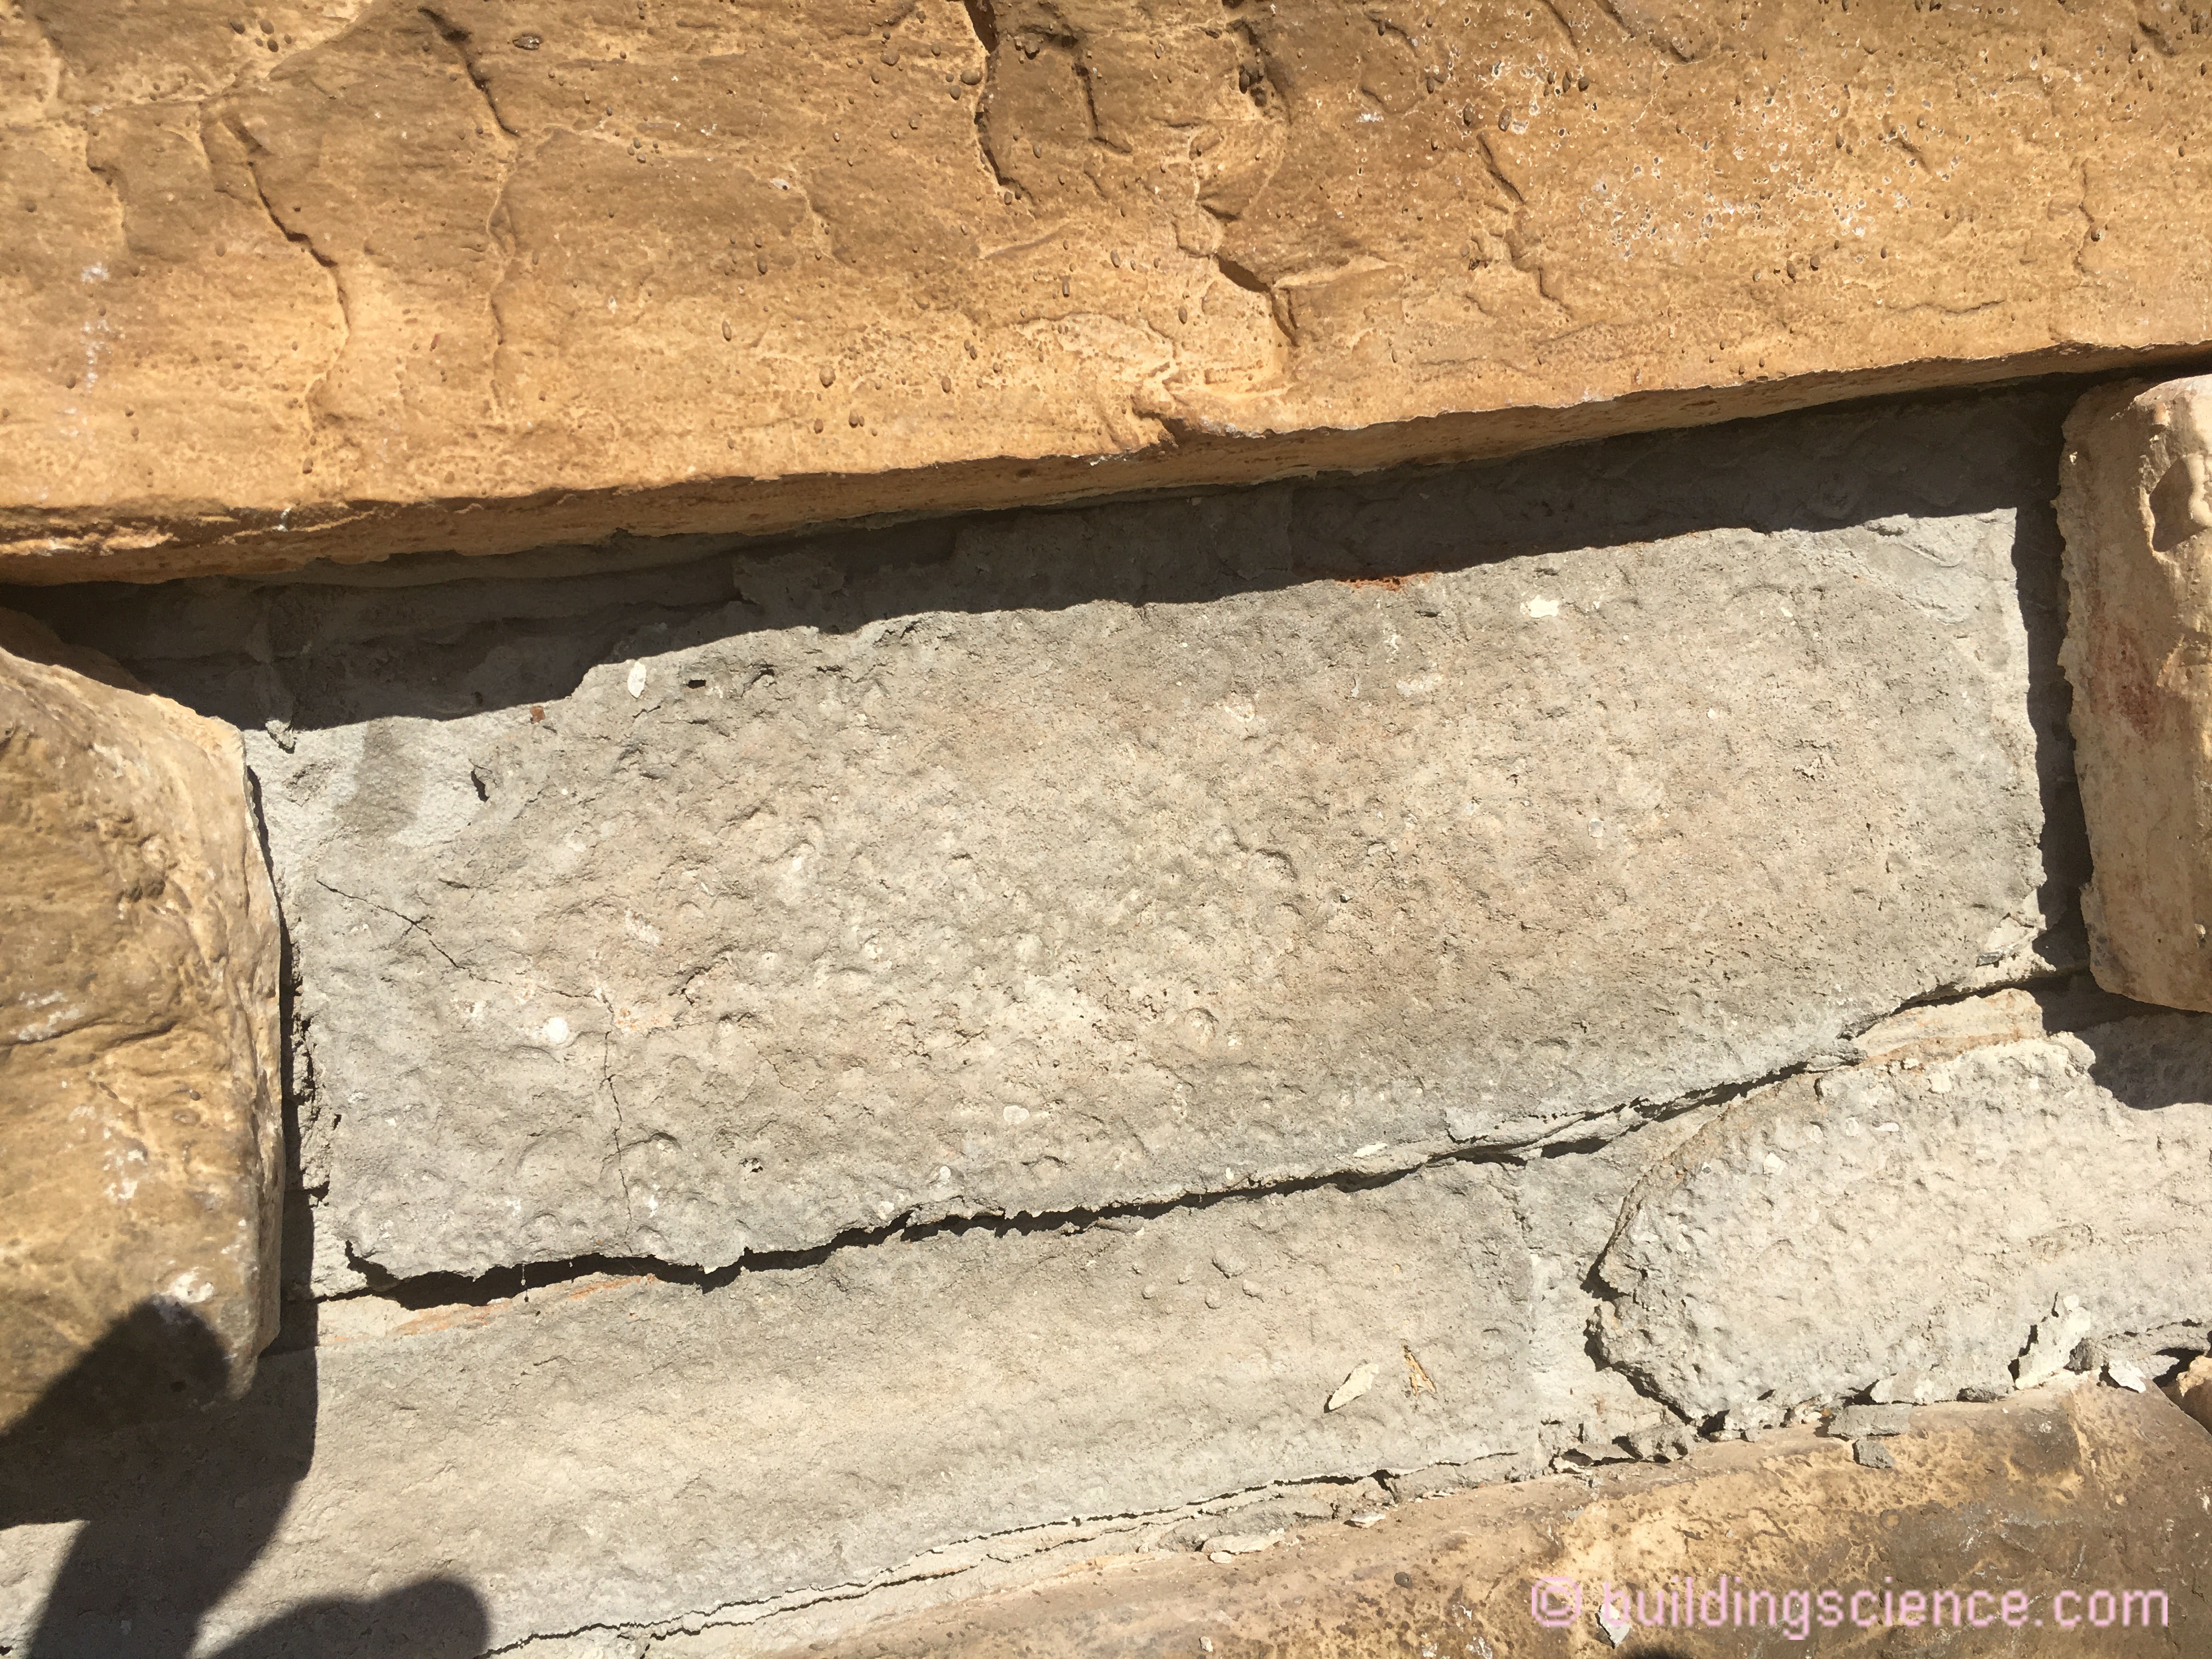
Photograph 6 - Manufactured Stone Veneer Adhesion Failure: Bond failure is at the veneer-thin set interface.
Isn’t that amazing? Workmanship failure only at the veneer-thin set interface and only where there is greater rain exposure? No workmanship failure at the thin set mortar to stucco interface…only at the veneer-thin set interface. And it is worse where the sheathing or base the stucco is installed over is less vapor permeable or less water absorptive.
More bond failures occur where the stucco is installed over OSB than plywood or gypsum sheathing. More bond failures occur where the stucco is installed over rigid insulations such as extruded polystyrene (XPS) and polyisocyanurate. Apparently workmanship is bad only where we have more rain, only at the veneer-thin set interface, and predominantly over OSB or foam sheathing. This is big news. Apparently, use of OSB and foam sheathing causes bad workmanship.
So how long does it take? Anywhere from 6 months to 2 years. Sometimes right away. Not right away a lot, but sometimes. Most of the time a couple of months to a couple of years.
So what is going on? The key is the thin-set mortar and the dwell time for water at the thin-set mortar to veneer interface. More failures appear to be linked to polymer modified thin set mortars where the mortars stay wet or get wet for extended periods of time.
Apparently the lessons learned in the 1990’s relating to adhering tile to concrete slabs and adhering tile in showers using polymer modified thin set mortars have not been applied to thin “real” stone and thin “manufactured” stone veneers. We were here before (“BSI-003: Concrete Floor Problems”, May 2008). We learned that the latex polymers in ceramic tile floor adhesives are very sensitive to highly alkaline environments. We learned not to put sand under slabs between the concrete and the plastic vapor barrier. We learned to use unmodified thin set when we installed tile flooring over anti-fracture membranes or over slab waterproofing (Photograph 7). We learned to use unmodified thin set when we installed tiles over impermeable shower waterproofing membranes (Photograph 8).

Photograph 7 – Floor Tile: Installation over an impermeable anti-fracture membrane must be done with unmodified thin set. Evaporation or drying cannot occur downwards into the concrete slab through the anti-fracture membrane. Since tiles are also waterproof and vapor closed evaporation or drying cannot occur upwards through the tile. No evaporation. Therefore, only unmodified thin set can be used. If a modified thin set is used a full bond does not occur.

Photograph 8 – Tile in Shower: Installation of tile over an impermeable waterproof membrane must be done with unmodified mortar. Evaporation cannot occur through the waterproof membrane into the tile backer board and evaporation cannot occur outwards through the shower tile into the shower area. Therefore, only unmodified thin set can be used. If a modified thin set is used a full bond does not occur.
As the polymer modified thin set dries water is evaporated enabling cross-linking to occur with the polymer chains. A polymer “tinkertoy” is created within a cement “tinkertoy”. We also talked about “tinkertoys” before (“BSI-102: The Coming Stucco-Pocalypse”, January 2018). The key point in tinkertoy creation is that the cement tinkertoy does not need evaporation to become a tinkertoy but the polymer tinkertoy does. The cement tinkertoy is created by a hydration reaction. Concrete, which is cement with aggregates can cure underwater….hence the term “hydraulic concrete”…
So, if we have an anti-fracture membrane over a concrete slab we can’t use a polymer modified thin set to adhere tile to it as the anti-fracture membrane is typically waterproof and vapor closed. Evaporation or drying cannot occur downwards into the concrete slab through the anti-fracture membrane. Since tiles are also waterproof and vapor closed evaporation or drying cannot occur upwards through the tile. No evaporation. Therefore, only unmodified thin set can be used. If a modified thin set is used a full bond does not occur.
If we install a waterproof membrane in a shower we can’t use modified thin set to adhere the tile for similar reasons. Evaporation cannot occur through the waterproof membrane into the tile backer board and evaporation cannot occur outwards through the shower tile into the shower area. Therefore, only unmodified thin set can be used. If a modified thin set is used a full bond does not occur.
What if a modified thin set achieves a full bond? Can the full bond be lost? Yes. The process is called hydrolysis. With concrete and cement we have high alkalinity. When we add water the alkaline base acts as a catalyst and we get cleavage of the polymer chain. This was (and unfortunately still is) a California “centric” tile flooring issue with sand layers under concrete slabs becoming saturated with water and unable to dry down. The initial tile setting using modified thin set works as the thin set can dry downwards into the concrete slab if the slab is not excessively wet. We get a bond. But over time as the sand layer attempts to dry upwards the thin set to tile interface becomes saturated and we lose the bond due to the hydrolysis reaction.
How does all this apply to thin “real” stone and thin manufactured stone veneer failures? Both thin “real” stone and thin “manufactured” stone veneer failures are occurring because the polymer modified thin set mortar bond is failing due to a hydrolysis reaction due to high alkalinity driven by water being concentrated at the mortar to stone or mortar to manufactured stone veneer interface. More rainwater exposure, more risk.
The water cannot dry or redistribute itself into the “real” stone because the stone is relatively impermeable. The water cannot dry or redistribute itself into the “manufactured” stone veneer because the manufactured stone is back-coated (“sealed”) to prevent excessive water absorption out of the thin set. The issue is desiccation of the polymer modified thin set mortar leading to not establishing a bond[5]. So a “porous” not real stone is made to behave like a non-porous real stone with the back-coating (Photograph 9).
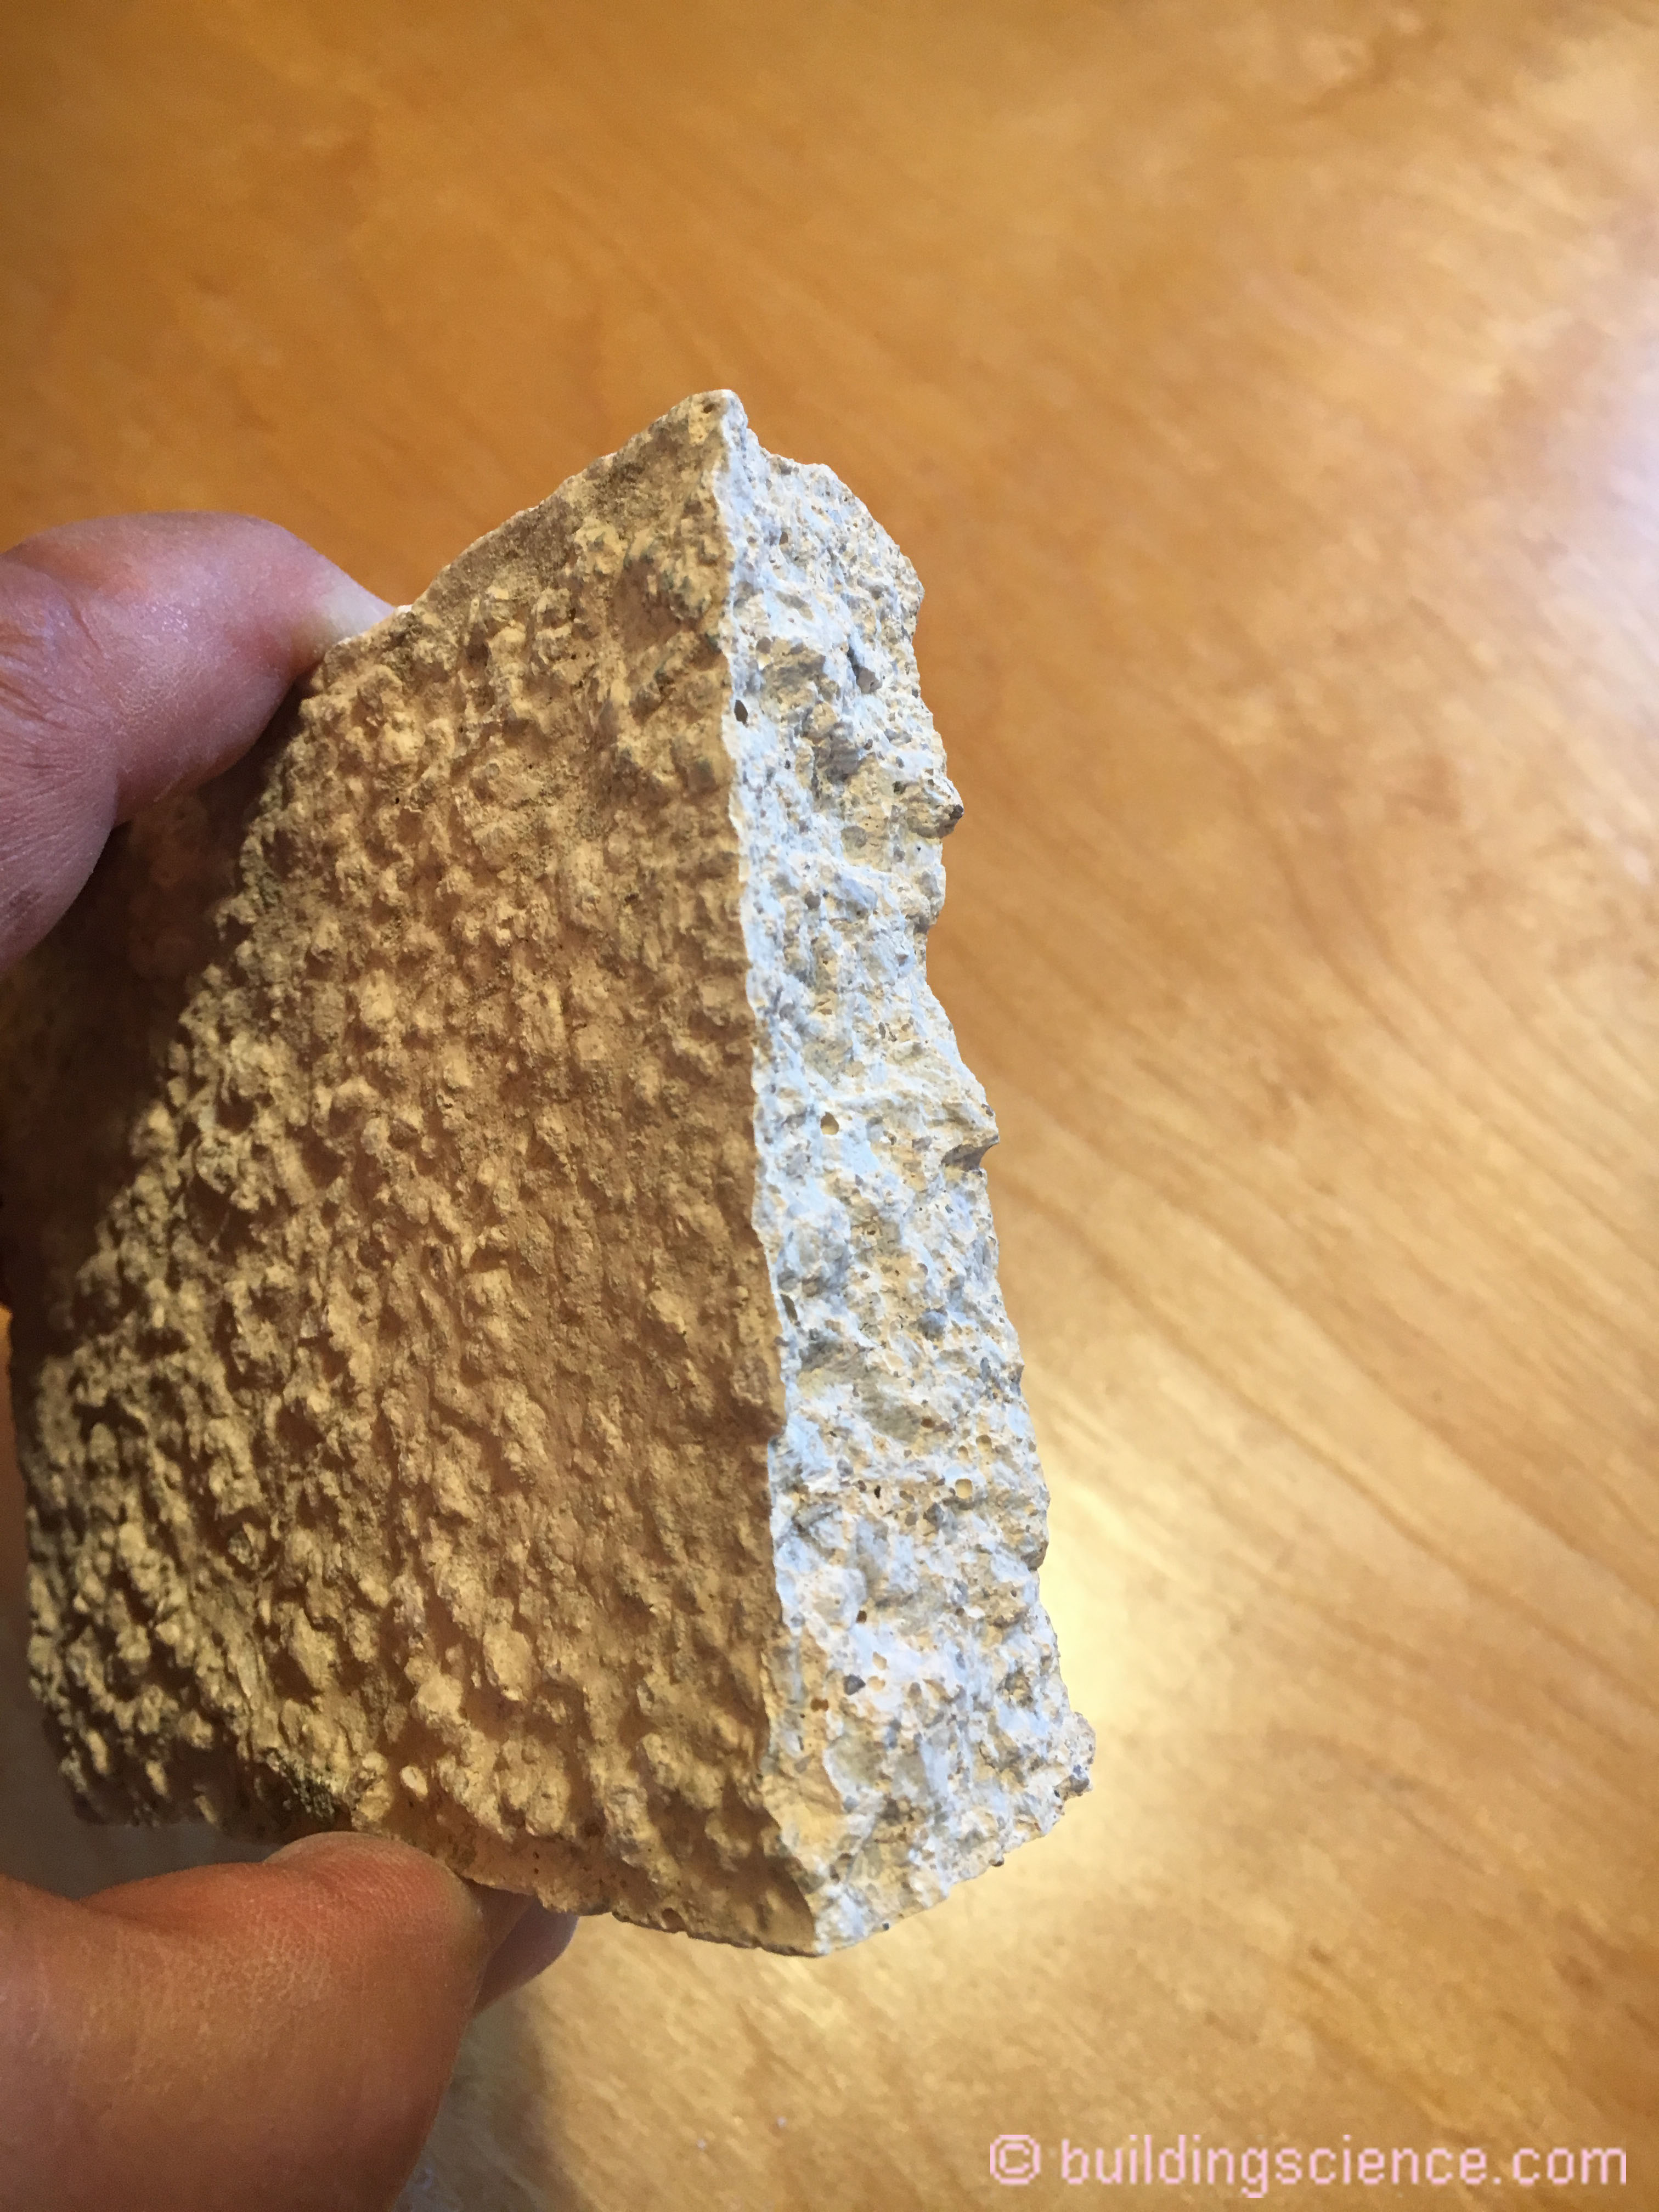
Photograph 9 – Coating on Back of Manufactured Stone Veneer: Manufactured stone is back-coated (“sealed”) to prevent excessive water absorption out of the thin set. The issue is desiccation of the polymer modified thin set mortar leading to not establishing a bond. So a “porous” not real stone is made to behave like a non-porous real stone with the back-coating.
Much redistribution also cannot occur inwards with both the thin real stone and the thin manufactured stone veneer because of the change to OSB sheathing (much lower inward vapor transmission) and a lack of drainage or the use of rigid insulation (no inward vapor transmission) and a lack of drainage.
So why the bond failure predominately at the veneer to thin set interface and not a bond failure at the thin set to stucco interface? The veneer to thin set interface is wetter and stays wetter longer than the thin set to stucco interface. The stucco is more absorptive than both the thin stone veneer and the manufactured stone veneer and some inward redistribution occurs. We got more inward redistribution when we had plywood sheathing and gypsum sheathing rather than OSB and foam sheathing.
So we get a weak bond or a failed bond or we never got a bond at the thin set to veneer interface. But what “pushes” the stone off the wall? Osmosis (Figure 2). Yup. We get it in flooring failures. We get it in roofing failures and deck failures with cold fluid applied waterproofing installed over concrete decks and concrete roofs. We get it in coating failures. Now we are getting it with thin real stone and the thin manufactured stone veneer.
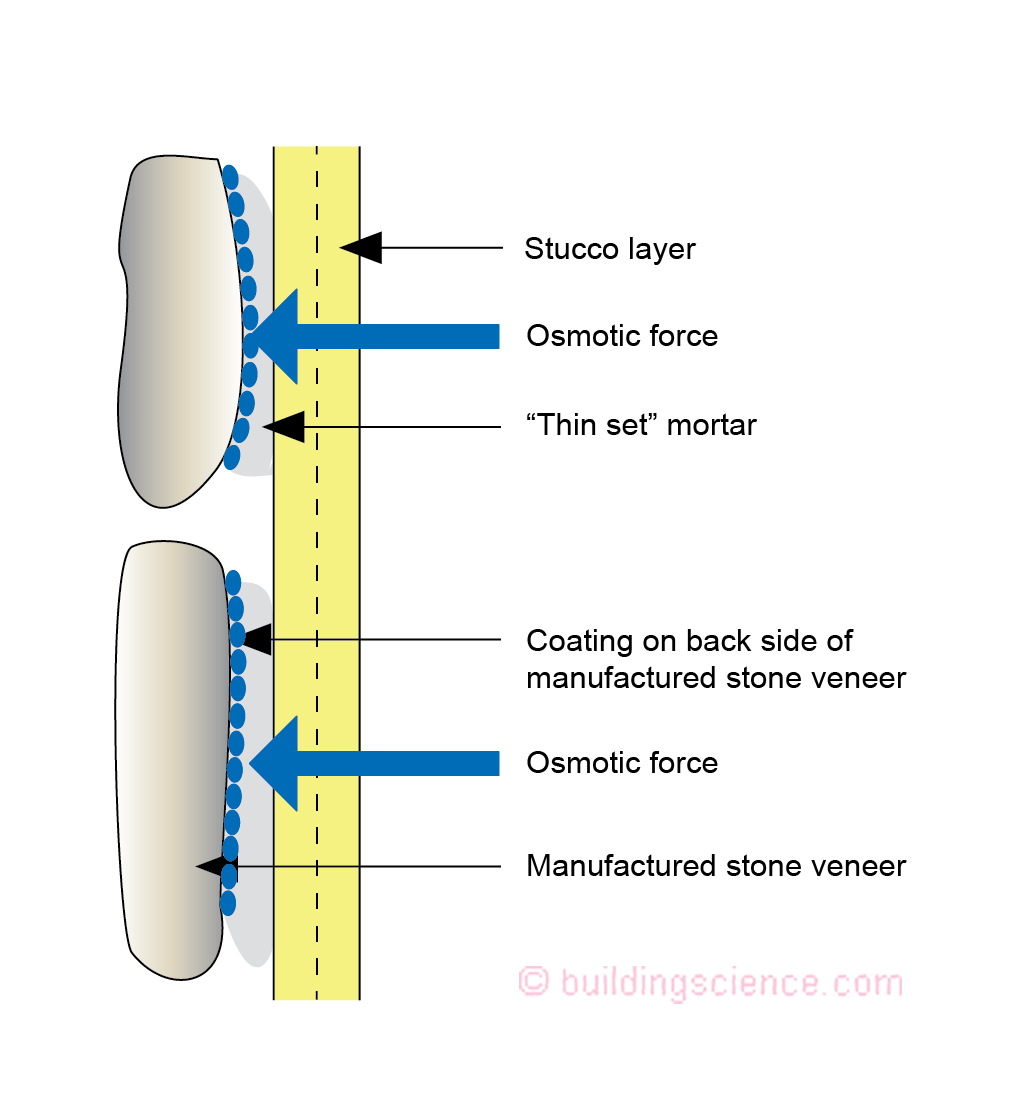
Figure 2 – Osmosis: There is salt in stone. You could argue that stone is really, really old salt. Second Law of Thermodynamics wants to get into the stone to dilute the concentration of salt that becomes a solute.
This is becoming a huge issue….the solution…..easy….a drained vented cavity behind the thin set mortar and stucco….sound familiar? Need to drain the rain baby….and dry the layers….Go back to Figure 1. The approach in Figure 1 addresses both the rot problem and the thin stone adhesion problem. We get a two-for-one.
Further note. We are getting good at understanding highly alkaline environments. Polymer modification today is not the same as polymer modification yesterday. Are some modified thin sets better than others? Yes….but….not enough to eliminate the gap to stay out of trouble. The lessons of the floor tile failures lead to a change in tile flooring practices. We are going through similar changes with thin veneers.
Think about the big picture…we need gaps behind claddings…we need gaps behind rigid insulation…we need gaps under protected membrane roof insulation and green roofs (Figure 3)…we need gaps under slabs (“capillary breaks”)…we need gaps almost everywhere[6]. Did not used to be this way. We changed materials, energy flow and moisture flow. To compensate we need to give back some energy. There is no such thing as a free thermodynamic lunch.
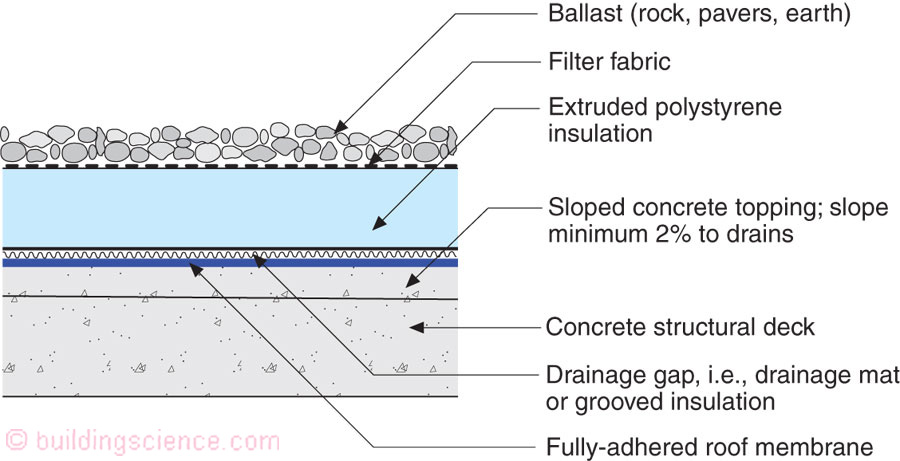
Figure 3 – Capillary Break Under Rigid Insulation: The gap under the rigid insulation prevents the rigid insulation from becoming saturated and promotes drying.
[1] I am taking credit for coining this phrase….ok, I am really taking blame for coining this phrase.
[2] Wolf, J. and B. Lahnert, “Performance of Latex-Modified Thin-Set Mortars in Applications of Thin-Brick Veneer”, Serviceability and Durability of Construction Materials, Volume 1, B. Suprenant, American Society of Civil Engineers, 1990.
[3] One project had three different contractors using the same materials and apparently between the three of them they were unable to find anyone to install the stuff. Really? And money was not the issue. Very high end project. Supervision was supervised by other supervision…
[4] Thin Stone Veneer Failures https://www.facebook.com/pages/category/Building-Materials/Manufactured-Thin-Stone-Masonry-Veneer-Failures-698582356878745/
[5] Back in the day, bricklayers would dip the bottom surface of bricks into a pan of water before placing the bricks on a mortar bed. This was to prevent the “kiln dried” brick from sucking too much water out of the mortar bed…desiccating the mortar bed… resulting in a cold joint rather than a chemical bond. Ah, the old days…when was the last time you saw this happen on a job site…
[6] Lauren Hutton hygric redistribution…