It is pretty weird to dig a big hole and drop a building into it. A one story house with a basement is really a two story house that you dropped into the ground burying one story. Think about it…now you have to make the part in the ground strong enough to keep the dirt out. Even more difficult you have to keep the water out. Oh yeah, you also have to keep the soil gas out. It is kind of dumb to try to install windows. What are you going to look at? Worms? So you surround the windows with vertical shafts in an attempt to connect them to daylight….my definition of being shafted. Guess what? It is much less expensive to build on top of the ground rather than build in the ground. Wherever we can build on top of the ground we build on top of the ground. So why do we dig down? Look at a map.
Where it is cold we have basements. Where it is not cold we have slabs on the top of the ground and crawlspaces on top of the ground[1].
We dig down up north because the ground freezes during a period of cold weather called winter. When the ground freezes the earth moves….I am pretty sure Carol King sang about it… When the earth moves and you have a building on top of it bad things usually happen. We dig foundations to go below the frost depth so the building does not move. If we have to dig down anyway why not use the hole for something useful like storing vegetables or coal or your entertainment center…presto chango….holes became cellars and then cellars became basements and then basements became part of the house…[2]
We are going to concentrate on keeping the water out of basements. We are not going to deal with the structural issues except where they impact keeping the water out. Why are we focusing on water? We are now insulating and finishing basement spaces and when basements leak we damage those spaces. We get lots of mold and decay and odors (Photograph 1 and Photograph 2). In the good old days before we finished the basement spaces or insulated them we could tolerate water leakage. Concrete, masonry and stone does not rot. Not finishing the spaces and not insulating them allowed the water that leaked in to dry. Not anymore. When basements leak today they are unable to dry. Here is the kicker…it is not unusual to have 1 out of 10 residential basements leak.[3] This is unacceptable.
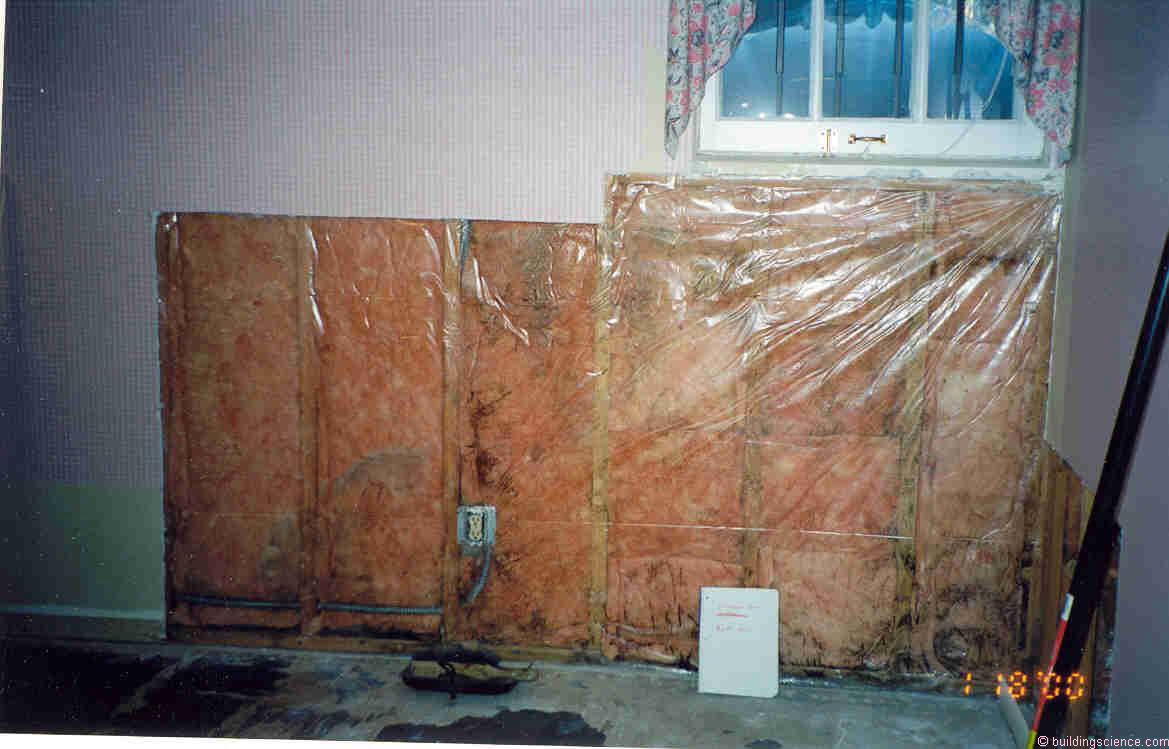
Photograph 1: Basement Water Damage– Insulating and finishing a basement on the interior that is experiencing ground water leakage often leads to significant damage.
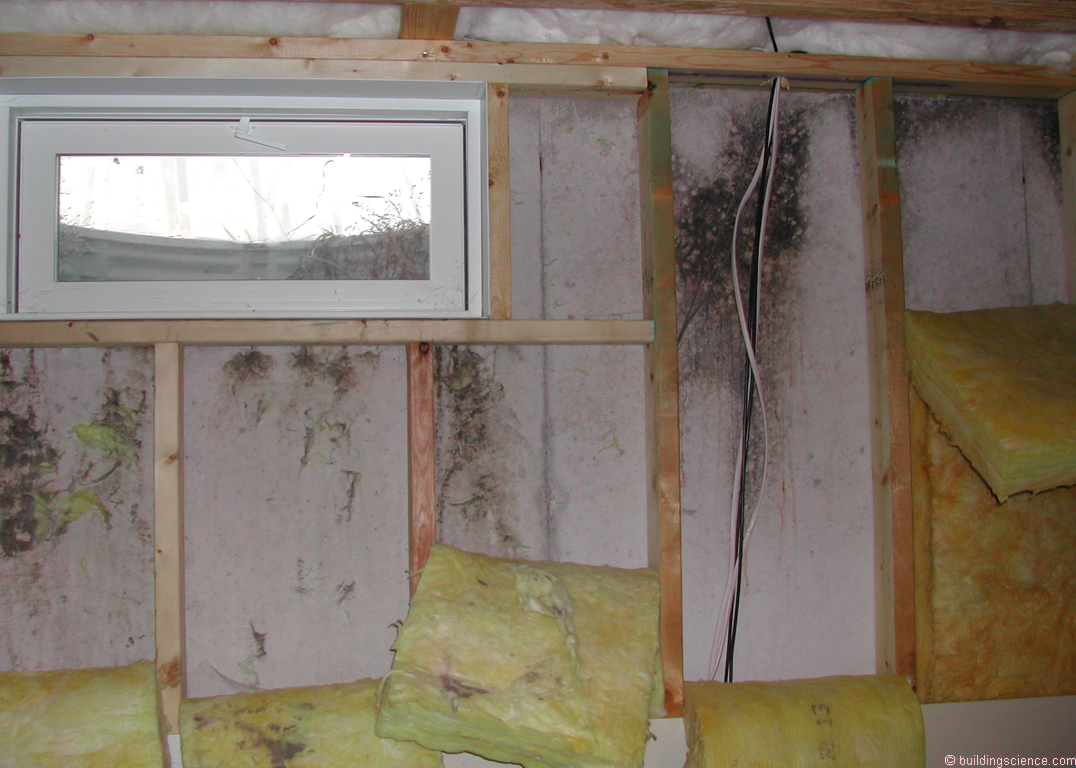
Photograph 2: More Basement Water Damage– Notice the ground water “mustaching” at the bottom of the basement window corners. Ah, shafted again…
Onto some obvious structural issues. I point out that there are only two kinds of concrete…concrete that cracks and concrete that will crack...so what do we know about concrete? Ah, it cracks (Photograph 3). Water can leak through cracks…but only if water gets to the crack. Hold onto that thought…we will get back to it[4].
Since we cannot prevent concrete from cracking we try to “control” the cracking using “control joints”. We in essence crack the concrete ourselves. We crack it in straight lines at predicable places and then fix the cracks that we cracked (Figure 1).[5]
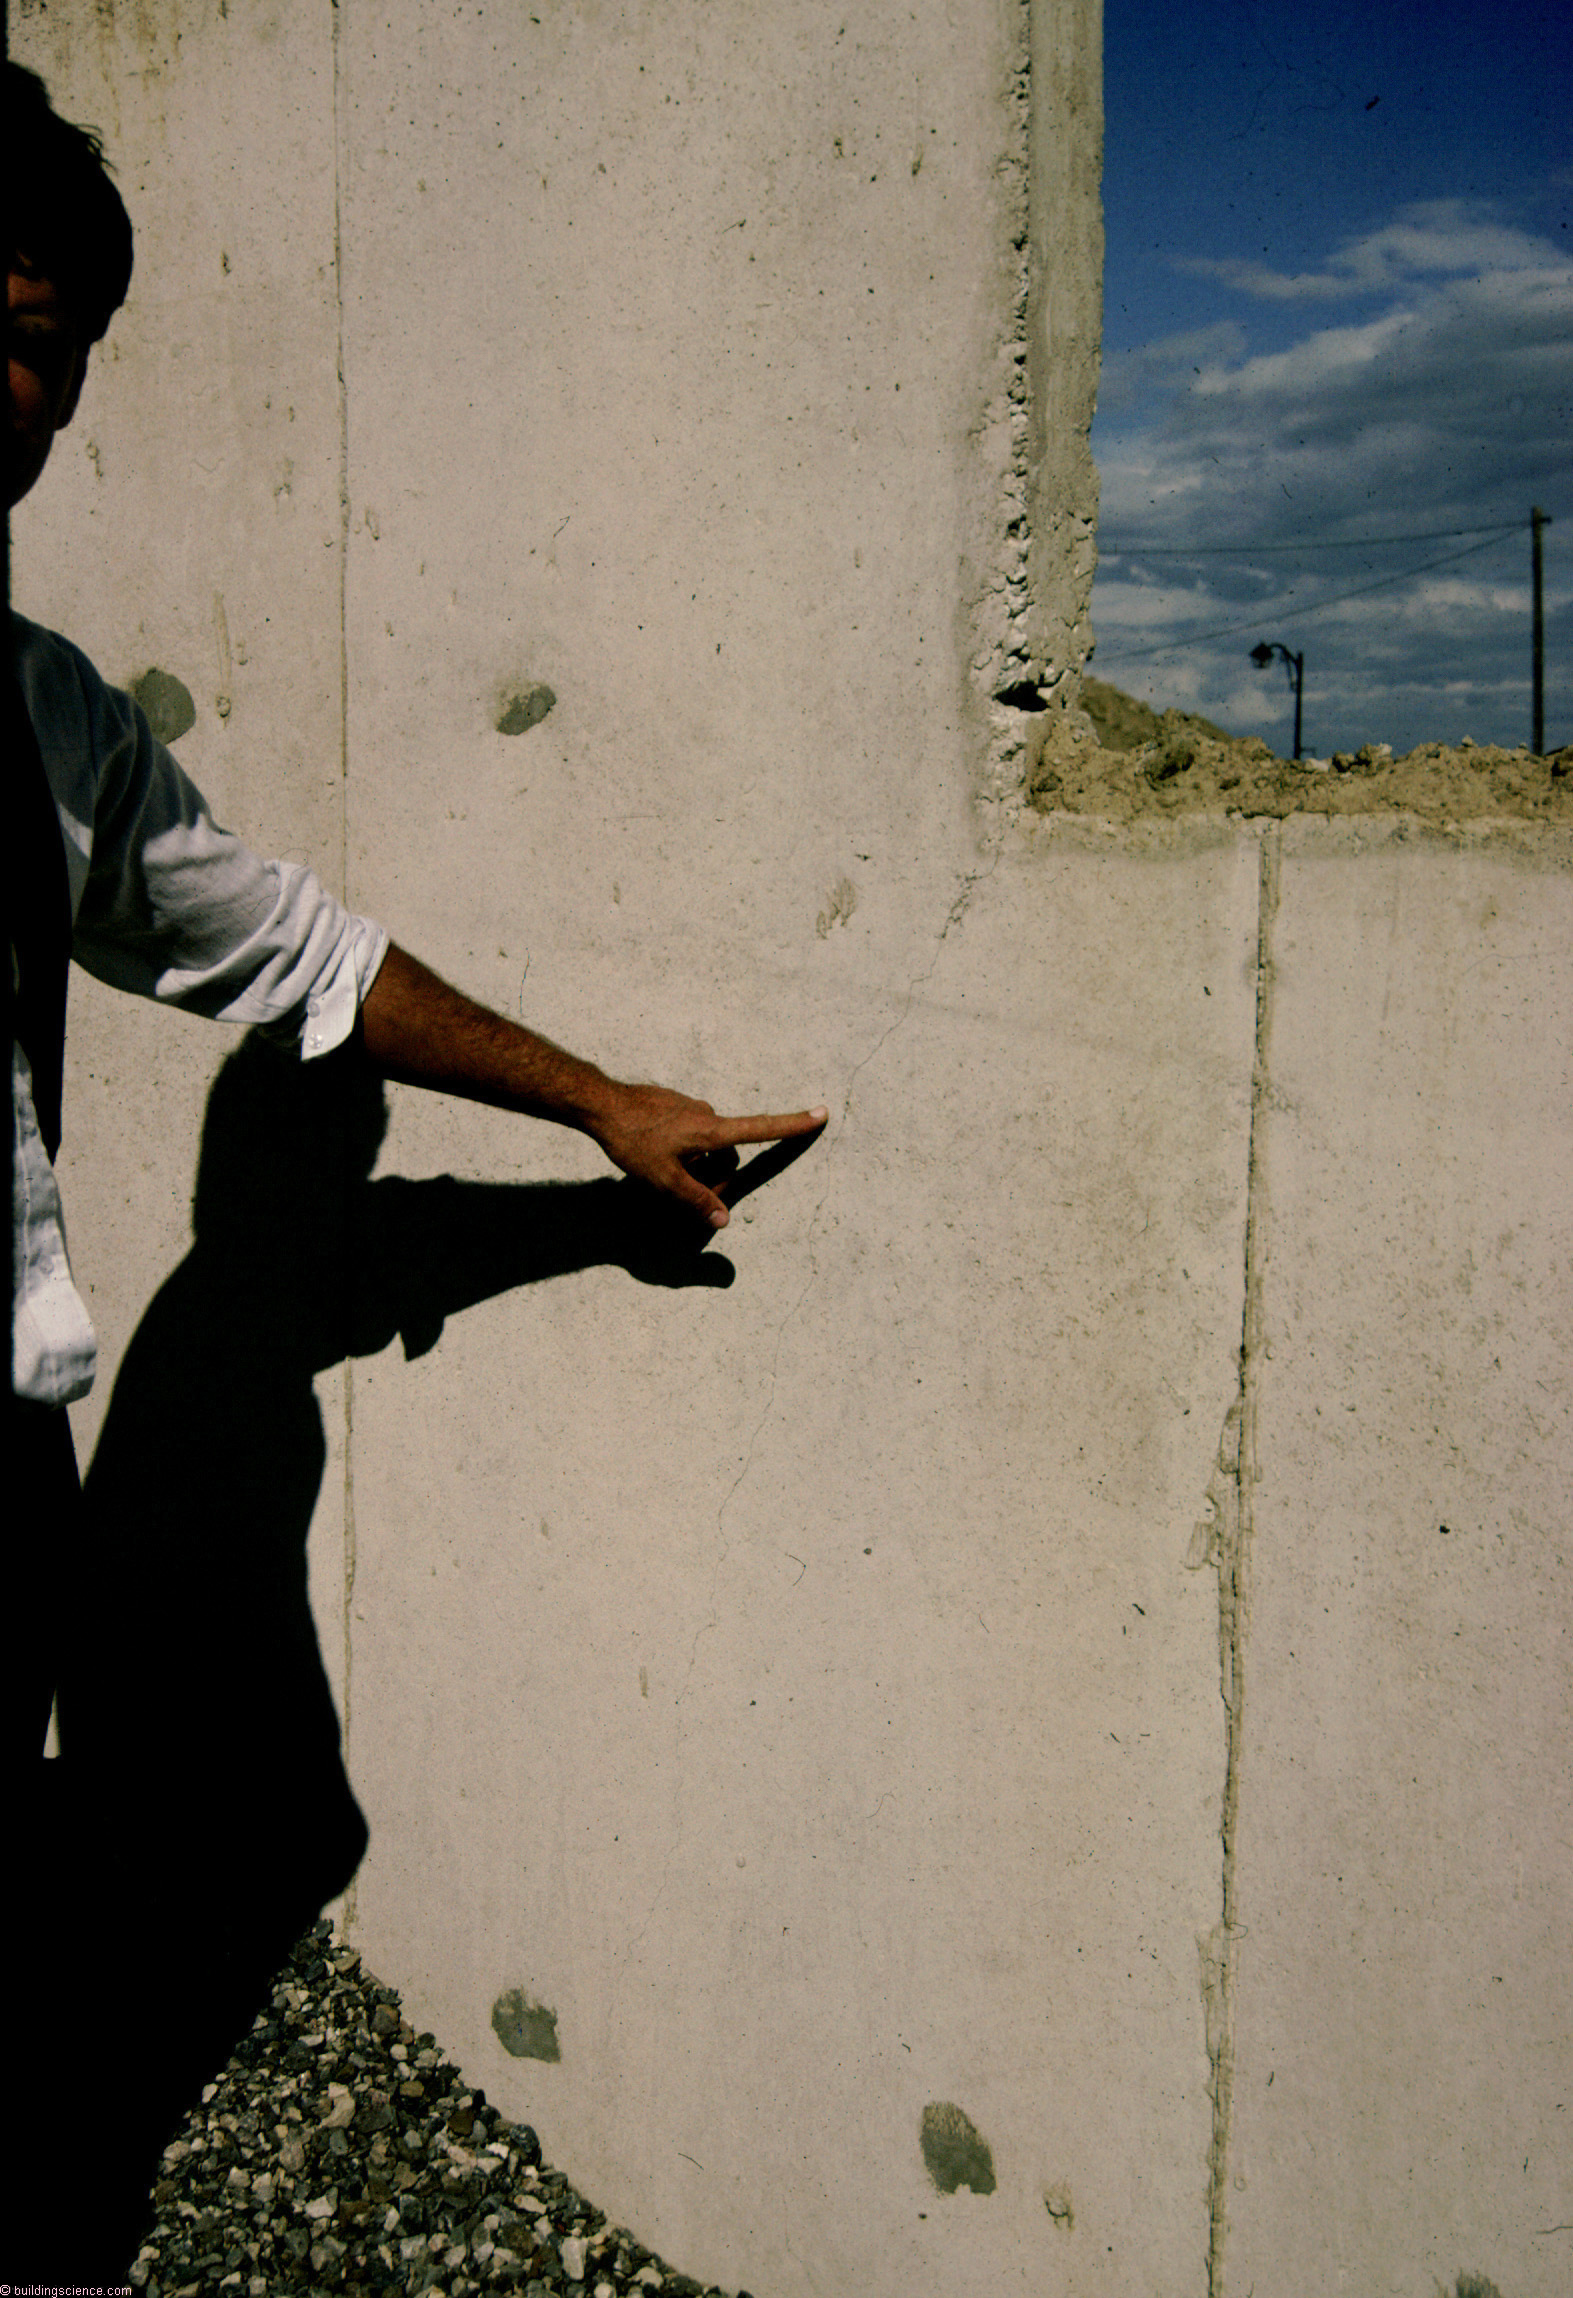
Photograph 3: Concrete Crack– Cracking typically happens at stress concentrations such as at punched openings. The hand pointing to the crack belongs to a young (at the time) James Lischkoff…before he became a famous Canadian building scientist.
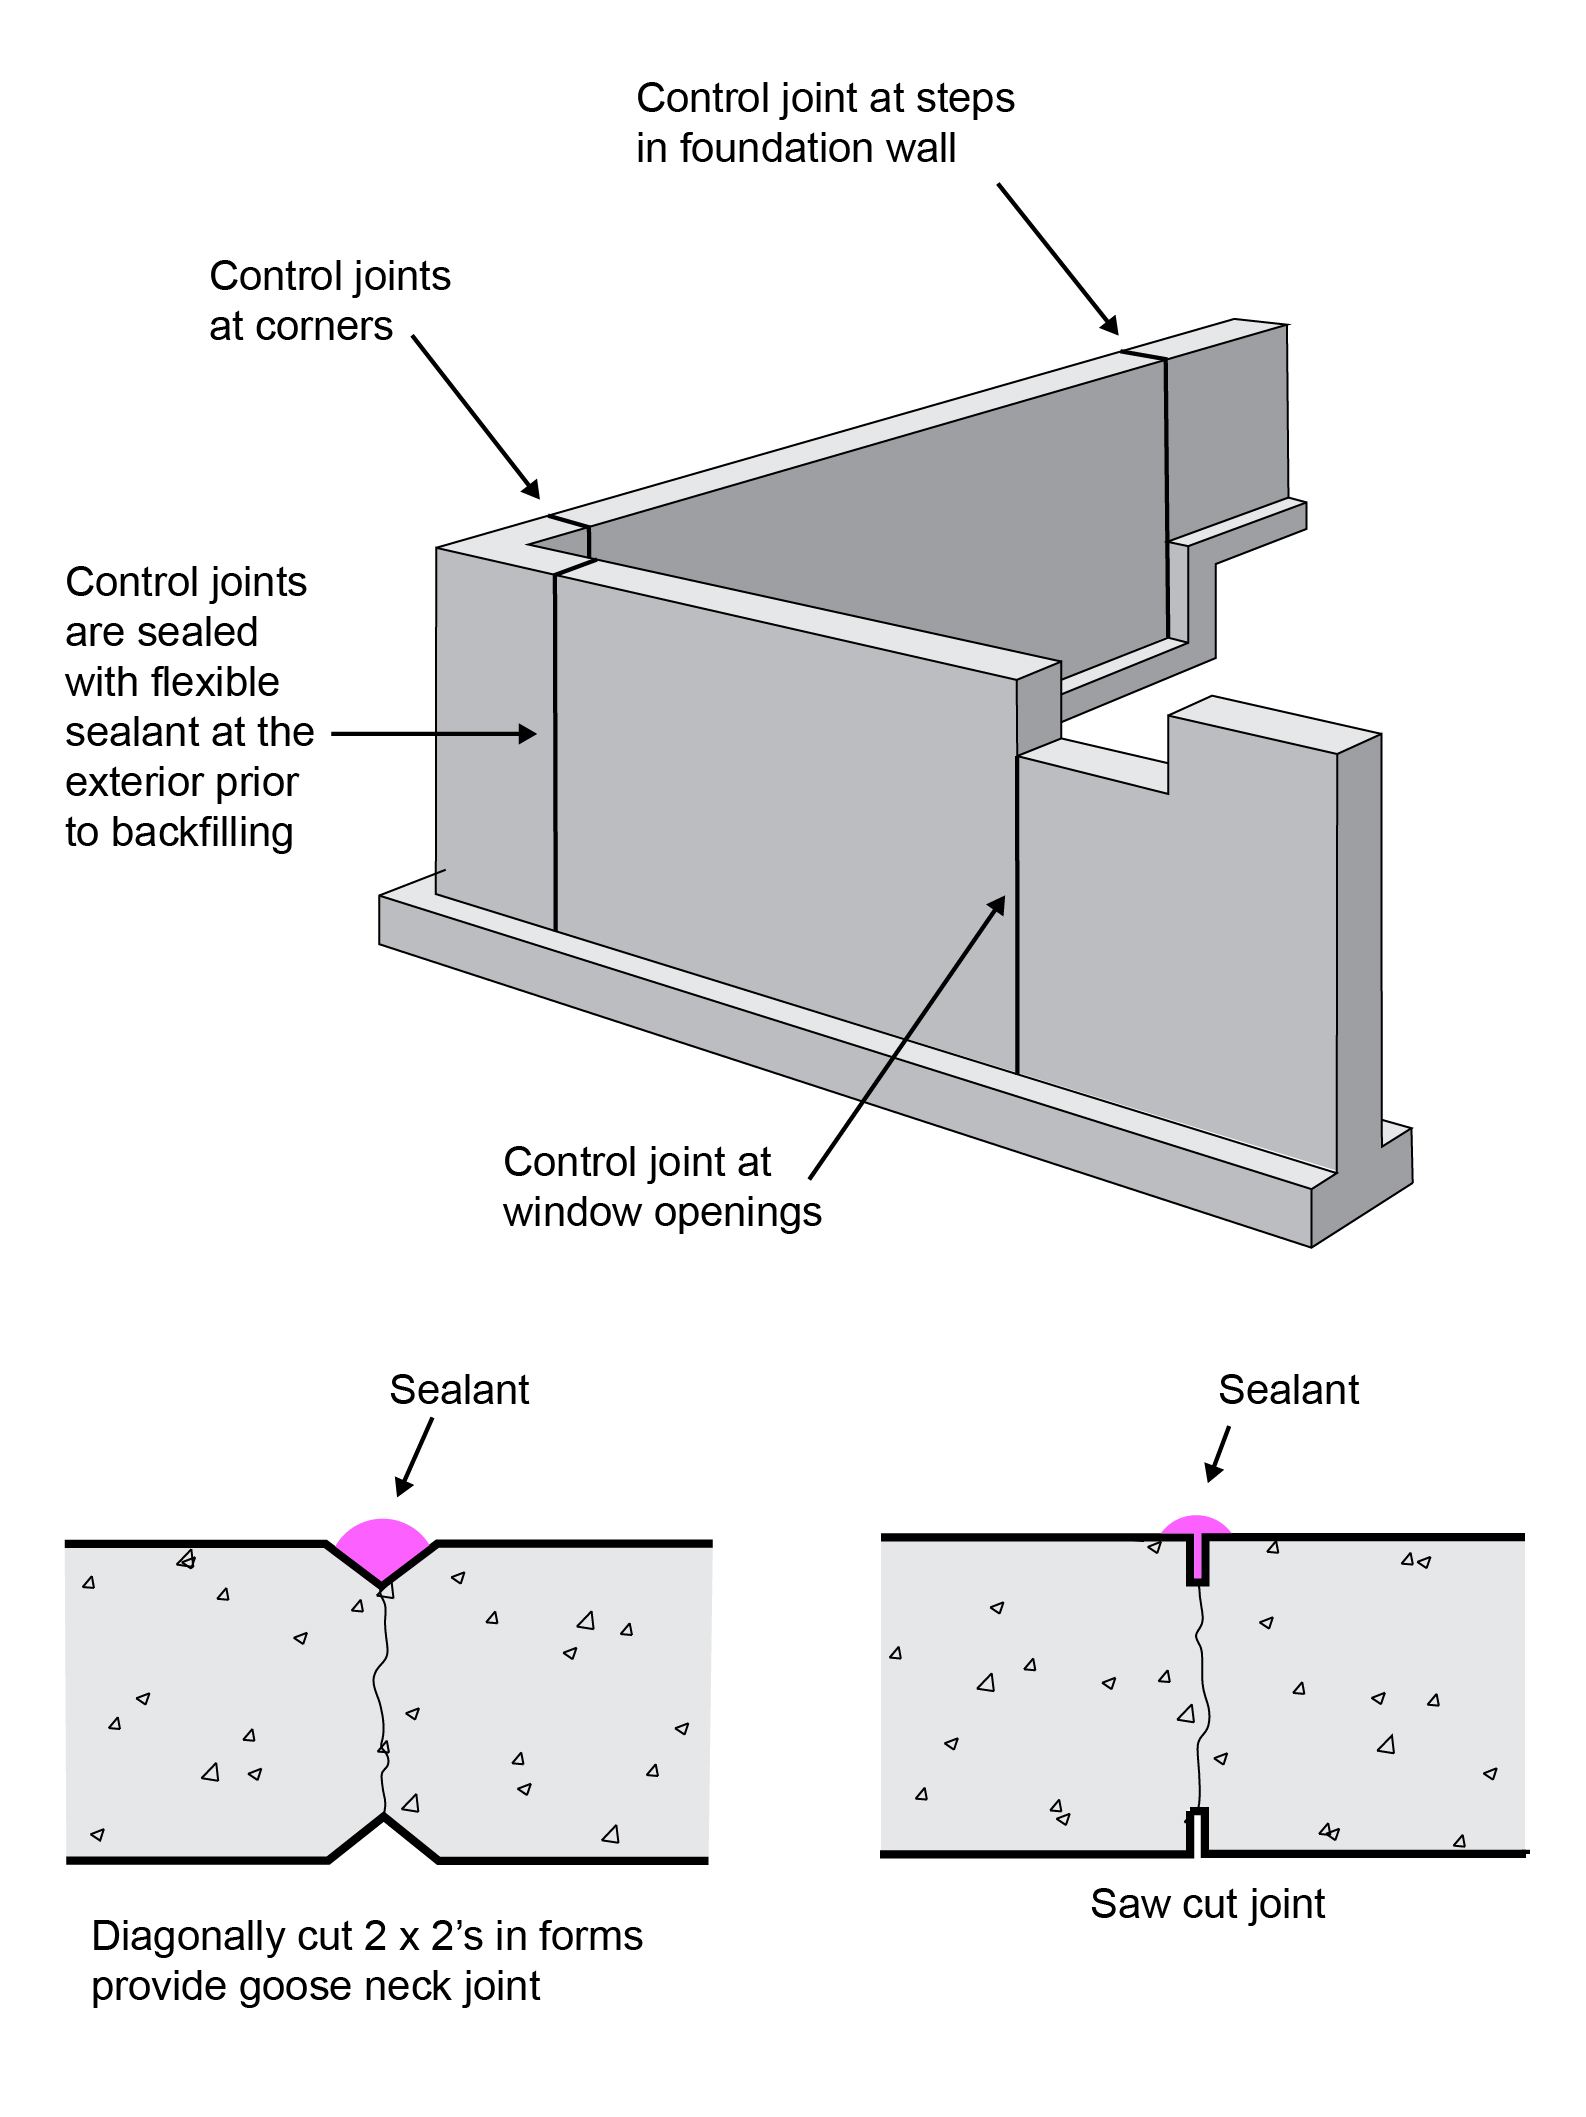
Figure 1: Control Joints- Since we cannot prevent concrete from cracking we try to “control” the cracking using “control joints”. We in essence crack the concrete ourselves. We crack it in straight lines at predicable places and then fix the cracks that we cracked.
But we are not done. We have to keep the water from the cracks even though we think we put cracks in all the right places and fixed them right. I also point out that as buildings age they move and crack. It is not always possible to predict where all the cracks will appear.
Is it possible to keep the water from the cracks? Yes. The fundamentals of groundwater control date back to the time of the Romans: drain the site and drain the ground. Why not just install waterproofing on the exterior of the foundation wall? I am old school. Keep the water away from the foundation wall and you don’t need to rely on the waterproofing. Note that waterproofing needs to be “perfect” whereas keeping the water away from the foundation wall allows you to not be “perfect”.
Today that means collecting the run off from roofs and building surfaces using gutters and draining the water away from foundation perimeters. Keep “surface water” from becoming “ground water”. Roof and façade water should not saturate the ground beside foundations. Grade should slope away from building perimeters (Figure 2).
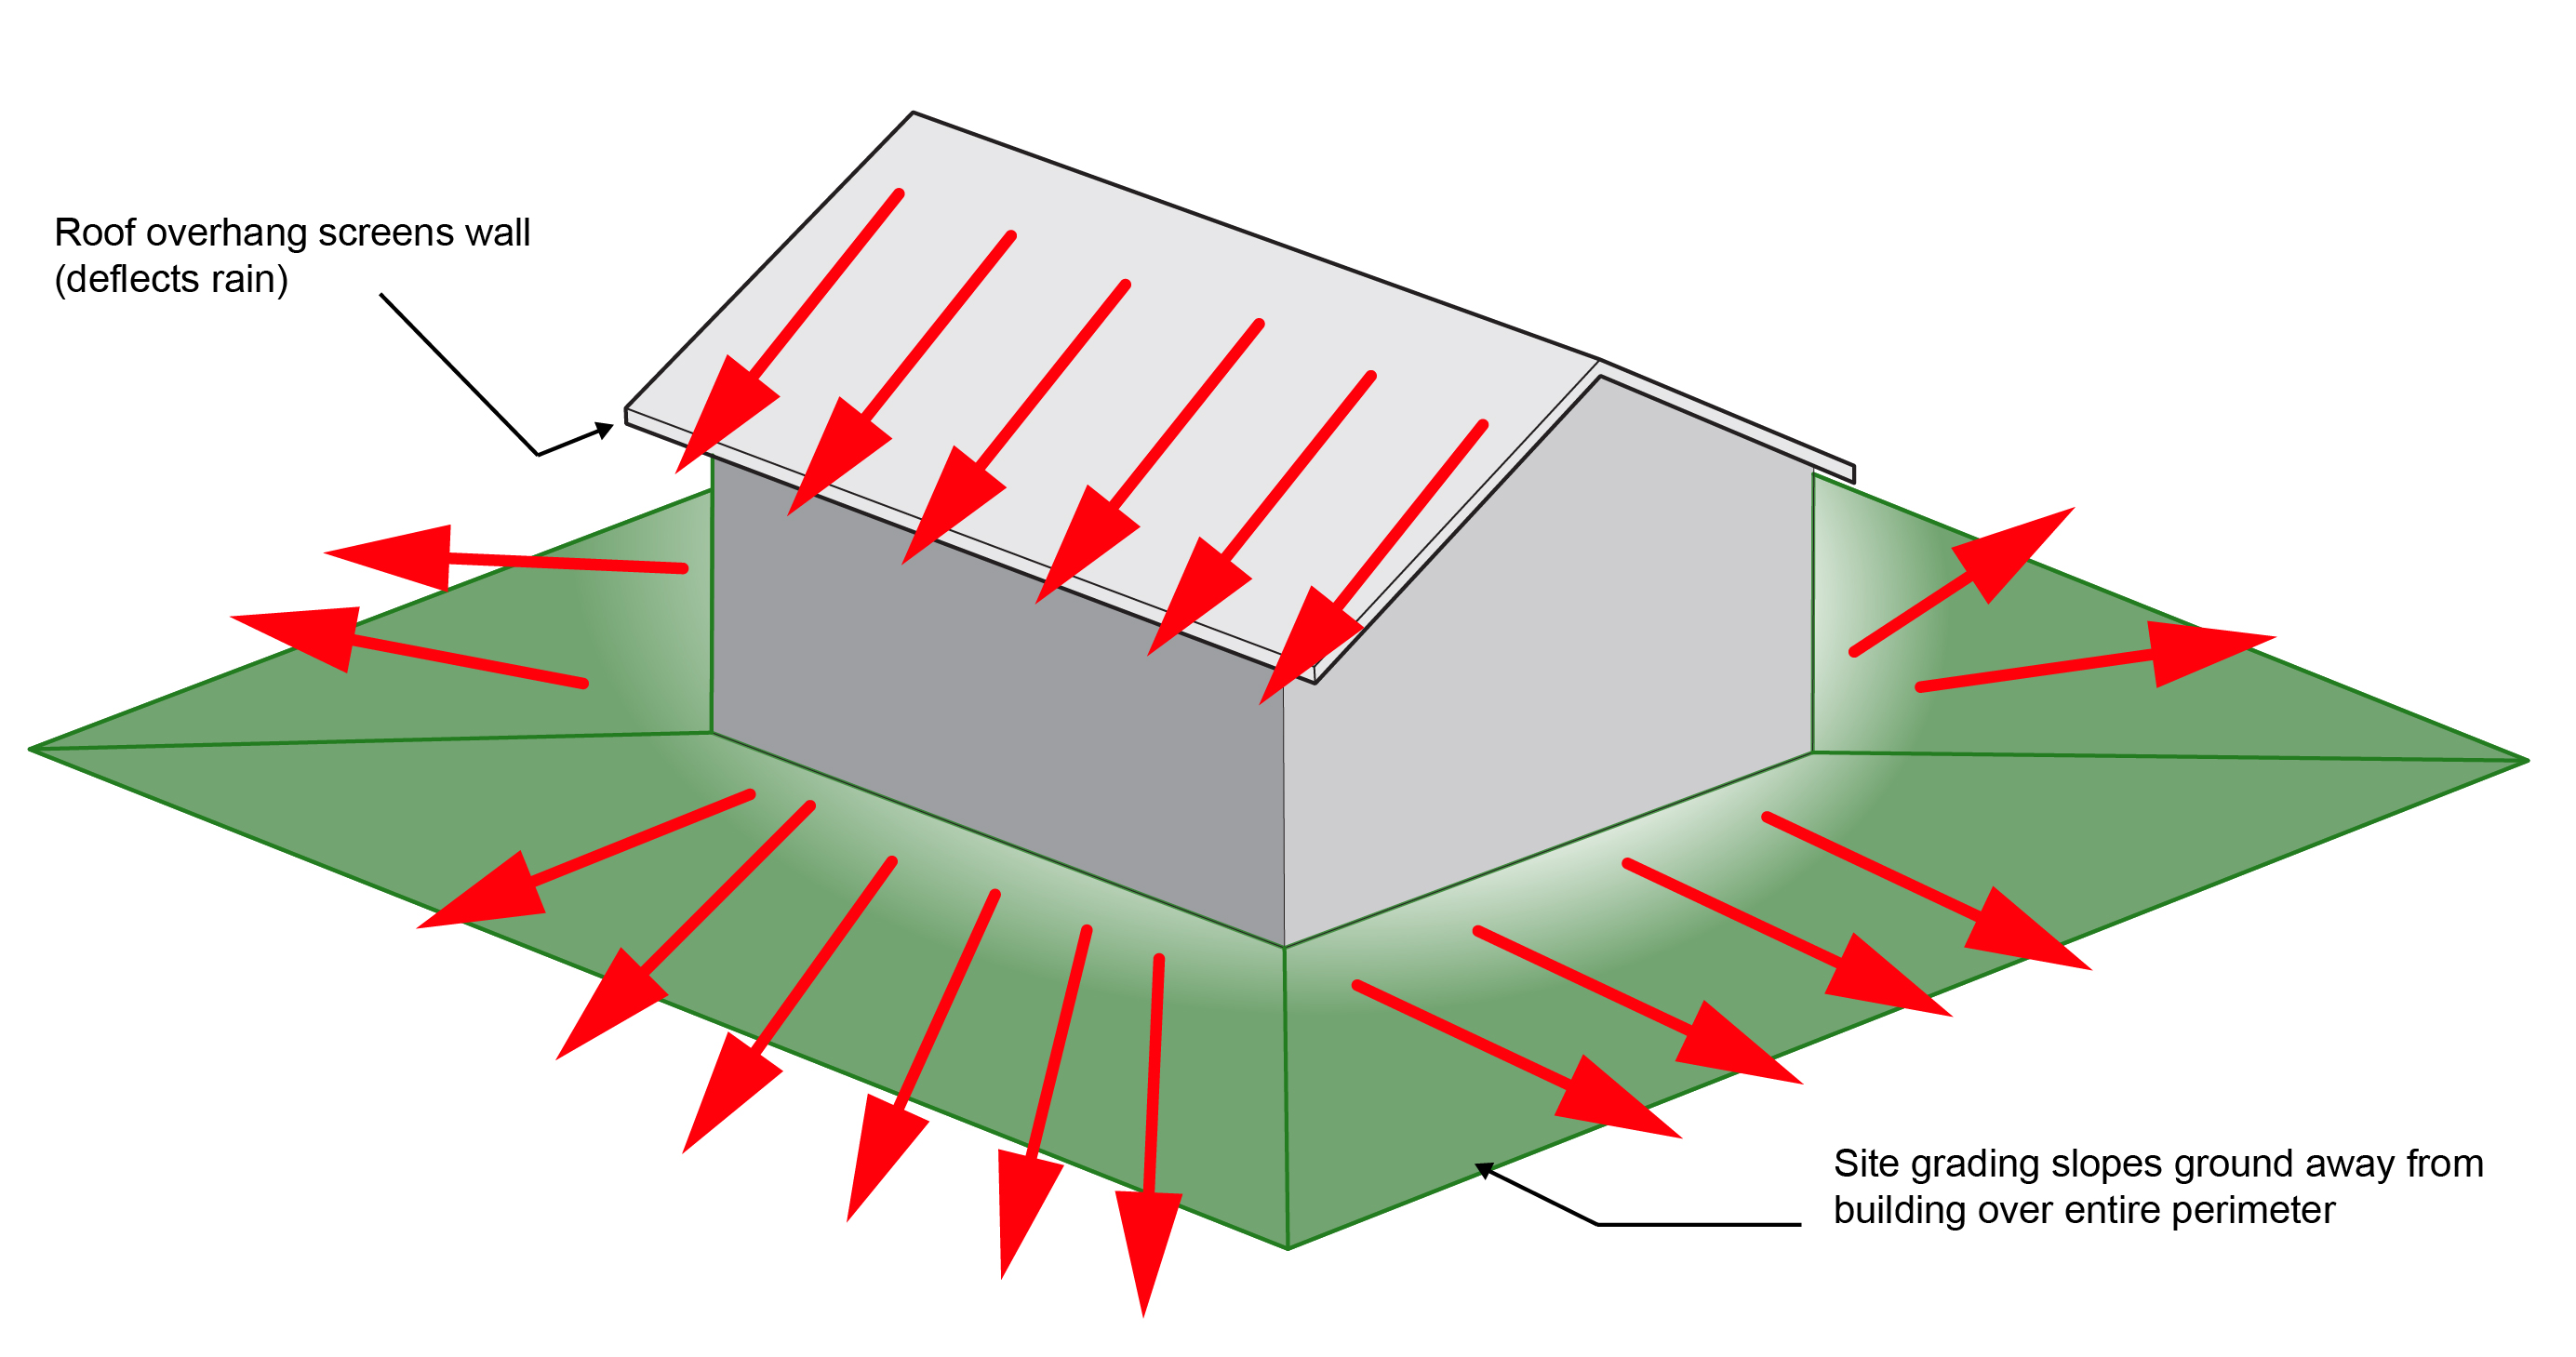
Figure 2: Drain the Site- Drain the water away from foundation perimeters. Keep “surface water” from becoming “ground water”. Roof and façade water should not saturate the ground beside foundations. Grade should slope away from building perimeters.
The steeper the slope away from the building perimeter the better. Floor levels should always be above the surrounding grade - the higher the better (except basement floors which should be higher than the surrounding drainage system). Standing water beside a building is a bad idea. Driveways and walk-ways should drain away from the building and be lower than floor levels. Patios and decks should also be lower than floor levels and should drain away from the building.
Layer the site. Floors on top – higher than the surroundings. Patios, stoops and garages lower than floors. Driveways and walkways lower than patios, stoops and garages. And finally, driveways and walkways should slope with the grade away from the building.
Nothing should be flat and level except the floors of the building. Slope everything away from the building. Slope the garage slab, the patio, the stoop, and the walkway. Slope everything. Remember: “down and out”. Direct the water down and away from the building.
Then assume that you fail at draining the site. Now you have to keep the ground water from getting to your basement foundation walls. Start with providing an impermeable layer covering the ground adjacent to basement foundation. Then provide a free draining layer of backfill material (Figure 3) or some other provision for drainage such as a drainage board or drainage mat (Photograph 4) or draining insulation (Photograph 5 and Photograph 6) so that the penetrating groundwater is directed downward to a perimeter drain.
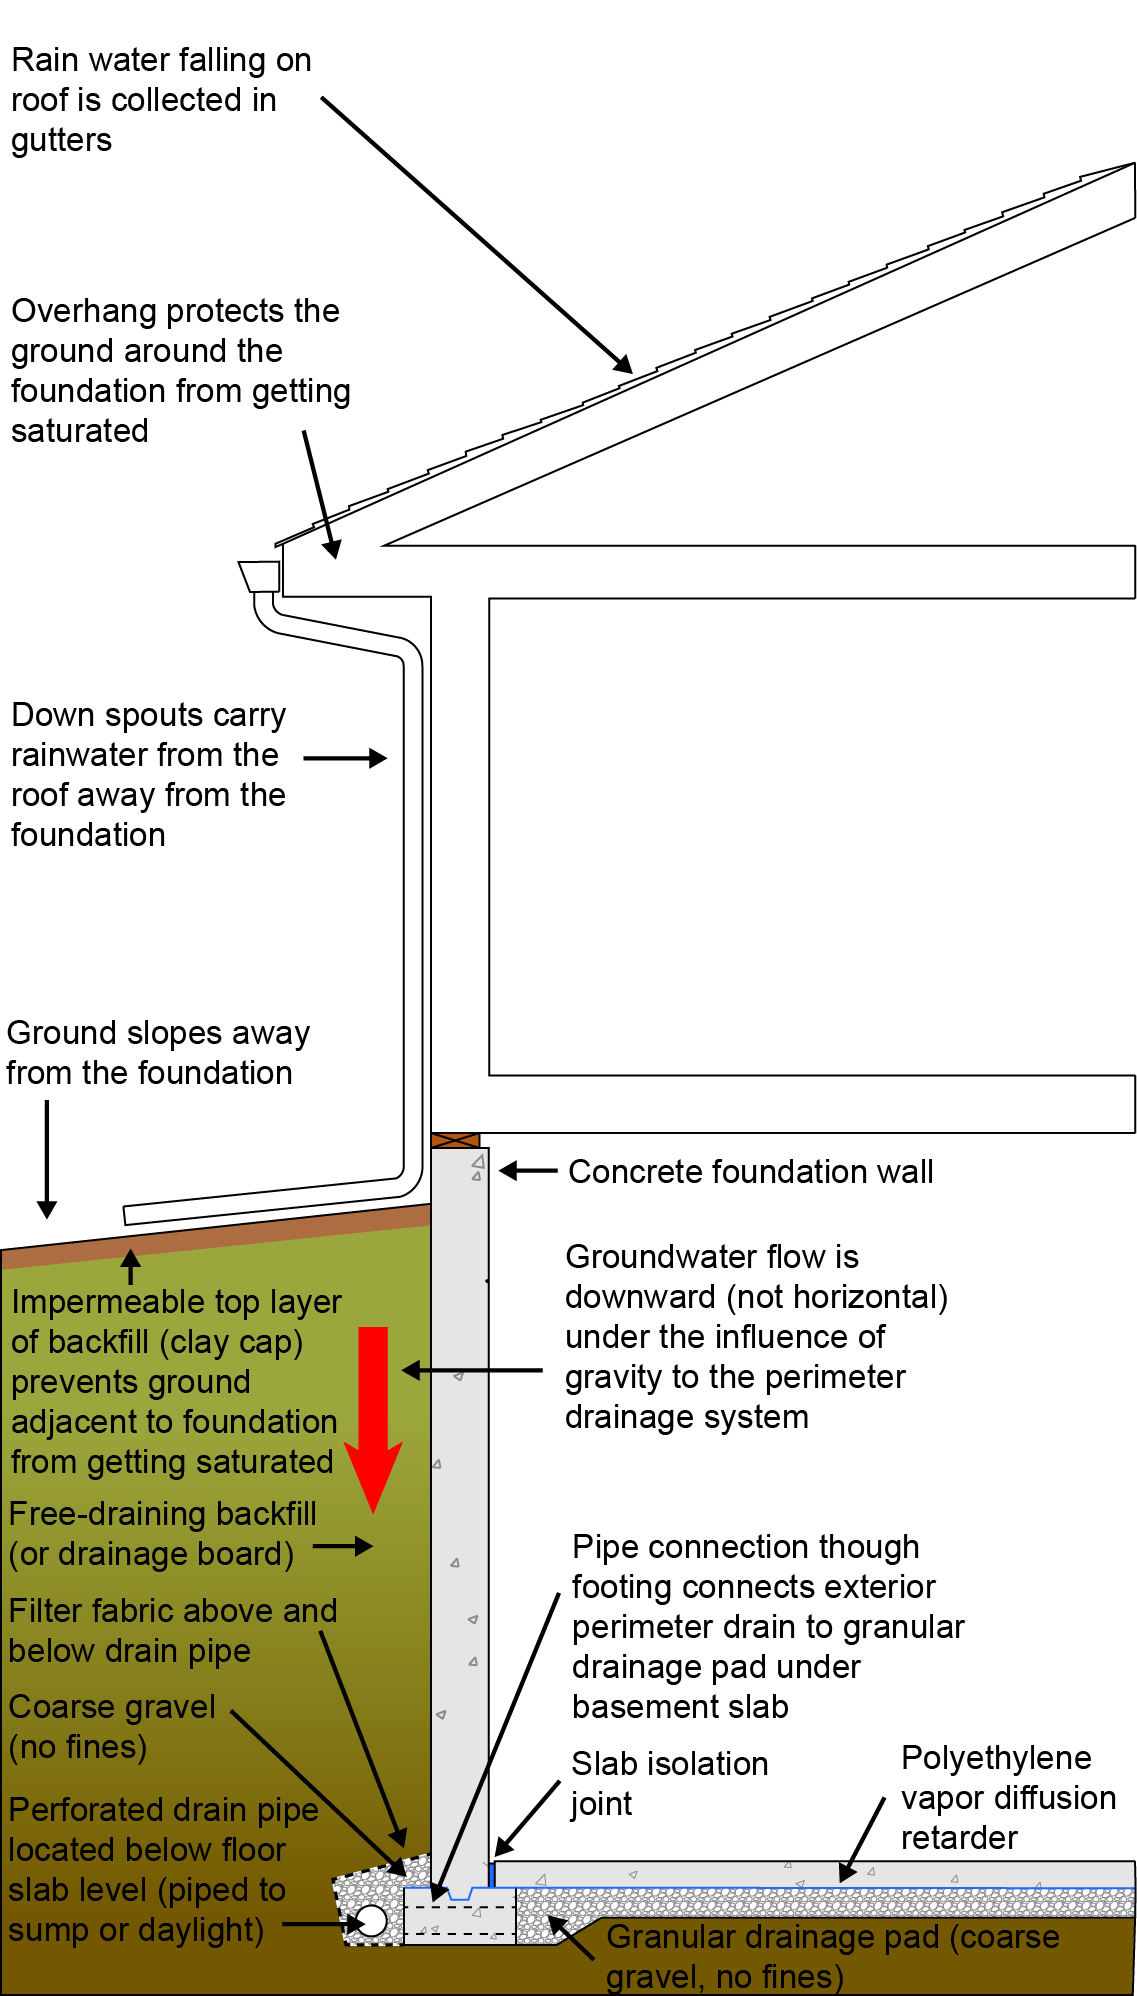
Figure 3: Drain the Ground- You have to keep the ground water from getting to your basement foundation walls. Start with providing an impermeable layer covering the ground adjacent to basement foundation. Then provide a free draining layer of backfill material so that the penetrating groundwater is directed downward to a perimeter drain.
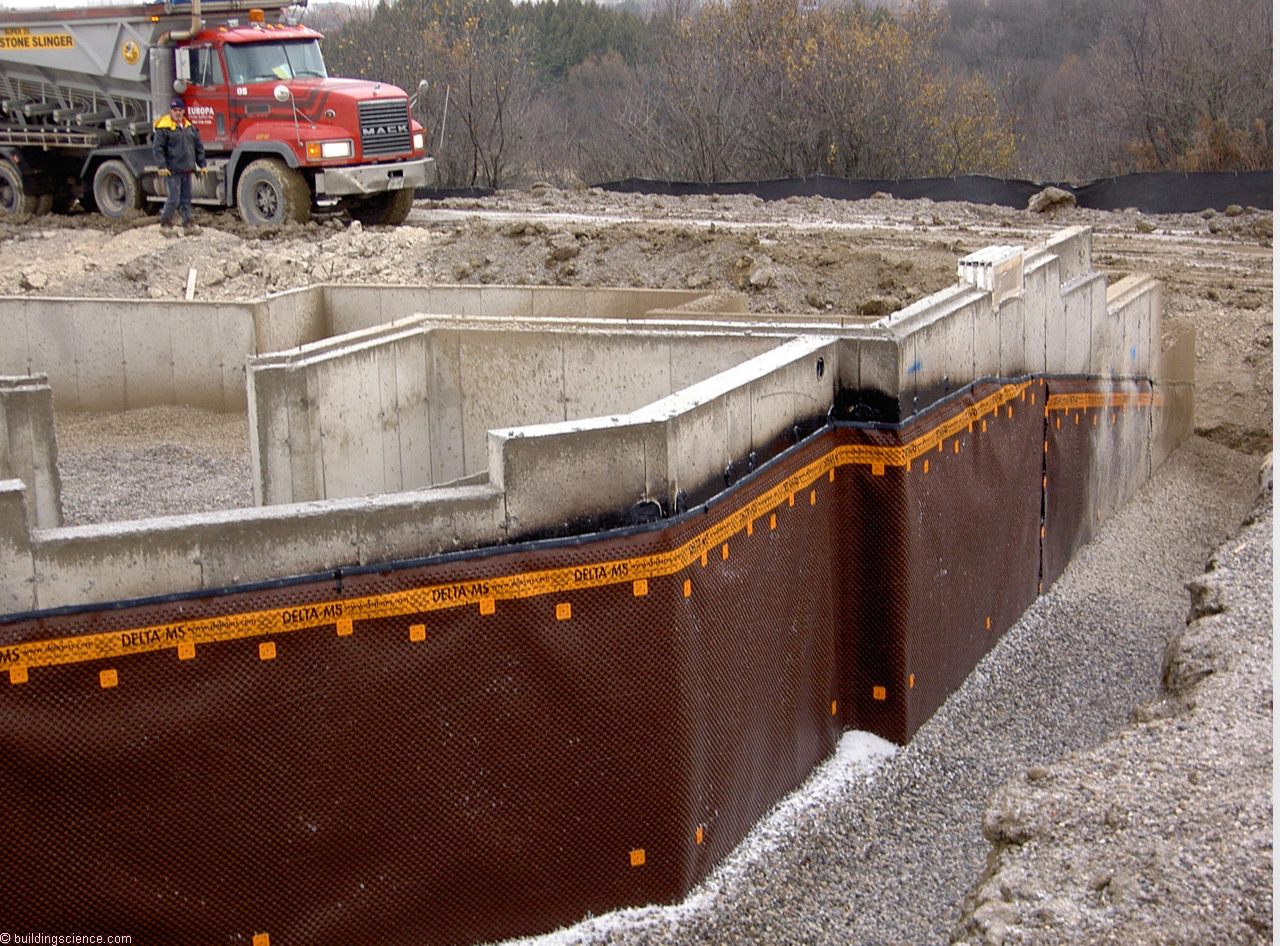
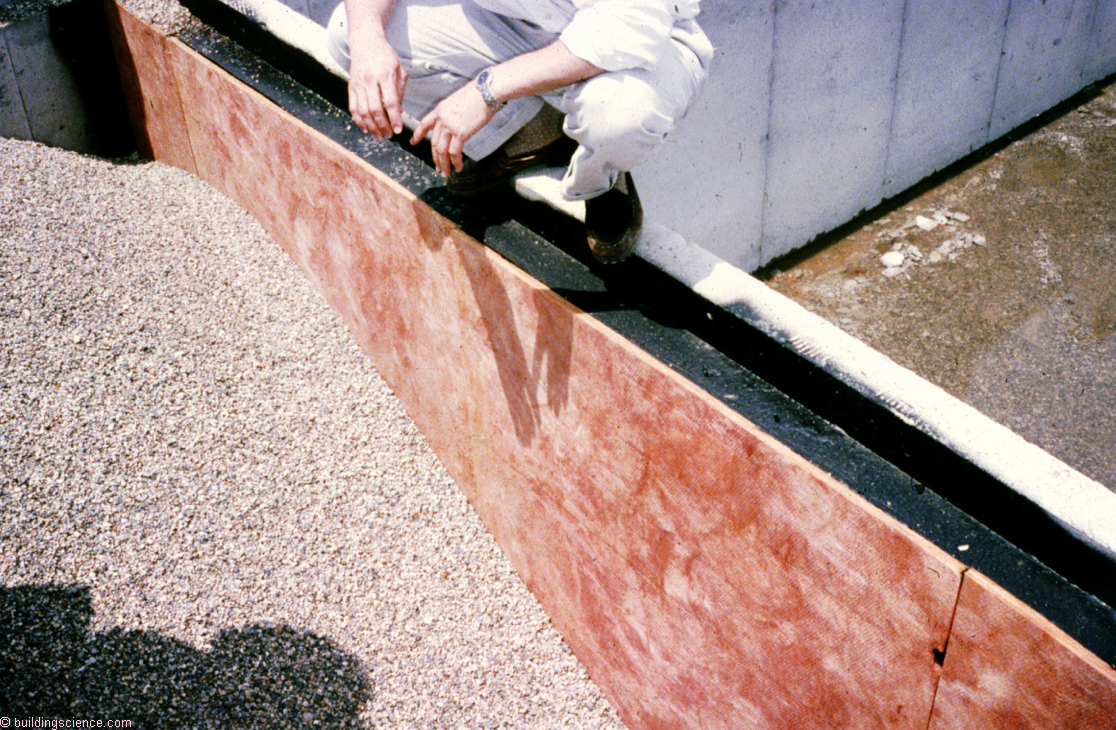
Photograph 4: Drainage Mat– An airgap is provided by “bumps” or “dimples” in the membrane. The airgap provides drainage controlling hydrostatic pressure.
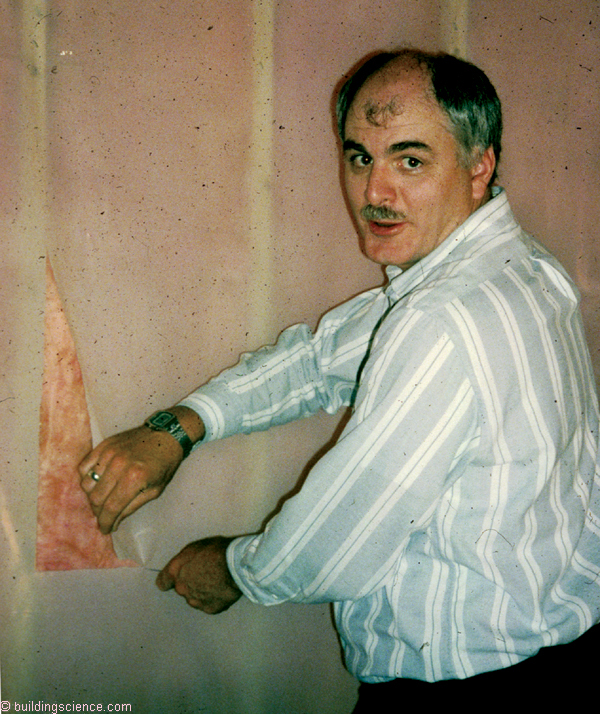
Photograph 5: Draining Insulation– The oriented nature of the fiberglass fibers provide drainage controlling hydrostatic pressure. The distinguished looking gentleman in the image is Professor John Timusk showing a young (at the time) graduate student (me) how draining insulation works. If I recall correctly “thatched roofs” work in a similar fashion. Note the lack of dampproofing…Professor Timusk believed that it was unnecessary in a cold climate if sufficient external vapor open insulation was installed. The draining insulation provided a capillary break so dampproofing for this function was not necessary. The vapor control function of the dampproofing was also unnecessary if the concrete foundation wall remained warmer than the ground. This was a very controversial position at the time. He was correct of course. He was always correct. This was during the time the Edmonton Oilers were winning Stanley Cups.
Photograph 6: More Draining Insulation– Notice the black dampproofing. This was a very conservative approach….and necessary with low thermal resistance levels of draining insulation. The insulation basically provided only the drainage function and the capillary break. The vapor control function was provided by the dampproofing.
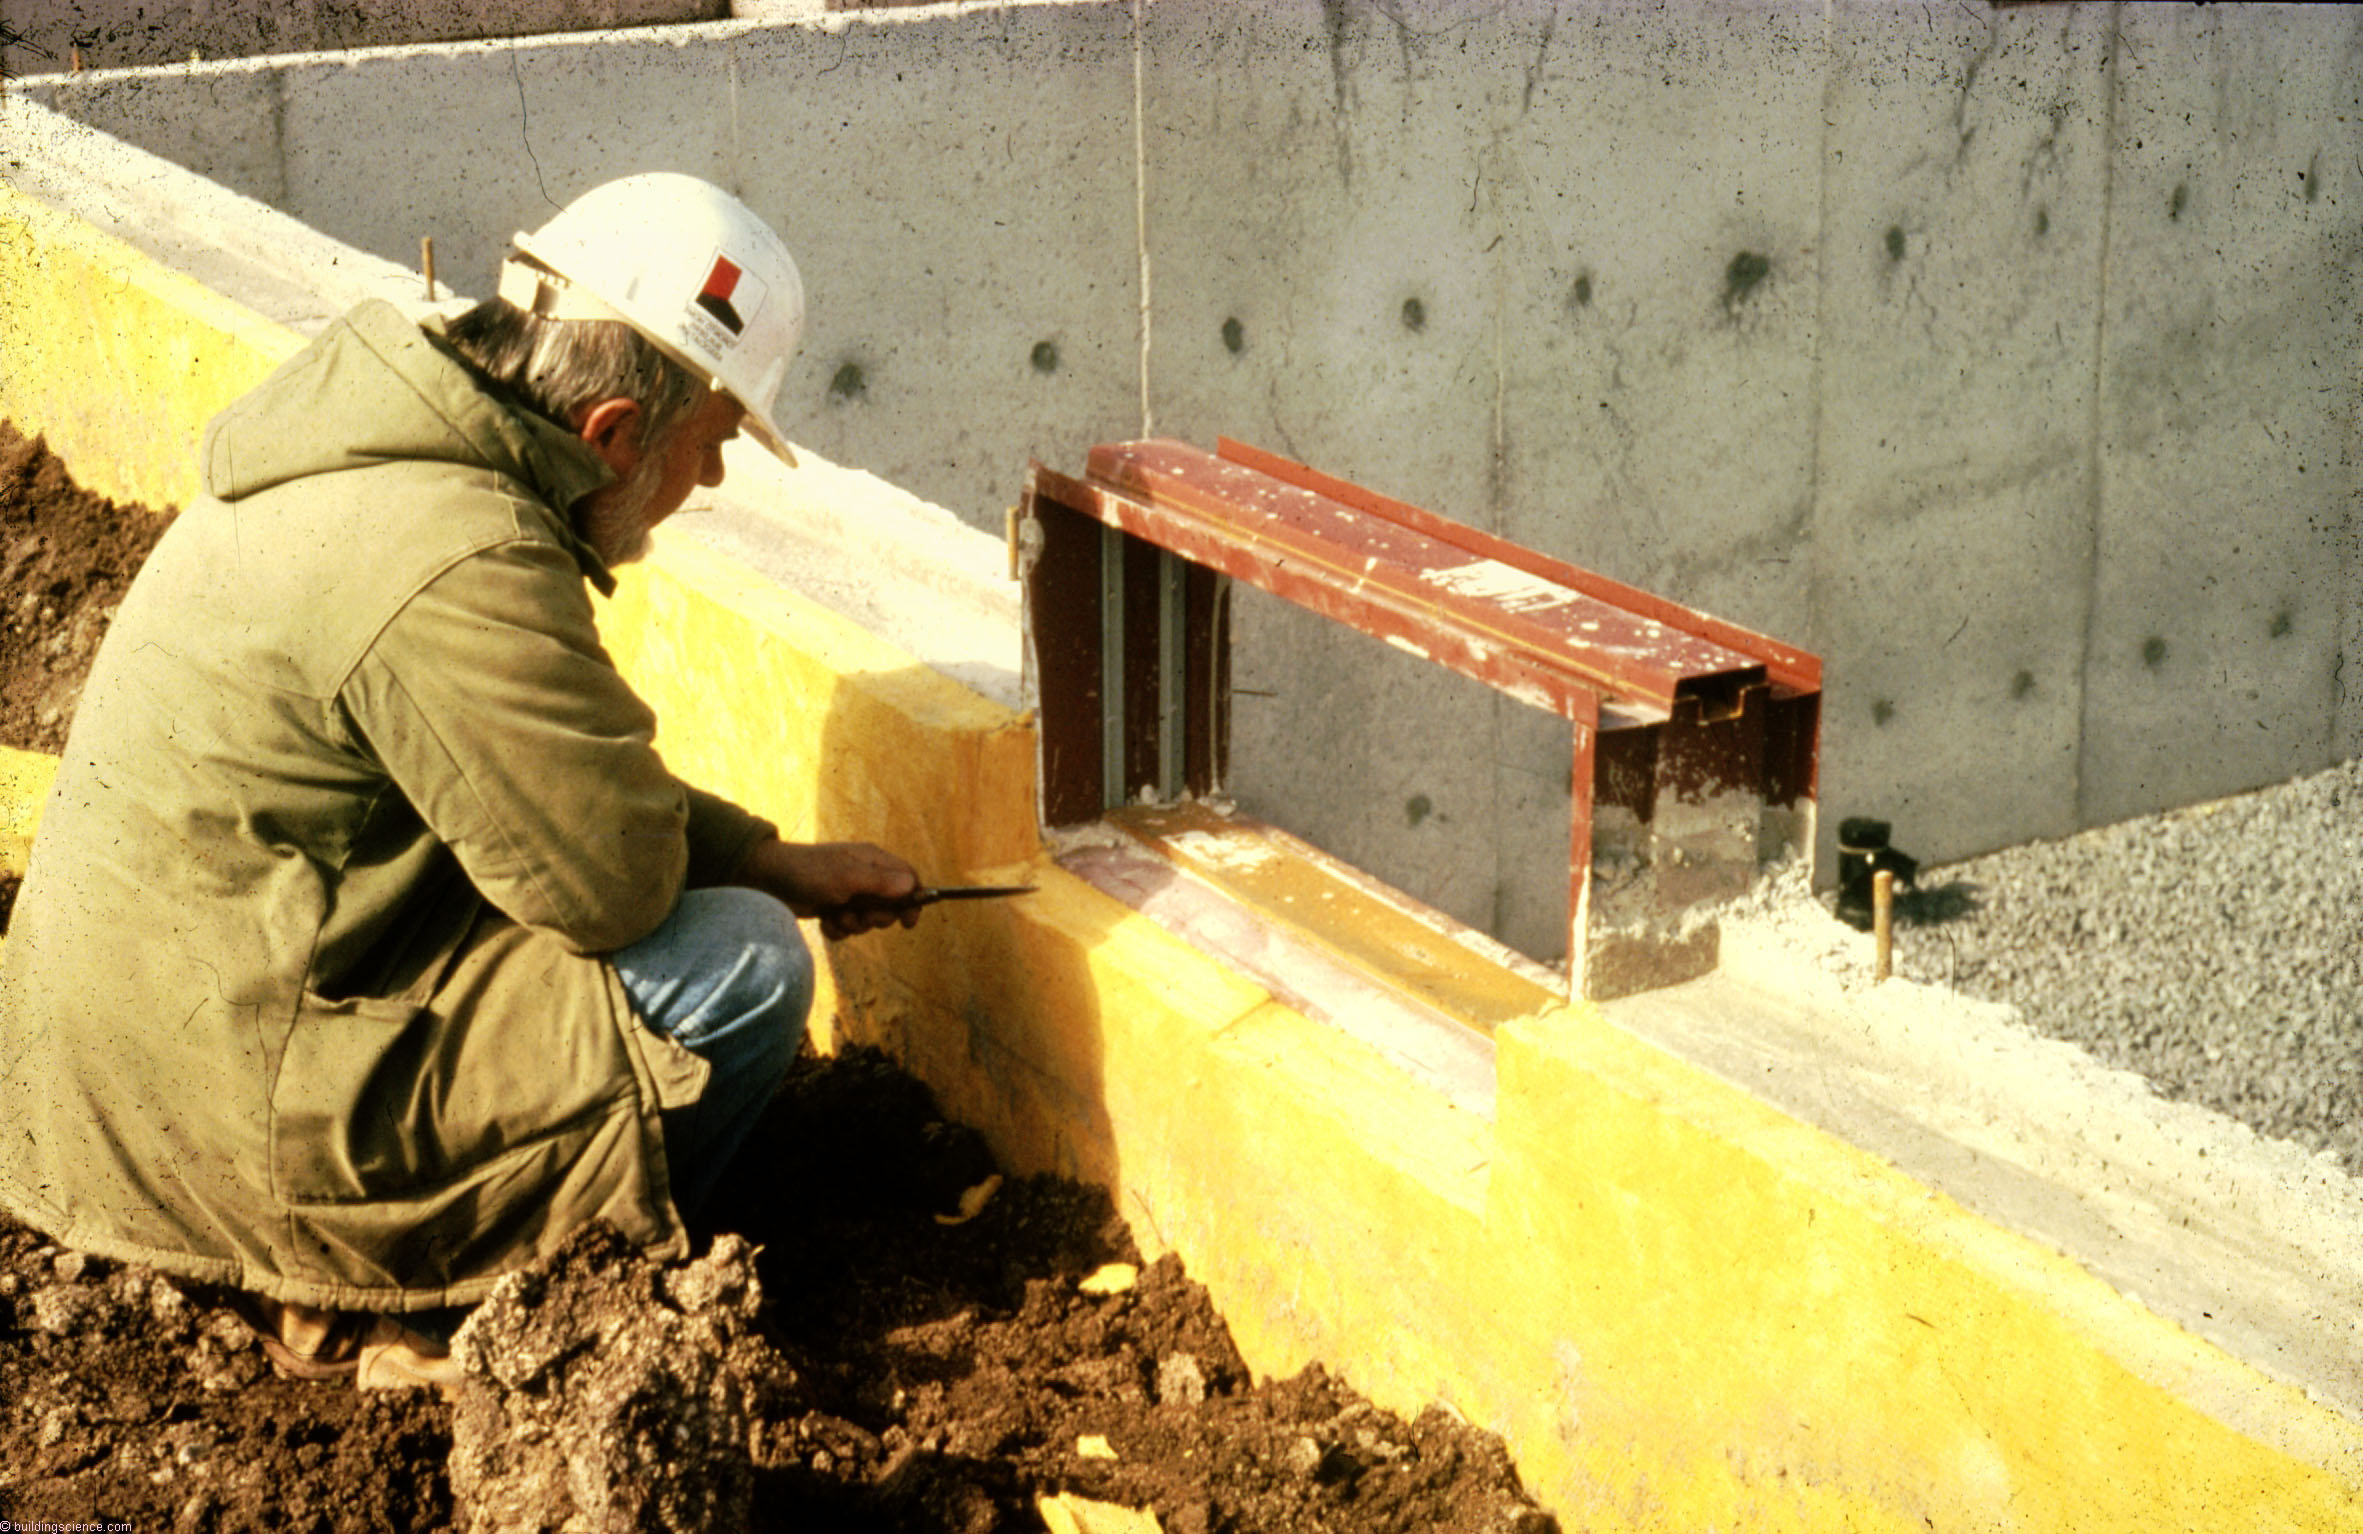
The perimeter drain should be located exterior to the foundation and wrapped completely in a geotextile (“filter fabric”). A crushed stone drainage layer under the basement slab should be connected through the footings to the perimeter drain to provide drainage redundancy and to provide a temporary reservoir for high groundwater loading during downpours if sump pumps fail during electrical outages (if gravity drainage to daylight is not possible).
The basement wall should be damp-proofed and vapor-proofed on the exterior and a capillary break installed over the top of the footing to control “rising damp”. Damp-proofing and vapor-proofing in these locations is often provided by a fluid applied coating of bitumen. In the past, capillary breaks over footings were not common. They were not needed when basement perimeter walls were uninsulated and unfinished on the interior, because these conditions permitted inward drying of the migrating moisture. For finished insulated basements they are an important control mechanism. Without them, moisture constantly migrates through the foundation, and then into the interior insulation layer and interior gypsum board lining.
In places where the ground water table is high…regularly above the height of the basement floor slab and dewatering of the surrounding soil is not possible or practical….waterproofing is the best and only strategy possible. This has huge structural implications due to the hydrostatic pressures involved in keeping the foundation from collapsing….adults have to be involved.
A capillary break and vapor barrier should be located under concrete basement floor slabs. Crushed stone or coarse gravel acts as an effective capillary break and sheet polyethylene in direct contact with a concrete floor slab acts as an effective vapor barrier. The concrete slab should be sealed to the perimeter basement wall with sealant (the concrete slab becomes the “air barrier” resisting the flow of soil gas).
The crushed stone drainage layer under the basement concrete slab should be vented to the atmosphere to control soil gas (Figure 4). Atmospheric air pressure changes are on the order of several hundred Pascal’s so that the soil gas vent stack is in essence a “pressure relief vent” or “soil gas bypass” to the atmosphere. Perforated pipe should be attached to the vent stack to extend the pressure field under the slab to the foundation perimeter and to the drainage layer outside the walls. Pipe connections through the footing extend the pressure field further to the exterior perimeter drain (as well as providing drainage redundancy as previously noted).
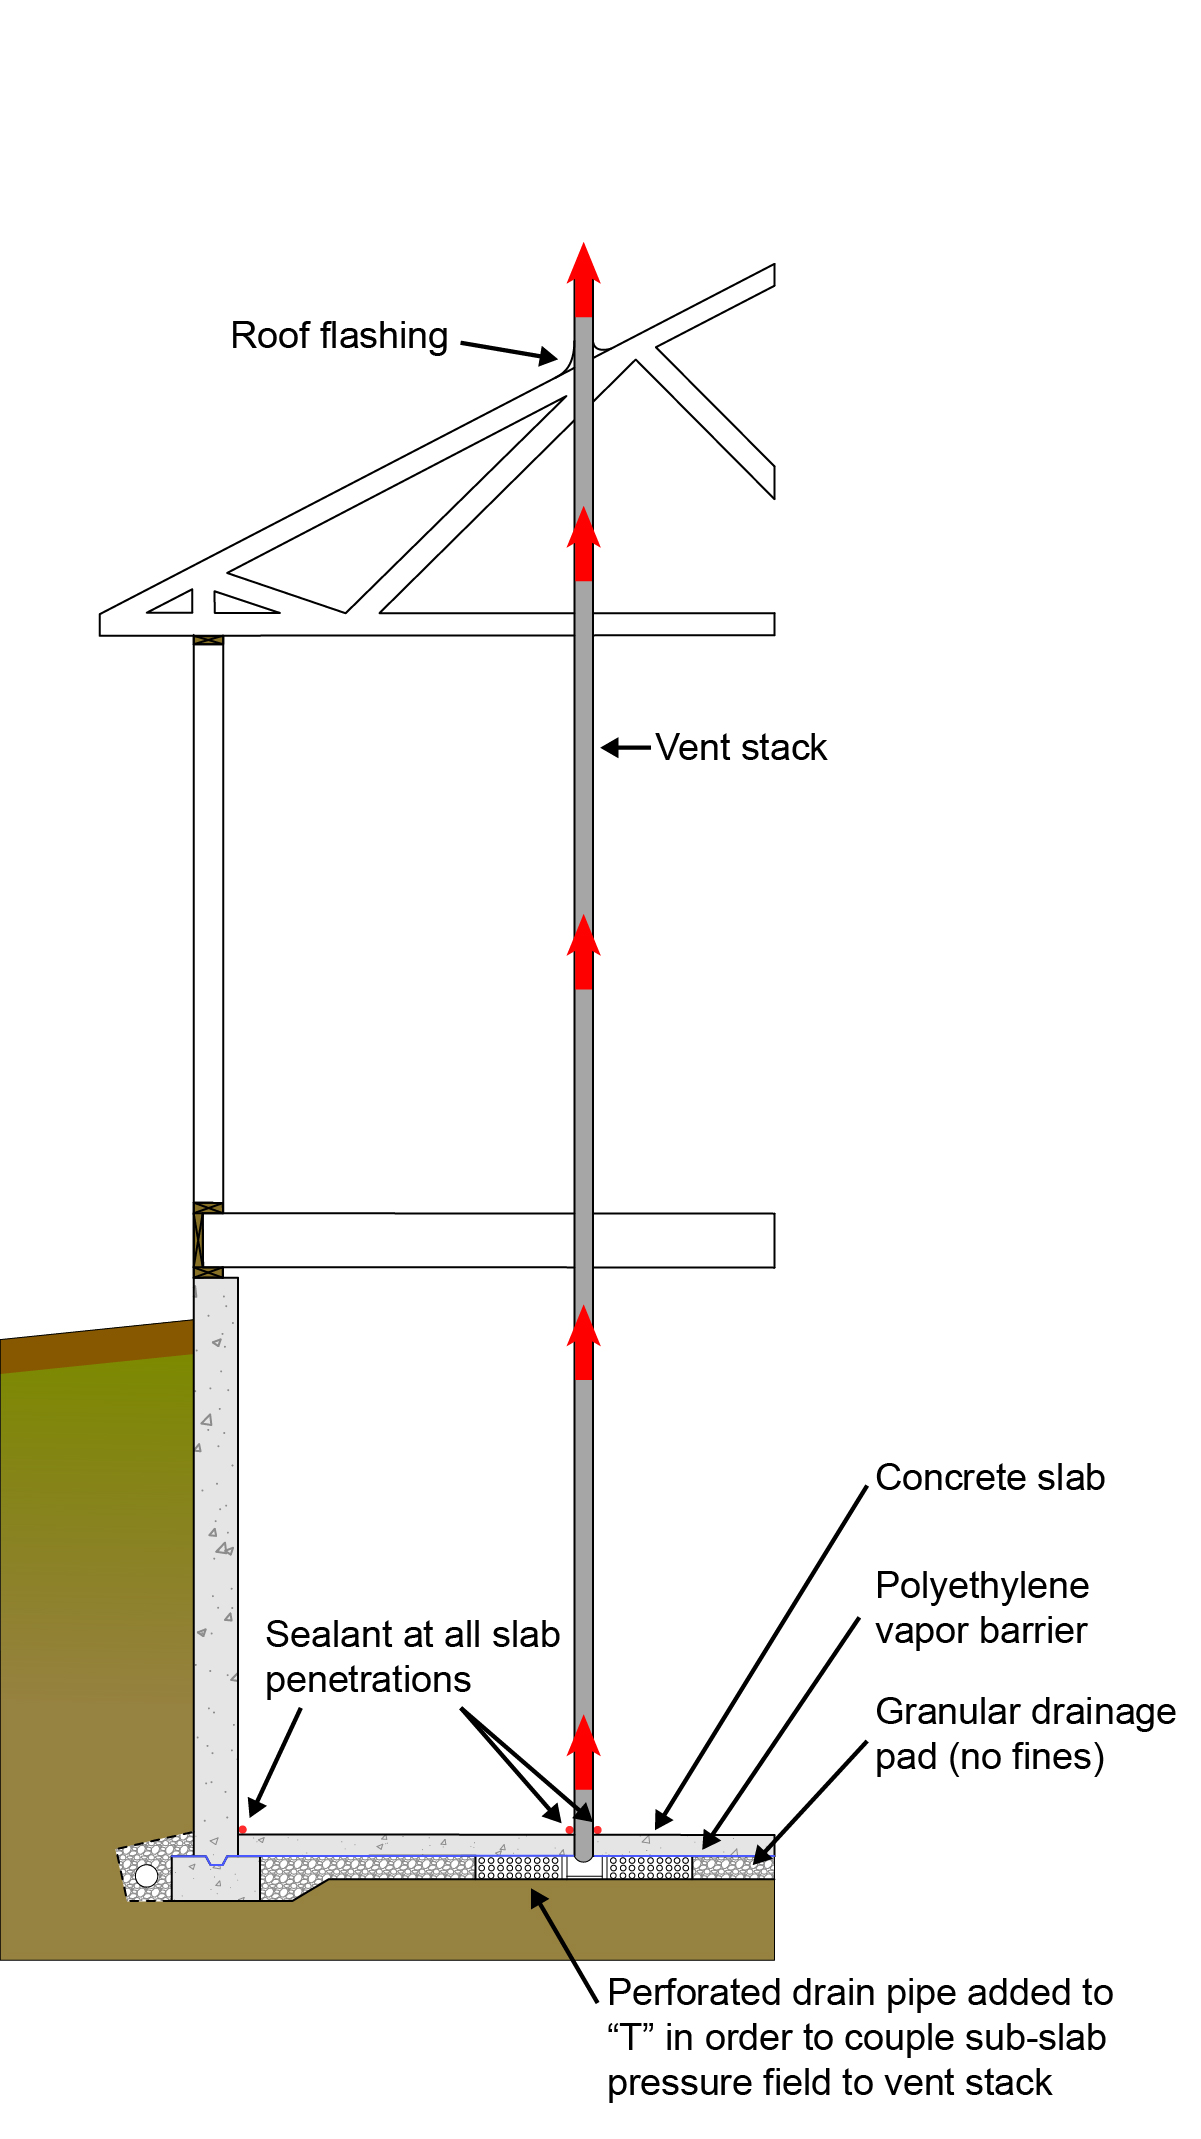
Figure 4: Vent the Ground- The crushed stone drainage layer under the basement concrete slab should be vented to the atmosphere to control soil gas. Atmospheric air pressure changes are on the order of several hundred Pascal’s so that the soil gas vent stack is in essence a “pressure relief vent” or “soil gas bypass” to the atmosphere.
Now we can insulate and finish the interior of the basement. Note what we have focused on first. Keeping the ground water out of the basement using drainage – drainage of the site and drainage of the ground. If you do not drain the site and drain the ground, do not insulate and finish the interior of the basement. But, but…we never did this before. That is true…but you never insulated and finished basements before.
This is all easy in new construction. What if you have an existing basement and you want to finish it and insulate it and it is leaking? Is there some approach short of exterior excavation and retrofitting a traditional water proofing system? Yes. Install an interior drainage system. You don’t have to dig up the exterior and re-landscape. Install an interior perimeter drain and couple it with a full height interior drainage layer. This drainage layer needs to be vapor tight and airtight to control the entry of water vapor and soil gases (Figure 5).
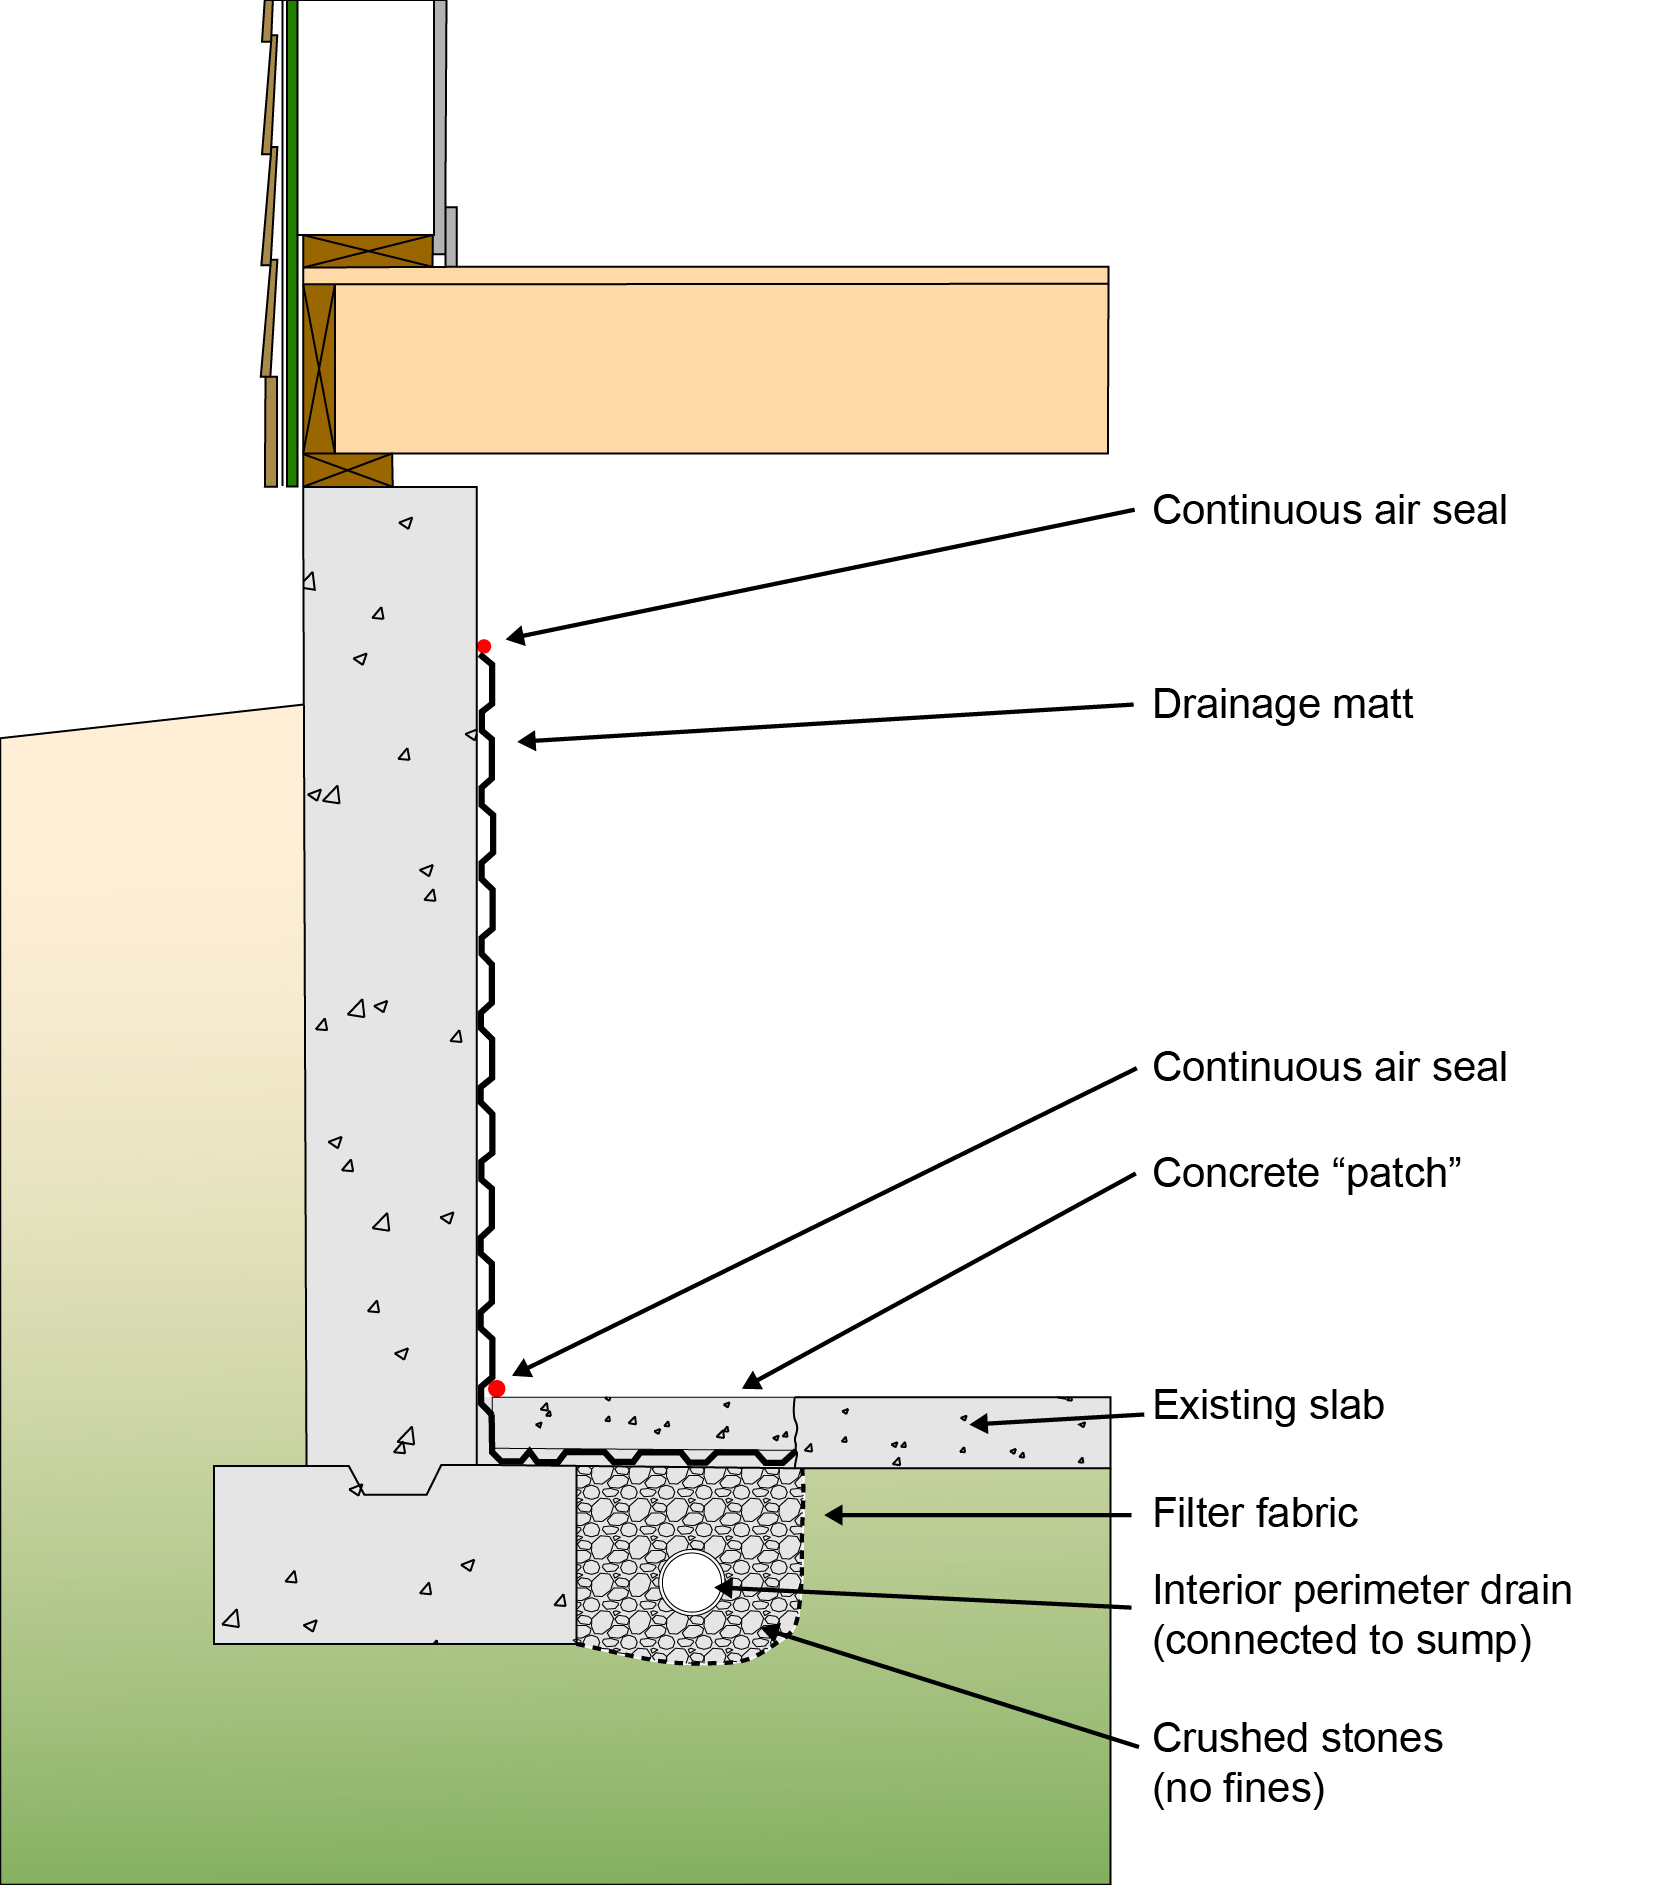
Figure 5: Interior Drainage System- You don’t have to dig up the exterior and re-landscape when you install an interior perimeter drain and couple it with a full height interior drainage layer. This drainage layer needs to be vapor tight and airtight to control the entry of water vapor and soil gases.
Interior drainage? Isn’t that against all the rules? Actually, no. We do interior drainage all the time in large scale construction projects such as tunnels through the alps and deep foundations on commercial buildings.
The key to interior drainage is to direct the water “to somewhere”. The only real choice is a sump pit with a pump. The pump should have a battery back-up and it should have an airtight lid. The battery back-up is obvious. Power goes out when it is raining hard and you need the drainage the most. The airtight lid is not so obvious. If the lid on the sump pit is not airtight soil gases such as radon, pesticides, termidicides, and herbicides enter. Notice the “cides” part. The “cide” ending such as in homicide comes from the Latin “caedere” meaning “kill”. And if radon was valuable we would mine it with a sump pit. Go with the airtight lid on the sump pit.
Let’s now look at the interior drainage layer. Recall how important it is to make sure the sump pit is airtight? Same thing for the interior drainage layer…and the interior perimeter drain it is connected to. The drainage layer should be airtight and vapor tight that also provides control of hydrostatic pressure. Controlling hydrostatic pressure is the easy part….provide an airspace between the foundation wall and the interior surface of the drainage layer that allows the water to run down to the interior perimeter drain. The air control and vapor control are more difficult. The interior drainage layer needs to be both an air barrier and a vapor barrier. It needs to be sealed airtight at the top of the wall. It needs to be sealed at the bottom of the wall. It needs to be sealed at its vertical joints. Note that the top of the wall means “above grade”.
Pretty neat eh? Install an interior drainage layer just as you would an exterior drainage matt. Both interior and exterior approaches need to control hydrostatic pressure and both need to be connected to a perimeter drain that is connected to a sump pit with an airtight lid. The big difference between the two approaches is that the interior approach absolutely needs to be airtight and vapor tight. Let me repeat, the interior approach absolutely needs to be airtight and vapor tight.
I need to clarify here….we don’t always do interior drainage on tunnels when we are not very smart such as the Big Dig in Boston…which has turned out to be the longest water ride in the world. Ah, my home town of Boston….don’t worry the Big Dig is getting slowly fixed with yes, wait for it, interior drainage.
How about finishing the interior after you are done? Knock yourself out. If you have exterior drainage you can pretty much do anything. If you have interior drainage you can pretty do anything…except for one stipulation. Absolutely, positively do not penetrate the interior drainage layer. Oh yeah, one more thing…do not install interior vapor barriers on the interior of insulated finished basements. We were here before (Figure 6 and Figure 7) (“BSI-105: Avoiding Mass Failures”, June 2018). You do not want to find what this handsome guy just found (Photograph 7).
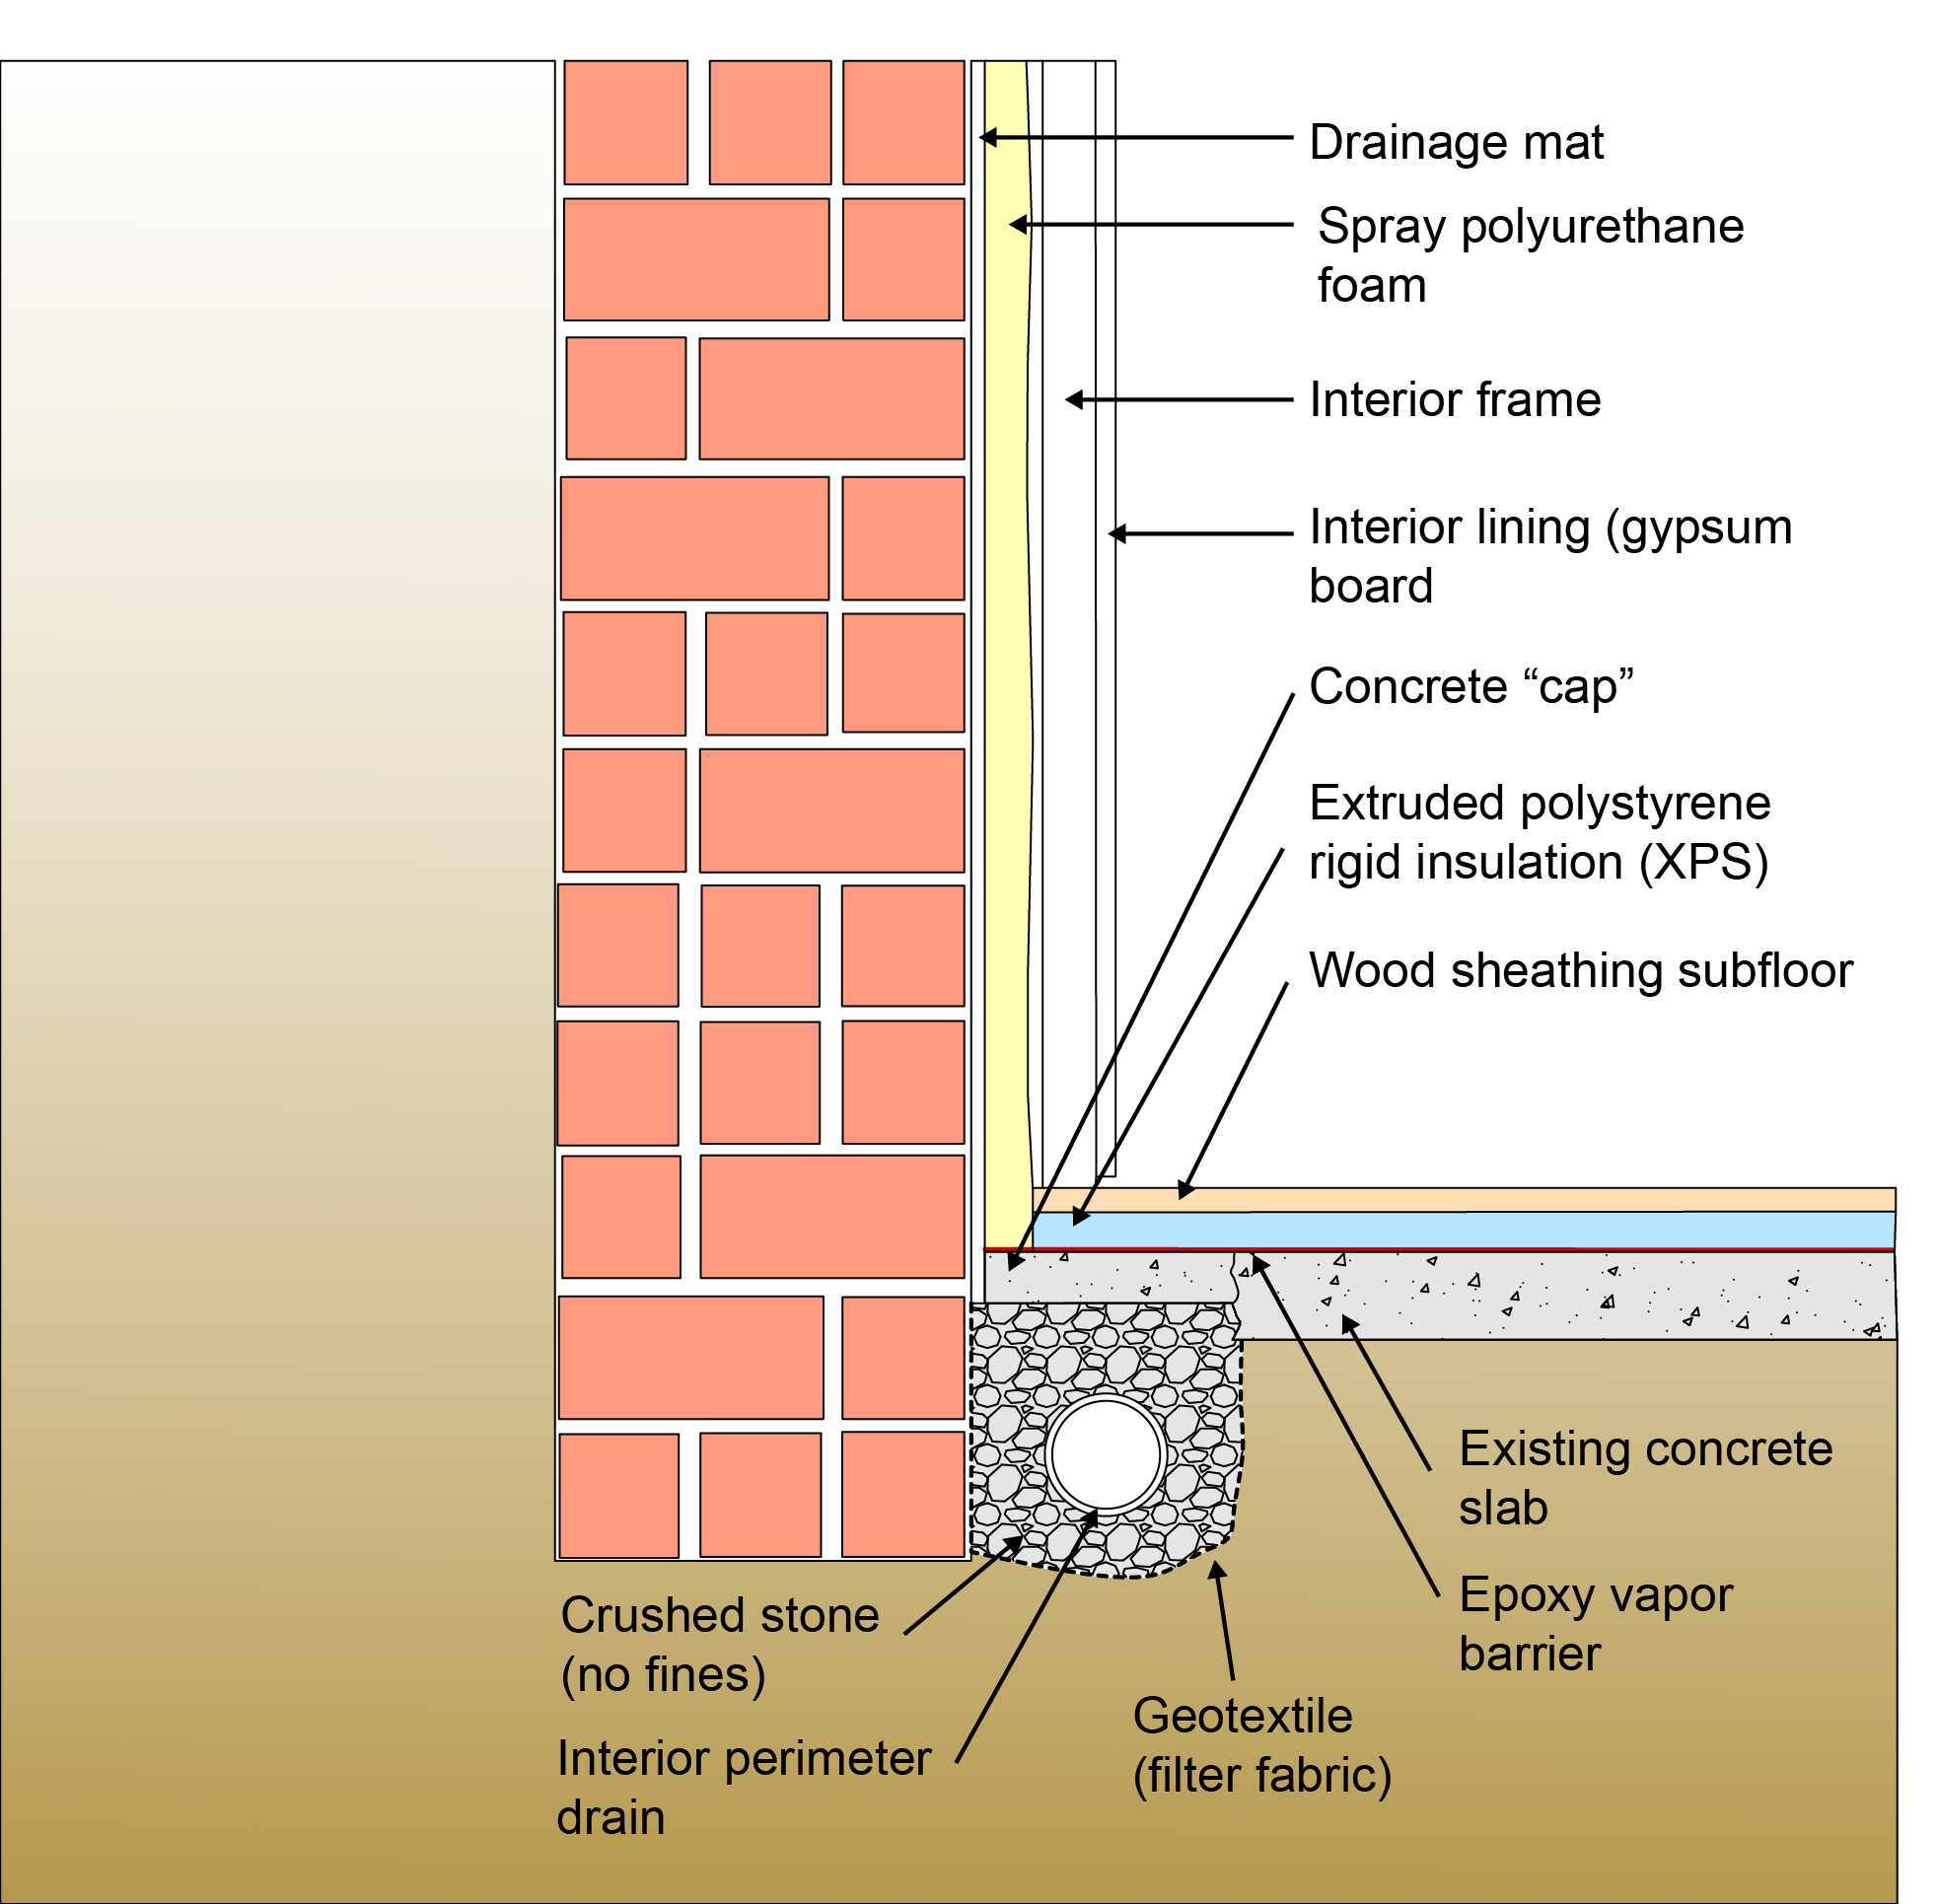
Figure 6: Avoiding Interior Vapor Barriers – Part I – Interior insulation layer can dry inwards from the face of the airtight and vapor tight interior drainage layer. In this assembly a drainage matt is insulated with spray polyurethane foam.
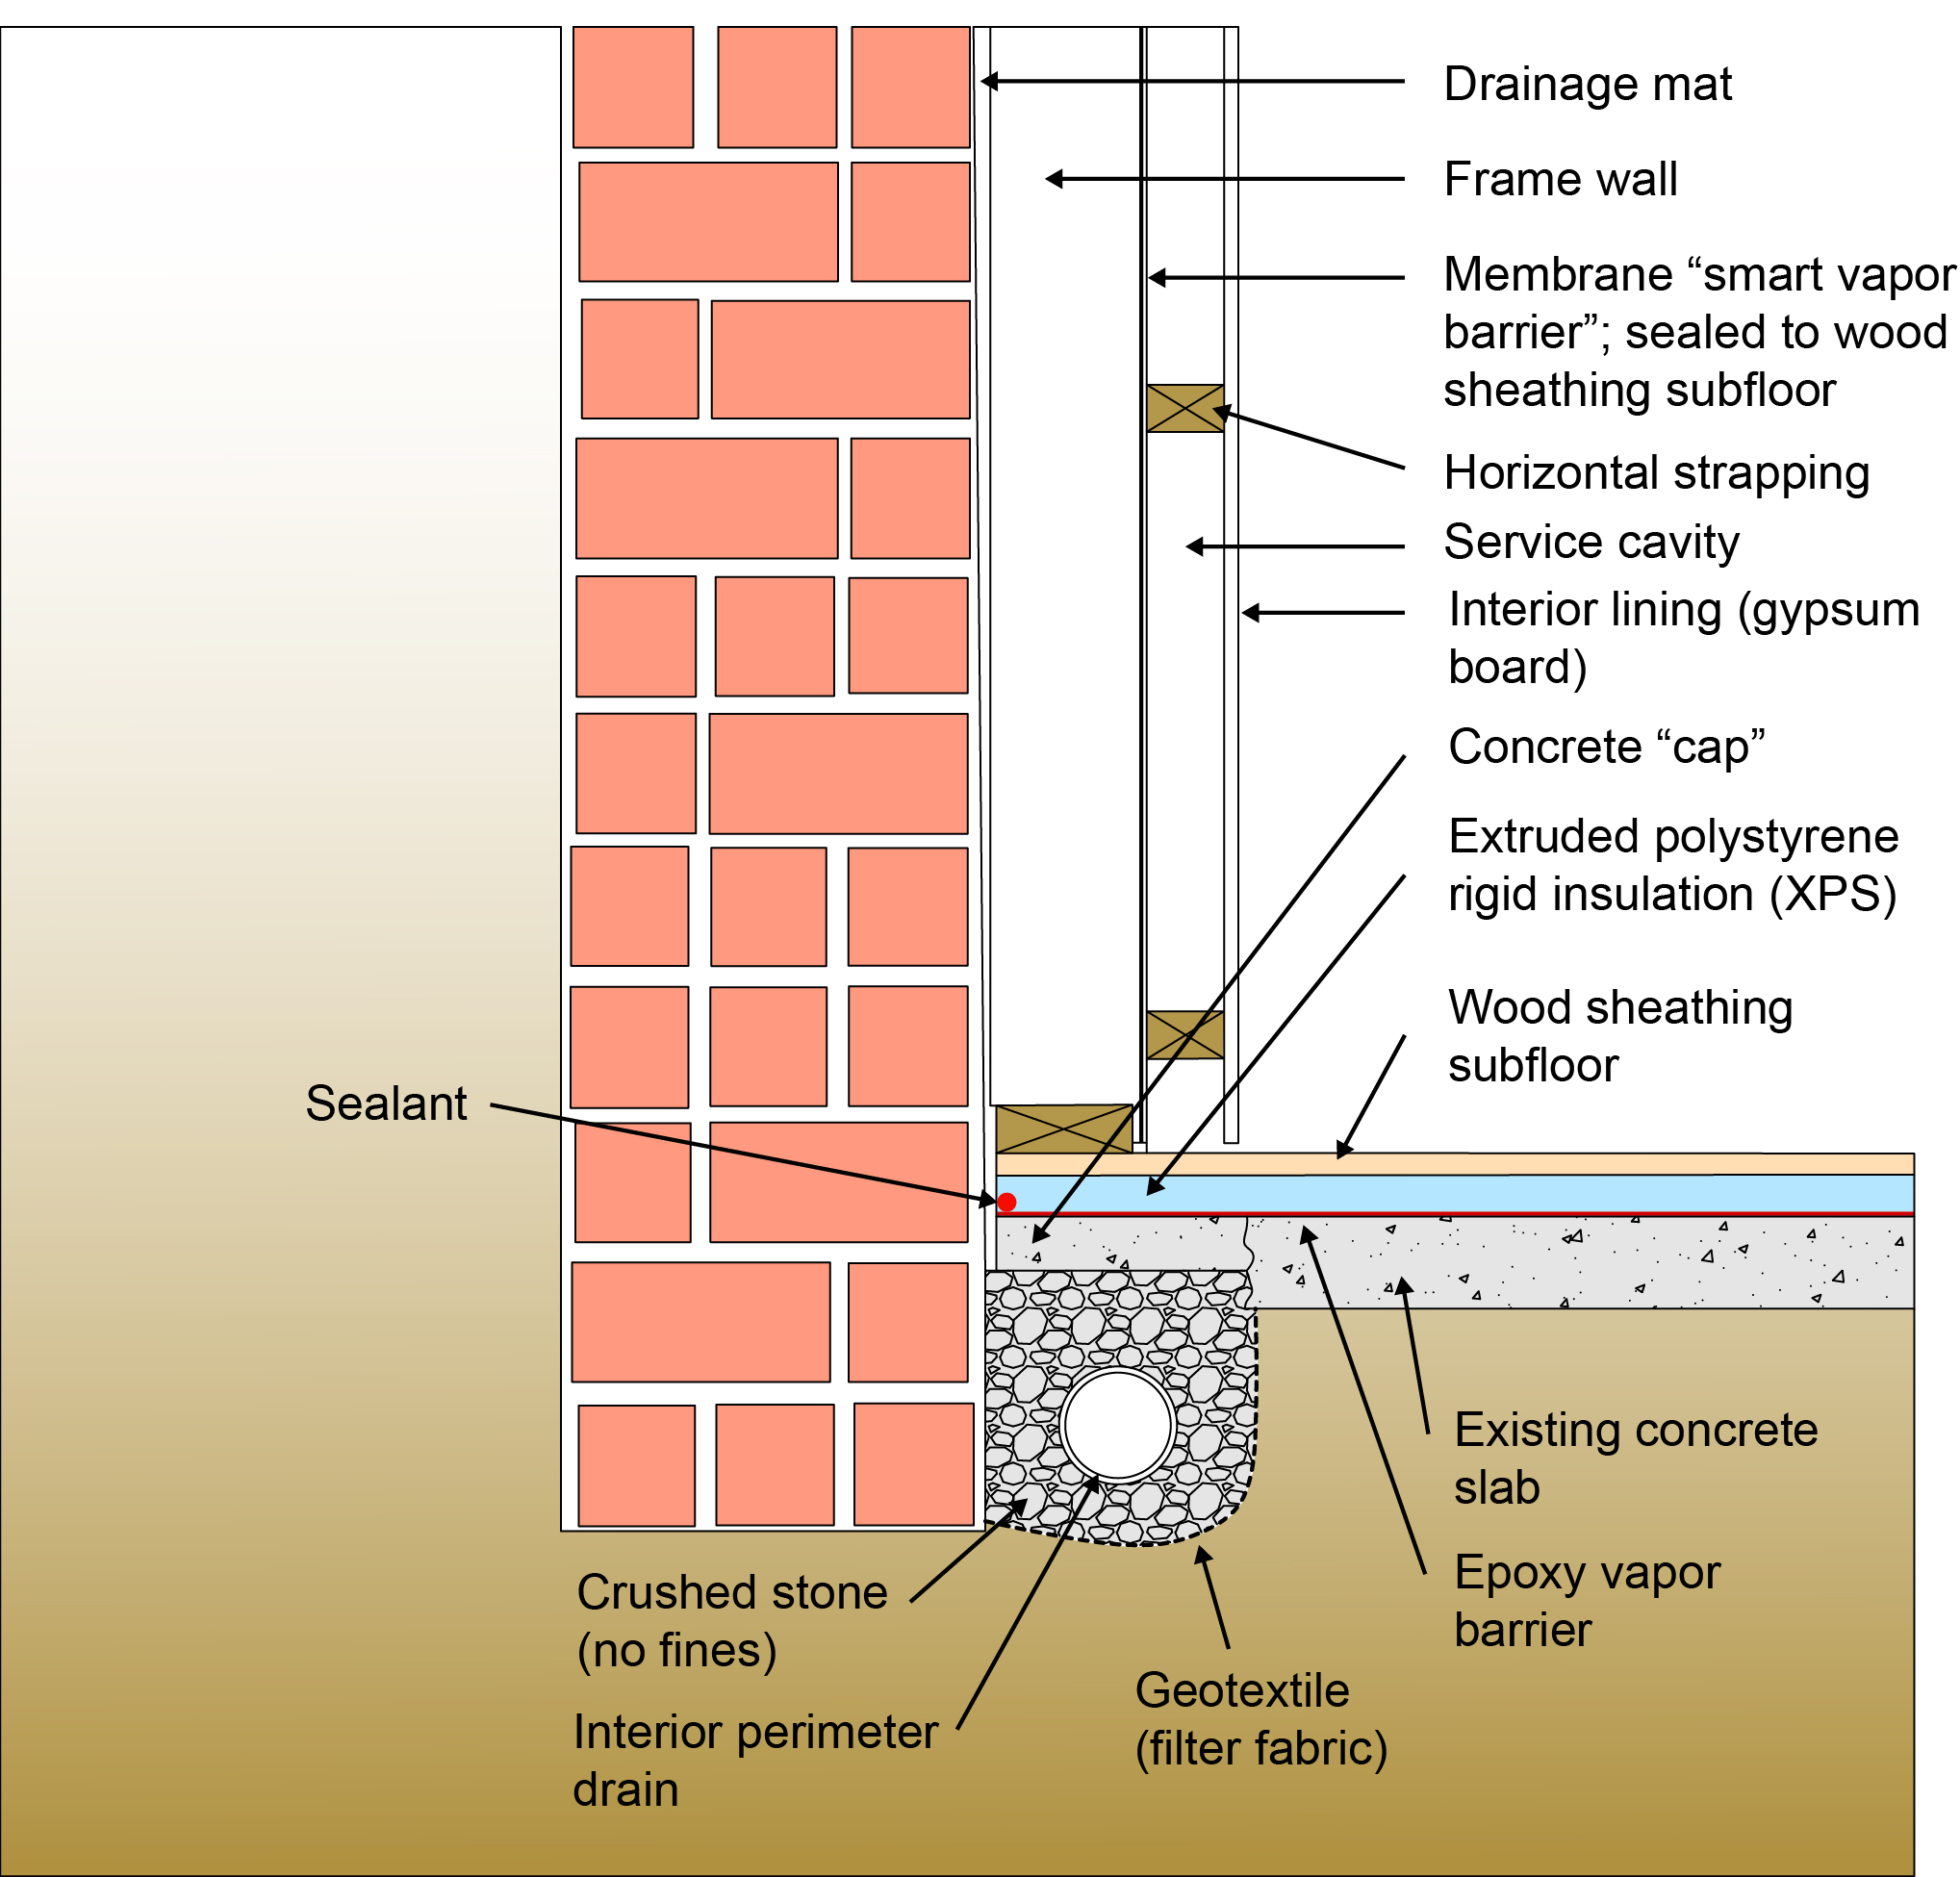
Figure 7: Avoiding Interior Vapor Barriers– Part II – Interior insulation layer can dry inwards from the face of the airtight and vapor tight interior drainage layer through the membrane “smart vapor barrier”. Note that the “smart vapor barrier” becomes vapor open as the relative humidity the membrane “sees” goes up. The typical inflection point for most “smart vapor barriers” is between 40 percent and 70 percent relative humidity.
Photograph 7: What is That Smell?– A very young (at the time) Professor Pat Huelman finding mold and water damage behind a leaking basement foundation wall insulated on the interior with fiberglass batts and a polyethylene vapor barrier.
[1] Yes, yes, yes…this is an oversimplification…there are other reasons we dig down. For example, in commercial and institutional construction we often go deep in the ground everywhere because of limitations on height from a zoning perspective.
[2] Some of you might recognize this paragraph…it is a direct copy of a footnote from “BSI-109: How Changing Filters Led to Condensation and Mold Problems”, December 2018. Folks reading that said that I should write about basements. Who knew that folks read footnotes?
[3] Back in Ontario in the early 1980’s when I was a homebuilder the New Home Warranty Program was reporting that 2 out of every 10 foundations going in leaked. When I started working in the United States in the mid 1980’s basement leakage was common with the production home builders. Getting specific call back information from production home builders is not easy… Having said that I am privy to information that I can’t share… but I will say that basement foundations leak regularly. For accurate information we will have to get the Russians to hack a few servers. On an unrelated topic I think that Ontario and the northern US have a lot in common…
[4] Concrete does not leak….we build dams out of it…except where we get cracks or have joints that we designed or constructed incorrectly
[5] My all-time favorite structural engineer… Eric Burnett…used to tell me…”Young Joseph if you don’t put in a control joint the building will put in its own..” I would ask him…”Dr. Burnett how do I know how many to put in and where to put them?” The answer was a classic “Burnettism”…”When the building stops cracking in places except at the control joints..” Ah, experience, grey hair and respect for the site…