We continue to insist on putting ductwork in attics. It is a dumb idea from an energy perspective – a couple of HERS penalty points at a minimum - and we continue to see condensation on the ductwork in the summers. We have tried almost everything to get the ductwork "inside". We have tried dropped ceilings (Photograph 1 and Photograph 2). We have moved the "inside" to the roof deck (Photograph 3). We have tried "burying" the ducts (Photograph 4). Almost nothing has worked. Well, not really. Dropped ceilings have worked. Moving the inside up to the roof deck – aka "conditioned attics" has worked. And "burying" the ducts has worked. The "weasel words" to note is the definition of "worked". What do we mean by "worked". If you mean "the physics" and "performance" you would be correct. If you mean "cost" and "convenience" and "ease" you might not be correct.
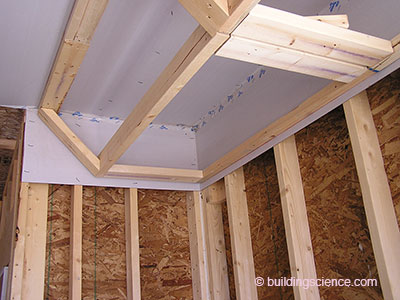
Photograph 1: Dropped Ceiling Framing - It is not easy to go to dropped ceilings. It is expensive* and it is difficult to make the ceiling plane “airtight” above the dropped ceilings.
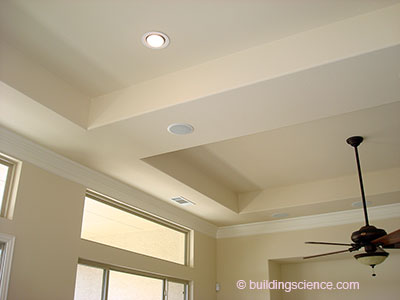
Photograph 2: Dropped Ceiling “Look” – Not everyone likes the look of dropped ceilings.
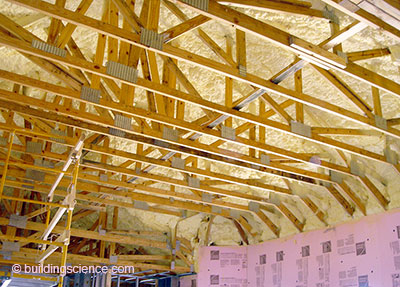
Photograph 3: Conditioned Attic - It is not easy to move the “inside” to the roof deck. Actually, it is easy. But it is expensive and that makes it not easy. Let me explain. Spray polyurethane foam makes it easy from a technology, performance and installation perspective. But it is more expensive than going to dropped ceilings.
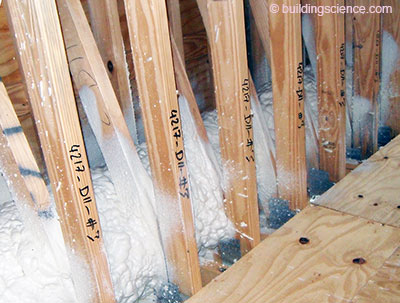
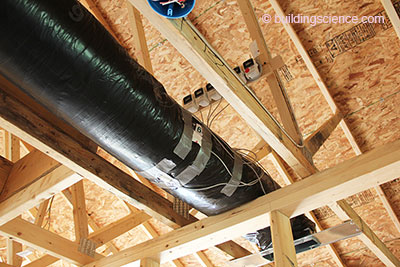
Photograph 4: Burying the Ductwork – High-density spray polyurethane foam used to create an “R-13” buried duct. The spray polyurethane foam creates a low perm coating to control vapor flow to cold duct surfaces.
It is not easy to go to dropped ceilings. It is expensive1 and it is difficult to make the ceiling plane "airtight" above the dropped ceilings. And it looks like #@%2. When you have basements you don't need dropped ceilings. But most of the places where people want to live don't have basements.
It is not easy to move the “inside” to the roof deck3. Actually, it is easy. But it is expensive and that makes it not easy. Let me explain. Spray polyurethane foam makes it easy from a technology, performance and installation perspective. But it is more expensive than going to dropped ceilings.4 How about insulating above the roof deck with rigid insulation? See expensive and add the words “not easy” and “might look like #@%. We were here some time ago (see BSI-063: Over-roofing—Don’t Do Stupid Things).
How about “burying” the ducts? We are going to spend some time here (Figure 1). I am really coming around to this approach5. We took a run at this also quite some time ago (see BSI-074: Duct Dynasty). At the time no one quite knew what R-value the ducts needed to be when you buried them. I cleverly avoided the issue back then. When we did it for real I would take a guess and then double the guess. Hey, when your butt is on the line you don’t take chances. Well, now we know – thanks to some real nice work by the same folks who I thought were crazy the first time I heard about the approach6.
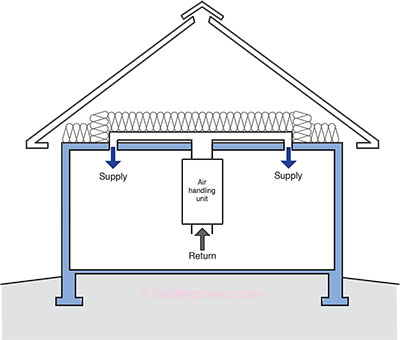
Figure 1: “Buried Ductwork” Concept – Ductwork located under attic thermal insulation in traditional vented attic.
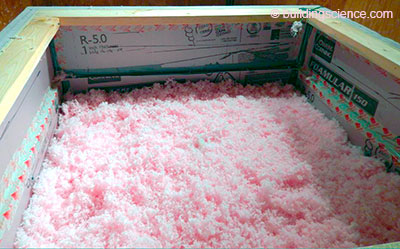
Through a bunch of laboratory work (Photograph 5 and Photograph 6) and test houses (Photograph 7, Photograph 8 and Photograph 9) and field experience I am convinced we know what works and what does not work.
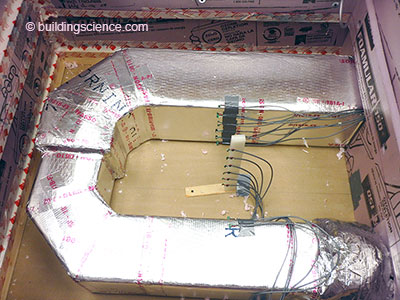
Photograph 5: Buried Duct Laboratory Test (above left) – Ductboard ductwork test box placed in an environmental chamber in order to determine the condensation performance limits of buried ductwork. Photograph 6: Buried Duct Laboratory Test Continued (above right) – Loose fill insulation “burying” the ductboard ductwork test box.
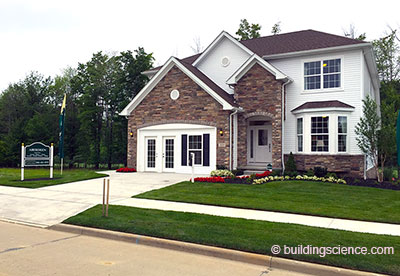
Photograph 7: Test House – One of several standard production houses located in various climate zones used to test buried ductwork configurations. Photograph 8: Test House Instrumented Ductwork - Ductwork surface condition instrumentation.

Photograph 9: Test House Attic – Loose fill insulation burying instrumented ductwork.
The magic R-values are R-13 and R-8. In hot-humid and mixed-humid climates — International Energy Conservation Code (IECC) Climate Zones 1A, 2A, 3A and 4A (Figure 2) – if you insulate your ducts to R-13 you can bury them in insulation and not worry about condensation or sweating ducts. Everywhere else if you insulate your ducts to R-8 you can bury them in insulation and not worry about condensation or sweating ducts. This is huge, folks. Huge.
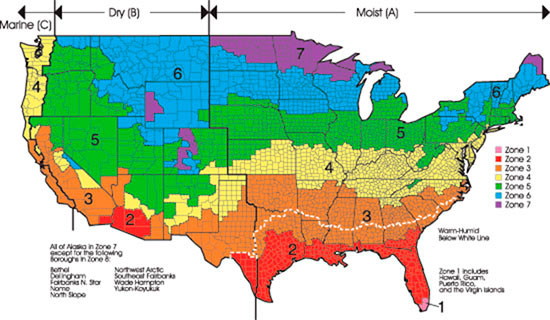
Figure 2: International Energy Conservation Code (IECC) Climate Zones - The magic R-values are R-13 and R-8. If you insulate your ducts to R-13 in hot-humid and mixed-humid climates (Climate Zones 1A, 2A, 3A and 4A) you can bury them in insulation and not worry about condensation or sweating ducts. Everywhere else if you insulate your ducts to R-8 you can bury them in insulation and not worry about condensation or sweating ducts. This is huge folks. Huge.
There has to be some kind of catch? Yes. There always is. The ducts have to be airtight – really airtight. How airtight? I say less than 5 percent of the rate flow as tested by pressurization to 25 Pascals. And the ductwork insulation has to be less than 1 perm or enclosed in a layer or surface that is less than 1 perm. You need to keep the vapor in attics from getting to the cold duct surfaces. Where does all this come from? Field experience. High-density spray polyurethane foam works when we spray it over R-6 and R-8 ducts in hot humid and mixed humid climates at a little more than 1-inch thick. But low-density foam does not work.
And don’t forget about the boots and penetrations. Same requirements as for ducts.
So why is this huge? Well, you get to put the ducts inside without having to put the ducts inside. If the code calls for R-38 insulation and you have R-38 insulation over the top of the inner lining of the ductwork your ductwork is now inside. Same goes if the code calls for R-49 insulation and you have R-49 insulation over the top of the inner lining of your ductwork your ductwork is effectively inside. Check out Figure 3 and Figure 4. Say your ductwork is R-8 and if you bury it in insulation with R-30 above the top of the ductwork the arithmetic is pretty obvious. Note that before you all go and declare victory recall the two “catches” above – the ductwork has to be tight and the we need to wrap the ductwork with a low perm layer. Oh, and don’t forget about the boots and penetrations.
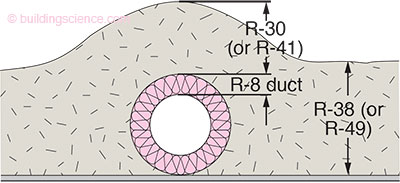
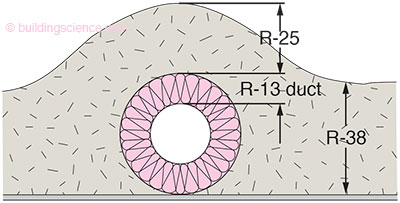
Figure 3: R-8 Buried Duct (above left) - Say your ductwork is R-8 and if you bury it in insulation with R-30 above the top of the ductwork the arithmetic is pretty obvious. This is equivalent to an R-38 attic with the ductwork located “inside”. Recall the two “catches” – the ductwork has to be tight and we need to wrap the ductwork with a low perm layer. Oh, and don’t forget about the boots and penetrations. Figure 4: R-13 Buried Duct (above right) – If your ductwork is R-13 and you bury it in insulation with R-25 above the top of the ductwork this is equivalent to an R-49 attic with the ductwork located “inside”.
Now to get really weird or interesting or wonky or sleazy…I love this kind of stuff… Let’s say, you have sweating ductwork and boots and you are in Fort Lauderdale or Atlanta? Seal up your soffit vents and turn your ridge vent into a vapor diffusion port (Figure 5, Figure 6 and Figure 7). Huh? We were kinda here with BSI-088: Venting Vapor. In a classic vented attic, moisture is brought into the attic during the summer via air change. Outside air enters at soffit locations and exits up high at ridge vents or upper vent openings. This outside air is the source for the condensation on your attic ductwork. The attic venting is responsible for the sweating ducts. So why vent the attic at all? Oh, boy. We are not going to go all the way there…but we will say that a really good reason to vent the attic is to keep the roof from rotting during the winter when the source for attic moisture is the house itself. So how do we keep the roof from rotting during the winter if we do not vent it?

Figure 5: Vented vs Unvented Attic With Vapor Diffusion Port – In the classic vented attic air change removes water vapor from the attic. In an unvented attic with a vapor diffusion port water vapor is removed via vapor diffusion rather than air change.

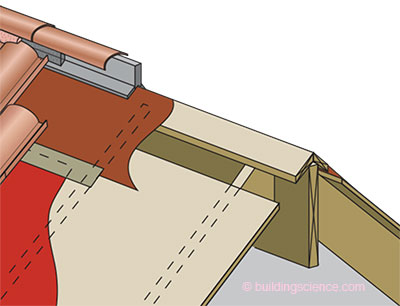
Figure 6: Vapor Diffusion Port for Shingles (above left). Any off-the-shelf ridge vent works. The only change is vent opening is covered with a vapor open but airtight layer such as a “housewrap” with a perm rating higher than 20 perms. Figure 7: Vapor Diffusion Port for Tiles (above right). Works with tiles as well.
Ah, here is the trick, we remove the moisture from the attic via vapor diffusion rather than air change. Pretty neat eh?
I know I mentioned this way back when…but this approach of sealing soffit vents and turning upper vents into vapor diffusion ports also prevents the roof from getting wet during hurricanes (there is no roof vent that does not leak rainwater during a hurricane) and it prevents burning embers from entering a vented attic in wildfire regions. All good things. No sweat, eh?7
Footnotes:
- How expensive and how difficult? Back in the day when I thought this approach had a chance we did a bunch of houses in Houston and Dallas and Las Vegas with different “big time big name top ten production builders” who actually were committed to trying to make it work and found the incremental costs were very similar across the geographic locations and across the production builders – between $2,000 and $2,500 per house. This is a huge number. Note that one of the performance targets was airtightness across the ceiling plane as well – the enclosure had to be less than 3 ach@50Pa. It was way easier to spend $300 to $500 to seal the ductwork with mastic and airseal the building enclosure to get to the 3 ach@50Pa. Pretty much everyone at the time was willing to take the 3 to 4 point HERS hit on leaving the ductwork “outside” because of the cost of locating ductwork in dropped ceilings was so high.
- Fill in inappropriate expletive. Interior designers and architects beat me up on this all the time. “Your dropped ceiling is ruining my beautiful clean lines.”
- In Texas we call conditioned attics “Texas basements”…
- About double the cost of going to dropped ceilings. But having said that, spray polyurethane foam provides such a huge performance benefit that it is one of my go to approaches when we have complicated roof geometries – aka “architects on drugs doing beautiful custom homes in difficult climates like Florida or in ski resorts in Colorado”. It is literally not possible to get a high degree of airtightness with any other technology in such situations. And, when we get to retrofitting existing buildings, there really is no other practical option.
- The folks and CARB and at Home Innovation Research Labs (the new name for the NAHB Research Center) got on to this a lot earlier than me. I thought at first it was a dumb idea. The ducts would sweat even more. They persisted and figured it out. Well done. Check out this link for the research.
- CARB and Home Performance Works – see previous footnote.
- If you say something is no sweat, you mean that it will not be difficult or cause problems, Cambridge University Press.