"If you want to save cash . . . flash"
"Don't be a dope . . . slope"
We are adding balconies to everything and people are forgetting that balconies are more than decoration but also have to function. And when we get it wrong it can be catastrophic2.
We are going to be dealing with wood balconies due to their popularity and because they tend to get done wrong more often than concrete and steel balconies.
Aside from the obvious structural engineering issues dealing with water is the number one issue.
With any balcony, getting the water off of it is a big deal. You need to drain the rain. Let me repeat, you need to drain the rain. Balconies need to slope to provide drainage. How much? One-quarter inch per foot works. When you slope the balcony deck the water goes over the balcony edge and the edge needs a drip function. And where the edge meets a wall it needs to terminate in a gutter or a “kick out”. If you do not provide a drip edge water stains the surface of the balcony face. Not a very good aesthetic result. It can also allow the water to wick inward.
It gets interesting3 when the balcony “traffic surface” is a concrete toping or tile set in concrete. There are two fundamental approaches to “waterproofing” a balcony deck. The first is where the waterproofing layer is exposed and also is the traffic surface. The second is where the waterproofing layer is covered over by a traffic surface. Wherever the waterproofing layer is covered it is critical that a drainage layer or space is provided immediately above the waterproofing layer. I do not use the word “critical” lightly. How big/deep/thick this drainage layer of space should be is open to debate. I typically recommend 3/8-inch. Note that concrete toppings are not waterproofing layers. And coating them with sealers does not turn them into waterproofing layers.
It gets even more interesting when architects push the balconies outwards and inwards and locate them in corners. The waterproofing of the balcony deck needs to connect to the waterproofing of the walls. Remember the first principle of building enclosures? Connect the water control layer of the wall to the water control layer of the roof and to the water control layer of the foundation? Well, a balcony is a roof that you walk on. The aesthetic complexity results in construction complexity. The detailing and execution of the detailing is a big deal. It is probably the most difficult thing to get right and probably the most important thing to get right.
Two of the most common–and most problematic–balcony detailing geometries are presented in Figure 1 and Figure 2. The figures are drawn with a concrete traffic surface installed over a waterproofing layer and drainage mat.
The figures are also drawn with a standard sheet water resistive barrier (WRB) such as building paper. The details remain substantially the same if a fluid applied water control layer is used or a fully adhered sheet membrane water control layer is used.
The details in Figure 1 show the intersection of a balcony edge perpendicular to a wall.
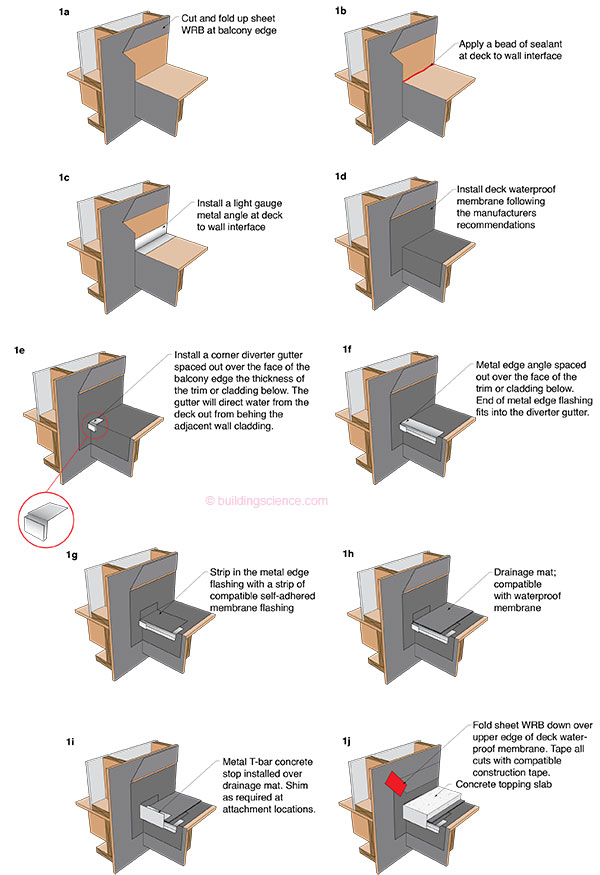
Figure 1: Intersection of a Balcony Edge Perpendicular to a Wall—The details remain substantially the same if a fluid applied water control layer is used or a fully adhered sheet membrane water control layer is used.
The details in Figure 2 show the intersection of a balcony edge proud of a wall.
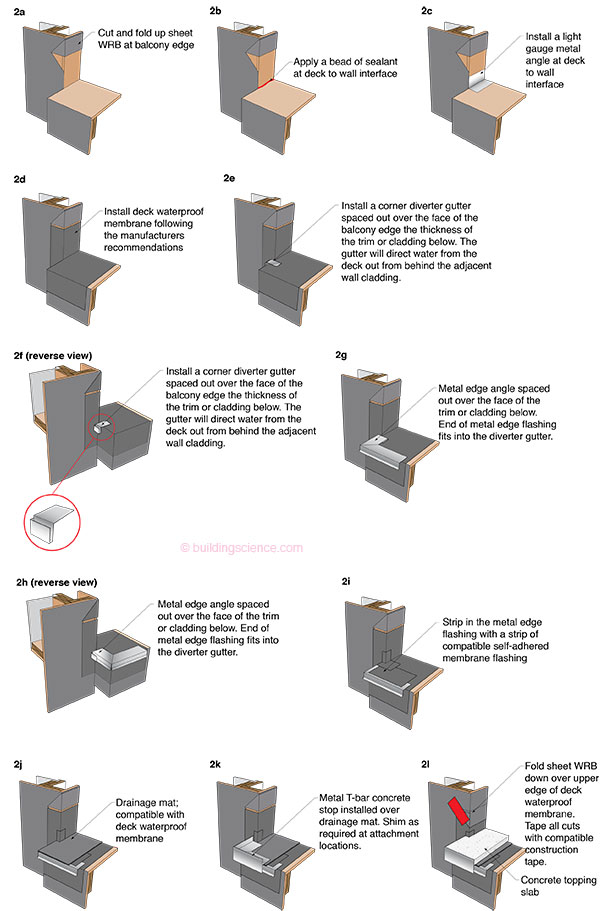
Figure 2: Intersection of a Balcony Edge Proud of a Wall—The details remain substantially the same if a fluid applied water control layer is used or a fully adhered sheet membrane water control layer is used.
Photograph 1 shows a sealant joint at the perimeter of the balcony deck where it intersects the exterior wall. Note the primer application on engineered wood deck sheathing and the OSB wall sheathing. The primer’s function is to facilitate adhesion of the waterproofing membrane. Also note the back dam support for the yet to be installed pan flashing in the rough opening for the balcony door.
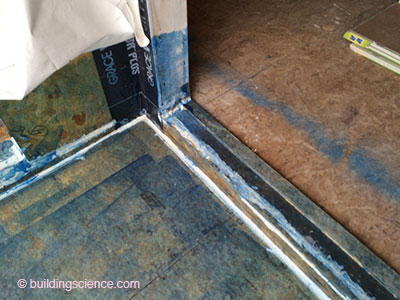
Photograph 1: Sealant Joint—A sealant joint is installed at the perimeter of the balcony deck where it intersects the exterior wall. Note the primer application on engineered wood deck sheathing and the OSB wall sheathing. The primer’s function is to facilitate adhesion of the waterproofing membrane. Also note the back dam support for the yet to be installed pan flashing in the rough opening for the balcony door.
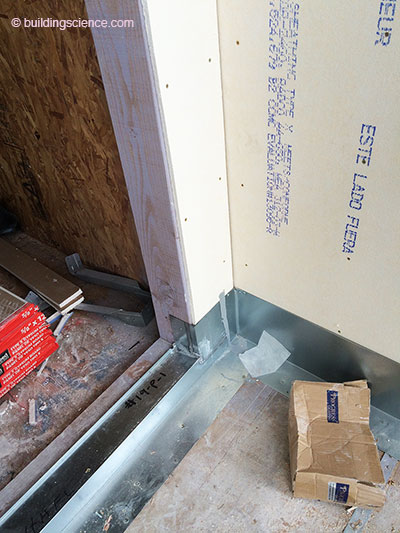
Photograph 2 shows the installation of a light gauge metal angle at the deck to wall interface. Note the use of plywood as the balcony deck surface. Plywood and engineered wood deck sheathing are typically both used interchangeably. However, adhesion of membrane waterproofing to engineered wood deck sheathing tends to be more difficult and primers become key to successful adhesion.
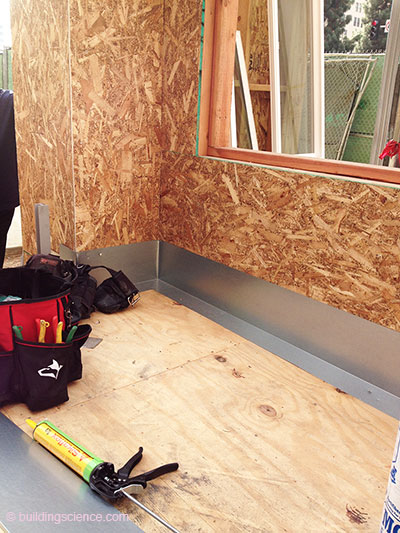
Photograph 2: Metal Angle—Note the use of plywood as the balcony deck surface. Plywood and engineered wood deck sheathing are typically both used interchangeably. However, adhesion of membrane waterproofing to engineered wood deck sheathing tends to be more difficult and primers become key to successful adhesion.
Photograph 3 shows the pan flashing of the rough opening of the balcony door. Note the back dam and end dam of the flashing for the balcony door. The back dam support for the pan flashing has not yet been installed. The back dam support protects the upstand of the back dam during the construction process.
Photograph 3: Pan Flashing of Balcony Door—Note the back dam and end dam of the flashing for the balcony door. The back dam support for the pan flashing has not yet been installed. The back dam support protects the upstand of the back dam during the construction process.
Photograph 4 shows the installation of the membrane waterproofing. In this balcony installation an additional metal flashing is installed over the waterproofing that is stripped into the pan flashed balcony door opening. This additional metal flashing protects the membrane waterproofing at the door opening.
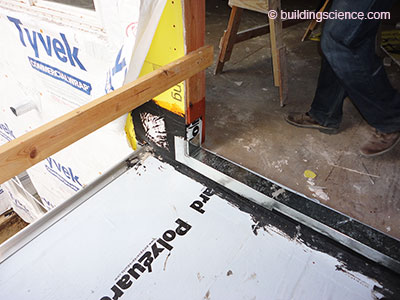
Photograph 4: Membrane Waterproofing—Additional metal flashing is installed over the waterproofing that is stripped into the pan flashed balcony door opening. This additional metal flashing protects the membrane waterproofing at the door opening.
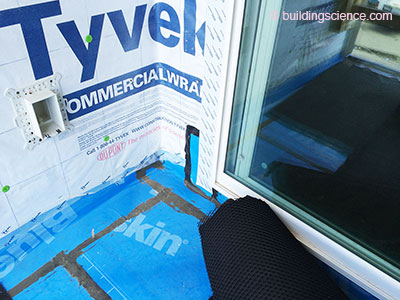
Photograph 5 shows the installation of membrane waterproofing stripped into the pan flashed balcony door opening. Note the drainage mat installed over the top of the membrane waterproofing. Also note the mastic application sealing the waterproofing membrane to the wall sheathing.

Photograph 5: Drainage Matt—Membrane waterproofing is stripped into the pan flashed balcony door opening. Note the drainage mat installed over the top of the membrane waterproofing. Also note the mastic application sealing the vertical portion of the balcony deck waterproofing membrane to the wall sheathing.
Photograph 6 shows the lapping of the water resistive barrier (WRB) over the vertical portions of the membrane waterproofing. Also note the installation of the balcony door. A drainage mat is yet to be installed.
Photograph 6: Shingle Lapping—The water resistive barrier (WRB) is shingle lapped over the vertical portions of the membrane waterproofing. Also note the installation of the balcony door. A drainage mat is yet to be installed.
Photograph 7 also shows the lapping of the water resistive barrier (WRB) over the membrane waterproofing. A drainage mat is in place as is the drip edge at the balcony edge.
Photograph 7: Drip Edge and Drainage Matt—The water resistive barrier (WRB) is lapped over the membrane waterproofing. A drainage mat is in place as is the drip edge at the balcony edge.
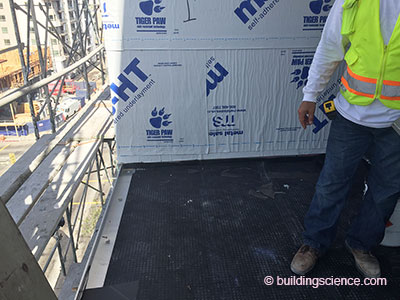
Photograph 8 shows the installation of a drainage mat. The vertical top edge of the perimeter balcony deck waterproofing membrane is yet to be stripped into the exterior wall sheathing with mastic.
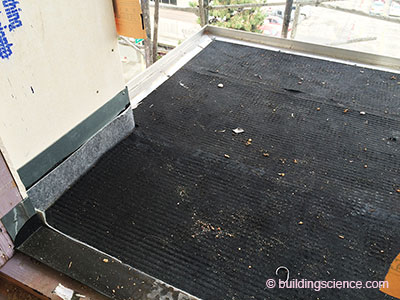
Photograph 8: More Drainage Matt—The vertical top edge of the perimeter balcony deck waterproofing membrane is yet to be stripped into the exterior wall sheathing with mastic.
Photograph 9 shows two drip edges at the balcony perimeter edge. The upper drip edge sheds water flowing over the edge of the concrete topping. The lower drip edge sheds water from the drainage mat gap on the top of the waterproofing membrane under the concrete topping. This two-stage drip edge approach is recommended to deal with any minerals carried in solution in drain water exiting the drainage mat gap.
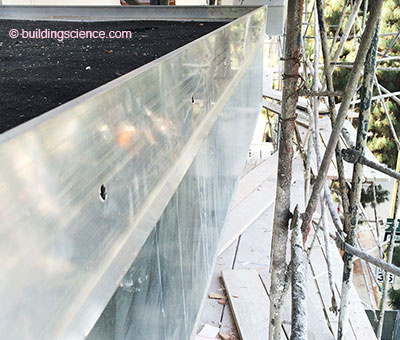
Photograph 9: Two Drip Edges—The upper drip edge sheds water flowing over the edge of the concrete topping. The lower drip edge sheds water from the drainage mat gap on the top of the waterproofing membrane under the concrete topping. This two-stage drip edge approach is recommended to deal with any minerals carried in solution in drain water exiting the drainage mat gap.
Footnotes:
- "decked out" – to be decorated with something, or dressed in something special – from the Cambridge Dictionary
- Balcony collapse in Berkeley, CA June 16, 2015 resulting in 6 deaths and 7 serious injuries
- As an engineer I try to avoid "interesting" details as much a possible. "May you live in interesting times" is purported to be a Chinese curse and means "may you experience much disorder and trouble in your life". I am pretty sure a Chinese engineer coined the phrase. OK, not true, no engineer, Chinese or otherwise, had anything to do with the coining of the phrase. But all engineers get it. The phrases popularization is attributed to Bobby Kennedy from a speech in Cape Town in the mid 1960's – a time and place that was apparently interesting.