Snap, Crackle and Pop are beloved gnome characters…cartoon mascots of Rice Krispies breakfast cereal produced by a small company you might have heard of…Kellogg’s1. Rice Krispies are one of the best things to come out of Michigan besides the Wolverines. “Pop” is “a mischievous yet also clumsy youngster and the center of attention.”2 Yup, sometimes spray foam can be considered to be “mischievous….and the center of attention…”
Here is the issue. Closed-cell 2-lb/ft3 (32 kg/m3)… “high density” spray polyurethane foam has tremendous adhesive and strength properties as well as high thermal resistance and airtightness. Closed cell spray foam is often installed on the underside of roof sheathing (Photograph 1). If the bond between the closed cell spray foam and the underside of the roof sheathing fails it fails quickly. Very quickly. And it lets everyone know that it has failed quickly. It shouts out the failure. Yup. You hear the “pop”. It wants to be the center of attention…and lets you know.
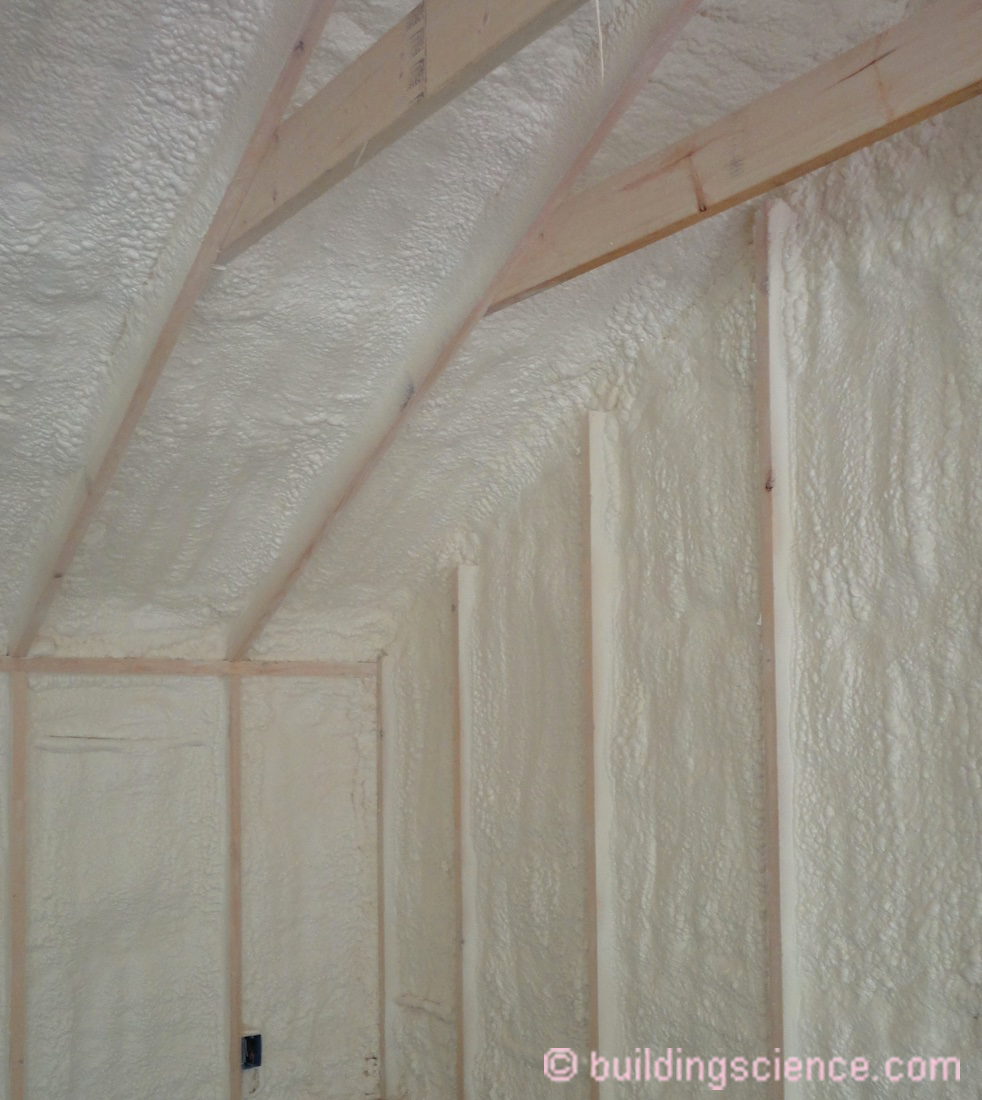
Photograph 1: Closed cell spray foam is often installed on the underside of roof sheathing.
There are a couple of reasons for this type of failure. The most common are thermal shock in the winter, poor installation technique, or overheating of the foam during installation on a hot day. If the spray foam is installed too thickly (“too-thick passes”) the heat buildup from the exothermic reaction in the foam can be intense. This can be exacerbated by too-hot substrates…summer work on the south elevation with black underlayment or roofing. This can result in a core density that is too low and that makes the spray foam dimensionally unstable in the core. This makes it difficult for the spray foam to handle thermal stress. The resulting thermal stress is often the greatest during cold weather. So the “failure” can happen months after the installation.
It is important to note that the “too-thickly” refers to “each pass” of spray application not the overall thickness of the installation. The maximum thickness per pass or per “lift” is determined by the manufacturer as the chemistry varies from manufacturer to manufacturer. Typical “lifts” vary between 2 inches and 5 inches. This next point can’t be stressed too lightly….follow the manufacturers recommendations. Always consider them as “requirements”. Several passes or lifts are typically required to meet the thermal resistance requirements of the assembly. The installed foam in each pass or lift needs to “cool” before the next pass or lift is applied.
Figure 1 illustrates good installation practice that maximizes bond surface. It is referred to as “classic picture-frame” installation…”doubled up”. The perimeter of the “framing bays” are sprayed first with a “fillet” of foam prior to the application of the “main” buildup followed by a second layer of “picture-framing”.
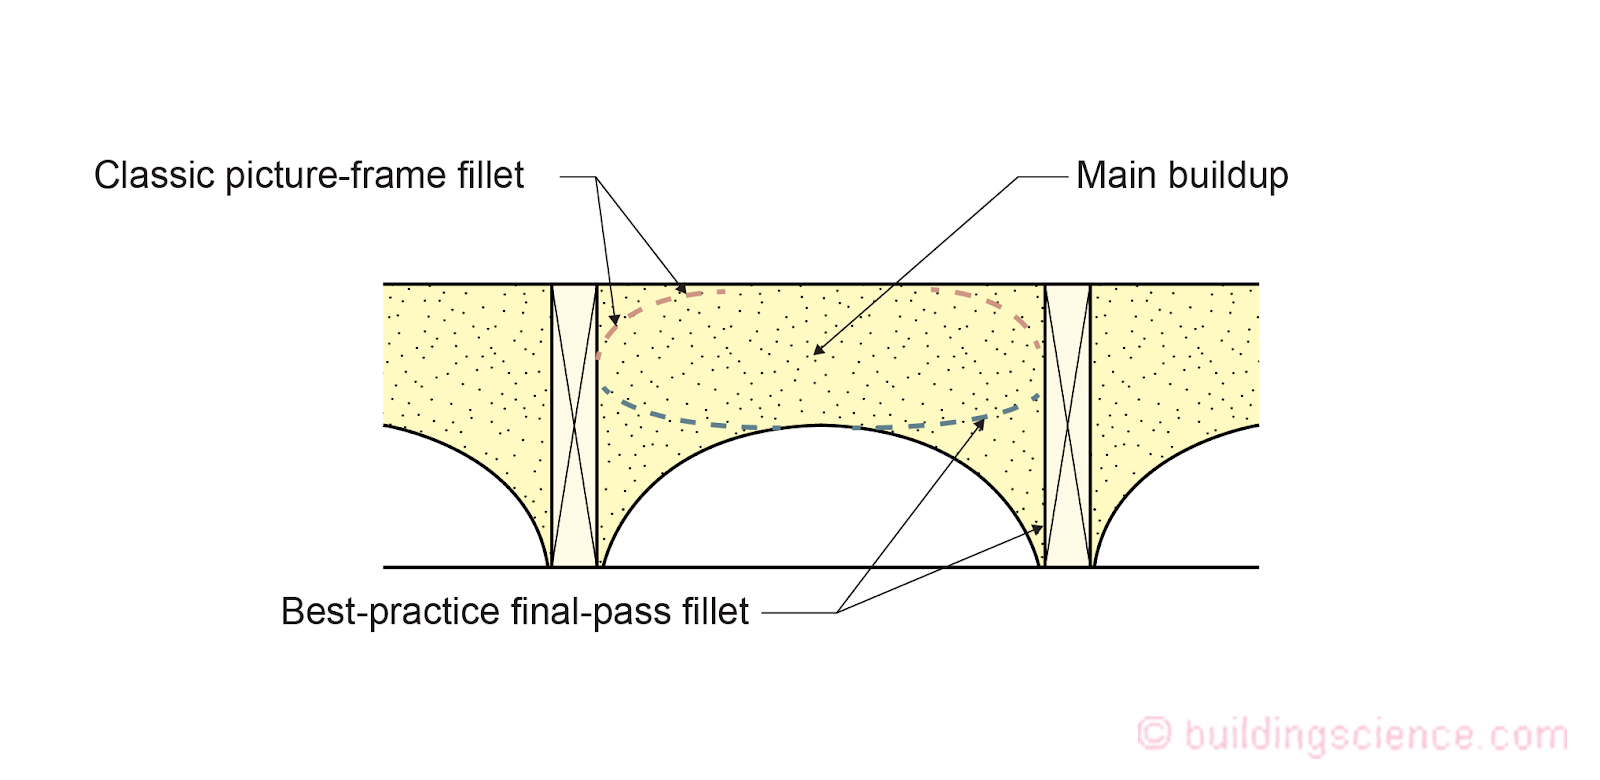
Figure 1: Good Installation Practice - Bond surface is maximized. It is referred to as “classic picture-frame” installation…”doubled up”. The perimeter of the “framing bays” are sprayed first with a “fillet” of foam prior to the application of the “main” buildup followed by a second layer of “picture-framing”.
Are we done? Nope. There is more. Closed cell 2-lb/ft3 (32 kg/m3) “high density” spray polyurethane foam also has a low vapor transmission….less than 2 perms (120 ng/Pa.s.m2) per inch of thickness. When you get to 2 inches thick, the typical vapor transmission is less than 1 perm (60 ng/Pa.s.m2) and that classifies the material as a Class II Vapor Retarder. Most closed cell spray foam applications on the underside of roof sheathing are 5 inches or more thick.3 At 5 inches the vapor transmission is approximately 0.25 perm (15 ng/Pa.s.m2)….give or take4….
Well, that sounds awesome…you don’t need a vapor barrier in a cold climate…. Yup…but nothing is ever without complications. In cold climates we are worried about this thing called “snow”…and ice-damming. Many folks install a fully adhered roofing membrane under typical shingles as a guard against ice dam related roof leaks. The most common fully adhered roofing membrane is less than 0.05 perms….a Class I Vapor Retarder….a for real “vapor barrier” is defined as less than 0.1 perms.
Now it gets interesting….the top side of the roof sheathing has a layer that is 0.05 perms (3 ng/Pa.s.m2)….and the underside of the roof sheathing has a layer that is 0.25 perms (15 ng/Pa.s.m2)… The vapor permeance is “5 times” greater at the bottom than the top. Ah, come on, who cares, both are so small it does not matter. I remind you of “mischievous” and that “Pop” gnome character. No upward drying is possible through the fully adhered “totally vapor impermeable” roofing membrane. None. Let me repeat the “none”.
But there is some upward vapor flow…not a lot but some…and we have seasons…one of which is called winter…and in the winter it is not always sunny all the time…and we have real people inside doing what they do to be called real people…and sometimes the humidity inside goes above 30 percent during the winter.5
And we build outside. Yup. Sometimes it rains. Sometimes the roof sheathing gets wet during construction…and does not dry “totally” and “completely” before the roofing is installed. Guess what? The moisture content of the roof sheathing goes up. And when the moisture content of the roof sheathing goes up it expands. Did I mention that the roof sheathing can’t dry upwards? I think I did. Interesting things happen when that occurs. The typical gaps in the sheathing joints the framer leaves close…and the shingles that span the joint tend to “ridge” upwards. We have similar issues with structural insulated panels (SIPs). See Figure 2.

Figure 2: Shingle Ridging in SIPs - The typical gaps between the SIPs close and the shingles that span the joints tend to “ridge” upwards.
It gets even better.
Let’s install black shingles. The sun eventually comes out. The black shingles get hot. Real hot. The moisture in the roof sheathing is driven downward. Not slowly, but quickly. The roof sheathing contracts. Not slowly, but quickly. The closed cell spray foam does not like “quickly”. As mentioned before it can’t handle the “quickly” and the “stress” of the movement is taken at the “bond” between the spray foam and roof sheathing. The bond fails. Just like the thermal shock described earlier. It fails quickly. Very quickly. And once again it lets everyone know that it has failed quickly. It shouts out the failure. Yup. You hear the “pop”. It wants to be the center of attention…and lets you know…..again.
So why did we not have “popping” with structural insulated panels (SIPs)? The SIP panel edges are not “restrained” as “strenuously” as the closed cell spray foam is to the sides of rafters. Nails are not in the same league as the adhesive strength of closed cell spray foam…the nail connections allow the SIPs to move. As such, the SIP foam cores do not de-bond from the top sheathing surfaces of the SIP panels.
In closed cell spray foam applications sometimes the “side” bond to the rafter fails…you see a crack at that location. Most of the time it is dismissed as “gee the foam was applied too thickly and the exothermic reaction followed by cooling (“cure shrink”) results in a huge stress that eventually results in the crack. Sometimes this is true…sometimes it is not. Sometimes it is the moisture stress. If the side crack occurs the bond at the underside of the roof sheathing typically does not fail. Sometimes both occur.
Let’s also put this into perspective. This does not happen often…but it does happen. We don’t have lots of totally completely impermeable fully adhered roofing membranes….coupled with black shingles.
So what do we do to deal with this? There are lots of ways. Here are a bunch:
- Install the closed cell spray foam correctly….not too thickly on surfaces that are not too hot or too wet.
- Install foam products that have a high enough density to resist thermal shock. Don’t install ultra-low density closed-cell spray foam in cold climates.
- Install a layer of rigid insulation against the underside of the roof sheathing prior to installing the closed cell spray foam. This reduces the thermal shock (Figure 3).
- Install a vapor permeable fully adhered membrane on the top side of the roof sheathing coupled with a “vented” “over-roof” (Figure 4). And by the way, the only way to really control ice-damming is to have a “vented” “over-roof” over this membrane. And yes we were here before. See “BSI-046: Dam Ice Dam", February 2011.
- Install a layer of rigid insulation over the top surface of the roof sheathing and another layer of roof sheathing, roofing underlayment and shingles. This reduces the thermal shock (Figure 5).
And then we can get back to enjoying Rice Krispies and that beloved gnome “Pop”.
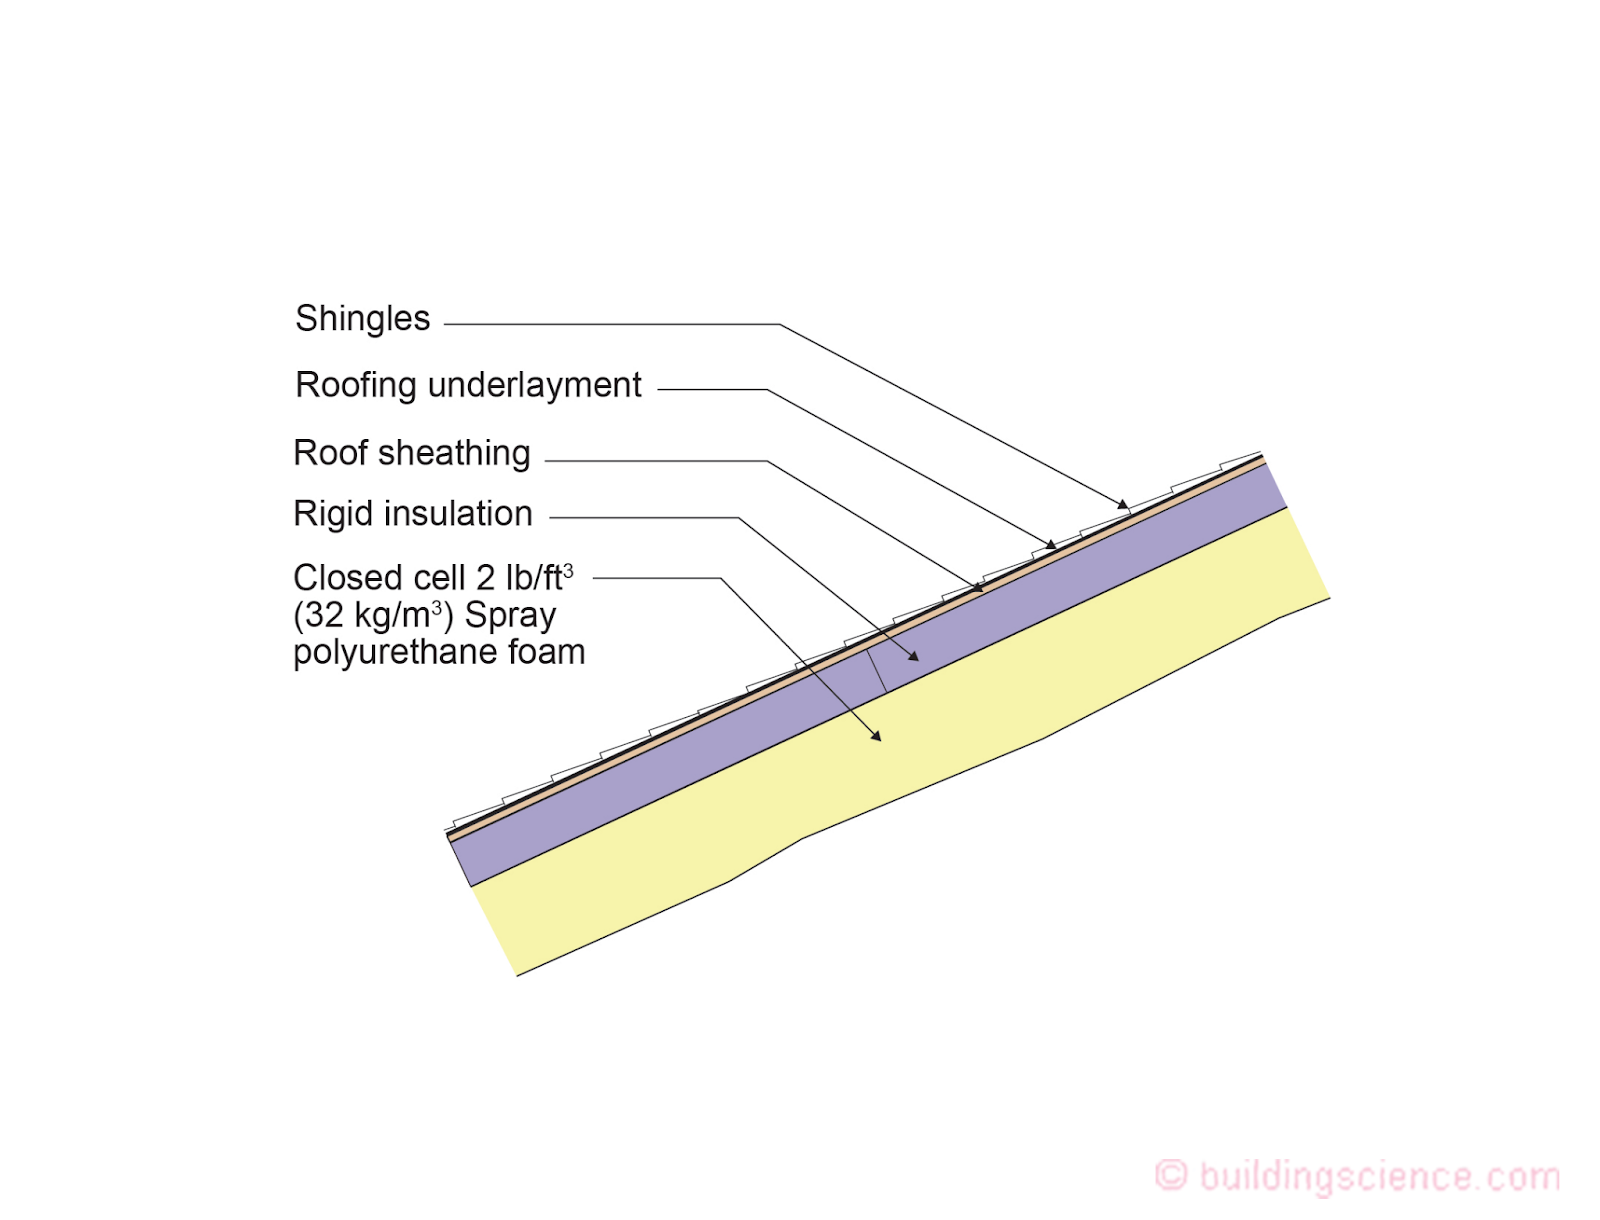
Figure 3: Reducing Thermal Shock - Install a layer of rigid insulation against the underside of the roof sheathing prior to installing the closed cell spray foam.

Figure 4: Increase Drying and Reducing Thermal Shock - Install a vapor permeable fully adhered membrane on the top side of the roof sheathing coupled with a “vented” “over-roof” to control ice-damming.
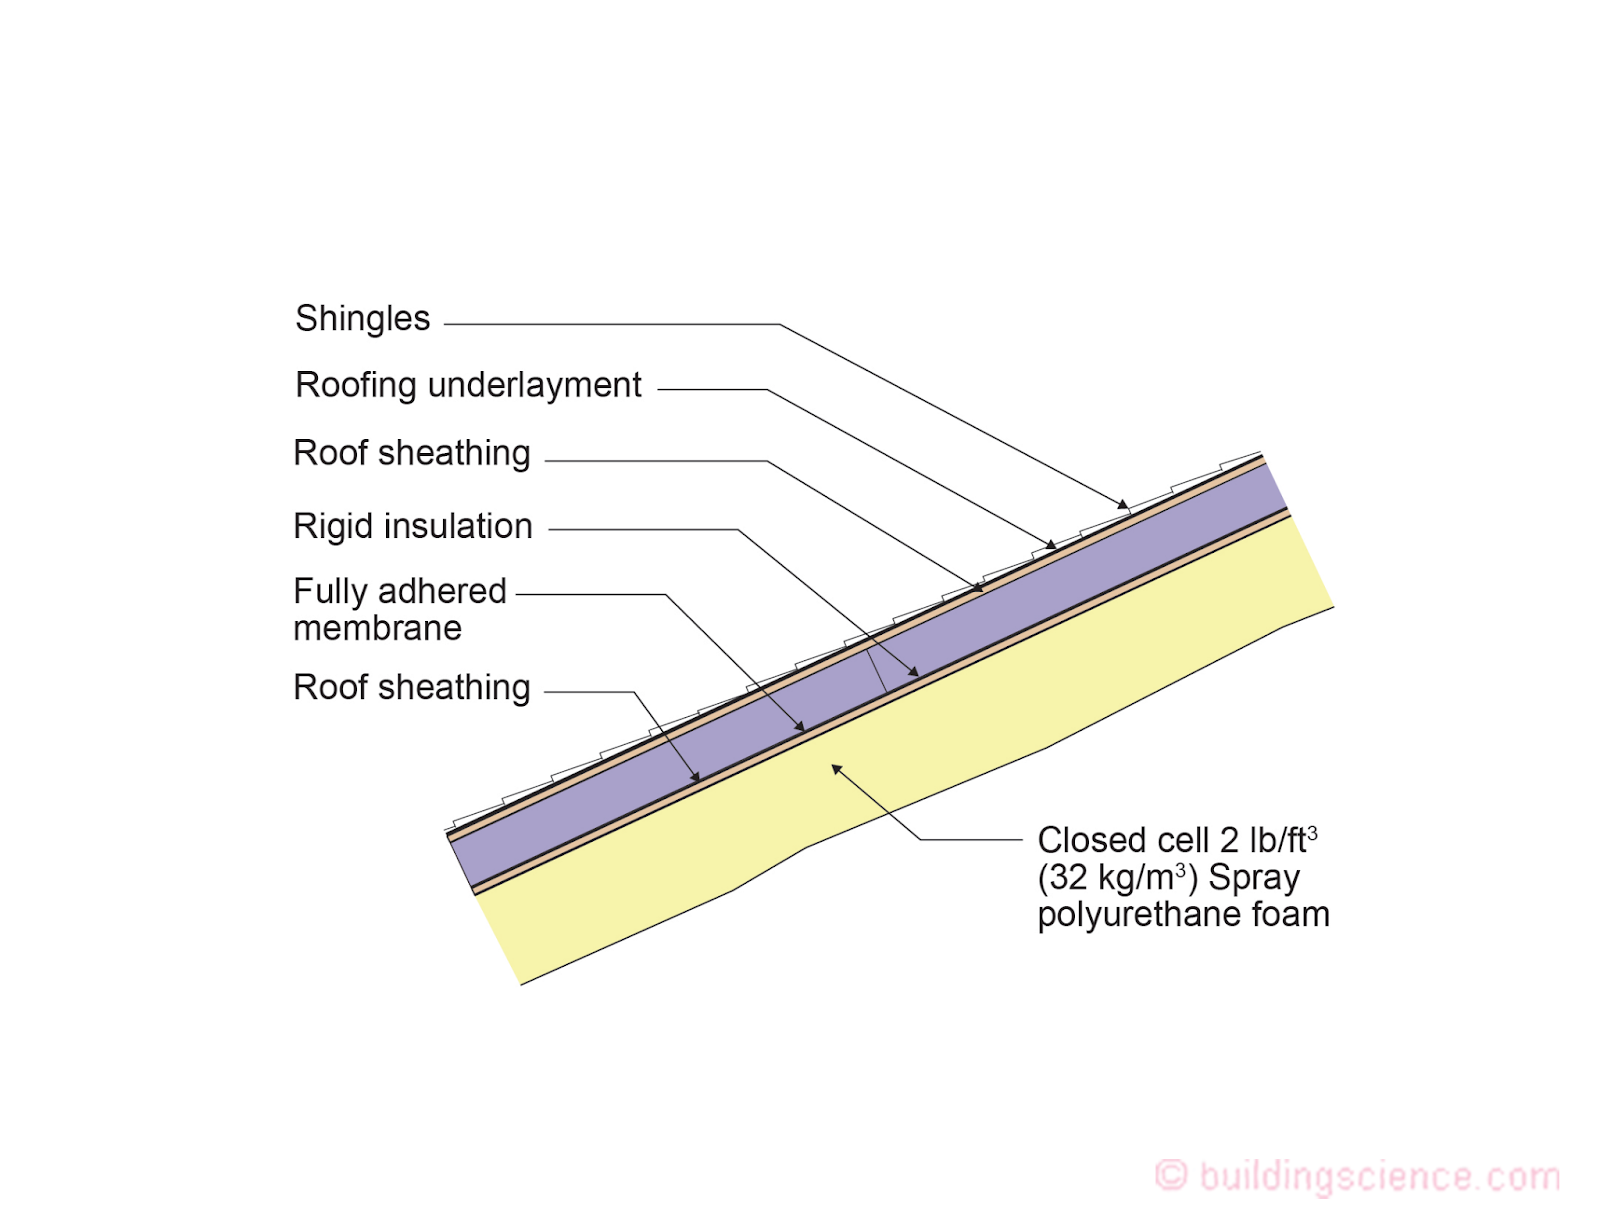
Figure 5: More Thermal Shock Reduction - Install a layer of rigid insulation over the top surface of the roof sheathing and another layer of roof sheathing, roofing underlayment and shingles.
Acknowledgements
A big thank you to Henri Fennell from N. Thetford, VT…a legend in the spray foam industry…and Chris Schumacher from Waterloo, ON…a legend in the building science community….for keeping me out of too much trouble on this piece.
Footnotes
1Kellogg’s is a huge multinational company with worldwide corporate office headquarters in Battle Creek, Michigan with a history going back to 1906…which is when I think was the last time my Toronto Maple Leafs won the Stanley Cup…
2Thank you “en.wikipedia.org”
3One of the most common roof rafter thicknesses is a 2x6….and closed cell spray foam is applied slightly “thinner” than the thickness of a 2x6 so that it does not have to be “shaved” when folks install interior finishes…hence the 5 inches. At five inches its thermal resistance is approximately R-30 (RSI 5.3).
4Those are “weasel words” as the range can be quite large based on installation skill, mix control, temperature, etc. One of the best studies of spray foam in real assemblies was done by Straube, Smith and Finch: (https://buildingscience.com/documents/reports/rr-0912-spray-polyurethane-foam-need-for-vapor-retarders-in-above-grade-walls/view
5And much higher if you install a humidifier and listen to the CDC and the Harvard School of Public Health…yes we were here before…see “BSI-133: Covert Covid Thoughts…", July 2022..