Ever wonder how we can build a 50 story glass tower that doesn’t leak, but we can’t seem to build a two-story house that doesn’t leak? The answer is a little bit of counter intuitive thinking.
We have learned to add holes and drainage in tall buildings in order for them to work. The lesson learned in tall buildings is that we can’t keep the rain out so we drain it out after it has entered. We can reduce the amount that enters but we can never completely keep it all out. Drainage and holes are key. These are regularly installed in tall buildings but not in short buildings. Until we add holes and drainage to small buildings they will continue to leak. This is so counter-intuitive that it borders on magic.
This story all begins with a cup in the rain (Figure 1). It is a plain ordinary cup, nothing magical about it yet. It is oriented parallel to the ground. Rain falls out of the sky due to something called gravity. The raindrops have momentum (“kinetic energy”) associated with them. There is no wind in this simple story of a cup in the rain so far. Sometimes the raindrops don’t fall completely straight down1 and so they will occasionally fall into the cup. But lo and behold, even though some raindrops enter the cup the rainwater can drain out of the cup due to the slope of the cup with a little help from gravity. Drainage at work.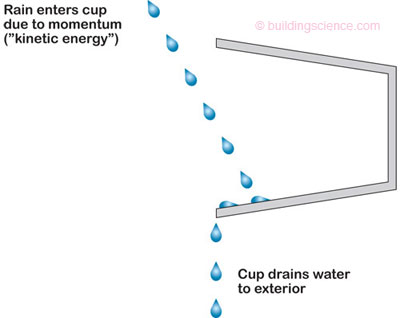
Figure 1: Cup in the Rain—Occasionally raindrops enter cup due to momentum and drain back to exterior via gravity and slope of cup. Did I mention drainage?
Let’s make it a bit more complicated. Let’s add wind (Figure 2). Wind enters the cup and pressurizes it. If the wind can’t get out the back of the cup (assume the cup has no holes) no more wind can enter into the front of the cup. Presto–no wind entry into the cup therefore no wind driven rain entry into the cup. That pesky momentum thing is still happening with the raindrops, but no matter we drain those suckers back to the outside as before. There’s that drainage thing again.
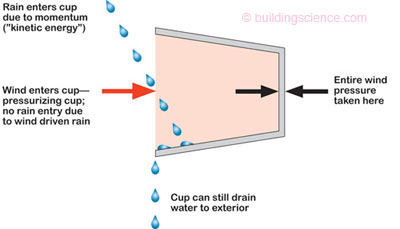
Figure 2: Cup in the Wind—Wind pressurizes cup so that wind driven rain cannot enter. Rain still enters cup due to momentum but this rainwater drains back to exterior. Note the drainage thing.
Now, let’s add a baffle to the front of the cup (Figure 3). We don’t want to completely cover the cup opening—we will leave the baffle a little short so that the bottom of the cup remains open. This opening at the bottom of the cup still allows the cup to drain. Remember drainage is good. We will keep coming back to that. The opening at the bottom of the cup still allows the wind to enter the cup and pressurize it. But think what the baffle does? It intercepts the momentum driven raindrops and keeps most of them from entering the cup. It gets better. There is little pressure drop across the baffle; the majority of the air pressure drop is across the back of the cup.
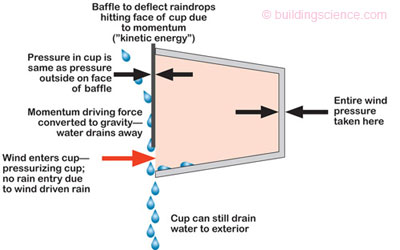
Figure 3: Cup with Baffle—Wind still pressurizes cup so that wind driven rain cannot enter. Baffle reduces rainwater entry due to momentum. Drainage back to exterior makes everything work.
This is the magic part—apart from the holes and the drainage. Even though I might have holes in the baffle, not much rain will be sucked through those holes because there is little air pressure drop across the baffle since the cup is pressurized. We call this concept “pressure moderation.”2
OK, now let’s apply this cup-baffle thing to an insulating glass unit in a high rise (Figure 4). This seemingly simple assembly is in reality an extremely elegant piece of engineering—even without getting into the emissivity of the coatings on the glass and the variations in gas fills. Drainage, holes and pressure moderation helps make the whole thing work. What good is a window unit that leaks? Who cares about the energy thing, the day-lighting thing, the visible light transmittance thing and the appearance thing if it leaks? Drainage, holes and pressure moderation deals with the leak thing so those other things can happen. One of the subtitles of these types of assemblies is the difference in the choice of materials between the outer seal and the inner seal. The outer seal is in a really very ugly environment—it is outside. It sees ultra-violet radiation, it sees heat, it sees cold, it sees water—all of the principle damage functions that make life miserable for seals. But we don’t care. Why? We can live with this outer seal leaking because this leakage is drained back to the exterior. There is that drainage thing again. And there is more, the loading on the outer seal is reduced due to the magic of pressure moderation.
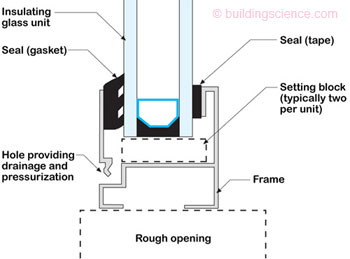
Figure 4: Insulating Glass Unit—Setting blocks are small in width/length and otherwise not continuous—they do not fill the chamber and can be ignored from an air pressure perspective. Note difference between outer seal and inner seal. Inner seal takes much of the air pressure.
Check out Figure 5. The hole at the bottom of the unit allows air to enter and pressurize the airspace (the “pressure chamber”). This takes load off of the outer seal and transfers it to the inner seal. The inner seal is now the primary air seal. But it does not see rain, heat, cold or ultra-violet radiation—it is inside. It is a lot easier to get a seal to work in this environment than in the outer environment. I will also let you in on a little secret (it’s in the footnote because it is a secret).3

Figure 5: Magic—Air enters bottom of glazing unit pressurizing the chamber. This reduces pressure across the outer seal.
The same principle applies to mullions (Figure 6). We don’t typically have to add holes to the snap plates that cover mullions to promote drainage as they are leaky enough by themselves. However, we sometimes have to add holes to make sure there are no disconnected airspaces and to promote drainage—that drainage thing again. It gets a little tricky with vertical sections as we don’t want vertical airspaces to run more than one story because then we get airflow in the airspaces. If we get lots of airflow we can also get some rain entry with the airflow. Do we get enough rain entry with this airflow to matter? Depends on whom you ask. Personally, I don’t worry much about the airflow because it tends to dry things and I feel that the associated rain entry with this airflow is pretty minor.4
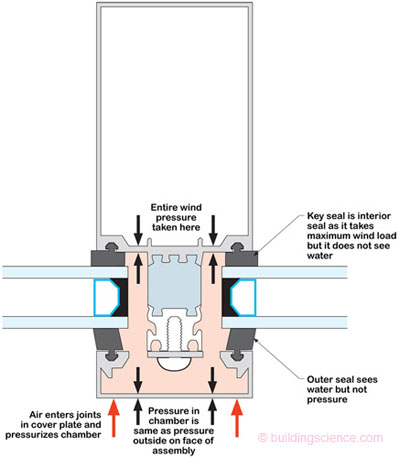
Figure 6: More Magic—Drainage occurs at mullions as well. Cover cap is leaky to air allowing air entry to pressure moderate airspace.
We can apply the principle to joints in precast panels (Figure 7 and Figure 8). With precast systems we call this approach “two-stage joints” rather than pressure moderation because the concrete folks have always been better and more descriptive in naming their stuff than the glazing geeks. Fewer geeks in concrete beget better language in concrete. Also, the biggest benefit is the drainage rather than the pressure moderation. We take everything we can get, but if we can only get one thing we take the drainage.
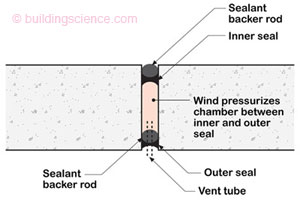
Figure 7: Precast Panel—Two-stage joint has vent holes that facilitate drainage.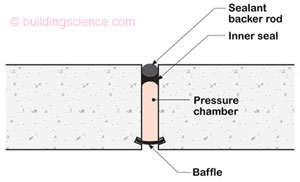
Figure 8: Baffled Two-Stage Joint—Baffle handles momentum; inner seal drains water to exterior.
So what is with residential construction? No holes in windows that promote drainage for one. Drainage? What’s that? The wind loads and therefore the wind driven rain loads are less and therefore the sophistication and need for higher performance windows is less. It is typical for 1 in 10 residential windows to leak out of the factory. And it is typical that 5 in 10 installed residential windows leak between the window and the field of the wall. This was acceptable when drying potentials were high and materials were not water sensitive. Not any more.
It is necessary to apply drainage and holes to the residential window-to-wall interface in order to protect the wall assembly. We can still live with the window unit itself leaking, but we can’t live with the window unit leaking into the wall. Over time, the residential window manufacturer’s will catch on to this drainage and hole thing in the manufacture of the window units themselves and then we won’t have to tolerate the window leaking at all. It makes me want to “weep” just thinking about it…
The way to address residential windows is to install an under window “gutter” or pan-flashing and then create an interior air seal that will pressure moderate the airspace between the window and the rough opening in the wall (Figure 9). If and when the window unit leaks the leaking water is drained back to the exterior without compromising the performance of the window (any more than it is already compromised due to manufacture and design).

Figure 9: Pan Flashing—Under window gutter installed to drain water to exterior. Airspace under window unit is weeped and drained to the exterior.
I live for the day when all residential windows are full of holes, drained and don’t leak. In the meanwhile, I will recommend that they be installed in drained and weeped openings. The lessons learned from the high-rise side of the industry have not yet traveled to the low-rise side of the industry. Apparently, good ideas start at the 4th floor.
Figures 10a through 10h—Note that bottom of window is unsealed on exterior to permit drainage to exterior. Window drains into a pan flashing that is drained to the exterior. Air seal is on interior perimeter (continuous around 4 sides) to provide pressure moderation of air cavity surrounding window inboard of exterior perimeter flashing tape and outboard of interior perimeter air seal.

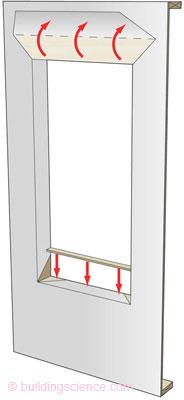
Figure 10a | Figure 10b | Figure 10c
Wood frame wall with housewrap and sheathing | Modified "I" cut in housewrap | Housewrap folded in at jambs and sill; housewrap folded up at head, backdam installed
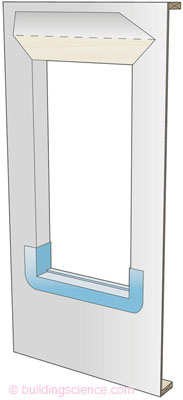
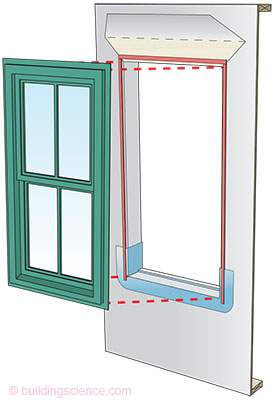
Figure 10d | Figure 10e
Formable flashing installed | Window installed plumb, level and square
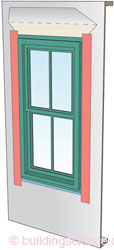
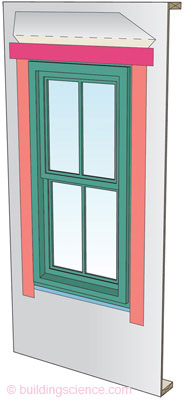
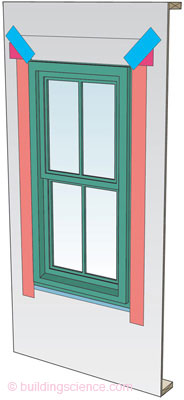
Figure 10f | Figure 10g | Figure 10h
Jamb flashing tape installed | Head flashing tape installed | Housewrap folded down at head and corners taped; inner seal installed around perimeter
Footnotes:
Sometimes this is referred to as “pressure equalization”—mostly by folks from the Great White North.
The inner seal does not have to be perfect. Trial and error—and mostly error—has shown us that a ratio of at least 10:1 in tightness between the inner seal and the outer seal and vent openings is necessary for pressure moderation to work. It is difficult to make the inner seal perfectly tight, but it is pretty easy to make the outer seal and vent openings deliberately leaky. Besides, the more vent openings the more drainage. We can just put in more holes on the outside to compensate for a less than perfect inner seal and help with the drainage. Yes, it is true; this old engineer has gone around and drilled holes in the outside of window units to get them to stop leaking. Three hundred years ago they would have burned me at the stake for this kind of Devils work but now all I do is send folks a bill.
This is the basis of the current ongoing Canadian Civil War between pressure equalization and ventilated and drained claddings. Old school engineers like me were taught by Old Masters like Handegord who pointed out that drainage was the key to life in general and pressure equalization—if it applied at all—was for joints and not for entire wall assemblies. Claddings were to be drained. Ventilated if you must, but first and foremost they had to be drained. Whereas joints in insulated glazing units, pre-manufactured windows both residential and commercial, joints in precast panels and connections between windows and wall assemblies could be pressure equalized but regardless they had to be drained. This view is not universally accepted—but I remind you dissenters that if you disagree with the Old Masters you do so at your own peril.