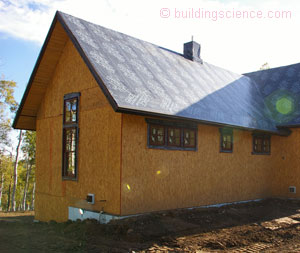
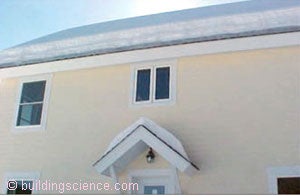
Ice dams (Photograph 1) happen when the outside temperature is below freezing, the roof deck temperature is above freezing, and there is snow on the roof.1 The warm roof deck causes the snow on top of the roof deck to melt, and the melt water runs down to the edge of the roof where the water freezes leading to a buildup of ice and a backup of water, hence the term “dam” (Figure 1).
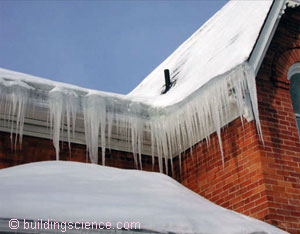
Photograph 1: Ice Dam—Beautiful, but bad, and sometimes dangerous. Folks die every year when big ones fall on them, or when they fall off roofs trying to get rid of them.
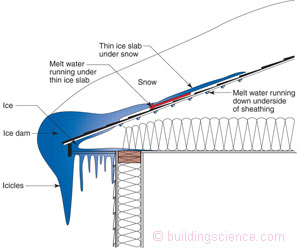
Figure 1: Melt Water—When the snow layer adjacent the roof deck melts, the liquid water is wicked upward into the snow pack by capillarity away from the roof covering. As the liquid water migrates upwards, it gets colder and freezes. As more snow melts and the liquid water phase exceeds the storage capacity of the snow, it runs downward under the ice layer via gravity. At the roof edge and roof overhang, the deck is much colder, and the drainage gap freezes solid causing the water to back up. It gets ugly pretty quickly.
Ice dams are big problems because they often lead to water leakage into building assemblies, and more seriously, to falling ice that can be fatal (not kidding here) and to the weight of ice leading to structural collapse of roof overhangs and the shearing of deck assemblies when large masses of ice fall on them.
The strategy to control ice dams is fundamentally straightforward: keep the roof deck below freezing when the outside temperature is below freezing. Pretty easy you say? Not necessarily, as we shall see.
Historically, we have tried pretty much everything except the right thing to control ice dams. In New England where I live, older buildings use metal “slip” surfaces to get the snow to slide off the roof, preventing the ice dam from occurring at the roof edge (Photograph 2).
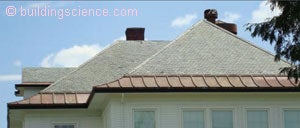
Photograph 2: New England Slip Surface—Older buildings in New England use metal “slip” surfaces to get the snow to slide off the roof, preventing the ice dam from occurring at the roof edge.
When that doesn’t work, we throw energy at the problem. Heating cables are still a common approach to dealing with ice dams (Photograph 3). And, then we add insurance—the belt and suspenders—we add a water protection membrane to the entire roof to keep the melt water out even if we get the ice dam because we have become conditioned into accepting that we can not avoid getting the ice dam, so at least we can limit the damage (Photograph 4). Hogwash. We should not accept ice dams.
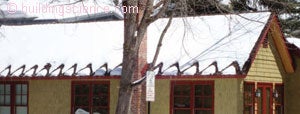
Photograph 3: Heating Cables—Throw energy at the problem. Heating cables are still a pretty common approach to dealing with ice dams.
Photograph 4: Insurance—It is not uncommon to install a water protection membrane on the entire roof to keep ice dam melt water out of roof assemblies. This does not prevent the ice dam from occurring; it only limits the damage.
Ice dams can be prevented. The best approach, the classic approach, to ice dam control is the vented roof (Figure 2). Keep heat from the interior from getting to the roof deck, and then remove any heat that gets there using ventilation. For this to work, and it does work, we have to do three things extremely well. First, construct an airtight “lid” or ceiling. Second, insulate the top of the lid with lots of insulation. And then third, flush away any heat that gets to the roof deck by ventilating the underside of the roof deck with exterior air. Done. No ice dam.2
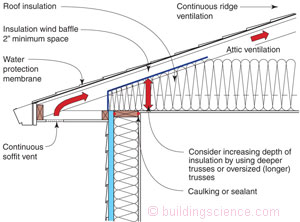
Figure 2: Classic Control Approach—Keep heat from the interior from getting to the roof deck and then remove any heat that gets there. First, construct an airtight “lid” or ceiling plane. Second, insulate the top of the lid with lots of insulation. And then third, flush away any heat that gets to the roof deck by ventilating the underside of the roof deck with exterior air. Note the air seals at the top of the exterior wall. Exterior walls are like chimneys—you don’t want to vent the tops of them into your roof. Also, it is a good idea that the minimum thermal resistance directly over the top of the top plate be greater than the thermal resistance of the wall. So, if the wall is R-30, you want at least R-30 directly over the top of the top plate. Also, note that a 2 in. (51 mm) minimum airspace is recommended under the sheathing. Most codes call for only 1 in. (25 mm). The codes are wrong. In ice dam regions, where ground snow loads are greater than 30 lb/ft2 (146 kg/m2) you need 2 in. (51 mm). This is because ventilation only works to remove small amounts of heat. Therefore, you need a lot of it.
There is no better technology. It’s simple, elegant, and effective. Unfortunately, we screw up this approach on a regular basis. We do dumb things like not making the lid airtight (Photograph 5), allowing heated air to get into the attic. Even dumber, we install heating systems in attics that leak air, conduct heat and radiate heat (Figure 3).
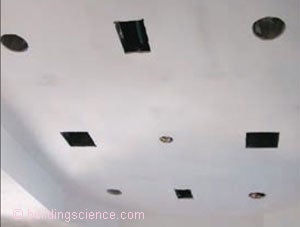
Photograph 5: Swiss Cheese Ceiling—Can you believe the perforations we put in attic ceilings? What are the odds that each one of these is going to be sealed airtight? Right. When they leak air, they leak heat, and the heat warms up the roof deck, and that is a problem. Air leakage induced attic heat gain is far more of a concern than conductive and radiative attic heat gain. In other words, airtightness is more important than insulation levels. But both are important.
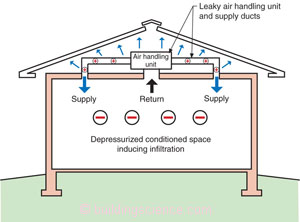
Figure 3: Stupid on Steroids—What could you possibly be thinking installing a duct system in a vented attic in a cold climate where it snows? The air leakage out of the ducts and the conductive and radiative losses from the surfaces of the ducts will kill you. Ice damming is absolutely guaranteed. Don’t do this. Stop. If you think you can guarantee that the ducts will be airtight, and that the openings where they penetrate the ceiling will be airtight, and that you can wrap them with enough insulation to avoid a problem, I have some Greek government bonds to sell you.
And, we’re not done yet. We often don’t bother to ventilate the underside of the roof deck assembly. And, by ventilate, I mean washing the entire underside of the roof deck with outside air. Every rafter or truss bay, not every third one, must be ventilated. Meeting building code mandated ventilation does not cut it, nor does meeting insulation manufacturer’s installation instructions. For ice dam control, more ventilation is better. Photograph 6 is not the answer. A minimum 2 in. (51 mm) air gap is necessary between the underside of the roof deck and the top of the insulation layer in ice dam regions—not the typical code specified 1 in. (25 mm). An ice dam region is anywhere the ground snow load exceeds 30 lb/ft2 (146 kg/m2). Where does this come from? Old guys. More about them later.
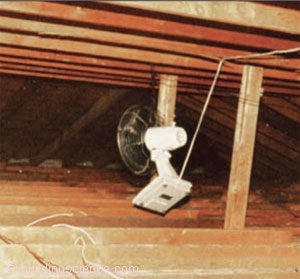
Photograph 6: Amazing—Rube Goldberg would be proud. I won’t say in which state this technology was attempted, because I live there.
So, what do we do about ductwork and heating systems? Put them inside. Or, move the inside so that they become inside (Figure 4). Note that this approach of moving the thermal barrier to the roof deck is not easy. You are now creating an unvented roof, which is OK if you get it right. The easiest way to do it right is insulate on the top of the roof deck (Figure 5). It can also be done with spray foam from underneath, but that is a topic for another day.
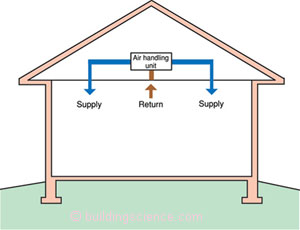
Figure 4: Conditioned Attic—Putting the ducts inside by moving the thermal boundary and pressure boundary to the roof deck. This can be done by insulating on the top of the deck or applying spray foam on the underside of the deck.
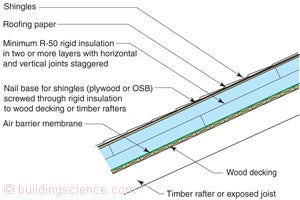
Figure 5: Compact Roof—Roof deck insulated on the topside. Note the air barrier membrane. If you don’t do this, the roof is doomed. You have been warned. A fully adhered membrane is recommended. Further, note that there is not a vented space under the roof cladding to compensate for the thermal resistance of the snow layer. This roof should be used where the ground snow load is less than 60 lb/ft2 (293 kg/m2) and should have a thermal resistance greater than R-50. With ground snow loads greater than 60 lb/ft2 (293 kg/m2), compact roofs should have a ventilation space under the roof cladding such as in Figure 8.
So how do we handle ice dams with compact roof assemblies like that described in Figure 5? Don’t we need ventilation? Sometimes yes. Sometimes no. To figure this out we need to study the old masters once again,3, 4 and appreciate some basic physics. In theory, you can install enough insulation in a roof assembly so that the roof deck pretty much stays cold (close to the temperature of the outside) and sometimes even colder due to something called night sky radiation. So lots of insulation and an airtight roof and we are done, right? Well, not quite. The problem is the snow. It’s on the top of the roof deck, remember?
You will be shocked to know that snow has an R-value and a pretty good one at that.5 It’s about R-1 per inch, depending on density (Figure 6). This is a pretty big deal. Think of snow on a roof as an insulating blanket that elevates the temperature of the roof deck.
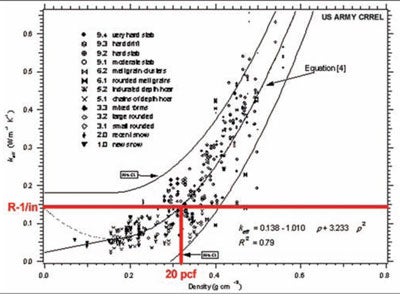
Figure 6: Snow Insulation—A plot of thermal resistance of snow versus density courtesy of the Cold Regions Research and Engineering Laboratory (CRREL) of the U.S. Army Corps of Engineers.
More snow means more ice damming simply because of the thermal resistance of the snow. So if you have a foot of snow on your roof you have somewhere between R-10 and R-15 as well. Even if you have an airtight roof assembly and lots of insulation—say, something like Figure 5—at some point the thermal resistance of the snow is going to be such that the roof cladding will be above freezing when the outside temperature is below freezing.
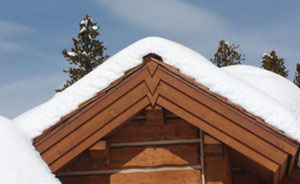
Check out Photograph 7. This is an extremely well constructed house: airtight and super-insulated. It has an R-50 unvented airtight roof. Unfortunately, it is in a secure undisclosed location in northern Vermont where it snows a lot. The photo shows a 3 in. (76 mm) ice layer just under all of that snow along the entire perimeter roof edge. The R-value of the snow warmed the roof deck sufficiently to raise it above freezing. You can’t build unvented roofs where it snows a lot even with super insulated roofs.
Photograph 7: Super-insulated Roof—Ice dam still occurs due to the thermal resistance of the snow blanket. Note the layer of ice under the snow at the roof perimeter. If it gets cold enough and if you get enough snow, all the insulation in the world will not save you. (Not quite true—at some point the heat flow to the roof deck is so small that not enough energy gets to the snow pack to melt enough water to have much of an effect. Snow has a heat of fusion of 144 Btu/lb [335 kJ/kg]. When you get above R-60, it takes hundreds of hours to melt a pound of snow.)
How do you define “where it snows a lot?” That’s where you need to rely on the experience of old guys and the U.S. Army. Check out one of the footnotes. The International Building Code has a pretty good map of “where it snows a lot” (Figure 7). Based on the experience of the aforementioned old guys and my personal experience, I define a ground snow load of 60 lb/ft2 (293 kg/m2) as “where it snows a lot” and the point at which you need to vent all roofs (even “super-insulated” roofs) to control ice damming.
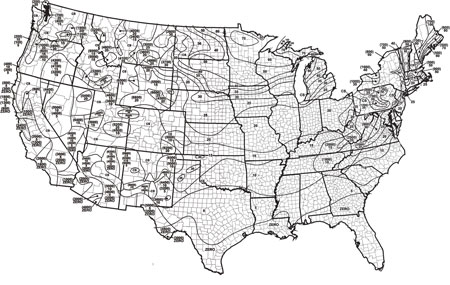
Figure 7: Ground Snow Load—Courtesy of the International Building Code, 2009 Edition. A ground snow load of 60 lb/ft2 (293 kg/m2) is defined as “a lot” and the point at which you need to vent all roofs (even “super-insulated” roofs) to control ice damming.
It is not unusual for me to recommend a “vented over-roof” be installed over the top of an “unvented compact roof” (Figure 8 and Photograph 8). Note to California architects who work in Aspen: this is the only way to construct a ski lodge on the top of a mountain.
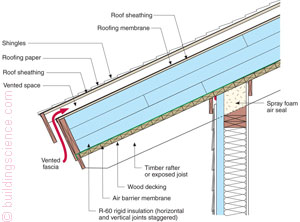
Figure 8: Vented Unvented Roof—Note that the air intake for the vented “over-roof” is at the fascia and that the overhang is insulated, compensating for cladding thermal plumes due to incident solar radiation.
Photograph 8: Vented Over-Roof—Pretty neat, eh? Note the air inlet at the fascia. Yes, the ridge vent is covered with snow, but snow is not an air barrier. I only need enough ventilation to compensate for the thermal resistance of the snow layer, and that is not much if I have an airtight roof and lots of insulation, say R-60.
Are we done yet? Nope, we have to appreciate the problems with overhangs. They trap heated air (Figure 9). This is a real problem with dark claddings. Say that it is 20°F (–7°C) outside—perfect ice dam weather. And, say that it is sunny. What is the temperature of a southwest-facing wall with dark wood siding? Oh, about 45°F to 50°F (7°C to 10°C). You get a nice thermal plume off the siding. All you need is an overhang. Wait, we have one (Photograph 9). Perfect. The trapped heat melts the snow, and you have a massive ice dam. Snow slides are so severe that you can’t use the front of the building. The good news is that there are always Australian ski bums around to handle the problem for you (Photograph 10).
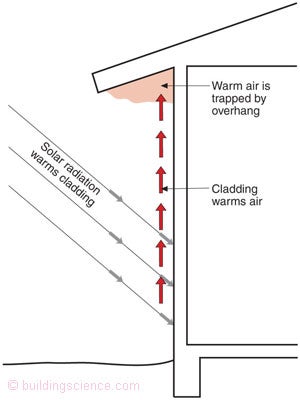
Figure 9: Cladding Thermal Plumes—Dark cladding, solar radiation and large overhangs combine to create ice dam heaven.
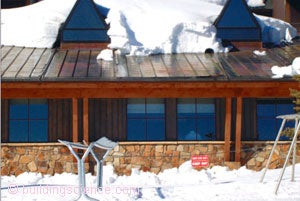
Photograph 9 : Don’t You Just Love Aspen—LEED-rated ski lodge, so you know it does not work. Note the large south-facing overhang that traps the heat leading to ice dams and snow slides
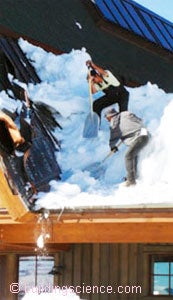
Photograph 10: Australians to the Rescue—They play football without pads. They are fearless, and they make lifelong friends. They also damage your roof when you get them to hack away the ice dams.
If you do not want to have the Australians save your bacon, you should insulate your overhangs in high snow load areas to control ice damming caused by thermal plumes off claddings. You should also always ventilate your roof deck in high snow load areas. That sometimes means that you have to construct vented over-roofs over unvented compact roofs. You always need to make your roof airtight and insulate it extremely well. And, don’t ever put ductwork or heating systems in vented attics.
In places where it snows, but not “where it snows a lot” you don’t have to vent your roof deck, but you do have to make your roof airtight, and you have to insulate it extremely well. If you don’t vent your roof deck, make sure you know how to build an unvented roof deck.
’Nuff said.
Footnotes:
This is an “ah-ha” moment. No snow, no ice dam. Not many ice dams in the Arctic because it is really windy, and the snow blows off roofs. Also, it does not snow much in the Arctic. Yup, amazing, but true. It’s just that the snow stays around for a long time. You want snow, go to Buffalo. Or even worse, go to Syracuse. More snow falls in Syracuse than falls in Anchorage, Alaska, and Anchorage gets more than 100 in. (2.5 m) per year. Folks who live in Syracuse, N.Y., go to Buffalo, N.Y., to get a break from the snow. Note to those who are geography challenged, Anchorage is not in the Arctic.
We can't prevent icicles. Snow melting due to sun exposure and refreezing is not stoppable by any means. However, this results in small icicles that do not cause water back up.
Wayne Tobiasson is another one of my unsung building science heroes. He has retired, finally, from the Cold Regions Research and Engineering Laboratory (CRREL) of the U.S. Army Corps of Engineers. Wayne knows ice dams. A nice paper to get you started if you want to know more is “Guidelines for Ventilating Attics and Cathedral Ceilings to Avoid Icings at Their Eaves” by W. Tobiasson, et al., in Thermal Performance of the Exterior of Buildings VIII/Roof Design—Practice.
There are these two other guys who also know stuff. Not so old, but masters nevertheless. Check out “Venting of Attics & Cathedral Ceilings” by Bill Rose and Anton TenWolde. Published in the ASHRAE Journal, no less, October 2002. Not a column, a real paper, reviewed, the whole nine yards. This one is a gem just for the references cited. The words are real good, too.
Canadians know this because we all live in igloos when we are not winning hockey gold medals.