This pamphlet is designed for members of the residential construction and remodeling industries, as well as owners and managers who work in affordable housing. It presents building guidance for both new construction and rehabilitation, as well as practices that can be used by property maintenance personnel.
The Building Connection
Housing and Health
Asthma is a serious disease that affects millions of Americans, particularly children, and it is increasing at an alarming rate. Asthma is an allergic reaction to certain exposures ("triggers") such as dust, mold, pests (cockroaches, rats, mice), pets (cats and dogs), cold air, and dry heat. These conditions can trigger other allergic reactions that include hayfever symptoms like itching eyes and runny noses. Many air pollutants that are associated with asthma are found at higher levels indoors than outdoors. Among them are the most common asthma triggers: particles from molds, dust mites, mice, rats, roaches and pets.
Indoor air contains other pollutants — such as carbon monoxide, volatile organic compounds (chemicals released from materials), nitrogen oxides, sulfur oxides, radon, soot and other particles — that make asthma worse or can make people sick. Some pollutants — ozone, sulfur oxides, carbon monoxide, pollens and soot — come from outside. Homes built before 1978 may contain lead-based paint, which during a renovation job can become hazardous if lead dust or paint chips are created by the work. Children or others in the home can easily ingest the duct and paint chips. The federal government has recommended work practices in the Lead Paint Safety Field Guide that help to contain and clean up lead dust and paint during and after rehabilitation work. A copy of the Lead Paint Safety Field Guide can be found at www.hud.gov/offices/lead.
We can control many of the sources of pollution that otherwise can make asthma worse or can make people sick by good design, construction, renovation, maintenance and operation. In addition, what we bring into our homes, how we live in our homes and how we clean and maintain our homes also affect the quality of the air in our homes.
Before You Design, Build or Renovate
The principles for a healthy home are the same for all types of construction: rehabilitation, new construction, low rise, high-rise, single family or multifamily.
The design and construction options for rehabilitation are limited by conditions of the salvaged building and equipment and extent of the rehabilitation. Despite the limitations, the same principles apply to whatever work is done as part of the rehabilitation.
There are seven principles to a healthy home. Ideally, a healthy home is:
- Dry
- Pest free
- Clean
- Toxic chemical free
- Well ventilated
- Comfortable
- Combustion by-product free
Not all princoples can be controlled by design, construction, renovation and maintenance. How we live in a home also matters. And not all principles can be achieved perfectly or completely or practically — they are goals.
Applying the principles for a healthy home to design, construction, renovation and maintenance does not have to result in significant cost increases. By understanding the interactions between building systems we can identify cost saving trade-offs that improve building performance and improve control of interior conditions such as comfort — particularly temperature and interior humidity. Additionally, many principles result in reduced call-backs and warranty claims.
Improve building envelope Costs more (+)
Downsize mechanical system Costs less (-)
Cost remains the same
Dry Water and humidity support the growth of mold, insects, rodents and dust mites. Keeping a home dry controls mold and pests, and discourages dust mites.
Dust Dust is a source of contaminants, provides food for some of the pests that trouble people in buildings and physically damages flooring. The amount of dust in a building can be reduced by ensuring it’s clean before occupancy, designing it to stop tracked-in dirt at the door and using finishes and equipment that are easy to clean and maintain.
Well ventilated Ventilation provides a mechanism to remove pollutants and control humidity. Windows that open and fans that run control pollutants.
Combustion by-product free Combustion by-products — such as carbon monoxide, sulfur oxides, nitrogen oxides and soot — should not be in a healthy home. Furnaces, water heaters and fireplaces that burn fuel must vent to the outside. Stoves, ovens and cook-tops that burn fuel must be used with fans that vent the combustion by-products to the outside.
Pest free Pests can lead to allergic reactions and to the use of pesticides. Food and water attract pests. Controlling food and water helps to minimize pests.
Toxic chemical free We are surrounded by chemicals, so no environment can be made completely chemical free. But we can control our exposure. Many things found in houses can be toxic in large doses. Some we can control by design and construction such as selecting materials that don’t smell or release chemicals. Others we can control by the way we live in the home. For example, many cleaning compounds, pesticides, oil- or alkyd-based paints and solvents can lead to problems. Many containers that these products are stored in slowly release the chemicals. It is best not to store these products inside. When in doubt, safely dispose of these products. Many municipalities operate household chemical disposal programs.
Comfortable Uncomfortable homes can make people take action that makes a home unhealthy. Too hot or too cold is usually uncomfortable.
Operable windows can control heat and provide ventilation. But sometimes when it is too cold windows will not be opened, and sometimes when it is too hot even opening windows will not cool the home enough.
And what happens when people are scared to open windows?
Sometimes the outside air has pollutants such as ozone and pollen that may require some people to keep windows closed and filter incoming air.
If people are cold they won’t ventilate their home. If people can’t afford to heat their home they won’t ventilate their home.
A healthy home has windows that open and fans that run — but a healthy home must also be healthy when windows are closed because it is too cold, because it is too hot, because people feel unsafe or because pollutants are present in the outside air.
Uncomfortable can also be too dry or too humid.
When a home is uncomfortably dry, people often humidify. Many times when people humidify they can over-humidify. Over humidifying may result in mold and mites and other pests. A properly built or renovated home will not require a humidifier to be comfortable.
When a home is uncomfortably humid, particularly in the summer and fall, it may require a dehumidifier or air conditioner. Even properly built or renovated homes may require a dehumidifier or air conditioner to control humidity in the summer and fall to be comfortable and healthy –– particularly in the southeast.
Factors That Must be Controlled for a Healthy House
To address the seven principles for a healthy home, the design, construction, renovation and maintenance must control the following factors:
- Water
- Rainwater control
- Groundwater control
- Plumbing
- Air
- Big holes and building boundaries
- Cold surfaces
- Indoor humidity
- Airborne pollutants
- Pressure changes
- Combustion
- Combustion appliances
- Garages
- Smoke
- Dust
- Entry control
- Lead dust control
- Cleanable surfaces
- Filtration
- Creatures
- Keeping them out
- Reducing food and water
Recommendations
Water
Water is a precondition for mold, insects, rodents and dust mites and is arguably the single most important factor in the design and construction of a healthy home. Water is the most important factor affecting the durability of a home and the most important factor affecting maintenance costs.
Control water = Fewer biological pollutants, increased building durability, lower maintenance costs
The three most important sources of water requiring control are:
- Rainwater control
- Groundwater control
- Plumbing
One of the key elements to controlling water is the concept of drying. It is common sense to accept that things will get wet — especially homes under construction or under renovation. The problem is not that homes get wet; it’s how long they stay wet and how well they dry. Homes should be designed to dry.
Rainwater Control
The fundamental principle of rainwater control is to shed water by layering materials in such a way that water is directed downwards and outwards from the building or away from the building. This principle applies to assemblies such as walls, roofs and foundations, as well as to the components that can be found in these assemblies such as windows, doors and skylights. It also applies to assemblies that connect to walls, roofs and foundations such as balconies, decks, railings and dormers.
Layering materials to shed water applies to the building as a whole (see Figure 1). Overhangs can be used to keep water away from walls. Canopies can be used to keep water away from windows, and site grading can be used to keep water away from foundation perimeters.
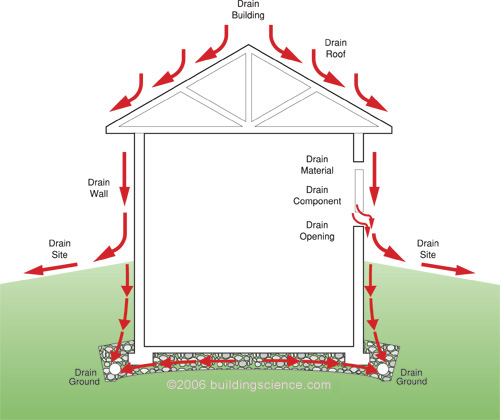
Figure 1: Layering material to shed water applies to whole building
When selecting building materials, take into account that building materials may be exposed to rain or other elements during construction. For example, walls without roofs on them will get wet. It is not a good idea to build these walls with exterior paper-faced gypsum board since it holds water, a major concern with party walls or fire walls in multifamily buildings. Instead, use glass-faced gypsum board or other water-resistant alternatives.
- Drainage is the key to rainwater control:
- Drain the site (see Figure 1)
- Drain the ground
- Drain the building (see Figure 2)
- Drain the assembly
- Drain the opening (see Figure 3)
- Drain the component
- Drain the material (see Figure 4)

Figure 2: Drain the building—patios and decks are lower than floors and slope away from building; garage floors are lower than main floor and slope away from building; driveways are lower than garage floor and slope away from building; grades are lower than main floor and slope away from building; stoops and walkways are lower than main floor and slope away from building; kickout flashings or diverters direct water away from walls at roof/wall intersections; overhangs protect walls.
Walls All exterior claddings — brick, stucco, stone — pass some rainwater. As such, some control of this penetrating rainwater is required. In most walls, this penetrating rainwater is controlled by a drainage plane that directs the rainwater downwards and outwards.
Drainage planes are water-repellent materials — building paper, housewrap, foam insulation — that are located behind the cladding and are designed and constructed to drain water that passes through the cladding. They are interconnected with flashings, window and door openings and other penetrations of the building enclosure to provide drainage of water to the exterior of the building. The materials that form the drainage plane overlap each other shingle fashion or are sealed so that water drains down and out of the wall.
Windows and doors are weak points in rainwater control for walls. If not flashed correctly they can channel water into walls. Steps for flashing a flanged window are detailed in Figure 3. In this case the window is installed in a stud wall with OSB sheathing, using housewrap as a drainage plane. The housewrap is stretched over the opening and then cut so it can lap the head flashing at the top of the window and yet tuck beneath pan sill flashing at the bottom of the opening. A panned sill flashing is installed in the bottom of the rough opening. It has vertical dams at the sides and back so that any rainwater leaking through or around the window is diverted to the outside of the housewrap below. Tape is used to seal the flange to the sheathing on the top, acting as a head flashing. Tape seals the side flanges to the housewrap on the sides. The flap of housewrap at the top is folded down over the tape and tope flange and the end cuts are sealed with tape.
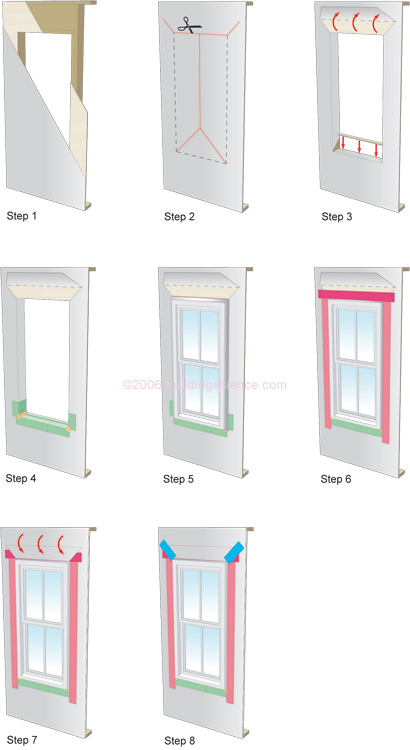
Figure 3: Installing window with housewrap on OSB over a wood frame wall in eight steps
Step 1: Start with wood frame wall with OSB and housewrap.
Step 2: Make modified “I” cut in housewrap.
Step 3: Fold in housewrap or tuck it head flap; Install wood backdam.
Step 4: Install first piece of adhesive-backed flashing (right); Install second piece of adhesive-backed sill flashing (right); Install corner flashing patches at sill.
Step 5: Install window plumb, level and square per manufacturer’s instructions.
Step 6: Install jamb flashing first then head flashing.
Step 7: Fold down head housewrap.
Step 8: Apply corner patches at head.
Figure 4 shows flashing details for trim added around the window. Framing a flanged window in this way makes it possible to remove the window at a later date without having to remove siding. Reservoirs are materials that store rainwater on the outside of homes, acting like a sponge when it rains. Once the reservoirs get wet, the stored water can migrate elsewhere and cause problems (see Figure 5). Common reservoirs are brick veneers, stuccos, wood siding, wood trim and fiber cement cladding.
To handle reservoirs get rid of them or disconnect them from the building (see Figure 6). Get rid of the moisture storage issue by back priming — painting all surfaces; back, front, edges and ends of wood siding, cement siding and all wood trim. This method is also effective for wood and fiber cement siding. If back-vented it is less important to back prime the siding. However, at least the bottom two feet should be back primed to avoid problems with back-splash. . .
Download complete document here.