Personally, I think the most beautiful floors in the world are wood. I like the look. I like the feel. Even Greenies like wood floors because apparently wood grows on trees.1
Wood floors have been around forever. You would think folks would know how to install them. Ha. We used to know. Then we forgot. Then it got weird. Wood changed into “waswood”.2 And then we began to install both wood and waswood on surfaces that were not easy to install stuff on. Like concrete. We sure like our concrete and we sure like our wood and waswood. It was inevitable that wood flooring would find a home on concrete slabs.
What is it with wood flooring on concrete? Two of the most fabulous building materials in the history of building materials should get along. Nope. Concrete loves water. It would love to stay wet forever. The longer it stays wet the stronger it becomes. Wood hates water. Water makes wood do weird things like move and rot. To make wood and concrete get along we either have to separate the wood from the concrete or we have to make the concrete dry enough not to irritate the wood too much. And, if we take the concrete dry enough route, it has to stay that way forever.
Back in the day old guys knew how to separate the wood from the concrete and make glorious wood floors. When we had concrete slabs on grade or basement concrete floors old guys learned to install a continuous layer of bitumen over the top of the concrete surface (Figure 1 and Photograph 1). The bitumen would be both a vapor barrier and a capillary break. It was sticky, icky, gooey and smelly and otherwise really good. It needed to be continuous. To keep it from getting over everything it was covered with felt paper. Sometimes it was installed in two layers. This was nothing more than a single ply or double ply built up roof installed on a concrete slab. This was an inside roof. A roof. Roofers did the install. Roofing technology.
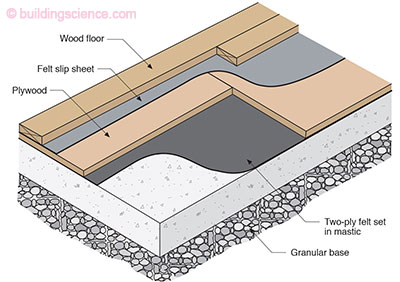
Figure 1: Back in the Day—A continuous layer of bitumen was installed over the top of the concrete surface. The bitumen would be both a vapor barrier and a capillary break. To keep it from getting over everything it was covered with felt paper. Sometimes it was installed in two layers.
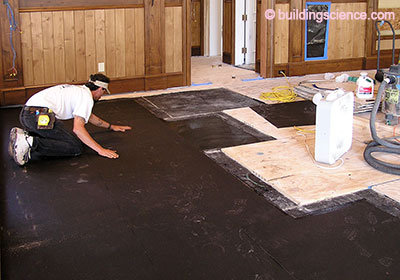
Photograph 1: Plywood Over Bitumen—Plywood replaced wood sleepers and was covered with a slip surface to keep the wood flooring from squeaking as it changed moisture content seasonally.
Over the top of this felt covered bitumen layer (or two bitumen layers) wood sleepers and wood plank flooring was installed. It worked fabulously. Old guys also got very clever at machining the backside of the wood flooring so that it would not warp due to differential drying between the top and bottom surfaces during seasonal moisture content changes (Figure 2a, 2b, 2c and 2d).
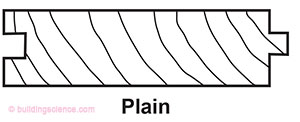
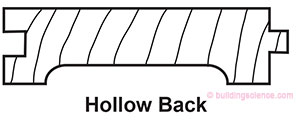
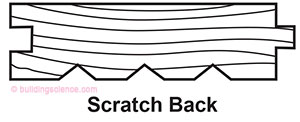

Figure 2a, Figure 2b, Figure 2c and Figure 2d: Clever Stuff—The backside of wood flooring was machined so that it would not warp due to differential drying between the top and bottom surfaces during seasonal moisture content changes.
The only improvement over a century was to replace the wood sleepers with plywood (Photograph 1) that was covered with a slip surface to keep the wood flooring from squeaking as it changed moisture content seasonally.
Then brain damage set in. It was the 60’s. Could have been drugs. Maybe Elvis. Maybe the Beatles. Folks began to leave off the bitumen and just install the felt. How dumb is that? By this time felts were typically impregnated with some bitumen. But impregnated felt is not a vapor barrier or a capillary break. The whole point of the felt was to be a cover sheet for the bitumen. It was never intended to be a replacement for the bitumen. Well it didn’t work. No surprise. But a lot of times folks got lucky as it became common practice to install a sheet of plastic under the concrete to separate the concrete from the ground. And if the concrete was allowed to dry before the wood flooring was installed things would work out—as long as the concrete did not get wet from the ground underneath or from the side.
Today, if we are smart, we don’t need to separate the wood flooring from the concrete as long as we separate the concrete from the ground and we allow the concrete to dry before we install the wood flooring. Easy to say but not always easy to do. And like most easy things there are “tricks” that you need to know. Some times folks don’t share the tricks. Many times folks don’t know the tricks in the first place.
So how do you separate the concrete from the ground underneath? Well you have to first understand that concrete slab foundations have a bottom and sides. Most people forget the sides. The sides are a really, really big deal. We plant things on the sides of buildings. We water the things that we plant on the sides of buildings. The ground is very wet on the sides of buildings.
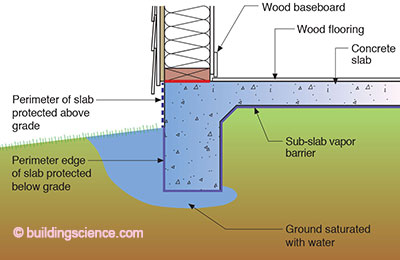
Figure 3: Monolithic Slab—A continuous polyethylene vapor barrier and capillary break needs to wrap the entire concrete surface that contacts the ground – especially the perimeter. It is also a good idea to paint the exposed edge of the slab above grade to keep it from getting wet from “splash back” (rainwater hitting the ground and bouncing back up) and enthusiastic over irrigation by occupants. The paint needs to be “liquid water” closed and “vapor water” open – hygrophobic and vapor permeable – that would be typical acrylic latex paint formulated for concrete substrates.
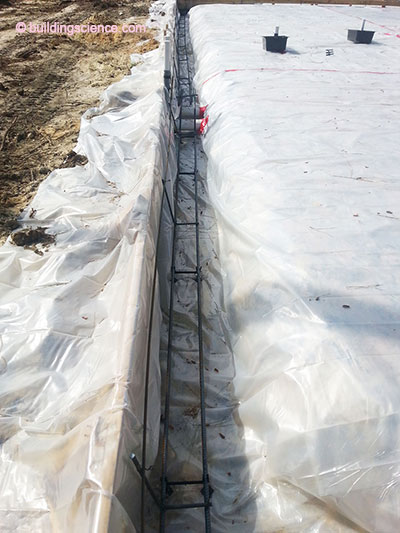
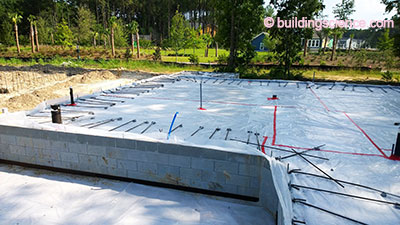
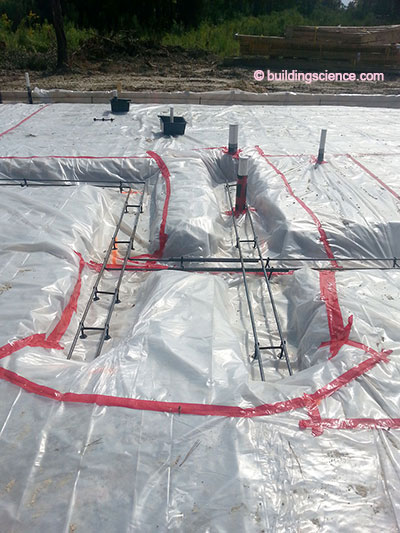
Photograph 2: Perimeter Slab Protection—The plastic vapor barrier is run over the top of the form boards and trimmed later after the form boards are stripped.
When we have a monolithic slab a continuous polyethylene vapor barrier and capillary break needs to wrap the entire concrete surface that contacts the ground—especially the perimeter (Figure 3). This means attaching a plastic “skirt” to the perimeter form boards or running the plastic over the top of the form boards (Photograph 2) and trimming the plastic later after the form boards are stripped. Both of these approaches are not common but need to be in place if you are installing water sensitive flooring like wood on a concrete slab foundation. Without the slab edge protection water can wick dozens of feet inward via capillarity (Figure 4) and then you end up with flooring problems such as discoloration, movement and decay (Photograph 3).
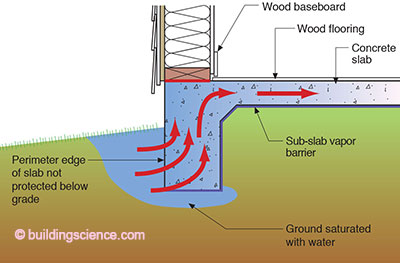
Figure 4: Capillary Wicking—Without the slab edge protection water can wick dozens of feet inward via capillarity.
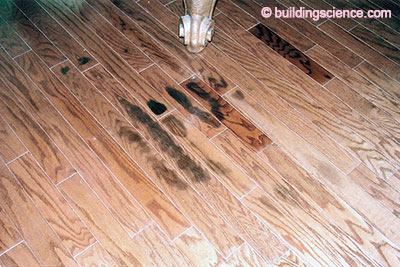
Photograph 3: Wood Flooring Problems—Discoloration, movement and decay.
It is also a good idea to paint the exposed edge of the slab above grade to keep it from getting wet from “splash back” (rainwater hitting the ground and bouncing back up) and enthusiastic over irrigation by occupants. The paint needs to be “liquid water” closed and “vapor water” open—hygrophobic and vapor permeable—that would be typical acrylic latex paint formulated for concrete substrates.
It is a lot easier to handle a stem wall foundation where the edge of the slab is wrapped and the slab is well elevated (Photograph 4 and Figure 5). So why not just use stem wall foundations? Sometimes the ground conditions suck and you need to go post-tensioned. Sometimes the local trade base does not exist to go there. Monolithic slab foundations are faster to construct and are easier to construct. And that often wins the day. They are here to stay so just deal with it.
Photograph 4: Stem Wall Foundation—It is a lot easier to handle a stem wall foundation where the edge of the slab is wrapped and the slab is well elevated.
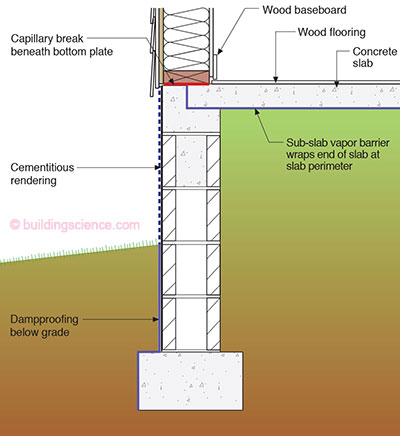
Figure 5: Stem Wall Foundation—It is a lot easier to handle a stem wall foundation where the edge of the slab is wrapped and the slab is well elevated.
So lets say we separate the concrete from the ground—both from underneath and from the sides. Now what? We need dry concrete. What’s the big deal? Just wait for the concrete to dry before you install the wood flooring (Figure 6 and Photograph 5). Problem with this strategy is that with “wet” concrete mixes this might mean many, many months. In new construction we might only have 90 days between placing the concrete and installing the flooring. To make this timeline work we need concrete without much water in it. We need low water-to-cement ratio concrete. The good news is that to make good concrete you need a low w/c ratio. The lower the w/c ratio the better the concrete. Period.
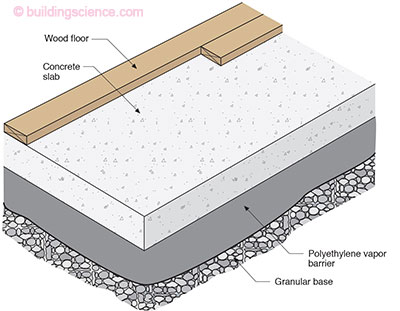
Figure 6: Separate the Concrete from the Ground—This needs to be done from underneath and from the sides. We also need dry concrete. We need low water-to-cement ratio concrete or we need to wait for the concrete to dry before we install flooring.
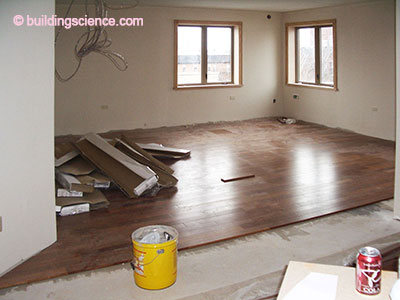
Photograph 5: Glue Down Wood Floor—A decade old and still going strong. Amazing what works if the concrete is dry when the wood goes down and stays dry over time.
How low do you need to go? A w/c ratio below 0.6 for sure3. How do I know that? Well, one of the secret numbers that old time concrete masters know but don’t share with the riff raff is that “bleed water” typically disappears when the w/c ratio is less than 0.6. Now this is not a hard and fast rule. Mixing, fines, aggregate types all factor in—but it is a pretty reasonable “rule”. Without bleed water you can easily place concrete on plastic vapor barriers or on fluted metal decks and not mess up you finishing by having water separate from the mix and float to the top surface and pond. One of the dirty secrets to finishing crappy concrete was to place it on a sand layer so that the sand layer would act like blotter paper and suck up the bleed water.4
Unfortunately, most residential concrete slab foundations have a w/c ratio higher than 0.6. To get to less than 0.6 you typically need a lubricant to allow you to get the concrete out of the truck and have it placed with a pump (“superplasticizer”). With a stiff mix folks always try to add water to the concrete in order to place it. And if you don’t watch them continuously the water gets added and you end up with crappy concrete with a lot of water in it. Adding what seems like a little water can do a lot of damage. With the superplasticizer there is no incentive to add water and you get the stiff mix (low w/c ratio) you need.
The water in the concrete issue is less of a problem with thin slabs because with a thin slab there is not a lot of concrete mass with a lot of water in the mass of the concrete to begin with. But where slabs are thickened for structural reasons wood flooring problems can occur (Photograph 6). Again, this all can be avoided with a low w/c ratio concrete.
Photograph 6: Thickened Slabs—The water in the concrete issue is less of a problem with thin slabs because with a thin slab there is not a lot of concrete mass with a lot of water in the mass of the concrete to begin with. But where slabs are thickened for structural reasons wood flooring problems can occur. Again, this all can be avoided with a low w/c ratio concrete.
So what do you do if you don’t have a low w/c concrete and you don’t have time? And even worse, what do you do if you don’t have an effective vapor barrier and capillary break? Well, you go back to the old way of doing things. You install a topside vapor barrier. But you do it smart with new materials.
The smart way is a fluid applied vapor barrier (Figure 7). Epoxies work well. The dumb way is to use a plastic sheet.
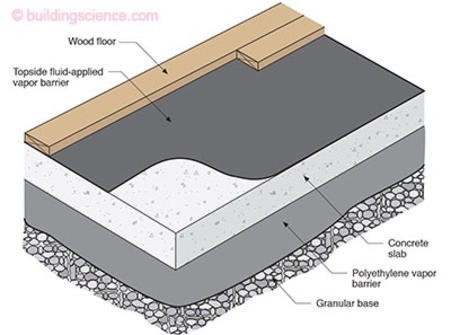
Figure 7: What if Your Slab is Wet? —If you don’t have a low w/c concrete and you don’t have time and if you don’t have an effective vapor barrier and capillary break you need to install a topside vapor barrier. A fluid applied vapor barrier such as epoxy work well. The dumb way is to use a plastic sheet. Don’t use a plastic sheet.
Why is using a plastic sheet a dumb idea? Folks on the Internet love it. It has got to be the right way to go if it is on the Internet. If the vapor barrier layer is not completely fully adhered condensation will occur in air pockets. If these air pockets communicate with the interior you will grow mold and algae. And the floor will smell. What are the odds that a thin sheet of plastic will be installed in an absolutely airtight manner on the top of a concrete slab where the perimeter of the plastic layer is sealed in a continuous airtight manner to the concrete and where the thin sheet of plastic will survive the construction process and not have any holes in it such as holes necessary to fasten the flooring?
That the polyethylene plastic sheet recommendation still comes from many in the wood flooring industry including wood floor trade associations is flabbergasting and disappointing. You would think they would know better. The old guys knew better with the bitumen layer. But apparently they all died off and didn’t tell the new guys. Come on guys, put the plastic sheet under the concrete not on the top of the concrete.
What if I want to insulate the floor? Easy, place the insulation under the plastic vapor barrier and over the top of a granular capillary break (Figure 8). Do not, and I repeat, do not install the insulation over the top of the plastic vapor barrier and under the slab. The insulation will get wet and stay wet forever. Under the plastic it can dry into the granular layer. Memo to everyone, with insulation you absolutely need a granular layer with no fines to act as a capillary break and further note that the only insulation that will work is an extruded polystyrene.

Figure 8: Insulating the Slab—Install the insulation under the plastic vapor barrier and over the top of a granular capillary break. Do not, and I repeat, do not install the insulation over the top of the plastic vapor barrier and under the slab. The insulation will get wet and stay wet forever. Under the plastic it can dry into the granular layer. Memo to everyone, with insulation you absolutely need a granular layer with no fines to act as a capillary break and further note that the only insulation that will work is an extruded polystyrene.
Are we done yet? Nope. Wood likes to move and no power in the universe will stop it from moving. It moves with relative humidity changes, as it is a hygroscopic material (Figure 9). In most places the interior winter relative humidity is low (typically 30 percent) and high during the summer (typically 65 percent). That means the wood flooring is going to float between 6 percent moisture content by weight and 12 percent moisture content by weight.
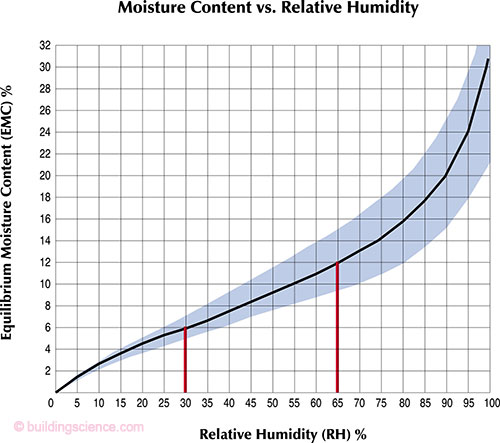
Figure 9: Conditioning the Wood Flooring—Wood expands and contracts with relative humidity changes as it is a hygroscopic material. In most places the interior winter relative humidity is low (typically 30 percent) and high during the summer (typically 65 percent). That means the wood flooring is going to float between 6 percent moisture content by weight and 12 percent moisture content by weight - a 6 percent seasonal swing. If you install wood flooring at 6 percent it will buckle when it goes to 12 percent. If you install wood flooring at 12 percent it will shrink and leave big gaps when it goes to 6 percent. Old guys knew this and conditioned wood to the mid range moisture content it would see during service. For most of the lower 48 states that would be 9 percent moisture content by weight.
Using “Joe math” that is a 6 percent seasonal swing. If you install wood flooring at 6 percent it will buckle when it goes to 12 percent. If you install wood flooring at 12 percent it will shrink and leave big gaps when it goes to 6 percent. Old guys knew this and conditioned wood to the mid range moisture content it would see during service. For most of the lower 48 states that would be 9 percent moisture content by weight. Most people have forgotten about this—so the folks who make wood flooring typically precondition the wood to 9 percent before they ship it and cross their fingers. Flooring manufacturers also like narrower planks as that results in more joints that can accommodate more movement. Unfortunately, the trend is to wider planks as they are currently “in style”. And don’t forget to leave gaps at the perimeter of rooms. Did I mention that wood likes to move—even “waswood”?
So how do you handle the movement if you don’t condition the wood and like wider planks and don’t like gaps? Consider a floating floor. New to the technology front—only a half century of experience to go on. Handles the movement part and is great for sound attenuation as the slip surface is often a thin foam layer.
Ah, style and a lack of knowledge coupled with wet concrete makes you wonder if walking the plank is not so bad an idea.
Footnotes
OK, not all Greenies. To some Greenies not all wood is good wood. Not all wood is green wood and I don’t mean green in the old term sense when green wood meant something real and definable. Just for the record I am not in favor of chopping down 1,000-year-old trees to make parquet flooring. For some folks nothing is ever good enough except for all folks to disappear from the planet because we humans are the problem and the planet would be better off without humans. How bout they start with themselves?
- Of course most people do not order concrete based on w/c. They order it based on “slump” and compressive strength (“psi”). For a w/c below 0.6 you typically need 3,500 psi (25 MPa) concrete with a slump of less than 4.5. I typically specify a w/c below 0.5 to absolutely, positively, beyond a shadow of a doubt stay out of trouble. Having said that, if you don’t screw with the mix on the site 0.6 will work. The key is not letting anyone screw with the mix on the site. Good luck with that.
- I am repeatedly stunned at the practice of installing sand over polyethylene under concrete slab foundations in California. To me that is a sign of bad concrete. With a low w/c ratio you don’t need the sand. We were here a long time ago “BSI-003: Concrete Floor Problems”.