It was the ants that finally did it.1 It wasn’t the shingles that needed to be replaced. It wasn’t the three-dimensional airflow network in the roof assembly. It wasn’t the lack of racking resistance. It wasn’t the lack of thermal resistance. It was the ants. Carpenter ants. There were just too many ants in my renovated barn.
I had seemingly done the perfect barn renovation 15 years ago. I installed a continuous water control layer, a continuous air control layer, a continuous vapor control layer and a continuous thermal control layer. I back ventilated my cladding system. It was all perfect (Photographs 1, 2 and 3). It looked great. I gave myself an award.2
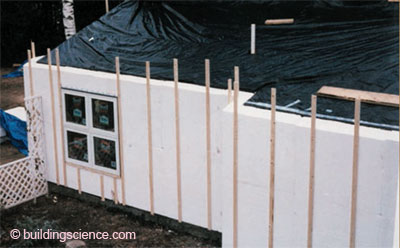
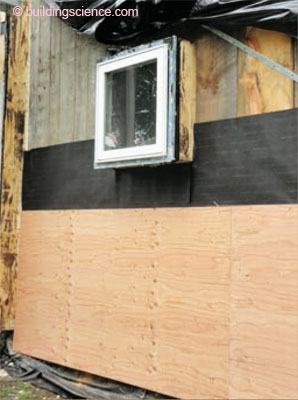
Photograph 1: Perfect Wall—Water control layer, air control layer and vapor control layer outside of structure. EPS rigid insulation thermal control layer held in place with 1x4 wood furring strips over the top of everything else. The world’s largest Canadian Beer Cooler built in Boston 15 years ago. Back-ventilated siding yet to be installed on wood furring strips.

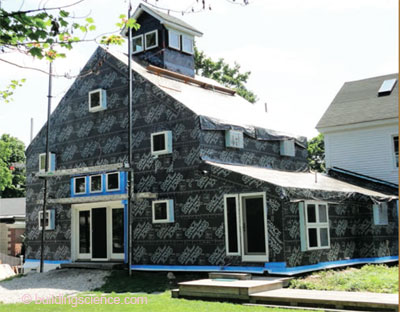
Photograph 2: Rigid Roof Insulation—Note the billowing polyethylene air barrier/vapor barrier. I should have known then.
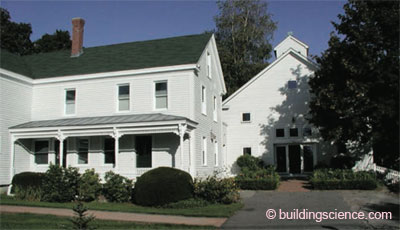
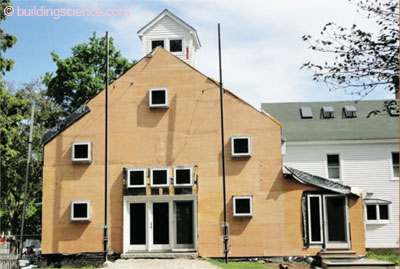
Photograph 3: Good Looking Barn—In this case the beauty is only skin deep.
Apparently, the perfect renovation was not so perfect. The ants didn’t come right away. Only a few in the first couple of years. The scouts to an invading army? My imagination getting the better of me? “Nah, get a grip,” I kept telling myself. But I couldn’t stop thinking of Charlton Heston, or was it Eleanor Parker? Then more ants came. And still more. The ants were winning. Suddenly they were everywhere.3 Where were they coming from? Why were they coming here? Why my perfect barn? Were the old wise men of building science wrong? How could that be?
I had to find out. But how to find out? Couldn’t I do an ant WUFI simulation? Couldn’t I do an ant IR scan? Nope. Only one way to find out. Take it apart. Are you kidding me? Take my dream barn apart? My office? But the ants kept coming. And then the shingles needed replacing. I finally took the darn thing apart. After 15 years. Completely. Right down to the original barn boards. Stripped the shingles and the siding. Stripped the furring strips and rigid insulation. Stripped the polyethylene air/vapor barrier. Exposed everything. I did it carefully, layer by layer. An autopsy for a building. I looked at everything. I had to do it. The ants. And I learned. I became embarrassed at what I found, but I learned.
It was so obvious it was embarrassing. I had already had enough embarrassment with the barn renovation. I learned about three-dimensional airflow networks the first year after the renovation—the first winter in fact (Photograph 4). I should have never installed the roof foam in one layer. It should have been done in several layers with the joints off-set horizontally and vertically.4 This was nothing that some old roof guy couldn’t have figured out or prevented. Ouch. But I already knew about this. Dumb, yes. But dumb that I knew about already. I needed to find new dumb. It didn’t take long.
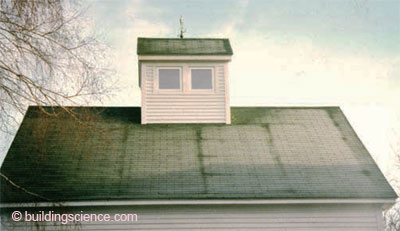
Photograph 4: The Embarrassment Starts—Can anyone say 3-D airflow network?
I found the ants. Tracked them layer by layer. Yes, they loved my foam. They made themselves a fabulous ant condominium—a fabulous ant “gallery” (Photograph 5)—in two spots. But I was ecstatic. Huh? The crew thought I was nuts. I was jumping around all happy about ants in my foam. Why so happy? The ants were only in two spots in the whole damn building. They were in the only two “wet spots” in the whole damn building. The ants only loved my “wet foam.” Where there was dry foam there were no ants. Duh. And it gets even better.
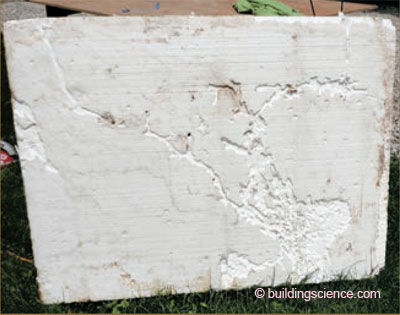
Photograph 5: Ant Gallery—The ants don’t eat the foam, they live in it. But they like and need water. Good thing I made sure they had some. This is a 4 ft x 6 ft (1.2 m x 1.8 m) ant gallery. There was one other like it. That was it for the entire structure: two of these bad boys. But the gallery went through the 10 in. (245 mm) thickness. Lots of space for lots of ants and lots of aggravation.
The wet spots were due to something really obvious—something unbelievably embarrassing—reverse flashing. Reverse flashing in two critical areas lead to a whole bunch of water getting into my roof insulation and wetting it. But not enough water leaked in to get past my water control layer. So my roof leaked because of two dumb mistakes—but my roof didn’t leak “inside” for me to see it. A bush league mistake—reverse flashing of all things (Photograph 6). And in two spots. In the entire building two flashing mistakes, two wet spots and two ant galleries. How long have I been talking about flashing issues? The shoemaker’s children are, in fact, barefoot.
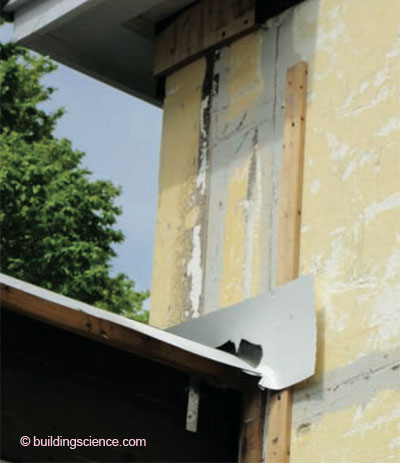
Photograph 6: Reverse Flashing—This image makes me ill just looking at it. The sheet metal should have been tucked under the furring strips and sealed—and even better there should have been a membrane that extended under the 8 in. (203 mm) of foam on the wall and tied into the wall water control layer behind the EPS foam. This happened twice. Guess where the ants were? You absolutely know that when this puppy was rebuilt, this did not happen again. Check out Figure 2 if you want to see the way it should have been built originally, and the way we rebuilt it.
The message here is obvious: keep things dry and you will not have ants. By the way, keep things dry and you won’t have a lot of other bad things as well. The dry/wet thing with ants is pretty much proving to be the case in all the ant foam infestation cases I (and others) have looked at over the years.
My barn foam was expanded polystyrene (EPS). Why did I pick EPS 15 years ago? It was cheap. I didn’t care much about R-value per inch as I was insulating from the outside and I had lots of space and I had lots of experience with installing thick layers of foam on the exterior of wall assemblies. I was a Canadian. We know how to do these things. One of my colleagues had ants, and his foam was extruded polystyrene (XPS). Another buddy had polyisocyanurate and had ants. I have seen ants in low density and high density spray foams. But only in spots that are wet. The type of foam does not seem to matter. Wet matters. How wet? Really wet. Saturated wet. Or where there is a layer of water trapped between a layer of foam and something else that stays wet for a long time. Flash, drain and ventilate and you do not have ants in foam or anything else for that matter.5
What else did I learn? Some neat stuff. Obvious, but neat nevertheless. Polyethylene sheets make a lousy air barrier, even when supported on both sides. It is just too difficult to get it done right with something so “flimsy.” There were lots of gaps, rips and tears. Original construction defects for sure. Stuff that I missed 15 years ago that I shouldn’t have missed. But, even so, it is not a very “robust” approach. I should have known better. Dumb again.
Having said that, the tape used to seal the polyethylene was fabulous (Photograph 7). In fact the same tape was used to seal sheets of XPS together on the main house and performed fabulously there as well. I opened up a bunch of spots on the main house to check adhesion and after 15 years the sheathing tape was like new (Photograph 8). There was nothing wrong with the main house; I just needed to know. I really, really needed to know. I have been finding this to be the case pretty consistently in other projects that I have opened up, as have others. Sheathing tapes are proving to work over the long term in terms of sealing XPS joints, foil-faced isocyanurate board joints and joints in housewraps/buildingwraps.
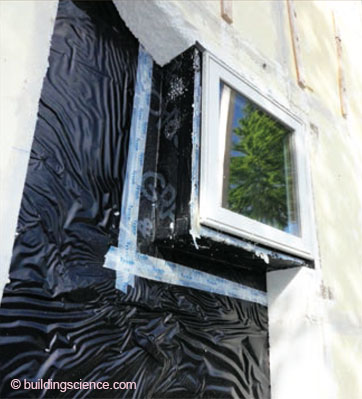
Photograph 7: Poly Air/Vapor Barrier—The sheathing tape worked well. The polyethylene had trouble withstanding the construction process. The membrane wrap around the window boxes held up well, except where it was reverse lapped and fishmouthed. Easy to prevent now that we know about the problem. Yes, I know, face-sealed window. I know better now. They didn’t leak, but I should have known better.
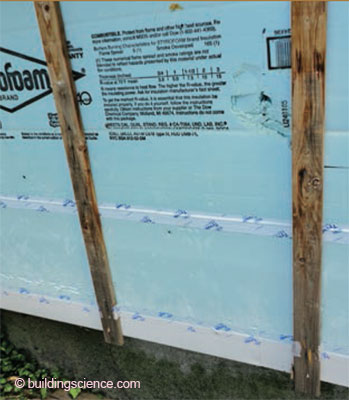
Photograph 8: Sheathing Tape Works—Look at how good this looks after 15 years. That is not new tape; that is 15-year old tape. Awesome. Note the aluminum C-section at the bottom of the blue XPS capping the bottom protecting it from critters. Note how good the untreated wood furring looks.
However, membrane strips or membrane tapes are a different story. They tend to pull away from surfaces over time; they “fishmouth” if they are not sealed at their top edge with a bead of sealant or if they are not “taped” at their top edge with a sheathing tape. As strange as it seems, I like to tape the top edge of a membrane strip (a.k.a., “flashing tape”) with a sheathing tape. The technical term for this is “terminated”—as in “fully-adhered membranes that are reverse lapped need to be terminated at their top edges.”
Guess what? No bees. Say what? Yup, no bees in the air gap behind the siding. After 15 years absolutely no bees, wasps, or critters of any kind anywhere behind the siding. For years, decades actually, I have been hearing the argument that vented cladding systems are prone to insect infestation. And for years, decades actually, I have not been finding that to be the case. Here is the caveat: don’t leave the air gap completely open at the bottom or at the top. Check out Photograph 9. I used a polypropylene mesh at the bottom of the assembly to allow airflow and drainage but to block insects. I also used an aluminum “C-Section” to seal the bottom cantilevered portion of my exterior foam insulation to keep squirrels and chipmunks and other animals from getting into the foam. No insect damage (except for the ants discussed earlier), and no critter damage have occurred after 15 years.
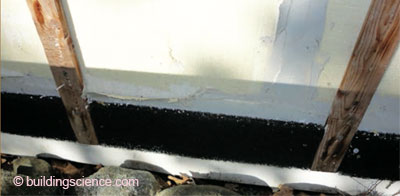
Photograph 9: Insect Mesh—Polypropylene mesh acting as an insect barrier is installed between the furring strips at the bottom of the wall. This particular mesh typically is used in attic ridge vents to keep bugs out of roofs.
More neat stuff: the 1x4 wood furring strips were untreated and looked brand new. After 15 years, untreated wood furring strips looked brand new. The screws were epoxy coated steel, and they looked brand new. All of them. Remember, we took everything apart and looked at everything. The crew took all the screws for use on other projects; that tells you something. Here is the obvious conclusion: wood furring strips do not have to be treated if the air gap is drained and ventilated. Even better, you don’t have to use stainless steel screws if the air gap is drained and ventilated. Epoxy-coated steel works great under these conditions.
The wood siding that was removed also looked brand new after 15 years. The wood siding originally installed was kiln-dried lodge pole pine treated with a penetrating water repellant preservative on all six surfaces, coated with an oil based primer on all six surfaces and top coated with an acrylic latex paint. This siding was installed on a ventilated air gap and all field end cuts were sealed with an oil-based primer prior to installation. The same approach was used on the trim. The trim was in good shape, but was beginning to show some age at trim bottom edges at the bottoms of the walls and at corners. The siding or trim had never been painted after it was originally installed—only power washed.6 The crew took the wood siding—no surprise there—it got reused.
Done with the pathology, now I had to put it all together again, but this time avoiding the aggravations and building on what folks now know in the industry. A couple of things to come clean on first. The barn needed more shear than it got with the original renovation 15 years earlier. I didn’t think it needed back then; I was wrong. How did I figure the shear issue out? Well, the darn thing would shake and move when a nor’easter would blow through. So I figured I had to sheath the whole building with a structural sheathing. Next, I wanted to upgrade the thermal resistance—pretty much double it from before. Things have changed energy wise in 15 years. And I wanted the building to be airtight. Really, really airtight. The airtight thing was a pride thing.
Since we were down to the original board sheathing on the outside I could do pretty much anything I wanted. I elected to wrap the entire building with traditional “black” building paper for aesthetic reasons. Huh? Well, when you are inside looking out you can see through the cracks, gaps in the original sheathing. I wanted something to fill the gaps. Then the entire building was sheathed with plywood for shear reasons (Photograph 10 and Photograph 11).
Photograph 10: New Wall—Note the “new” tar paper on the old barn boards under the new plywood structural sheathing.
Photograph 11: Shear Control—A beautiful sight: plywood structural sheathing wrapping the walls and roof of a hundred-year board-sheathed timber frame. Bring on the nor’easters.
The plywood sheathing was then wrapped with a fully adhered peel and stick membrane (Photograph 12). This layer acts as a water control layer, an air control layer and a vapor control layer. Note the control layer continuity between the roof assembly and the wall assembly. Reverse laps in the membrane were taped with sheathing tape.
Photograph 12: Control Layers—An even more beautiful sight: a fully adhered membrane acting as a water control layer, air control layer and a vapor control layer. Reverse laps are taped with sheathing tape. No more poly for me.
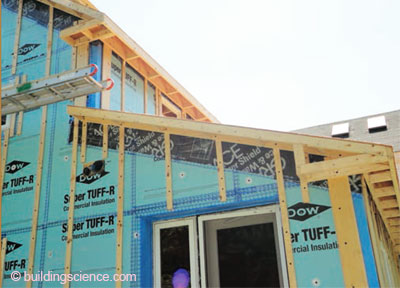
The thermal control layer for the walls and roof went on next: 8 in. (203 mm) of isocyanurate for the walls (four layers: each layer 2 in. (51 mm) thick with joints offset and each layer taped); 10 in. (254 mm) of isocyanurate for the roof (five layers: each layer 2 in. (51 mm) thick with joints offset and each layer taped). Check out Photograph 13.

Photograph 13: Thermal Control Layer—Note the four layers of rigid insulation on the walls and the five layers of rigid insulation on the roof. You had better believe that each layer was offset horizontally and vertically and that each layer was sealed. I watched every sheet go in this time. None of this “faith-based” stuff anymore.
Wood furring (untreated) was then installed with long epoxy-coated steel screws through the rigid insulation into the structural sheathing and original board sheathing. Roof overhangs float on the top of the rigid insulation and tie into the wood furring on the walls (Photograph 14, Figure 1 and Figure 2).
Photograph 14: Floating Roof—This takes a little bit of thinking to see what is going on. Check out Figure 1 and Figure 2 and then come back to this photograph. The overhangs are structurally sound, they just don’t look that way until you understand how box beams work and that the rigid foam is not going to slide down the slope.
Figure 1: Control Layer Continuity—Note how the “under” roof is drained over the top of the wall. Also note how the overhang is framed. The roof plywood is screwed to the 2x8, locking the 2x8 into its vertical position. The roof plywood isn’t going anywhere due to the long screws attaching it into the structural sheathing.
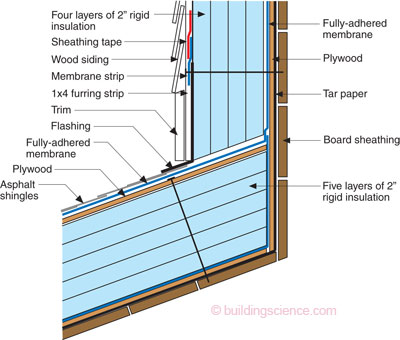
Figure 2: Ant Control—Note how the “under” roof and “over” roof membranes are tied into the wall’s water and air control layer behind the wall insulation.
Wood siding was installed over the wood furring strips. The wood siding was treated identically to the original wood siding and was installed identically to the original. However, the trim used was cellular PVC. Why? Ah, I couldn’t get anyone to do wood trim the way we did it originally, and I felt the PVC stuff would be easier to install and work better and look better. The detail at the bottom of the wall did not change (Figure 3). Why mess with success?
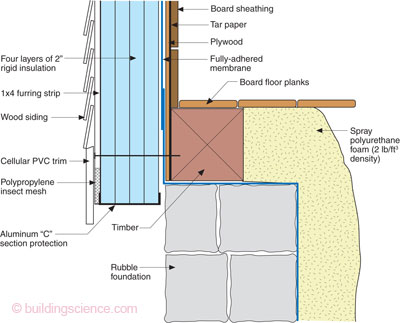
Figure 3: Bug and Critter Control—The aluminum sheet protects the underside of the wall rigid insulation layers. The polypropylene mesh keeps bugs out of the furring strip cavity.
How did it turn out when all was said and done? Check out Photograph 15. New shingles. Lots of new insulation. Lots of shear.7 No three-dimensional airflow networks. Not quite the plantation house of Charlton Heston and Eleanor Parker—but it will do—the Marabunta be damned.
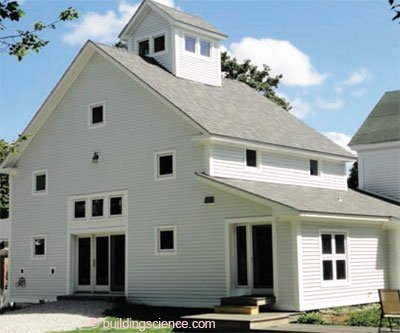
Photograph 15: Done—Looks almost normal. R-65 roof and an R-52 wall more or less. And tight. How tight? Pick an outrageous phrase. The actual numbers are for another column. Check out the two round holes where the heat recovery ventilator (HRV) intake and exhaust goes. The extreme tightness leads to some interesting problems with exhaust fans and extreme pressures that require some nifty solutions. Later babe.
Footnotes:
“Leiningen Versus the Ants” by Carl Stephenson is a short story published in the December 1938 edition of Esquire subsequently made into a movie “The Naked Jungle” in 1954 staring Charlton Heston and Eleanor Parker. In the story and in the movie, Leiningen battles a “seemingly unstoppable mass of army ants” at his plantation in the Brazilian rainforest. This is arguably the greatest short story ever written. I first read it in Grade 5 at Tumpane Public School when my teacher, Mr. Pemberton, got tired of my classroom antics and sent me to the library with the task of reading every book in the library before he would allow me back. He said I should start with this “Leiningen” fellow and talk to him the next morning about what I had read. I read it and I was hooked. If reading was this good I had to do more. Thank you, Mr. Pemberton, for inspiring me and imparting the lifelong gift of reading and imagination.
Isn’t that the way we do things? We give ourselves awards, or have our friends give us awards; our friends who all think the same way we do and do the same things we do in the same way? We don’t actually have to see if something works. We just have to believe that it will or have our friends believe that it will.
OK, not everywhere, but there were too many of them to ignore. When I was working in the barn—it served as my office—I would see two or three every hour wandering around. They would come in bursts. Then nothing for weeks. Then they were back again. This went on for years. Too few to get too worked up about right away, but too many to completely forget about. I treated surfaces with boric acid and chased them into hiding, but I knew they were still there, and it was driving me crazy.
I covered this in BSI-036: Complex 3-D Airflow Networks. I used my barn as one of the examples of how not to do things. Dumb.
OK, a few other minor points, don’t run your foam into the ground. If you do, you will have ants even if it is dry because they love the pathway. Even with borate treated EPS foam. The borate keeps the ants out of the EPS foam but not out of the gap between the foam and the foundation wall. You can break the pathway and make this issue go away by capping the joint at the top to the foundation wall, or not run the foam into the ground and now you don’t have the pathway. This is also effective with termites: the “don’t run the foam into the ground” part.
How do you like them apples? Fifteen years in Boston with wood siding and the original paint, and it looked brand new. Thank you, Bill Feist of the USDA Forest Products Laboratory in Madison, Wis., for telling me how to do paint on wood. Wow, were you ever right! And, kudos to Charlie Carll, also with the FPL, for keeping with that message.
Hurricane Irene went almost directly over the top of the barn after we were done. I had a grin a mile wide. I mean who rides out a hurricane in a 100-year-old barn jumping up and down like a kid calling everyone he knows saying nothing is moving? It wasn’t Bill Haley’s “Shake Rattle and Roll,” but Bob Seger’s “Like a Rock.” Oh yeah, no leaks either.