Hospitals are not fun places to work in, and they are not fun places to build and design or to fix and repair. The stakes are often high. Nothing is more sobering than when someone dies because of a mistake, especially when the mistake does not seem to be a big deal. Actually, a couple of mistakes. Each one was not such a big deal, but when taken together, they became a big deal.
I learned about mold the hard way. The experience made me want to stay away from hospitals. First, take an immunocompromised patient. In my case, the patient was an organ transplant recipient. Expose the patient to an opportunistic pathogen going by the name of aspergillus fumigatus. This mold can overrun an immunocompromised patient’s defenses leading to aspergillosis and to death. It is the leading cause of death in acute leukemia and organ transplant recipients. At the time I was involved, much earlier in my career, AIDS was a death sentence, and aspergillus fumigatus was often the straw that broke the camel’s back. Aspergillus fumigatus grows on certain building materials, and that is where I came into the picture.
It’s been 20 years, and even today I can’t say too much for obvious reasons. I got a call from someone who said it was important—a matter of life and death—and for the first time I didn’t laugh. When one person dies from aspergillosis, it must be reported to the Centers for Disease Control and Prevention in Atlanta. When two people die, it is considered an epidemic. There was an epidemic in a mixed climate hospital east of the Mississippi River and north of the states that lost the Civil War.
Could I get on a plane tonight? When you get a call like that, you get on the damn plane. Actually, I drove, because I could get there faster.
My task was to find where the aspergillus fumigatus was coming from. The autopsies showed it was growing inside of patients. The patients didn’t come into the hospital with it growing inside of them. They were exposed to it inside the hospital.
It is actually a pretty easy assignment in principle. Find the wet spot and figure out how the wet spot is connected to the patient.
The hospital was amazing. It was clean, efficient, and modern. Everyone knew what they were doing—from the maintenance staff to the doctors. Everyone. It was the first time I was exposed to a team—a real team—not some garbage description from a management consultant.
Where to start? Just like any building investigation, first determine if there are any patterns. One of the first questions I asked was where had the patients died? The team looked at me as if I was from a different planet. Not a different planet. “Just Canada,” I said.
Did the patients die on one side of the hospital more than on another side of the hospital? One of the doctors growled, saying he knew it was a mistake to get me involved. What a stupid question. Right. Except that the southwest corner was where the action was happening, and the race was on.
It was a classic reservoir-cladding-solar-driven-moisture-vapor-barrier-on-the-wrong-side-of-the-assembly problem. But, it had a twist that changed my career direction. Check out Figure 1. The hospital building enclosure was a brick veneer with a masonry block backup wall. Mistake one: no water control layer on the exterior of the block backup wall (see BSD-105: Understanding Drainage Planes). The masonry block backup wall was insulated on the interior with semi-rigid fiberglass insulation. Mistake two: a foil-faced vapor barrier installed on the interior of the semi-rigid fiberglass insulation. Mold grew on the paper reinforcing of the foil vapor barrier. Guess what type of mold? Yes, aspergillus fumigatus. There it was: the mold reservoir and amplification site. But, how did the mold get from there and inside the patient?
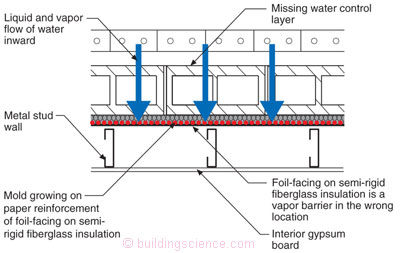
Figure 1: Hospital Wall—Classic reservoir-cladding-solar-driven-moisture-vapor-barrier-on-the-wrong-side-of-the-assembly problem.
The patient rooms were positively pressurized relative to both the outside and the corridors. It was a beautiful system: continuous preconditioned air from rooftop units injected directly into each room. Wow. The pressure control was perfect, and continuously monitored. There was no way the mold in the interstitial cavity could have gotten into the room. Or, so I thought. Check out Figure 2. The room was pressurized relative to the outside but the exterior wall was negative due to the configuration of the room air-handling unit. The room air-handling unit extracted air from both the room and the exterior wall cavity, mixed this air with the outside direct ducted air and injected it back into the room. Unfortunately, the air in the exterior wall cavity was contaminated with aspergillus.
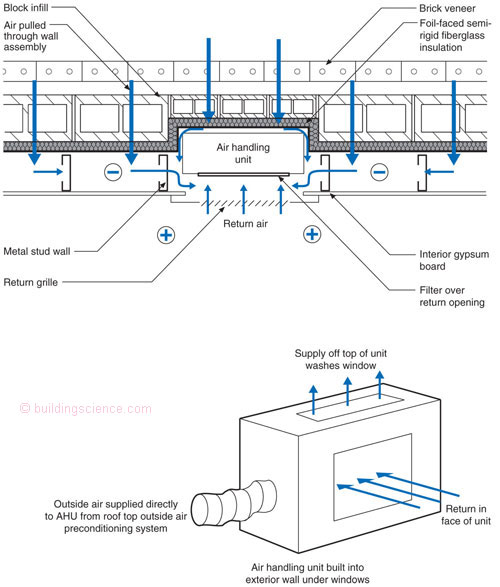
Figure 2: Air-Handling Unit (AHU) Depressurizing Wall—The AHU pulls air from both the room and the wall cavity. The air in the wall cavity was contaminated.
This was the first time “I got it.” Walls could suck while rooms could blow1 (see BSI-002: The Hollow Building). The air-handling unit was depressurizing the interstitial cavity sucking the mold out the exterior wall and injecting it into the breathing zone of the occupied space. This was mistake three. The solution was pretty straightforward—disconnect or uncouple the air-handling unit from the exterior wall cavity, get rid of the interior vapor barrier, add some water and vapor control to the assembly and extend the interior positive pressure field into the wall cavity (Figure 3). Oh yeah, one more minor thing, clean up the rooms without killing anyone else. This was the first time I deliberately pressurized a wall cavity. It was not the last time, as we shall see.
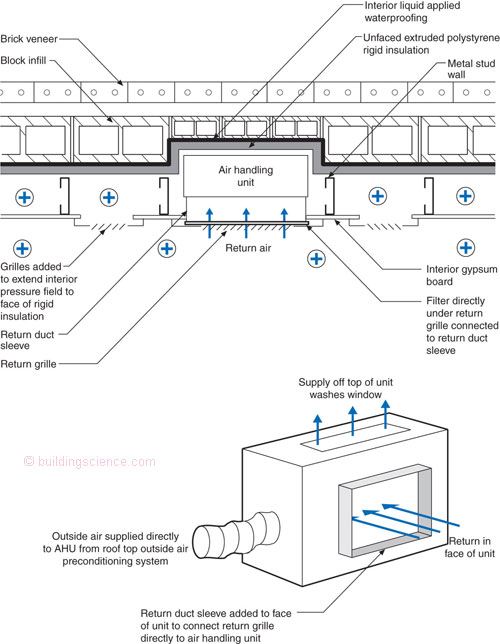
Figure 3: Uncouple the AHU—Sleeve added to the AHU to connect the return grille directly to the unit. Note the interior air pressure field extension into the wall cavity. Also, note the use of unfaced or unskinned extruded polystyrene rigid insulation—a semi-vapor permeable non-water sensitive material.
I thought I was on to something. Something big and unique and mine. Nope, not a chance. Old guys got there long before me.2
The next chance I got to do something with pressurizing cavities came along within a year: a data processing center in Connecticut (Photographs 1 and 2). It was a classic over-humidified-and-over-pressurized-building-in-a-cold-climate problem. You know what is coming. It was a precast building. It cried for help—literally. Condensed water leaked out at the joints and the tops of windows in cold weather (Photograph 3), or damaged interior finishes (Photograph 4).
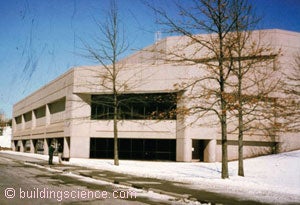
Photograph 1: Data processing center in Connecticut.
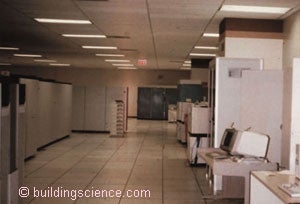
Photograph 2: Humidified and pressurized conditioned space.
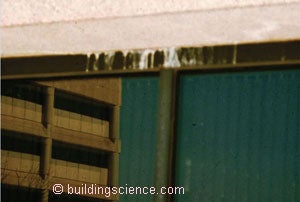
Photograph 3: Condensed water leaking out at window heads.
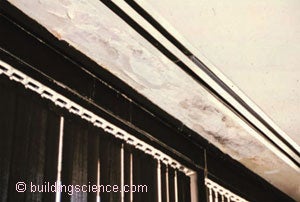
Photograph 4: Water damaged interior finishes at exterior walls.
The HVAC system was a classic data processing center approach (Figure 4). A raised floor supply plenum with continuous preconditioned outside air. It was a beautiful system. Too bad the building enclosure was not matched to it (we still see these problems in modern underfloor air-distribution systems). The building enclosure was precast panels insulated internally with an insulated steel stud wall. The external concrete precast units were much more airtight than the interior gypsum board lining—by a significant margin. Interior humidified air exfiltrated into the cavity between the precast and the steel stud framing condensing on the backside of the precast (Figure 5).
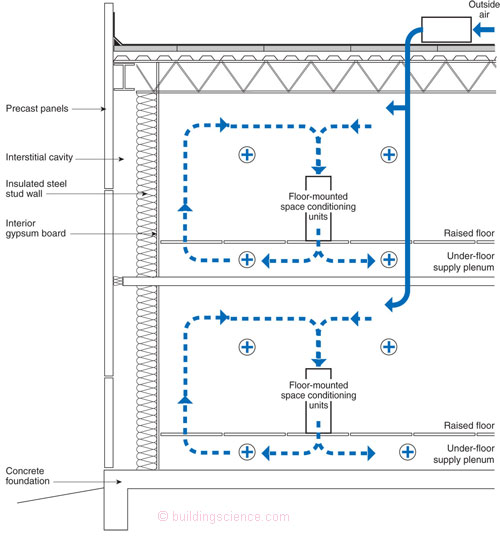
Figure 4: Classic Data Processing HVAC System—Raised floor supply plenum with continuous preconditioned outside air.
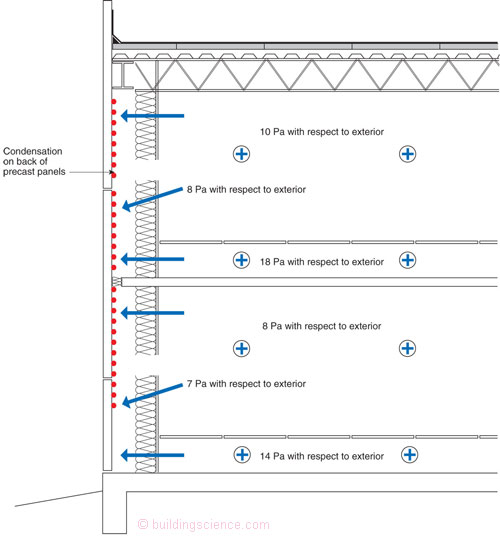
Figure 5: Precast Dehumidification System—The cold precast panels were the primary air barrier. This lead to condensation on the back side of the precast.
The right design solution for the enclosure should have been the “perfect wall” (see BSI-001: The Perfect Wall). But we were too late; the building is up, and the necessary cost and effort to turn this enclosure into the “perfect wall” was not going to happen. However, there was an air gap between the precast panels and the interior steel stud wall framing that varied between 2 in. and 18 in. (51 mm and 457 mm). (The reasons for this gap I still do not understand to this day. It was an architectural thing obviously beyond my humble engineering mind’s ability to grasp.) See Photograph 5. This air gap turned out to be a gift from the engineering gods. The solution was to pressurize the gap relative to the interior with outside air when outside temperatures dropped below the dew-point temperature of the interior air (Figure 6 and Photograph 6). No recladding. No major expense. And fast to fix. I still get thank you cards from the client to this day.

Photograph 5: Gift from the Engineering Gods—A continuous perimeter air gap between the precast panels and the interior insulated steel stud wall framing.
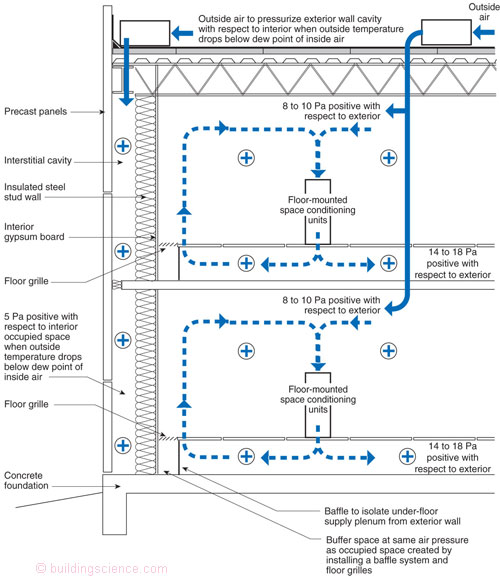
Figure 6: Pressurization of Exterior Wall Cavity—Note the baffle and floor grilles that prevent the extension of the positive pressure field of the supply plenum from extending to the exterior wall assembly.
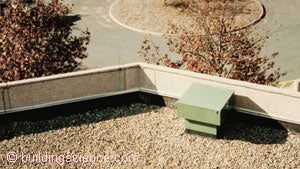
Photograph 6: Rooftop interstitial cavity pressurization system.
Next is a rich guy’s house. I love rich guys because they are usually really cheap. That’s how they got to be rich guys in the first place. This rich guy heard about the data processing center repair. The other thing about rich guys is that they are connected. The call I got was beautiful and typical for a rich guy. Rich guy: “I have a roof condensation problem due to air leakage. My consultant tells me that I need to take apart my roof and install an air barrier and provide building code recommended roof ventilation.” My response: “Listen to your consultant. He has it right.” Rich guy: “His approach is very expensive. I would like to pay you to be clever.” My response: “OK, but I need to get paid up front because I have dealt with rich guys like you before.”
Figure 7 describes the problem. Even though the roof was ventilated the ventilation provision actually drew inside air into the roof cavity due to the leakage of the ceiling. The flow path resistance of interior air migrating into the roof assembly was less than the flow path resistance of the outside air being introduced at the soffits.

Figure 7: Ceiling Condensation Problem—Venting does not save you, it often makes it worse.
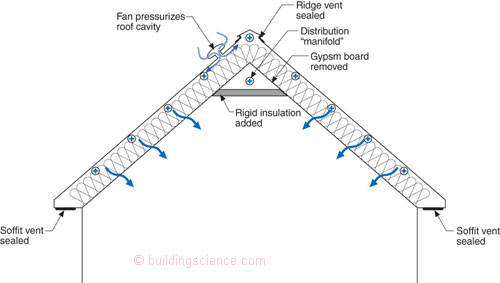
Figure 8: Non-Classic Cathedral Ceiling Condensation Solution—The key is not to over pressurize.
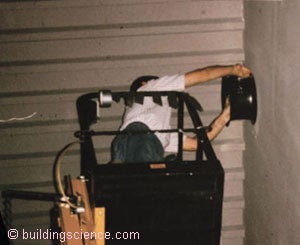
Figure 8 describes the solution. I sealed the ridge vents and soffit vents and added a fan (Photograph 7) to pressurize the roof assembly. Thank you, Dick Solvason and Gus Handegord. I also stripped a little bit of gypsum board at the interior of the ridge to create a manifold to distribute the air. The key was not to ventilate the roof with outside air, but just to pressurize it slightly. I did not want to chill down the interior gypsum board finish, as it could lead to potential condensation or mold. What pressure did I select? I guessed. 1 Pa (0.004 in. w.c.) was probably too small and too difficult to control to, and 5 Pa (0.02 in. w.c.) was probably more than I needed. So, I picked a range between 2 to 3 Pa (0.008 to 0.012 in. w.c.) and it worked. The fan was controlled by an outside thermostat. Whenever the outside temperature dropped below 40°F (4°C), the fan would turn on.3 Today, we could use variable speed fans and self-calibrated low pressure manometers to target a fixed pressure whenever an enthalpy controller indicated the need for pressurization.
Photograph 7: Attic supply fan pressurizing roof cavity.
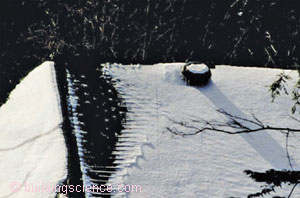
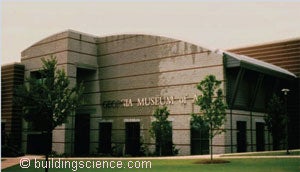
Finally, we get to the job that I probably had the most fun on ever. I can’t tell you everything that went on, but I can tell you this much.4 It was an art gallery, and it was beautiful, and it was southern, and they had an important collection that was coming from France (I am restraining myself here), but they had a roof leak problem, and it had to be fixed before the collection arrived. I had two weeks to find it and fix it, or the collection wasn’t coming. Except it didn’t sound like the typical roof leak problem that I was familiar with. I mean, when it rains the roof leaks, and it usually leaks when it is raining. Duh. But, this roof was different. It would rain, say on Monday, but it would not leak until Wednesday or Thursday. The roofers had given up. When folks give up, I typically get a call.
This was a head scratcher. I sat outside the building for about an hour just looking at it. Whenever I do this, I would scare my partners or the youngsters working with me. Now they just leave me alone, and go and get a coffee. After a while it came to me. I thought “hospital problem” and “Dick Solvason” and “rich guy” and “data processing center” and mint julep.5
It wasn’t the roof that was the problem. It was the wall that was the problem. The wall was a reservoir cladding that got wet when it rained. When the sun beat down on the wall to dry it the evaporated moisture got into the roof assembly and condensed and dripped out. The wall was in essence vented into the roof. How to prove it? Easy. Wet the wall with a fire hose (Photograph 8), and hope that it does not rain for a couple of days, and that it is sunny. Sure enough, we got the roof to “leak” when it didn’t rain by wetting the wall and waiting a day. Awesome. Now what? We did not have time or money to rip apart the parapet (the roof-to-wall connection) and install a physical barrier (air barrier) that would prevent air from the wall from getting into the roof. But, we had toys.
Photograph 8: Fire hose wetted reservoir cladding.
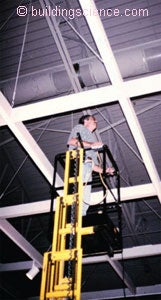
The first thing that we did was to install some pressure taps in the roof assembly and wall assembly and parapet assembly (Photograph 9), and connect everything to a multichannel digital manometer (Photograph 10). Then, we cut a couple of holes in the interior walls up near the top at the underside of the roof, and used duct tape to hold a Duct Blaster® in place and figure out how much air needed to be added to pressurize the parapet to prevent air from migrating from the wall assembly into the roof assembly (Photograph 11). How much of a pressure difference did we need? You guessed it: 3 Pa (0.012 in. w.c.). Where did that come from? Experience. Final solution? Get ready for it… just leave the Duct Blasters® in place, and call it a day (Photograph 12). It was cheap, fast, and it worked. The collection came and went.
What is the moral of the story? Easy. Negative pressures can be dangerous. Read the old guy’s stuff. Blowing is often more useful than sucking. Positive pressures beat negative pressures. Rock beats scissors, paper beats rock. Carry on.
Photograph 9: Installing pressure taps.
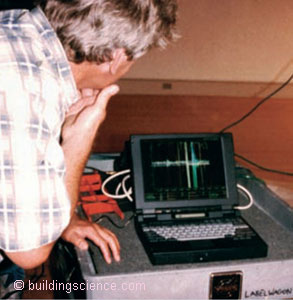
Photograph 10: Multichannel digital manometer.
Photograph 11: Duct Blaster® pressurization of parapet assembly.
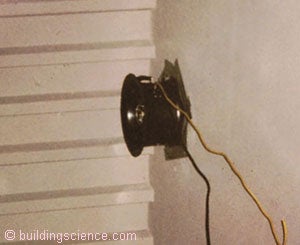
Photograph 12: Final Solution—Duct tape and a fan.
Footnotes:
This was the 1980s. The lightbulb that went off in my head lead me to hotels, dropped ceiling return plenums in offices and schools, and three-dimensional airflow pathways and interstitial pressure fields, and a doctorate; and, apparently to a column in ASHRAE Journal.
Whenever I thought I was particularly clever or smart, I would go see Gus Handegord, National Research Council of Canada and John Timusk, University of Toronto, and chat with them. They inevitably would tell me stories of someone doing something similar earlier, and usually much better. It was humbling and necessary. It makes you appreciate the knowledge base you are a part of, and that you have a responsibility to both grow and to pass on. The pressurization of roof cavities goes back to the late 1940s and early 1950s and a genius by the name of Dick Solvason, also from the National Research Council of Canada. He was into pressurizing moisture damaged roofs in Manitoba Indian housing. In those days we called them Indians—now they are the “First Nations”—indigenous peoples of the Americas located in what is now Canada.
How did I size the fan? I guessed. I bought three fans and installed them. It turned out that I only needed one fan. But, I didn’t know that. Could I have figured it out more accurately? Yes. Today, I would have used a “Duct Blaster®” to pressurize the space and get the flow rate necessary for pressurization. But, Gary Nelson hadn’t invented the Duct Blaster® yet, and a blower door would have been too big. Incidentally, I used a blower door to size the fans necessary to pressurize the data processing center interstitial cavity. By the late 1980s, digital manometers were readily available, and I always had one with me. They replaced cigarettes and smoke pencils and a licked hand. I miss the old days.
In a bar in a couple of years from now, if you buy me a good single malt, I might spill the beans; or perhaps in my last ASHRAE Journal column if Fred approves.
This has nothing to do with the story except for what I learned to drink during this project.