If someone invented wood today it would never be approved as a building material. It burns, it rots, it has different strength properties depending on its orientation, no two pieces are alike, and most cruelly of all, it expands and contracts based on relative humidity. Can it get worse? But, of course. Wood expands differently based on orientation. However, despite all of these problems, wood is the material of choice when it comes to building houses and I predict it will make significant inroads in commercial construction.1
Wood expands and contacts based on the relative humidity the wood is exposed to (Figure 1). It is not unusual for interior wood moisture content to cycle between 6 and 12 percent moisture content seasonally. Makes for interesting wood trim problems, wood flooring problems and sometimes makes opening and closing wood doors a challenge.
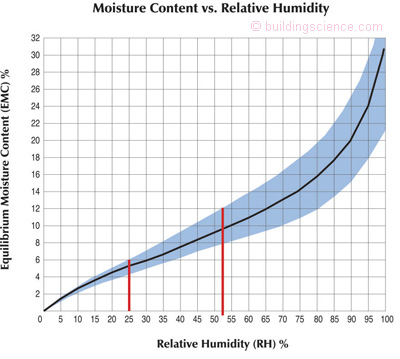
Figure 1: Sorbtion Curve for Wood—Adapted from “Understanding Wood” by R. Bruce Hoadley, Taunton Press, 1980. Best wood book around. I got my copy signed by the master himself. Thank you Professor Hoadley for my love affair with wood. The “red” bars are typical of “wintertime” and “summertime” interior relative humidites. It is not unusual for interior wood moisture content to cycle between 6 and 12 percent moisture content seasonally. Makes for interesting wood trim problems, wood flooring problems and sometimes makes opening and closing wood doors a challenge.
Weirder still when wood shrinks and expands, it shrinks and expands differently along the grain than perpendicular to the grain. It shrinks and expands much more at a right angle to the grain, than along the grain. Studs don’t get shorter or longer, but they do get thinner or thicker (Figure 2). This is a big deal when we frame buildings. Floor joists and rim joists made from “dimensional lumber” (real 2x10’s for example) shrink a great deal (Figure 3) and that affects exterior cladding (stucco cracks between floors) and interior gypsum finishes at two story spaces such as stairwells. Old timers knew this and “balloon framed” two story spaces and stairwells. This problem is generally disappearing with the use of engineered wood I-joists and oriented stand board (OSB) rim closure material. These materials do not have a grain and tend to be more dimensionally stable.
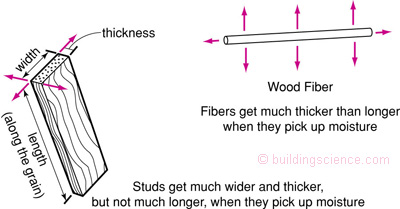
Figure 2: Fiber Orientation in Wood Framing—Wood studs get wider and thicker when they pick up moisture, but not taller, much like middle aged guys who drink lots of beer like the author. With drying, the studs get thinner but not shorter.

Figure 3: Shrinkage Between Floors—There is more shrinkage in the 13.37 inches of wood between floors than in the almost 200 inches in the wood studs above and below the floor framing and top and bottom wall plates. Typically we get between 3/8 inch and ½ inch shrinkage between floors whereas we only get a combined 1/16 of an inch in the wall studs above and below. If horizontal control joints are not provided in stucco between floors cracking occurs and the cladding “bulges” outward. It is not unusual for vinyl siding to “bulge” and “unzip” between floors for the same reason.
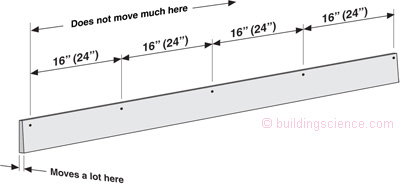
With wood siding we nail long horizontal strips of wood directly into wood studs every 16 inches (now every 24 inches with advanced framing…). The wood siding does not grow appreciably in length, but does increase in thickness with wetting and then shrinks with drying (Figure 4). The expansion and contraction with changing moisture content stress the paint film and causes the paint to fail over time. This is helped along by ultra-violet radiation exposure of the paint film that leads to the paint film becoming more brittle due to cross-linking of the polymer chains in the paint.
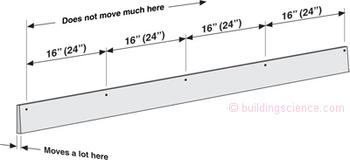
Figure 4: “Real” Wood Siding—“Real” wood siding has a “grain” and does not increase much in length, but does cycle in thickness. This “stresses” paint coatings. Back venting and back priming dramatically reduce the effect.
The wood moves most on the south and the west exposures due to the effect of the sun heating the surface of the wood and lowering the relative humidity at the woods surface. Recall the psychrometric chart (Figure 5), heating air lowers relative humidity. During the day relative humidity goes down and at night relative humidity goes up just because of the diurnal temperature swings. The sun exacerbates the difference by heating exterior cladding surfaces. Wood “sees” relative humidity, rather than vapor pressure or “absolute humidity.” At night when the wood cools the relative humidity goes up. The cycling of the relative humidity the exterior wood cladding sees works on a daily, weekly, and seasonal cycle. This leads to continuous expansion and contraction of the wood. The worst swings are on the south and the west exposures. Guess which exposures see the most peeling paint?
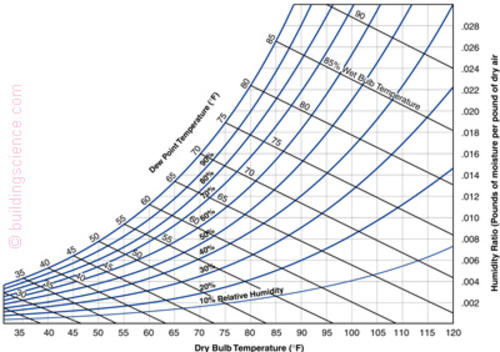
Figure 5: Psychrometric Chart—Yes, I know you have all seen this before, but look at it a little differently this time. Think of it from the perspective of wood. Whenever the relative humidity goes up, the moisture content in wood goes up. Weird. So when we make wood cold it gets “wetter.” When we make wood warm it gets “drier.” We don’t have to rain on it for this to happen. Stop thinking about the air’s dew point and absolute humidity when you think about hygroscopic materials like wood.
Of course this gets even worse when we insulate wall assemblies and the exterior cladding gets colder still. Just adding insulation into a wall assembly causes the cladding relative humidity to cycle through a greater range, and with wood based cladding this is hell on paint. Yup, adding insulation to walls or increasing insulation levels in walls causes paint to fail. It is a good thing we have better paint today. The old alkyd paints did not stand a chance when we “invented” insulation. We learned to compensate for the problem that insulation caused by painting the backside of the wood (“back-priming”) to reduce the rate and magnitude of the moisture swings. Even better we learned to install the wood cladding over an airspace (“back-venting”).
When we began to go to hardboard siding we had fewer paint problems because we took away the movement in the “thickness” dimension by getting rid of fiber orientation. Hardboard did not have a “grain.” So it did not expand and contract as much thickness-wise as “real” wood. But nothing is ever easy or free - hardboard ended up having movement along its length where “real” wood did not—and so hardboard “grew” in length and tended to buckle (Photograph 1) since it was restrained by nails every 16 inches. Hardboard was made at high temperature that drove all the moisture out of it. If it was installed before it had a chance to “equilibrate” it would buckle. I remember installing hardboard siding as a kid and my dad would make me lay it out on the lawn and paint the backside of it with water to “expand” it before we nailed it up. Yup, old guys sure were practical—I miss you dad.
Photograph 1: Buckling of Hardboard Siding—Hardboard grows along its length as relative humidity (and therefore moisture content) goes up. Since it is nailed every 16 inches its movement along its length is restrained and therefore it buckles.
When we look at wood floors things get ugly. The wood boards tend to cup as they dry due to the orientation of the wood grain (Figure 6). Once again old guys came to the rescue, they learned to “quarter” saw logs rather than “plane” saw logs (Figure 7). This eliminated the “cupping” problem, but did not eliminate wood flooring movement problems entirely. Even “quarter” sawn boards (“radial shrinkage”) move significantly across the grain (Figure 8). If wood flooring is not conditioned to the mid point of the moisture content range expected (around 8 percent—see Figure 1 again) before being installed entire flooring systems can buckle (Photograph 2). The wider the boards, the greater the movement. Small boards can hide lots of movement in lots of joints. Many wood flooring systems are designed to “float” to account for this movement.
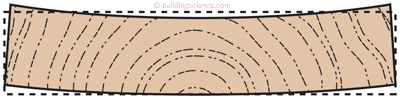
Figure 6: Wood Board Cupping—When wood dries it will cup if sawn in a “plain” fashion.
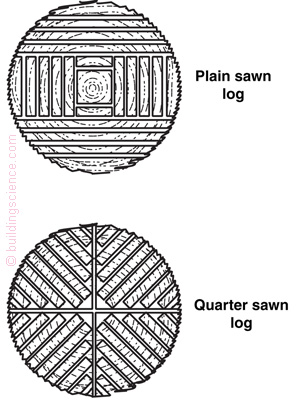
Figure 7: Plain vs. Quarter Sawn Logs—Old guys to the rescue—quarter sawing logs keeps boards flat when they dry.
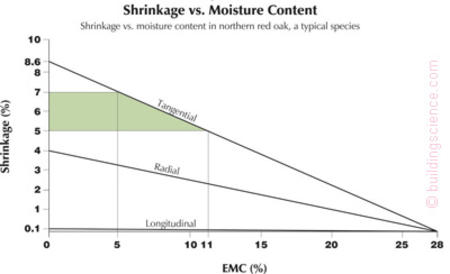
Figure 8: Wood Shrinkage Based On Orientation—Only longitudinal shrinkage is minor. Even radial shrinkage can “get” you. This graph is also based on Hoadley.
Photograph 2: Buckling Wood Floor—If wood is not conditioned to the mid point of its expected moisture content range prior to installation it will buckle.
The most impressive “old guy” wood technology was the “Colonial door” (Photograph 3). Colonial doors were designed so that the frames had virtually no cross grains whereas the panels, which were cross-grained were allowed to slide into joints (Figure 9).
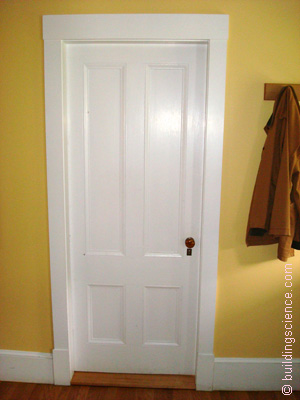
Photograph 3: Colonial Door—The most impressive “old guy” wood technology. Frames had virtually no cross-grains whereas panels which were cross-grained were allowed to slide into joints.
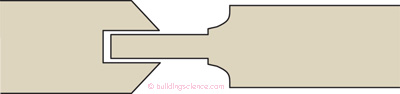
Figure 9: Colonial Door Panel Joint—As the cross grain panel
expands it moves into the space provided in the grooved frame.
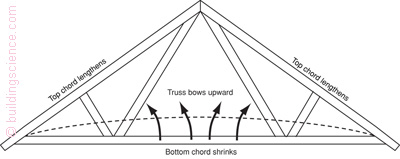
When we began to use wood trusses in place of rafter roofs we rediscovered what old guys knew about wood movement. A wood roof truss has an upper chord and a lower chord and they are connected…duh… The upper chord gets cold in the wintertime in a vented attic whereas the lower chord stays nice and toasty warm if it is under lots of insulation. The more insulation we add the colder the attic and the colder the upper chord because we reduce the heat loss out the top of the building. The more attic or roof ventilation, the colder the upper chord becomes. What did old guys know about wood? The colder we make wood the wetter its gets. The warmer we make wood the drier it gets. The top chord becomes wet and grows and the bottom chord becomes dry and shrinks (Figure 10) and presto we have truss uplift (Photograph 4). You cannot restrain the truss from movement by fastening it to the walls—the wall will move (Photograph 5). The only solution is the “Zen” solution—let it move. Hence, floating corners and truss clips (Figure 11 and Figure 12).

Figure 10: Truss Uplift—Top chords get longer as they get colder
while bottom chords get shorter as they get warmer. The truss bows
upward as insulation levels go up and ventilation levels are increased.
You cannot stop this—so don’t even try.
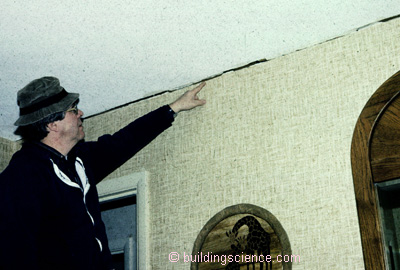
Photograph 4: Truss Uplift—Gypsum board ceiling cracks at interior wall ceiling connections due to truss uplift. Trusses move up in the winter and come down in the spring. Ah, the changing of the seasons, leaves change color and fall, and the trusses move up while the birds fly south.
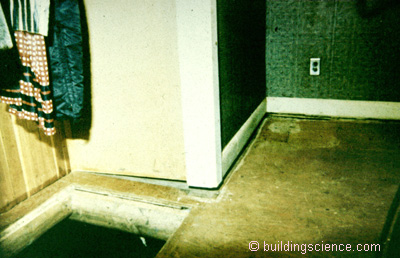
Photograph 5: Floor Uplift—Trying to keep the wood trusses from moving by anchoring them to the walls does not work. There is no power in the universe strong enough to stop wood from moving. Recall that the Egyptians used dry wood wedges that were then wetted to shear off blocks of stones for their pyramids. Nails will not do the trick here.
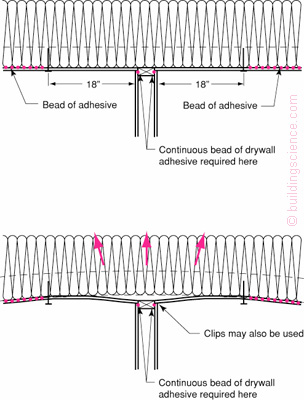
Figure 11: Floating Corners—Truss uplift is not truss uplift if the client can’t see it. Floating corners hide the movement.
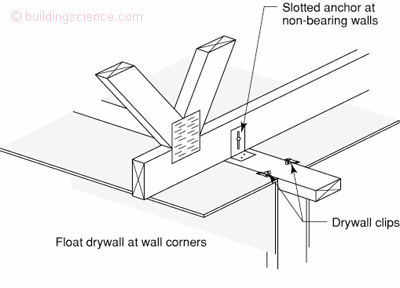
Figure 12: Truss Clip—Note the movement slot to accommodate the seasonal upward movement of the truss.
With all its weirdness we have learned to love and work with wood. Too bad we are running out of the really good old stuff. So is this the end of wood? Nope. We are going to have to learn to work with the younger woods, the smaller woods and the composite woods and the “was woods.” Are they going to work the same as the old stuff? Nope. Any bets on us finding new things to worry about? In a generation I bet my kids are going to look back and say us old guys sure knew stuff. We won’t tell them about the mistakes we made first figuring stuff out. Be prepared to see stuff you have never seen before. Don’t panic, its’ just wood and we’ve had to deal with this before. We will figure it out. We always do.
Footnotes:
Wait for it…wood “curtain walls.” Treated wood in an assembly performs better in a fire than steel studs and wood is not thermally conductive. Don’t believe me? Visit New Zealand and Australia and check out some of their 10 and 20 story buildings. Concrete structural frames and treated wood frame wall infill assemblies. Gypsum board linings on the inside and outside of the wood frame assembly covered with open rain screen vented fiber cement panels. Exceptionally energy efficient and low cost, and pretty ‘greenie weenie” to boot.