Window and doors are typically installed using one of two approaches: 1) barrier system installation or 2) a drained system installation. Barrier installations do not provide for forgiveness to water infiltration through or around the window or door opening and should be limited to areas of low rainfall potential or areas where the area is protected (such as under overhangs or porches). Drained installations are designed to manage small amounts of water infiltration through or around the window or door opening, by collect and draining the water back out to the exterior. Central to the performance of a drained opening is a pan flashing.
A pan flashing is an element installed below every window and door designed to collect and direct any water that may leak through or around the opening back out to the exterior. As such the sealing of the window or door assemblies into the rough opening (through the use of membrane flashing and/or sealants) should be made at the jamb and head of the window, however the sill should be left free to drain to the exterior.
There are four essential characteristics of pan flashing:
the pan flashing surface is a durable waterproof material that provides a continuous water barrier without holes, tears or wrinkles that could retain water in the opening;
the pan flashing has a back dam or positive slope to direct water to the outside of the wall;
the pan flashing has end dams at the sides to prevent water from moving laterally into the wall;
the pan flashing laps over the drainage plane beneath the opening.
Material
In wood framed openings the pan flashings may be fashioned in the field from self-adhered flashing membrane, self-adhered formable flashing, non-water-sensitive sheet metal and certain liquid-applied waterproof membranes.
Manufactured pan flashing may also be used to drain the opening. Note that two-piece pan flashing will need to be sealed at the joint between the pieces and that pre-cast panned sills for masonry openings will need sealant at the joints with the side of the opening.
At concrete slab edges a seat may be cast into concrete to act as pan flashing for openings in the exterior wall.
Back Dam and Sloping
A block of wood nailed at the back of the rough opening sill can be used with membranes to create a back dam. Similarly, beveled siding can be nailed at the bottom of the rough opening to create a positive slope under the membrane. The back dams of manufactured pan flashing and sheet metal pan flashing must be protected against bending and breakage during window installation.
End Dam
Just as a back dam prevents water from being directed to the interior side of the opening, end dams are needed to prevent water from running laterally off the pan and into the wall. As with most critical details, it is the corners that present the real challenges.
When a membrane is turned up the jamb from the sill, it is important that the membrane make a tight corner and not span across or “chamfer” the corner. If the membrane is not tight to the corner it is vulnerable to being torn by the corners of the window unit—this would create a hole exactly where it is most dangerous.
When sheet metal is used to create flashing at inside corners, it is common practice to make a cut to allow the inside corner and then apply sealant over the seam. A much more durable technique is to create a flat folded “dog ear” to allow the inside corner between the end dam and back dam.
Drainage over Drainage Plane
The function of the pan flashing can be entirely subverted if the water collected in the pan flashing is not allowed to drain to the exterior (e.g. if the bottom flange of the window is sealed to the drainage plane) or if the pan flashing is somehow drained behind the drainage plane. To prevent reverse-lapping at the bottom of the pan flashing, it is important that the drainage plane material is installed at the bottom of the window before the pan flashing is installed. An alternative that can be employed with self-adhered flashing materials is to leave the release paper on the bottom flap of the pan flashing until after the housewrap or building paper is installed.
The bottom edge of the opening must remain open to allow for drainage. At the same time, integrity of the air barrier at the opening must be maintained. All windows and doors should be air sealed around their entire perimeters on the interior with sealant or non-expanding foam. The foam is installed from the interior prior to the installation of the interior trim.
It may be helpful to use shims at the sill to ensure adequate drainage space. Where pest entry is a particular concern, copper mesh or similar screening may be used in this drainage opening.
Pan Flashing for Exterior Wall Openings Details
Figure 1
Water Management Fundamentals: Drained Component, Drained Opening
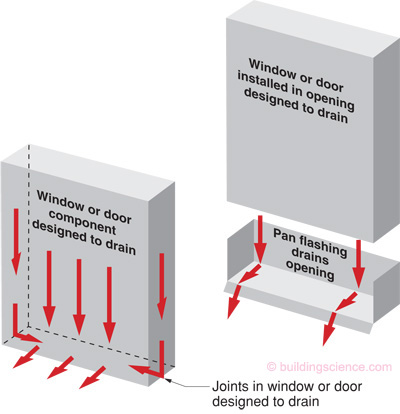
Figure 2
Pan Flashing Materials
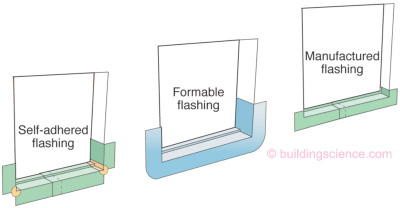
- Non-formable self-adhered membrane requires corner patches
- Formable flashing must be pressed into corners to prevent window corners from tearing membrane
- Two-piece manufactured flashing requires seal at joint
- Back dam of manufactured pan flashing must be protected from breakage during window installation
Figure 3
Sheet Metal Pan Flashing
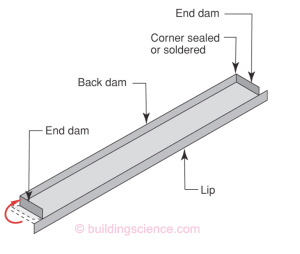
- Corner between end dam and back dam should be folded not cut
- Back dam must be protected during window installation
Figure 4
Back Dam Options for Membrane Pan Flashing
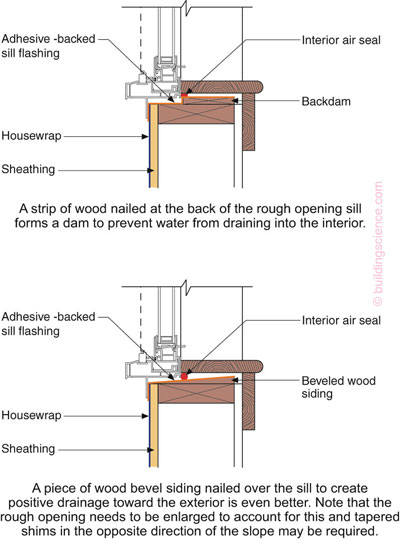
- A strip of wood nailed across the back of the rough opening sill forms a dam to prevent water from draining into the interior
- Beveled siding nailed over the sill creates positive drainage toward the exterior. Note that tapered shims in the opposite direction of the slope may be required to support interior trim.
Figure 5
Seat in Concrete as Pan Flashing
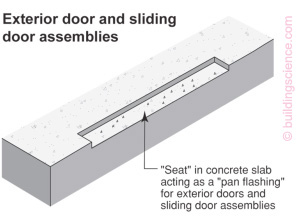
- A seat cast in concrete has inherent back dam and end dam.
- It is important that framing not extend into the seat below the top of the slab.